


Check out Toshiba’s first camera modules for the Project Ara smartphone

News on Google’s Project Ara modular smartphone has been picking up steam as of later, and we’re starting to see the first developmental modules for the device.
Today, we have pictures and information regarding Toshiba’s camera module for the device, which is still in development.
In these pictures,we can see a 2MP front shooter, as well as a 5MP and 13MP rear cameras. Development is set to be complete in 2016. Hit the break for more.

The modular device is expected to launch in Puerto Rico by the end of 2015, so we’ll be getting a ton of more information in the coming months about Project Ara.
Source: GSM Dome
Come comment on this article: Check out Toshiba’s first camera modules for the Project Ara smartphone

Deal: Buy a Nvidia Shield Tablet (16 or 32GB) from Amazon and receive a $30 gift card

The NVIDIA SHIELD Tablet was one of our favorite Android tablets of last year. It’s a great gaming device with a stellar screen, loud front-facing speakers, and has plenty of official accessories to choose from. One of the only drawbacks to the tablet is the price point, which starts at $299 for the 16GB Wifi-only model and runs up to $399 for the 32GB Wifi/LTE variant. However, if you’re in the market for a new Android tablet, you may want to head over to Amazon today. If you buy either the 16GB or 32GB NVIDIA SHIELD Tablet, you’ll score a $30 Amazon gift card with your purchase. If you choose to go with the 32GB variant, Amazon will even throw in a copy of Half-Life 2, Half-Life 2: Episode One and Portal with your purchase. Unfortunately, the games aren’t included with the 16GB version.
If you need a refresher, the NVIDIA SHIELD Tablet has an 8-inch 1920 x 1200 IPS LCD display, a 2.2GHz Tegra K1 processor, 192-core GPU, 2GB of RAM, 16 or 32GB of on-board storage, a 19.75Wh battery and MicroSD expansion up to 128GB. If you’re interested in learning more about the tablet before you make the big purchase, check out our full review.
So what are you going to do with your $30 gift card? We’d recommend trying out the NVIDIA SHIELD Controller. It might be a little pricey, but it really makes gaming on the device so much better. If you’re interested in this deal, head to the links below to purchase a tablet for yourself.
Buy the 16GB NVIDIA SHIELD Tablet
Buy the 32GB NVIDIA SHIELD TABLET

Deal: Grab the Dell Venue 8 7000 from Best Buy for only $369.99 ($30 off)

If you’re in the market for a new Android tablet, today seems to be the day to buy one. Right now, Amazon is throwing in a $30 gift card with the purchase of the NVIDIA SHIELD Tablet (16 or 32GB). If you’d like to shop around a bit, though, Best Buy is currently selling the Dell Venue 8 7000 for only $369.99, which is $30 off the normal retail price. Considering this tablet is on the higher end of the price spectrum in the Android tablet world, the $30 discount might be just what you need to pick one up.

If you need a refresher, the Dell Venue 8 7000 has a 8.4-inch 1600 x 2560 OLED display, a quad-core 2.3GHz Intel Atom Z3580 processor backed by 2GB of RAM, 16GB of internal storage, MicroSD expansion up to 512GB and an 8MP rear-facing camera with Intel RealSense 3D technology. Aside from the large “chin” towards the bottom of the device, the Dell Venue 8 7000 has a near edge-to-edge display, a long-lasting battery, killer gaming performance and a beautiful screen. While the camera is a bit gimmicky and the device can sometimes be difficult to hold, we really like this tablet. Our very own Taylor Martin reviewed it, and you can check out his full comprehensive review here.
This is truly one of the best Android tablets on the market right now, and this is the first discount we’ve seen for this device since it’s launch back at CES 2015. If you’re interested in taking advantage of this deal, head to the link below.
Buy the Dell Venue 8 7000 from Best Buy for $369.99

Apple Helping Developers Finalize Apple Watch Apps at Cupertino Headquarters
 Apple has invited third-party developers to its headquarters in Cupertino, California to allow them to test and finalize apps for the Apple Watch, according to 9to5Mac. The report claims that developers have been arriving at One Infinite Loop this month to work with Apple engineers on finishing WatchKit-based apps in categories such as sports, productivity and finance.
“The developers invited by Apple to Cupertino range from those behind titles for sports applications and productivity software. Apple has also been meeting with banks to work on WatchKit applications that assist with the Apple Watch’s Apple Pay functionality. Besides U.S.-based banks, Apple has been working on WatchKit apps with developers from Germany-based banks, which indicates Apple is likely in talks with more foreign banks to expand Apple Pay to more countries across the world.”
MacRumors reported a few weeks ago that some developers have been asked to have Apple Watch apps readied by this month, although this report claims that Apple seems to be operating on a more urgent timeline, possibly in order to ensure that some apps are finalized for an upcoming marketing initiative or media event. In the meantime, Apple has reportedly been holding workshops to train retail employees about the Apple Watch in Los Angeles, Cupertino, Austin and Atlanta.

Xbox One’s video editing app Upload Studio hits version 2.0

Xbox One‘s Upload Studio has now been updated to version 2.0 and with it a revamped look and lots of new features. Upload Studio is the Xbox One’s video editing app that allows any Xbox user to make professional looking gameplay videos and clips

ASUS definitely plans to release smartwatch not using Android Wear

Back in January Asus let it be known they were working on a successor to their Zenwatch smartwatch wearable. Part of their plans include extending battery life by looking for some new chip technology and possibly an alternative operating system to Google’s Android Wear. CEO Jerry Shen revealed late last week that the company is working on a solution that does not involve Android Wear as the way to achieve longer battery life in a smartwatch, although the Zenwatch successor may still get Android Wear.
According to Shen, “we will have another (smartwatch) that is not based on Android Wear and features a longer battery life.” The other smartwatch he is referring to is something other than the second-generation Zenwatch which Shen says will use Android Wear. A non-Android Wear device could be announced alongside the next Zenwatch or it could be the third-generation of the device that gets the alternate operating system.
As part of their future strategy Asus is looking at a Mediatek system-on-chip that is still under development to power their forthcoming wearable devices. Combined with a new operating system, Asus hopes to squeeze seven days of life out of a single charge.
source: Focus Taiwan
via: G for Games
Come comment on this article: ASUS definitely plans to release smartwatch not using Android Wear

Monday Makeover: An extensive look at Themer
There is a plethora of apps out there that allow you to customize just about every single thing on your android smartphone without even rooting. That is why we have started the weekly series “Monday Makeover.” Each week we will take one of these customization apps and talk about setting it up, discuss the features of it, and show you how you can make your android device truly one of a kind. Last week we talked about the popular homescreen replacement Nova Launcher. This week we are taking a look at Themer, another homescreen replacement that goes about customization quite differently.

Getting Themer up and running on your phone is fairly simple. Once downloaded, you can tap your home button and select Themer from the menu. If you are not presented with this menu after tapping the home button, you can open your settings menu and go to the “Home” tab. Here you will see your options for your homescreen and you can select Themer. After this, you can return to your homescreen to see the default Themer setup.
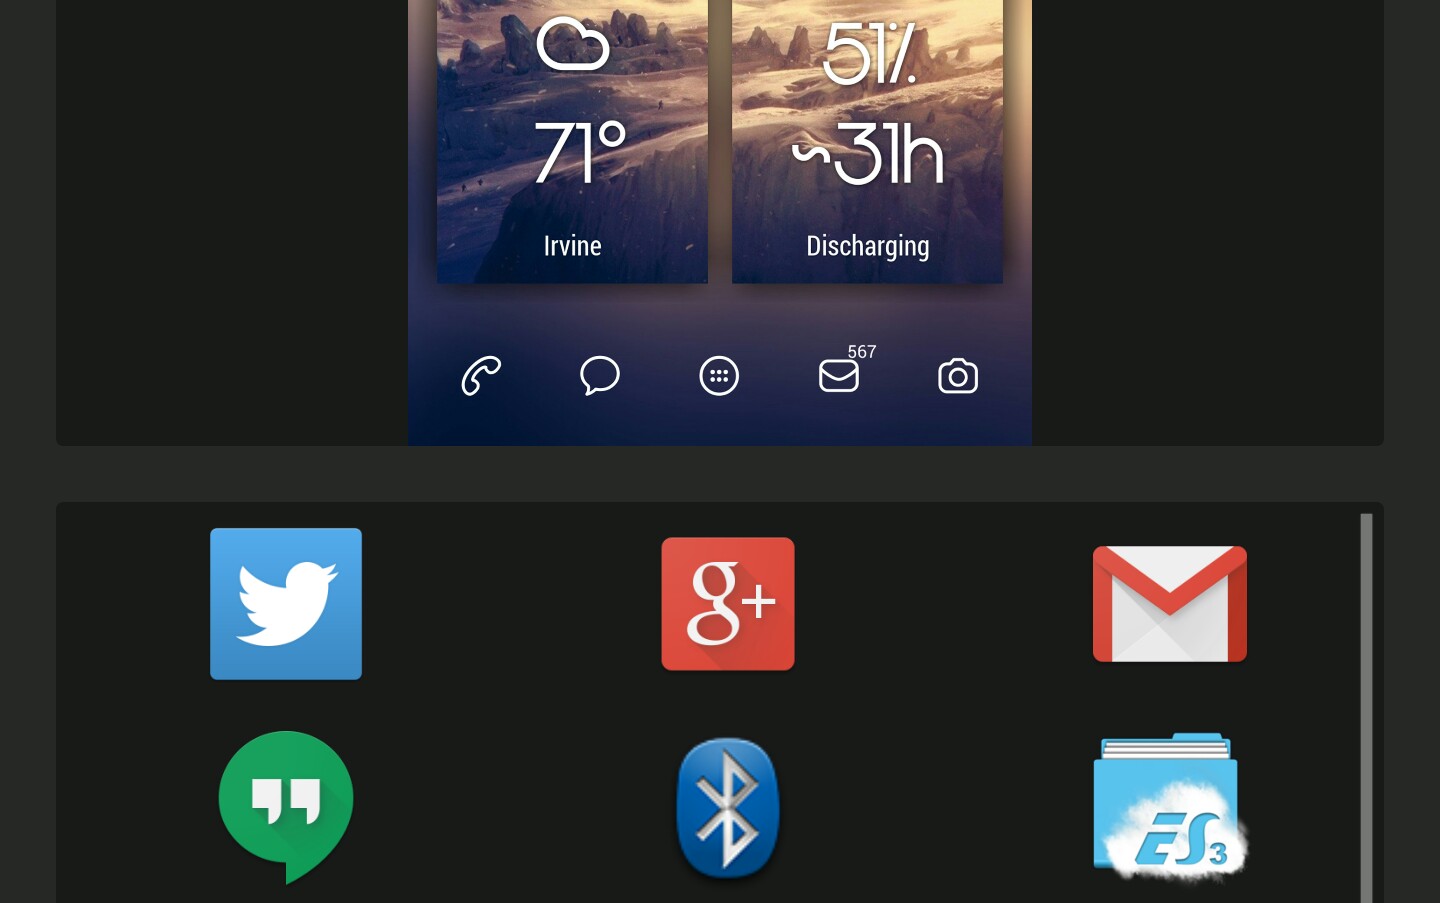
You will be greeted by the Themer welcome screen, and after tapping “Let’s Go” you can choose to import icons from existing launchers you have. You are then taken to the default Themer homescreen. There are three pages that include widgets for weather, time, and other apps. While you are free to spend time customizing this setup as you see fit, Themer gives you the options to choose from hundreds of premade themes that can change the look of your phone with minimal effort. Let’s dive into the wonderful world of themes. First, hold down on your homescreen to bring up the Themer menu. We will be taking a look at the “Themes” menu first.

Themes

This is Themer’s claim to fame. MyColorScreen, the creators of this app, have been providing Android users tutorials on different homescreen setups and how to customize their device. Many people wanted to make their device unique, but did not have the understanding or time to customize every detail. With Themer, you do not have to do that. You simply apply the theme you want and you can be on your way. In the “Themes” menu, you can see just home many options are available. You can search for themes that have certain characteristics by tapping the magnifying glass in the top right and typing in your search. The button to the right of the magnifying glass gives you the option to look at the newest and trending themes, but you can also look at some of the most popular tags for themes. Swiping in from the left reveals another menu where you can look at themes you have favorited and downloaded. You will also see options for the general and advanced menu. If you want to make your friends jealous of your awesome homescreen setup, there is also are share button in this menu. Applying a theme is extremely simple. Just tap on the theme you want to use, and press “APPLY.” Your theme will be downloaded and set as your homescreen. Now you have a unique and beautiful themed homescreen that is sure to turn heads.
Settings

Next, we are going to dive into the settings menu of Themer. Hold down on your homescreen and select “Settings” from the popup window. This will bring you to a list of menus and we will be taking a look at “Email and SMS” first.
In the “Email and SMS” menu, you are able to select default apps for email and SMS. Under “Gmail Account Setting” you can choose your default email account and the default folder you will want to view. The two unread counts options let you choose what you want the unread badges to display.
The “Icon Badges menu” lets you decide when you want icon badges to be displayed. You can either have them on or off on the homescreen and app drawer. You can also select which apps are able to display app badges by pressing “Select apps to enable badges.”
If you have not already noticed, Themer provides you with a toolbar in your notifications with access to several device settings like Wi-Fi and Bluetooth as well as Themer Settings and the camera. You can choose to enable or disable this toolbar in the “Notification Toolbar” menu.
Under “Theme Apply Preferences,” you can choose to have app icons imported from other themes. This way you will not mess up your main setup by switching themes. Since you can customize themes after downloading them, you can choose to autosave your edited theme to come back to later.
If you are tapping on the email icon or SMS icon and the wrong app is opening, the “App Preferences” menu is where you need to go. Here, you are able to select what app you want to open when each icon is pressed. These settings can be changed at any time.
The weather popup menu gives you the option to choose your weather provider and the units which are used for temperature.
Under the “Manage App Drawer” menu, you are able to completely customize the look of your app drawer. Set Icon Pack lets you change the look of your icons in the app drawer which can drastically change the look of your phone. Appearance Settings opens a separate menu that allows you to change the background color and transparency, text color, number of columns, and the icon size. These are all relatively self explanatory. Hide Apps lets you remove apps from your app drawer without having to uninstall them. They are still on your phone but not visible in the app drawer. Manage Favorites lets you choose your favorite apps so they are easy to find. This can be useful if you have a lot of apps on your phone. Manage Categories allows you to add categories and place apps in certain categories. This will help you organize your app drawer.
The “News” menu lets you add or remove news feeds from displaying on the Themer RSS widget. There are a few feeds preloaded and you can add you own to customize your homescreen even more.
Under the “Gestures” menu, you are able to set certain actions/apps/shortcuts to happen when a gesture is performed on the homescreen. There are many different options here, but I recommend taking the time to set these up because they can make your phone much easier to use.
If you get sick of Themer and want to return to your old homescreen, clicking the “Use Old Homescreen” menu will open up a dialog box and let you choose a new launcher.
Apps

The next menu on the homescreen popup window is “Apps.” This is not actually a menu, but instead it is a way for you to access your app drawer. Depending on the launcher you were using before Themer, this app drawer setup may look completely foreign to you, but it is fairly simple once you understand it. Unlike other app drawers that scroll horizontally, this drawer scrolls vertically. You also have you apps sorted alphabetically and you can drag the list on the right side of the screen to reach apps that begin with a certain letter. This setup can be extremely helpful if you have a lot of apps. Swiping in from the left reveals the “Categories” tab. Here you will see your apps sorted into categories like Most Used, Communication, and Entertainment. Tapping the three dots in the upper right corner of each category gives you the options to add apps to that category, hide that category, and move that category. Swiping to the rightmost screen displays your favorites. Here, you can tap “Manage Favorites” and select your favorite apps. They will always be in this screen. In the top right corner of the app drawer, you will see a plus sign. Tapping this brings up the option to add more tabs to your app drawer. This way, you can add categories which can be swiped to in the app drawer.
Widgets

Up next on the popup window is “Widgets.” In this menu, you are able to add widgets to your homescreen setup. To add widget, simply tap and hold on the widgets you want and drag it to the desired place on your homescreen. Tapping and holding widgets on your homescreen lets you resize, remove, and configure them. If you want to remove a widget or app from your homescreen, tap and hold on it and then drag it to the “X” at the top of your screen.
Wallpaper

Under the “Wallpaper” menu, you are given several options for customizing your homescreen. You can see how many pages you have on your homescreen and you can use the plus and minus buttons on the right side to add and remove pages. Tapping “Change Wallpaper” allows you to change the wallpaper of your theme to whatever you want. “Make Default” changes the default page of your homescreen. This is the screen that is displayed when the home button it pressed. You are also given the option of a Single, Multi, or Scrolling Wallpaper. A Single Wallpaper will have one static image displayed at your background. A Multi Wallpaper allows you to set different pictures for each one of your homescreen pages. Scrolling Wallpaper give you one image that moves when you swipe between homescreen pages.
Advanced

The “Advanced” menu opens a popup window with several options for those wanting more cutomization. Themer Actions gives you access to buttons that will open a certain app or complete a certain action. Shortcuts place buttons on your screen that can take you to a certain place on your phone quickly. You can have a shortcut that opens to a specific settings page, a specific contact, or a specific place on a map. These can be extremely useful if you take the time to set them up. Smart Categories allows you to put the categories from your app drawer on your homescreen. You can select any one that you want and it will act like a folder that contains all the apps in that category. Unlock Widgets allows you to remove and resize the widgets that are part of the theme you applied. This can be useful if you want to change their setup, but it can get out of hand if you do not know what you are doing. Tapping more opens up the “Advanced Settings” menu that we are going to take a look at separately.
Advanced Settings

This menu can be accessed by opening Themer Settings and tapping on Advanced Settings or by opening the Advanced menu in the homescreen popup and tapping on More. This menu gives access to customization options that allow you to change the look of themes and work more in depth with your phone. We are going to take a look at each menu separately.
Desktop
The Desktop menu give you access to all the option for customizing your homescreen pages. You are given the option to lock homescreen widgets and icons. This can be helpful for after you have gotten your homescreen setup exactly the way you want it. Locking both of these makes it impossible to move them until you unlock them from the settings menu. Search Bar places a persistent Google search bar at the top of your homescreen. Desktop Grid Size lets you change the amount of rows and columns on your homescreen pages. This will be useful for those with bigger phones who can fit more on their screens. However, messing with this may cause the widgets on your themes to change size which will require you to go resize them. Desktop Margins lets you change how far away from the edges of your screen the desktop grid stops. Number of screens changes the amount of pages on your homescreen. Scroll Indicator give you a bar at the bottom of your screen to show what page you are on. Wallpaper Transition lets you choose the animation that occurs when you swipe between pages on your homescreen. This is only important if you have differnt wallpapers for each homescreen page. Show Desktop Shadow creates a shadow effect on the top and bottom of your wallpaper. Force re-sizeable widgets allows you to change the size of widgets that are not meant to be resize. This can change the look of some if they do not scale well. Allow overlapping widgets give you the option to place widgets on top of each other. Remove widget padding causes widgets to reach to the edges of their grid without any space in between. Show Icon Text displays the names of apps below their icons on the homescreen.
Icon Badge
This menu lets you customize how the unread count badge is displayed. You can change the shape of it, its position on the icon, its background color, its border color, its border width, and its text color.
Notification Bar
Here, you can customize the look on your notifiaction bar and nagivation bar. You can chose to have the nofitivation bar alway be shown, automatically hidden, and its transparency. These features can come in handy if you do not like to the look of your notification bar on you theme. You can also change the color of your navigation bar if you have a phone with onscreen buttons.
Folders
This menu lets you change the appearance of folders on your homescreen. Folder Preview Background lets you chang the shape of folders when they are closed. Expanded Folder Preview Backgroud changes the color of the background when the folder is opened.
Dock
You do not have many customization options when it comes to the look of the dock. You only have the options to show or hide the dock and show the dock divider.
Icons
Under this menu, you can customize the look and actions of popular icons like phone, email, and SMS. Tapping on one of the icons brings up a popup window with several options. You can change the label displayed under the icon. You can also link each icon with a specific app so it opens every time the icon is pressed. There is also the option for a swipe up action. This will cause an action to occur when you swipe up from the icon. An good example of this is launching the Contacts app whenever you swipe up from the Phone icon.
Resize Icons
This menu lets you choose the size of the icons on your homescreen. Clicking on Icon Size will let you choose between small, medium, and large, or you can choose the size yourself.
Export Theme
If you have created your own theme and want to share it, this menu will allow you to do so. You will be given the option to name your Theme and it is saved under the file path sdcard/Themer/Exported/Zips.
Share
When you bring up the popup window on your homescreen, the next menu up is Share. This menu allows you to share your homescreen setup with your friends. You can post it on social media, send it through email or SMS, or even send it through BlueTooth. This can guarantee some screen envy from your friends.
Save
The last menu on the list is Save. This menu does not do much other than save your theme for later use. If you have spent time changing a premade theme into what you want, you can use this menu to save your theme. You can then switch to another theme if you want to try it out. When you want to return to your old setup, you simply choose to apply the theme you had and it will give you the option to apply the theme new or use the saved version with all of your changes.
This brings us to the end of another Makeover Monday article. We have doven deep inside of Themer to see everything it has to offer. It is a wonderful solution for those that want an easy way to make their phone unique, but it also offers some deeper customization features for those wanted to control every aspect of their phone. You can download Themer for free in the Play Store and there are no in app purchases or pro versions. Everything is given to you for free. So go try it out and let everyone know what you think about it in the comments. While you are down there, let us know what customization app you want to see in future Monday Makeovers and we will make sure to check them out. Have a great week!
(function() var script = document.createElement(‘script’);script.src = ‘https://stacksocial.com/widget.js?publisher=androidguys&type=editorial_post_widget_preferences’;script.async = true;var entry = document.getElementsByTagName(‘script’)[0];entry.parentNode.insertBefore(script, entry);)();
http://www.androidguys.com/pubgalaxy/728×90.html
The post Monday Makeover: An extensive look at Themer appeared first on AndroidGuys.
Samson Meteor M2 speakers review
Features for the M2 speakers include:
- Compact multimedia speaker system
- Sold as a stereo pair (one active speaker, one passive speaker)
- 2.5″ drivers
- Additional rear-ported passive radiators produce full-range audio
- Crystal clear high-end performance
- Exceptional bass response
- Side panel Power (I/O) button and Volume control
- Includes speaker (integrated on passive speaker) and 1/8″ Aux cables
- Rugged zinc die cast construction
- Sleek, elegant finish
Coming from the company known for its speakers and microphones, Samson has its Meteor M2 speakers available for sale at a cost of $149.99. Should you consider buying these?
If these’s one thing you’ll notice immediately about the M2 speakers, its the quality aluminum construction. The pair of speakers are completely surrounded by an aluminum shell, and provide the look of vintage microphones to be honest. Not that this is a bad thing, I actually really like the look of these speakers, as they are very unique. The M2’s are compact, which makes them easy to move around should you need to organize. The speakers are also very easy to setup, with only one of them containing three ports; a port to connect to the left speaker, a DC IN port for power, and the auxiliary port for whatever you wish to play music from.
Obviously, sound quality is the most important part of a pair of speakers, and for the Meteor M2 speakers, the results were rather disappointing. Listening to many different types of music, I compared Samson’s Meteor M2 speakers ($150) to the similar priced Klipsch ProMedia 2.1 ($160) computer speakers, and the results weren’t even close.
Samson’s speakers provided great volumes for the music I played, with adjustable volumes on the speakers themselves. Samson’s instructions said to maximize the volume on your computer, then adjust the speaker’s to the desire volume. With everything setup, I just wasn’t enjoying my music as I had wanted to. With computer speakers priced at $150, I expect speakers that can push out some bass while holding onto the clarity of sound, but the Meteor M2’s could barely push bass at all. I have seen and used speakers around the size of the M2’s, and I know it is possible to be able to push bass much better than these guys can. A good example being my Klipsch ProMedia 2.1 speakers, being a little bit bigger than the M2’s, priced only $10 more than the M2’s, absolutely killing it with bass output. Not only do the Klipsch speakers by themselves provided better bass and clarity, the $160 package comes with a sub woofer!
I hate to bash the Meteor M2 speakers, because they are great speakers that provide loud volume, and mids that are easy to listen to, but when compared to other speakers priced very similarly, the sound quality doesn’t come close. Overall, these speakers have a great look to them, with their all metal design and vintage style, but sound quality could have been better for the price. While the bass was absolutely nothing to brag about, I enjoyed the speakers acoustic quality, as it sounded very sharp and clear. However, it is not right to recommend these speakers when there is much better options on the market priced very similarly.
You can check out these speakers here on Amazon’s page or here at Samson’s website.
(function() var script = document.createElement(‘script’);script.src = ‘https://stacksocial.com/widget.js?publisher=androidguys&type=editorial_post_widget_preferences’;script.async = true;var entry = document.getElementsByTagName(‘script’)[0];entry.parentNode.insertBefore(script, entry);)();
http://www.androidguys.com/pubgalaxy/728×90.html
The post Samson Meteor M2 speakers review appeared first on AndroidGuys.

Sling TV getting premium movie content thanks to Epix

Dish’s Sling TV is great for cord-cutters, but has no on-demand content or even recent movie releases for times when TNT and TBS won’t cut it. It’s about to fill both of those gaps by tying up with Epix, a premium content channel co-owned by Viacom, Paramount and other studios. It’ll carry all four of Epix’s channels for scheduled viewing along with its streaming service, letting cable-haters watch recent cinema, classics and Epix original programming. Dish hasn’t revealed the Epix price yet, but the basic Sling TV service runs $20 and sports, news and kids add-in packs are $5 a pop. Epix is also a $5 add-on from providers like Time Warner Cable.
Filed under: Home Entertainment, HD
Source: Sling TV

HTML code reveals One M9 name on HTC’s official website

HTC is only two weeks away from launching their next big flagship on March 1st, and thanks to a plethora of leaks and rumors, we seem to have a pretty good idea as to what we can expect out of the flagship. But with all of the leaks we’ve seen so far, we’ve just been assuming that the device will be called the M9. Now, following the company’s previous two handsets, the name of the device could very well be the HTC One M9 since the past two flagships went by the names M7 and M8. Up until now, we haven’t seen anything from HTC regarding the true name of the flagship, though we have seen some leaks revealing that the company may be internally referring to the handset as “Hima.” But in a new discovery on HTC’s official website, the company outs the name “HTC One M9″ in the HTML code. Take a look at the image below for reference:

A few lines away from the One M9 name is the reference to the “One Life” tagline, which will likely be the phrase used to promote the new One handset.
It’s also worth noting that the company’s most recent flagship’s official name is the HTC One (M8), with parentheses. So, according to this HTML code, it could suggest that HTC plans to drop the parentheses from the official name of the device. While the “HTC One M9″ might not be the most appealing name out there, I think we can all agree that dropping the parentheses is a good branding decision.
Looking for more HTC rumors? Check out our HTC One M9 Rumor Roundup!
