


Steam’s item trading system is convoluted to protect you

Steam’s community market may have started as a system for buying and selling silly hats in Team Fortress 2, but it’s evolved over the years. These days, its an active economy and item trading system with heavy account security and complicated transaction restrictions. It has to be, Valve says. When it comes to hacking, “all Steam accounts are now targets.”
It’s the burden of a thriving community economy, the company explained in a recent statement. Steam items and trading cards can be sold for real cash, and these rewards (which are doled out for participating in events or buying and playing games on the service) have become so prolific, that virtually every account is a target worth hijacking. “What used to be a handful of hackers is now a highly effective, organized network in the business of stealing and selling items,” the company said. “We see around 77,000 accounts hijacked and pillaged each month.”
This threat has forced Valve to invest in two-factor and mobile authentication for Steam accounts and, for users without these security features enabled, frustrating restrictions on trades and market transactions. New item purchases can’t be traded for up to 7 days, for instance, and users without authentication have to wait an additional three days before traded items are delivered. Users with Steam Guard Mobile Authenticator can avoid some of these restrictions, but ultimately the entire processes is slowed down in an effort to make account hijacking more difficult for hackers.
Valve published a lengthy statement on its website explaining that while it’s just as frustrated as the community, the extra secuirty measures are necessary. “Any time we put security steps in between user actions and their desired results, we’re making it more difficult to use our products,” the statement reads. “Unfortunately, this is one of those times where we feel like we’re forced to insert a step or shut it all down.” Check out the full post for yourself at the source link below
Source: Valve
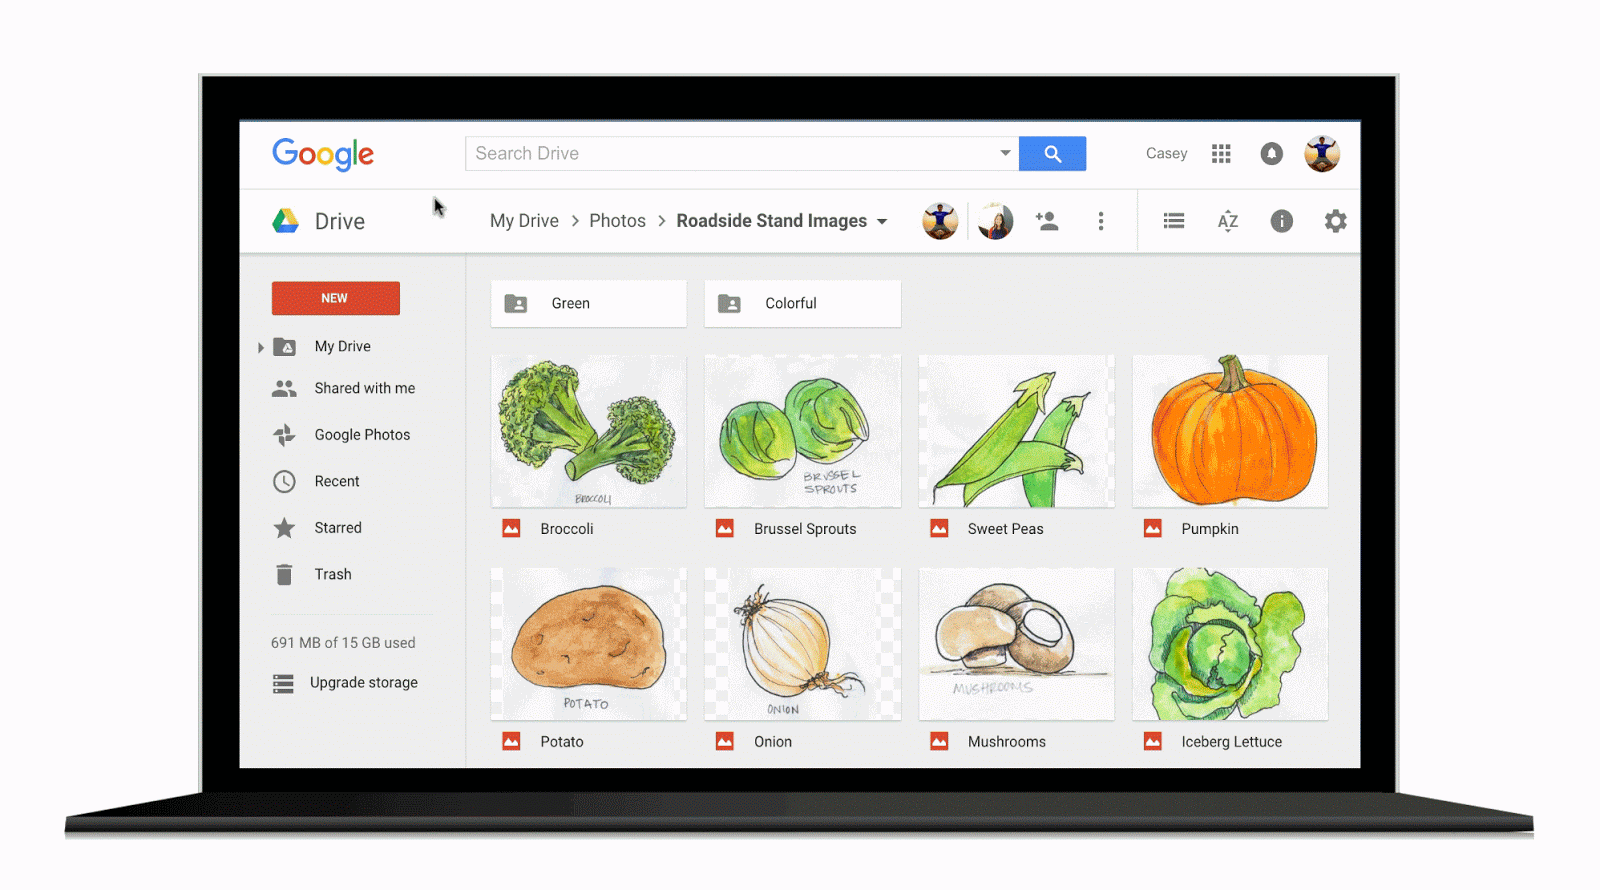
Google Wallet transactions can now be made using only one’s cellphone number
![]()
Google has pushed out a major update to its Wallet application today. With the update, users can send payments using one’s cellphone number rather than using one’s full email address that was previously required.
The update for Google Wallet is rolling out to those living in the United States first, with others to come at a later date. Starting now, the only thing required to transfer money is one’s 10-digit cellphone number. Users will have the choice to send money from their Wallet balance and/or a supported debit card. Best of all, the recipient in which you’re sending the credit too doesn’t even need the Wallet application installed to claim the money. All is done through a simple text message notification, which opens up a secure link to claim the credit. The recipient will then be prompted to enter the account information in which they want to attain the credit. The update should be hitting the Play Store shortly so keep a close eye. 
Source: Google
Come comment on this article: Google Wallet transactions can now be made using only one’s cellphone number
Get three months of Lookout Premium free of charge before the December 21 deadline

As a special holiday promotion, mobile security company Lookout is offering Lookout Premium free of charge for three months.
Lookout is a mobile security application available on Android and iOS. If you were previously interested in upgrading to Lookout Premium, or want to give Lookout a try, users can get the Premium version of the service free for three months with this new promotion. In order to send it, you’ll have to fill out a form at the company’s website linked down below before December 21. You can send it to as many as three email addresses. In the email will be a PIN code granting access to the Premium service which can be redeemed in the Lookout mobile application. The offer applies to everyone excluding those who already have an existing Lookout Premium account. All PIN codes must be redeemed by January 5, 2016.
Source: Lookout
Come comment on this article: Get three months of Lookout Premium free of charge before the December 21 deadline
Google makes it easier to find your files in Google Drive
Google announced yesterday that they would be expanding the search capabilities of their Google Drive platform. You can now search all of your files at the same time without regard to which device the files were uploaded from.
Other new features include:
- Narrow your search to a file type from the search box on Android, iOS, and the web.
- Open advanced search instantly from the search box.
- Access recent files or search Drive from the home screen using 3D Touch on iOS.
- Search Drive using the iOS search bar without opening the Drive app.
- Search for shared files by file owner using their name or email address.
- Use advanced search options like the date a file was modified, words it contains, or who it was shared with.
If you’re like me and you don’t organize your files within Google Drive, this will make finding the files you need extremely easy. Gmail, of course, has had this type of search functionality for a long time. It kind of makes me wonder, what took them so long? What do you think? Let us know in the comments below.
The post Google makes it easier to find your files in Google Drive appeared first on AndroidGuys.
Faraday Future will build its Tesla-fighting EV in Nevada

Carmaker Faraday Future materialized earlier this year with word of significant funding from a Chinese backer and a list of designers that hail from Tesla, BMW, GM and Ferrari. We won’t see a concept version of the electric car it’s building until CES in a few weeks, but today the company announced where it will build the 2017 model. Following the lead of its supposed competitor Tesla Motors and the Gigafactory, Faraday said its $1 billion facility will be located in Nevada near Las Vegas. In another move mirorring the Tesla announcement, governor Brian Sandoval announced the plant would be a source of jobs for Nevada residents and a boon to the local economy, justifying a $250 million tax incentive.
Faraday Future:
Our seasoned team of leaders includes:
- Nick Sampson, Senior Vice President of R&D and Engineering
- Former Director of Vehicle & Chassis Engineering, Tesla Motors
- Dag Reckhorn, Vice President of Global Manufacturing
- Former Director of Manufacturing, Tesla Model S
- Alan Cherry, Vice President of Human Resources
- Former Senior Director, Human Resources, Tesla Motors
- Tom Wessner, Vice President of Supply Chain
- Former Director of Purchasing, Tesla Motors
- Richard Kim, Head of Design
- Founding member of BMW i Design and Lead Designer, i3 and i8 concepts.
It’s promised a vehicle that’s 100 percent electric, as well as connected and personalized “in ways you’ve never even considered.” Faraday even claims it will attract tourists from Vegas for plant tours “and other engaging experiences” — an offer I’m happy to take them up on if it explains exactly what the company is planning. It all sounds good, but with only words and a vague sketch to go by, we’ll be waiting on January 4th to see exactly what rolls out on the CES stage.
This is the dawn of tomorrow. Keep your eyes on the horizon.
A photo posted by Faraday Future (@faradayfuture) on Oct 30, 2015 at 9:24am PDT
Via: Reuters
Source: Faraday Future
Yahoo wants to manage your Gmail account too

When Yahoo announced two months ago that it would add third-party email support to its newly launched Mail app, only Hotmail, Outlook and AOL accounts were supported. Now, however, Gmail — arguably its biggest rival — has joined the party too. Thanks to Yahoo Mail’s new smarts, the app won’t just fetch the most recent 200 messages when you add it — it’s actually able to access your entire Gmail archive; attachments included. And since you’ll have your Gmail working with the Yahoo Mail app, you’ll be able to search across all your contacts and accounts in one unified interface. Other features of the new Yahoo Mail can also now work with your Gmail account — they include a smarter contacts manager that’ll automatically add email recipients based on your history, plus the new password-free Yahoo Account Key sign-in method. Gmail support in Yahoo Mail is available today in both iOS and Android apps plus, of course, the Yahoo Mail website itself.
Source: Yahoo
‘Fallout Shelter’ update brings pets, vault dweller evictions, and more
 Still playing Fallout Shelter? Bethesda has released an update to the vault building simulator that brings quite a few new features and enhancements to the game to keep players engaged.
One of the biggest new features is the inclusion of pets in your vault, allowing you to add dogs and cats to your underground ecosystem. These pets improve productivity and happiness for the dwellers in your vault and add some variety to the creatures you’ll find.
There are some other new interface features in the latest update, including an option to evict dwellers from your vault, the ability to sell all of your weapons or armor in your stockpile, and some new dialog options for vault dwellers. There are also some bug fixes and new objectives.
Hit the link below to grab your update.
Come comment on this article: ‘Fallout Shelter’ update brings pets, vault dweller evictions, and more
Tumblr gets new option to send posts as messages
 Tumblr is rolling out a new feature to users that will allow you to send any post on the site as a message to another user. There’s a new “paper airplane” button on the site that composes a message that you can fling to any of your friends, so you can carry on a conversation in nothing but Tumblr posts.
The update is live on the web right now, with the Android update rolling out over the next day or so.
source: Tumblr
Come comment on this article: Tumblr gets new option to send posts as messages
Verizon brings Star Wars to the Droid Turbo 2 via Moto Maker

With Star Wars: The Force Awakens just around the corner, everybody is getting into the Jedi spirit. Verizon in particular has been behaving like an adorable fanboy, launching Star Wars themed Google Cardboards earlier this month, giving away tickets through TheoryWars.com, and presenting the red carpet livestream of Episode VII’s world premiere. Now they’re bringing some pretty sweet Star Wars themed Moto Maker designs to the party.
Starting tomorrow, you can get a Droid Turbo 2 with back panel and trim design customized to match the aesthetic of a particular character. The available options include BB-8, Poe Dameron, Rey, Kylo Ren and a First Order Storm Trooper. Although it was theoretically possible to make these designs in Moto Maker all along, some of the artistically challenged among us would have botched the job. Pro designers have come to our rescue, however, and paired these customized Droid Turbo 2’s with some sexy-as-hell wallpapers that fit with the design perfectly.
#gallery-1
margin: auto;
#gallery-1 .gallery-item
float: left;
margin-top: 10px;
text-align: center;
width: 25%;
#gallery-1 img
border: 2px solid #cfcfcf;
#gallery-1 .gallery-caption
margin-left: 0;
/* see gallery_shortcode() in wp-includes/media.php */


 See also: Motorola Droid Turbo 2 review
I’m not going to lie. I enjoy my bamboo backing, but I’m kind of having some buyer’s remorse here. For any Verizon customers looking to get into the Moto line, it looks like tomorrow is a pretty good time to make the jump.
If you’re interested in checking out these designs in more detail, click the button below to head over to Moto Maker. Maybe even come up with your own theme and wallpaper combo.
What do you think of Verizon’s latest Star Wars venture? Let us know in the comments!
Next: Best Verizon phones
Nexus 7 not charging? How to replace the USB port and headphone jack – Android customization

I hope you had some fun changing up the text-to-speech output settings on your Android device with last week’s Android customization article. That was pretty simple stuff, and while this week is also really easy, our new project can be a little intimidating to those that are not comfortable with a screwdriver. If your 2012 Nexus 7 is not charging, and you think it is the USB port that’s dead, or your headphones have stopped working and you think it is the headphone jack, let’s replace them.
Let me explain a little more before we get started. My Nexus 7 began experiencing charging issues, sometimes it would charge up no problem, other times it was a pathetic trickle, if any charge at all. As I desperately tried to identify why my favorite tablet was failing me, I eventually found that certain power cables would work, and others would work if they had some pressure from the side. There was some extra wiggle in the plug. Bottom line, my USB port had worn out.
Aside from the USB port on the Nexus 7, if your headphone jack is toast, know that the board and cables for these two items are connected. To fix one will replace the other.
Related:
10 great uses for old Android devices
Marshmallow ROMs headed to Nexus 7
Before we begin
While the original Nexus 7 has a proven track record of the USB port wearing out, please take the time and care to be sure that yours is needing replacing. To be sure, use the pogo-pin connectors on the side of your tablet to charge up the battery, if this works as it should but your device still will not charge or connect to your PC through the micro USB cable, it’s a safe bet your port is dead.
Parts & Tools
To fix your Nexus 7, you will need just one part, the small chipboard with ribbon cables that includes the micro USB port and headphone jack for your device. I found mine on Amazon for about $13. It is now just $12, and best of all, it comes with a little tool kit to get you started.
If you go looking for your own parts, please try to find OEM ASUS branded replacement parts. Others may work just fine, but sometimes it is better to be safe than sorry.

Luckily, minimal tools are required for this fix. Be sure to set yourself up in a clean and clutter free environment, an anti-static computer repair pad is highly recommended, as is an anti-static wrist strap ofrgloves. Otherwise, the list is short:
- Plastic spudgers or guitar pick
- Electrical tape (optional)
- Small Phillips head screwdriver – #1 should work, but maybe bring a #0 as well
This package deal has more than you need today, except the tape:
ASUS Nexus 7 OEM USB port & tool kit – Amazon
Replace your Nexus 7 USB port and headphone jack
Please take your time preparing for this project, there is no point having to open your Nexus 7 more than you absolutely need too. The plastic clips are very resilient, but they’re not perfect, you don’t want to break any of them.
Once you dive into this, please also take your time on the inside, oils from your fingers or any other debris or contaminant is not good for the electrical components. Be sure to avoid electrostatic shock to your device as well, that little spark from your fingertips can destroy small electronic components.
That out of the way, let’s dive in and fix your Nexus 7!

Bring all of your tools, parts and your Nexus 7 to your anti-static mat. Be sure to have good lighting and prepare to take notes or draw diagrams to remember where the screws should be replaced.
Open your Nexus 7

There is a good chance you’ve done this before, place your Nexus 7 face down on your surface then use the plastic spudger or guitar pick to pry open the tablet. Work your way around the edges slowly to loosen the back cover.

With most or all of the backing loose, pull the cover straight off of the tablet, pull by hand and grip from the top. There are extra mounting points along the bottom edge, there is no trick to get passed them, just take care to pull slowly to not break anything.
Look at all those fancy components.

Pro tip: Before we proceed, you see how I have colored tape on a number of pieces under the hood. These are mostly unnecessary, except for the speakers. The bit of tape over the battery connection in the top right is just for peace of mind, helps prevent the connector from coming loose, which has never happened to me. The tape on the speakers at the bottom serve a different purpose.
The back cover of your tablet will slowly destroy the default black cloth speaker covers, when they finally tear through, wires become exposed. These wires create a short as they contact the back cover, resulting in audio problems from the speakers and the headphone jack. This may be the cause for your headphone jack and/or USB port failures to begin with, or other random issues with your tablet. Use a touch of your electrical tape, or your wife’s decorative wrapping tape if it is handy and you are lazy like me. Just be sure to leave the center of the speaker uncovered, you still need sound to come out.

First things first, please remove the connection for the battery. Located near the top right of the device, it is a multi-wire connector that simply pulls out. Use the spudger to assist, you don’t want to damage anything.
Battery unplugged, start pulling the screws.

You can pull all of the screws across the bottom, or just pull the few to release the speaker bar. Just be sure to keep them in order so you can put them back later.
Pull the speaker bar up to release, then flip it over to the side to get it out of the way. We do not want to unplug the speaker, it is just in our way.

Finish pulling all the screws across the bottom. You’ll find more underneath the speaker bar and one hidden under the silver tape at the far left.
Screws removed, carefully pull up on the USB port and headphone jack to release them from their position. They will just slightly pop loose for now, do not yank on anything just yet.

Release the little clip to disconnect the wired connection to the USB board. It is just above the USB port.
Pull the old USB board to the side and place it next to your new USB board.
Inspect to ensure they appear the same.

Once you are satisfied that they look like the same part, you’ll want to pull the silver tape off of the headphone jack. This will pull up a small silver casing as well. Transfer both the casing and tape to the new USB board.
You are ready to re-assemble.
If you are comfortable with things, simply reverse the steps above then jump to the What’s next section for some new ideas. Otherwise, let’s walk through the re-install quickly.
Place the new USB board into place. Make sure it all fits before anything else, then proceed.
Connect the electrical plug into the new USB board. Put the board in place and begin replacing just the screws that went below the speaker bar.

Once the USB board is screwed down, (gently, it should only need a couple pounds of force on each screw,) bring the speaker bar back into place.
Replace all of the screws to your tablet. Again, ensure that they are snug, but do not over tighten.

Screws in place, time to reconnect your battery. The battery plug is pretty simple and easy, just pop it in, give it an extra push with a spudger if you want, then put some tape over top the connection, which is still optional.
Take one last inspection to make sure everything looks like it did before, then we are ready to finish up.
Put your back cover on your Nexus 7.

I know this is common sense, but it is important that you ensure the back cover is properly installed. Go around all edges at least twice to make sure all the clips are secure. What you may not know is that the back cover houses several antennae for your device. Your cover needs to be snug or else those connections may not stick and your WiFi, GPS, NFC and more may not work.
That’s it folks. Go ahead and connect your micro USB power cord and see if your Nexus 7 has life once again. Also, be sure to test the speakers and the headphone jack to ensure they are all working as well.
The USB port and headphone jack may be a little tight, be gentle with them until they break in.
What’s next
Do you remember those pogo-pins on the side of your tablet? They provide docking functionality to your tablet. The default configuration, with the tablet in portrait orientation and the top where it belongs, on top, the bottom pin is your power positive connection, the top pin is your ground connection and the center two are for left and right speakers. You can purchase a dedicated dock, or you can build your own, please just use good connectors, don’t mess with the wires like I did.

Special note: The pogo pin connection does not offer the same level of smarts as the micro USB port. You are still protected from overcharge by the internals, but you will not be able to transfer data to your PC, only the USB port can do that.
To extend the life of your Nexus 7, I said this before, please try to avoid contacting or damaging the parts inside your tablet. For example, that big brown shiny sticker you see in there is the heat shield/sync for your processor. Without that sticker, your tablet will likely overheat and incur damage.

If you can’t decide if you should repair your problematic Nexus 7, don’t forget that it is still a capable device for simple applications. It would make a great photo frame, still plays music without issue, makes a great little message board and can even install into your car’s dashboard, if you’re ready to take your DIY skills to the next level.
See: How to install a Nexus 7 in your car dashboard
Next week
If the allure of screw drivers and electrical tape is not your thing, no worries, we’ll take our Android customization series back to software for next week. Join us as we take a look at root. That’s right, we’ve been slowly working toward this day, the day we root a device for you and play around with some of the great tools available in the community. We’re going to start off with the Nexus 7 you see above, you didn’t think we revived it for nothing, did you!
What physical repairs or alterations have you made to your Android devices?
For more customization projects: Android customization series
- Daily quote or Chuck Norris joke on your Homescreen – Android customization
- How to create an advanced battery log using Tasker – Android customization
- How to create custom, actionable notifications on your Homescreen – Android customization
- Lock screen widgets on Android Lollipop – Android customization
