


Top 3 reasons to buy a Chromebook over a cheap Windows laptop

You don’t have to spend a lot on a Chromebook to get a machine that will last and let you keep your sanity.
When looking for a new computer, you may think that the only things you need to really consider are price, storage, screen resolution, and how heavy it’s going to be to lug around, but before all of that, consider what operating system is really going to give you the best experience and performance. While in previous years there were some legitimate reasons to go for a Windows laptop over a Chromebook, they’re all gone now. For the vast majority of computer users, Chrome OS will offer better performance and need less maintenance, especially at lower price-points.
Whether your kid needs a new laptop for homework or you need to upgrade to a computer that doesn’t take 5 minutes to boot up, your best bet for a low-budget computer is a Chromebook.

Built for business, built to last
Chromebooks are consistent, durable, and enterprise-approved
Chromebooks are expanding upon their not-insignificant footholds in two industries that have very important priorities when it comes to their computers: education and enterprise. Both of these fields have to distribute and maintain computers for hundreds to hundreds of thousands of users of very skill level, so there are three things they value over all else:
- How easy is it idiot users to work on?
- How hard is it for idiot users to break?
- How hard is it for our IT department to keep it updated and secure?
Chromebooks feature a very simple, sandboxed operating system. Even grade-school children can learn their way around a Chromebook with minimal instruction, and since Chrome and Android apps on Chromebooks are sandboxed from the core Chrome OS system, it’s very hard to break that system. Since Chromebooks sign in through a Google Account or enterprise cloud-based account and sync to the same account, any user in the company can log into any Chromebook the same way, which brings us to another beautiful benefit of Chromebooks.
 Sign in with any Chromebook, get the same experience.
Chromebooks are designed around using the cloud for most of your document and data storage. If a student smashes their Chromebook on the bus or spills acid on it during a lab, all they need to do is log into their account on another Chromebook — or log into that account on their phone or home computer — and keep working on their homework; the only data they lost was whatever was saved in the Downloads folder.
Read more: How one non-profit uses Chromebooks in the workplace
Keep it supported. Keep it safe.
Chromebooks have an assured support life
Windows updates can take your computer down for hours at a time with little to no warning, and while the machine reboots to install updates, you can’t use your laptop for anything. Windows 10 has alleviated some of this strain, but updates that keep your machine offline for 20+ minutes are still common. Even worse, some Windows machines — especially cheaper laptops — often don’t get driver and firmware updates from their manufacturers needed to keep up with Windows updates and remain secured.

Chromebooks fix most of these problems, for one reasonable price.
Chromebooks all have their driver/firmware/system updates pushed out through Google, keeping Chromebooks updated every 6 weeks or less. When an update comes, Chrome OS will install it in the background, then an icon will appear in the bottom-right system tray when finished, noting that your Chromebook is ready to reboot. Chrome OS will not force itself into a update reboot the way Windows can and often does.

Whenever you’re done with what you were using your Chromebook for, you can tap Restart to Update or in many cases just shut the lid. Your Chromebook will reboot and be back up and running in less than a minute. Heck, most times when I reboot a Chromebook for updates, it’s back up and waiting for my password in less time than it takes to say this entire sentence.
This nearly perfect update system does come at a small prince, and that price is that every Chromebook on the market has an Automatic Update Expiration (AUE) date, after which Google isn’t committed to pushing out updates. Most Chromebooks have at least 5 years of support between their release and their AUE date; for instance the HP Chromebook X2 that came out this summer will be updated until June 2024, or 6 years after its launch.
Find out what your Chromebook’s Automatic Update Expiration date is
Do it all and do it all easily
You really can do everything you need to on a Chromebook
Once upon a time, Chromebooks needed an internet connection to get much of anything done outside basic word processing, and so to this day, most people think Chromebooks aren’t real computers that can’t do anything without an internet connection. Well, those people are missing out, because not only can a Chromebook do just about everything your Windows machine can — outside of professional-level CAD rendering and some proprietary programs like iTunes — a Chromebook will do them better and faster than a bargain-bin Windows laptop, and to them better for years longer.

Google Play and Android apps have come to more and more legacy Chromebooks in recent months, and almost all new-model Chromebooks being launched or sold on the market today come with Google Play, meaning that if you can do something on an Android phone, you can do it on a Chromebook, including using the Microsoft 365 apps like Microsoft Word and Adobe Cloud Creative apps like Lightroom CC. In addition, Google announced that support for natively running Linux apps is coming to Chromebooks, with the feature already live in the developer channel for Chrome OS’s most powerful models. Linux apps mean that the professional-level CAD rendering and other high-end, computing-intensive tasks that are still currently unavailable on Chromebooks are going to be available, too.
And no matter what you install, Chromebooks continue to purr along since everything is sandboxed and secure. While Windows machines will start to bloat and crawl the more programs you install and the more you use the machine, my four-year-old Lenovo Chromebook is still as steady, stable, and speedy as it was when Jerry sent it to me back in 2014.

Do yourself a favor and buy a Chromebook
A $300 Windows laptop is going to be crawling and begging to be put out of its misery in a year or two, while a $300 Chromebook just asks “What’s next?” and keeps on helping you bang out term papers and catch up emails. It’s good enough for your kids’ schools; it’s good enough for IT professionals across the country, and it should be good enough for you, too.
The best Chromebooks you can buy today
Chromebooks
- The best Chromebooks
- Chromebooks in education: Everything you need to know
- Should you buy a Chromebook?
- Chromebook Buyers Guide
- Google Pixelbook review
- Join our Chromebook forums
How to fix PlayStation 4 overheating issues

My console is overheating, how did this happen?
Overheating isn’t just a hassle; it can be damaging to your PlayStation 4. Prolonged heat at high temperatures can ruin your circuit boards, and no one wants that. A lot of the reasons that revolve around your console overheating are not your fault, so don’t beat yourself up. From a system overload to a routine cleaning job, I’m here to help walk you through your overheating problems!
Available options
- Room temperature and random flukes
- Compressed air is your friend
- Proper ventilation
- Check for system updates
- Check for game updates
- Make room for more memory
- Get a cooling device
- Check the warranty of your device
Room temperature and random flukes
Sometimes a console overheating is just a one-time fluke. Before you freak out about the possibility of your console being broken forever, try turning it off. Let the PlayStation cool down to a normal temperature, and then turn it back on. If you are still experiencing issues, continue on below for some more opportunities for easy fixes.
Another thing to check is what temperature you are keeping the area your PS4 resides in. If the room is kept too hot, it will cause your PS4 to overheat. Make sure your house is set to a comfortable temperature for safe gaming! Now we all know there’s always that one room in the house that stays hotter or colder than the rest. Thankfully you can get a cheap thermometer from Amazon for about $5 to track the temperature of your room. This way you have an active visual of whether you need to turn on a fan or open a window.
See on Amazon
Compressed air is your friend

If you own any sort of game consoles or computers, a can of compressed air should now be on the list of things in your handy drawer. I can not even begin to count the number of problems I have had with technology that a can of air saved me from. That being said, if your PlayStation 4 is overheating the first thing you want to check is the cleanliness. Dust buildup can also be a reason your USB ports are acting up!
Are the fans on the sides of your console dusty? Usually, that’s the #1 reason for a loud or overheating PS4.
Unplug your PlayStation 4 completely and find a flat surface to work on.
Take your can of compressed air and gently navigate it through the openings to the fan on your PS4.
Go through and clean out the USB ports.
Turn your PS4 around and give your plug ports and gentle blow with the can as well.
When you feel satisfied, wipe down your PS4 with a microfiber cloth.
When all is said and done, plug your console back in and see if the overheating issues have improved. If you feel that your PlayStation requires a deeper clean, you may need to resort to a professional. Taking apart your PlayStation can be risky business.
See on Amazon.
Proper ventilation
Now that you’ve used your can of compressed air to clean out your fans, make sure there is enough space for them to pull in the proper amount of air. While PlayStation did design the PS4 to be able to rest vertically I still don’t recommend it. Having your PS4 rest horizontally ensures that both fans are able to intake air for the maximum ability to keep cool.
Check for system updates
Not everyone plays their PS4 online or even has it hooked up to the Wi-Fi. Even if you don’t, it’s good to set a reminder on your phone to connect your PlayStation to the internet and check for software updates. This will increase the performance of your console and reduce the risk of it over-working itself and overheat!
Make sure your console is connected to Wi-Fi!
Select Settings from your top menu on the main screen of your PS4. It will resemble a briefcase.
Select System Software Update.
Select Check for Updates
If there is an update, select Install Update. If there is not an update it will notify you!


Check for game updates
Another type of update you want to keep on top of is the updates to the games themselves. Most PlayStations are set to automatically update when connected to the internet, but on the off chance, you aren’t here’s how to do that manually!
Make sure your console is connected to Wi-Fi
On the main menu of your PS4 highlight the game in question.
Press the Options button located on your controller.
Scroll down the options menu and select Check for Update.
If there is an update, select Install Update. If there is not an update it will notify you!


Make room for more memory
Sometimes when a PlayStation 4 is reaching it’s maxed amount of memory it’ll start to give you some problems with performance. This isn’t overheating, but the way the system slows down can feel similar. You can fix these issues by clearing up some space or buying an external hard drive. The good thing about the second option is that you can get a fairly good one on Amazon for roughly $90 and it’ll give you an extra 2TB of memory!
See on Amazon
How to check and delete memory from the Settings menu
Select Settings from your top menu on the main screen of your PS4. It will resemble a briefcase.
Select Storage.
If you are looking at the space on an external hard drive select Extended Storage.
To delete content, press the Options button on your controller and press select.

How to delete a game from the main menu
On the main menu of your PS4 highlight the game in question.
Press the Options button located on your controller.
Scroll down the menu that will pop up and select Delete.


Are you still experiencing overheating issues on your PlayStation 4? What sort of tips and tricks did you try to solve your issues? Tell us in the comment section below!
Cooling stand for original PS4
Cooling stands are an affordable way to help with your overheating issues when you can’t afford repairs to the device and your warranty is up.

For $17.00 on Amazon you can find the Kootek Vertical Stand with Cooling Fan. This device is compatible with your PlayStation Slim and your original PlayStation 4 not your PlayStation Pro. Click here for the same device made for your PlayStation Pro for only a dollar more! Not only will this device give you the ability to keep your console cool, but it also serves as a charging stand for your controllers! No worries on USB ports either. As you can see from the picture there are 3 for you to use for all your charging needs.
See on Amazon.
Cooling stand for all

For 29.99 on Amazon you can find this DOBE PS4/ PS4 Slim/ PS4 Pro Cooler, Multifunctional Vertical Cooling Stand. It has an anti-slip stand on the bottom of the device to prevent pets and children alike from pulling things they shouldn’t while giving your device more fans to keep it cooler. Aside from that the fronts of the device can charge up to two DualShock controllers and let you know when they are fully charged!
See on Amazon.
Check the warranty of your device
Whether the fans are extremely loud and not working (or silent and not working) you might need to actually send the devices in for repairs. Call the company you bought your console from to check what warranty plan you have. I’ve listed below the warranty information for the most popular places to buy your device from.
If your warranty is up (or not covering the damages) see below for some cheap alternatives you could do instead.
- Amazon warranty information
- Walmart warranty information
- Best Buy warranty information
- Game Stop warranty information
Still experiencing overheating issues?
Let us know in the comment section below what your device is giving you problems with, or what you’ve done to make it better!
Update July 2018: We’ve added information on buying cooling devices, checking warrenty and ensuring enough ventilation space as well as an organizer at the top of the article for your easy access!
PlayStation 4

- PS4 vs. PS4 Slim vs. PS4 Pro: Which should you buy?
- PlayStation VR Review
- Playing PS4 games through your phone is awesome
Amazon
Unknown Sources: Everything you need to know!

The Unknown Sources setting isn’t the mystery — or the demon — it’s made out to be if you know a little bit about it.
To install apps that you downloaded from somewhere besides the “official” app store from Google or the company that made your phone, you need to enable the “allow unknown sources” setting. There has always been a bit of confusion about what it is exactly and how things work. We’re going to remedy that and talk through everything you need to know about unknown sources. Don’t worry, it’s gonna be fine.
What are ‘Unknown Sources’?
No, not people who leak government stuff to the press. The Android kind of unknown sources. It’s a scary label for a simple thing: a source for apps you want to install that is not trusted.
Unknown = not vetted directly by Google.
When we see the word “trusted” used this way, it means a little more than it usually would. In this case, trust means the same as it does for a web certificate and everyone involved on all sides will vouch for the source. Google says you can trust Google Play. Samsung goes one more step and says you can trust Samsung Apps or the Amazon App Store (for example). Because these sources are trusted, you don’t have to enable the installation of unknown (not in the circle of trust) sources to install apps from them. Someone who is in charge of making these kids of decisions is vouching for these app sources.
In short, a trusted source is one that the company you gave your money to, the company who built it, and the company who wrote the software all have vouched for.
Why is there even a setting for this?
Half the people reading this will think that no company should allow us to install apps they do not trust. The other half will think that nobody should be telling me what apps I can and can’t install. Having a setting in place is the only real solution.
It’s not really a good idea to just let any app from any place get installed on your phone. When you block app installs from places not in that trusted circle, random drive-by downloads can’t happen. Full stop. It’s insanely difficult to find an exploit that can force you to install an app you don’t want. It should be because that sort of trickery is never done for a good reason. Going one step further and just outright blocking the darn things is the type of over-the-top phone security Google loves.
And Google doesn’t claim that apps from other places are a bad thing. It has a whole page that tells app devs how to go about offering apps without putting them in the Play Store. All Google has to say about the Unknown Sources setting is:
User opt-in for apps from unknown sources
Android protects users from inadvertent download and install of apps from locations other than Google Play (which is trusted). It blocks such installs until the user opts in to Unknown sources in Settings > Security on their device. Users need to make this configuration change before they download your apps to their devices.
Note that some network providers don’t allow users to install applications from unknown sources.
Google is cool with developers doing it and cool with you downloading and installing them. But they make sure you opt-in for it before you do.
Are unknown sources a bad thing?
Nope. But enabling the setting for no good reason or leaving it on all the time is.
The internet is a big place. There are plenty of places to get apps that are as trustworthy as Google or Samsung or LG or any other company with their own on-device app store. You just need to do a tiny bit of poking around to make sure a place is trustworthy before you grab an app from it.
The Unknown Sources setting is like the stove: turn it off when you’re done using it.
Reading this article is a good start. Read other Android websites, too. We’re not afraid to tell you when you can trust something or someplace. Here are two places I trust as much as anything from Google: Amazon and F-Droid. I use them both and am not afraid to tell you to use them if they have something you want. And everyone else here would say the same thing.
In essence, Android Central trusts Amazon and F-Droid and thinks you can, too. But because of Google’s definition of trust, in this case, they can’t. Knowing that both Amazon and the folks running F-Droid scan all their files and are diligent about how they are distributing them isn’t enough for Google because they need to do those things themselves before they trust a source. Google has more at stake because they are Android, for better or for worse.
What is a bad habit is leaving the unknown sources box checked if you don’t need to. If an app you installed will run with the setting disabled, disable it until you need it again. If an app won’t run without it enabled, find out why before you install it.
You’re still protected

Google wants to scan every single app you install right before you install it. It will ask you to let it do so and to let it do it in the future the first time you try. At Google I/O, we were told that Google scans 50 billion apps per day to ferret out any with malware, including the ones you are installing. And this doesn’t depend on having the latest version of Android. Every single phone with access to Google Play running Android 4 or higher has these protections built in through Google’s Play Services feature. While no type of scanning is going to be 100% foolproof, chances are someone else has installed that app before you and Google has looked at it, and they will look harder if it does anything fishy. Or has a hidden ability to do anything fishy.
Fifty. Billion. Every day. That’s a helluva lot of apps.
Google, Apple, Samsung, and every other company takes the integrity of their app store very seriously. Nothing makes them look worse than me telling you about bad apps that slipped through, so they do everything they can to keep it from happening. In this case, that benefit rolls over to apps you installed from elsewhere. Win all around!
Why don’t companies just put their apps in Google’s Play Store?
That’s a question with a big, convoluted answer that no two people will agree on. Let’s just say that Google places some restrictions on ways developers can make money. Not everyone is willing to accept those restrictions.
Of course, test apps and beta apps and project apps are better off being hosted locally and set to whoever needs them. But for big production ready apps, not everyone wants to use Google Play.
Android Oreo changes everything
Google has reworked how apps from places other than trusted stores are installed, and with Oreo, it’s a much better and safer experience.
If you have a phone running Oreo, you won’t see a setting to allow installation of apps from unknown sources. Instead, Google treats this as an app permission and you’re asked each and every time you want to install an app you got elsewhere.

The new permission is tied to the app itself, not any user settings. Because it’s treated the same as every other runtime permission, like access to your camera, an app that would try to get you to install any other app is unable to trick you with a dialog or use false pretenses. You have to say yes each and every time.
You’ll also find a list of apps that use this permission in your settings. That means you can revoke the permission and the app is unable to function. Doing things this way makes it easier for developers to distribuite apps from places other than the Play Store because users won’t get confused by installation instructions or feel that the app isn’t safe because of the language used.
How do I turn Unknown Sources on?
Open the device settings. Look for a gear icon in the notification shade near the top left corner and tap on it.
Scroll down to the Security section and tap to open it.
Scroll down to the entry labeled Unknown sources and read the subtext because you should always read any and all subtext in a “security” section of settings.
Read the pop-up box that tells you Google isn’t responsible if you install apps from places they do not explicitly trust and click OK to enable the setting.

You disable the setting the exact same way. Toggle the switch off and installation is once again blocked for apps downloaded outside of trusted app stores.
So should I enable the setting?
If you want to install an app that you trust — you know the source and are sure they aren’t pulling a fast one and that the app is exactly as the developers have written it, then you can enable it when you need it.
There are a lot of different ways to define trust, but we think that word of mouth is one of the best ones. Your friends, people in forums and comments, and your favorite Android blog can tell you whether or not they think you should trust a thing or place, and whoever is saying it should be willing to tell you why.
Most importantly, you don’t have to worry about temporarily enabling Unknown Sources if you trust a place that has an app you want to install.
I trust Amazon because it vets every app in its store and it is a popular source. That means if an app slips through, it will get caught quickly. I trust F-Droid because every app it offers has the full source code available and provides a checksum to make sure you’re downloading a verified copy that it compiled itself. Not everyone wants the source code. You don’t necessarily have to know either of these things because someone else has looked into it and the information is available. You should still do any personal vetting that you need to feel comfortable, but generally, a site that’s not trustworthy is going to be talked about even more.
Do a little bit of homework and you’re golden. Just be sure to turn the setting back off once you’re done installing your apps.
Wrapping it up
This is a simple breakdown to make sure everyone can understand what’s going on when asked to enable the Unknown Sources setting or when you see people warning against it. There are other more nerdy things like signing keys and heuristic scanning that could be talked about, but we feel that will muddy the water a little. If you’re the type of person interested in the minutiae, the Android Developers site has plenty of information about how Google Play works and what else Google does to make it safe. It’s great reading if you’re inclined.
For everyone else, just know that the Unknown Sources setting isn’t really a mystery or anything to be afraid of if you need it. And when you don’t make sure it’s turned off.
Stay safe!
Updated July 2018: With all the security worries lately, we’ve refreshed this piece to help you protect your devices and data.
Hit the sandy slopes in Alto’s Odyssey! [Game of the Week]

Update July 27, 2018: Alto’s Odyssey is finally out and free to download and play for Android! Then, dive into the dark depths of a spooky tunnel in Deeper Waters!
Alto’s Odyssey
Alto’s Odyssey has finally arrived for Android and it was well worth the wait. The sequel to the wildly popular Alto’s Adventure, Odyssey takes everything you loved about the first one — the shifting landscapes, the gorgeous graphics, and the simple yet addictive gameplay — and layers on more depth and features.
Gone are the snow-capped mountains and runaway llamas. Instead, Odyssey takes us to more tropical locals with Alto swapping his snowboard for a wall-riding sand board. There’s more interaction with the environment here, too, with dust devils tossing Alto high in the air, mystical birds helping you collect out-of-reach coins, and much more to explore as you progress through the game.
There’s a ton of challenges to complete and multiple areas to unlock and explore. As with the previous game, levels are randomly generated so each playthrough is unique — which makes this a great game to play over and over again. I instantly fell in love with this game and you will too!
Best of all, the game is free to play for Android users with in-app purchases available to remove ads and buy upgrades. Alto’s Odyssey is a fantastic game that you won’t want to miss out on!
Download: Alto’s Odyssey (Free w/IAPs)
Deeper Waters
Because I love to highlight really interesting indie titles, I gotta throw out a nod to Deeper Waters. One of the developers from UnBased Studios reached out to me and asked me to check out their new game — so I did.
Apologies for the somewhat phallic icon aside, this is an oddly addictive game that has you dive deep down a watery cave filled with jellyfish. Your goal is to dodge the jellyfish, collect the rising air bubbles, and dive as deep as you can. The lighting effects are the best part — you cast a light as you continue to dive down and you’re light continues to dim until you collect an air bubble.
It’s hard to determine exactly what your character is — it certainly seems to not be from our world — but there are multiple character mods that affect your buoyancy, make you faster, or give you extra lives. It feels reminiscent of Flappy Bird in terms of being a quick game to play with
Download: Deeper Waters (Free w/IAPs)
Android Gaming

- Best Android games
- Best free Android games
- Best games with no in-app purchases
- Best action games for Android
- Best RPGs for Android
- All the Android gaming news!
Google Assistant: Everything you need to know
There’s a lot going on with the Google Assistant — let’s break down the important stuff.

In May 2016, we got our very first taste of the Google Assistant with the debut of Allo. The Assistant was a big draw to Allo at the time, with Google marketing it as a helpful bot that could make restaurant reservations, search the web, and more within your conversations.
Since then, the Assistant has gained heaps of new features and expanded to smartphones, tablets, speakers, and more. Google’s shown no interest in slowing down development for the Assistant, meaning that it’s likely here for the long-haul.
Whether this is your first encounter with it or you just need a quick refresher, here’s everything you need to know about the Google Assistant.
The latest Google Assistant news
July 27, 2018 — You can now schedule custom routines for specific times/days
Building upon Custom Routines that were added to Google Assistant earlier this year, users can now schedule these routines to go off at a certain time/day. Previously, custom routines you made could only be used after saying a specific command.
While creating a routine, you’ll now see a new “Set a time and day” option under the “When” section. Here, you can choose the time you want it to play and what day(s) it should repeat.
There are a lot of ways to take advantage of this, with one example being to have your coffee pot turn on, crank up the AC, and hear about the weather as you’re waking up without having to ever speak to your Google Home. Neat!
July 26, 2018 — Dutch is now an officially supported language
Good news, Dutch speakers! As of July 26, 2018, Google’s confirmed that the Google Assistant now speaks Dutch as one of its official languages.
Assuming you’ve got an Android phone running Marshmallow or later, you can now access the Assistant to ask it questions about the weather, create calendar appointments, control smart home devices, and more.
In addition to your phone, you’ll also be able to use Dutch on the Google Home later in the year once the smart speaker goes on sale in the Netherlands.
All the important details
Google Now paved the way for Google Assistant


The Google Now page compared to the new Google Feed.
Before there was the Google Assistant, we had Google Now. Google Now was introduced to the world all the way back in 2012, offering contextual info through the Google Now page and helpful answers to random questions with an “OK Google” voice command.
A lot of what made Google Now so great can still be found in the Google Assistant today, with the exception of the Google Now page. The Google Now page used to be home to cards showcasing the weather, information on packages that had shipped from online orders, boarding passes, and more. It’s since been replaced by the Google Feed – a collection of news stories Google thinks you’ll be interested in – and it’s definitely the biggest departure between the two services.
The Google Assistant as a whole is still more powerful than Google Now ever was, but long-time Android users like myself are still mourning the loss of that Now page. RIP, old friend.
Read more: Google Now is being left to wither and die as Google Assistant takes the focus
It’s available on just about everything
In just a few short years, the Google Assistant’s gone from being exclusive to a now-failed chat app to being integrated into just about anything you can think of.
You’ll find Google Assistant built right into most Android phones, it’s the star of the show for the Google Home lineup, and it’s even making its way into sound bars.
Here’s the full list of devices with Google Assistant
Setting up the Google Assistant is as easy or complex as you want
When you set up a device for the first time that has the Assistant, getting started is pretty simple. Accessing it is just a voice command or tap away depending on what gadget you’re using, but if you want to really fine-tune your experience, Google’s got you covered.
Take a quick dive into your Assistant settings and you’ll find options for just about everything – including your weather preferences, changing the Assistant’s voice, retraining your voice model, picking out preferred news sources, and much more.
How to set up and customize Google Assistant
Google Assistant is available in multiple regions and languages
Of course, a smart voice assistant isn’t any good if you can’t actually use it. Fortunately, Google Assistant will be available in 52 countries —adding 38 countries this year — and 17 languages by the end of 2018.
More: Google Assistant will expand to 38 countries and 17 languages in 2018
Google Home’s the premier way to get the Assistant in your house (at least for now)

It’s great to have the Google Assistant on your phone, but if you want to truly experience just how helpful it can be, you’ll want to consider picking up a Google Home.
Google Home is Google’s line of smart speakers that put the Assistant on full-display, allowing you to control smart devices, ask random questions, set timers, play music, and more by just using your voice.
You can spend as little as $49 for the Google Home Mini, $129 for the original Google Home, or a whopping $399 for the Google Home Max.
However, as great as the Home series is, don’t forget that Smart Displays are just on the horizon.
Announced at CES 2018, Smart Displays are essentially smart speakers with the Google Assistant and a touch screen display that can show you helpful visuals when talking to them. It’s basically Google’s answer to the Amazon Echo Show and Echo Spot, and we can’t wait to see more from them.
Everything you need to know about Google’s Home speakers
Then again, is an always-listening speaker the right fit for your home?
However, the convenience of a Google Home (or any smart speaker for that matter) does come at the cost of privacy. Speakers like the Google Home are “always listening”, meaning they’re constantly on the lookout for a hot word to know when you’re talking to it (such as “Ok, Google” and “Hey, Google”).
This means the microphone on a Google Home is always active, but it’s not necessarily storing all the audio it hears when it doesn’t detect its hot word.
Most all speakers allow you to restore some privacy by being able to mute the microphone, but if you want to start asking the Assistant questions, you’ll need to unmute it first.
To learn more about these “always listening” speakers, I’ll pass the mic over to Jerry
Big upgrades are coming to the Assistant on Wear OS


Switching gears for a second, the Google Assistant on Wear OS (formerly Android Wear) is about to get a big upgrade.
In the near future, the Assistant on Wear OS will support Assistant Actions (basically apps for the Assistant) and give you the option to hear its responses through your watch’s speaker or a pair of connected Bluetooth headphones.
Along with this, Google will be adding something called “smart suggestions.” After asking the Assistant for the weather, for example, you’ll see little bubbles for “weather tonight”, “use celsius”, and more so you can continue the conversation with just the tap of your finger. Google Assistant on Android offers something similar, and it’s a great tool to have.
IFTTT supercharges the Assistant’s usefulness

IFTTT (If This Then That) is a powerful online tool that allows you trigger something (that) if a certain event (this) happens. You can connect IFTTT to the Google Assistant to create your own recipes using this formula, and it can allow for some incredibly helpful combinations.
Some of our favorite uses for IFTTT and the Assistant include adding contacts to your Google account, setting your Google Calendar status to Busy for a certain period of time, and much, much more.
Getting started with IFTTT can take some time and patience if you’re new to it, but once you’re all set up and ready to go, it can prove to be a lifesaver.
How to connect Google Home and IFTTT to do amazing things with your connected tech
You’ll get the same experience no matter what devices you use
With so many devices capable of running the Assistant, it’d be easy to think that the experience you get on one gadget would be different from another. This is something that Google struggled with for a while at first, but we’re finally in a position where the Assistant experience you get on a smart speaker, for example, is the same you’ll get on your phone.
There are a handful of features here and there that still create for some discrepency, but for the most part, the Assistant you use on your Pixel 2 is the same one found on Google Home.
Google Home and Google Assistant finally offer the same experience
Google Duplex is actually going to be a thing

Google showed off Duplex — Google Assistant making natural-sounding phone calls on your behalf — at I/O 2018, but quickly noted that it was just an experiment. Flash forward a couple months, and Google announced that certain users have started testing Duplex, and a public release will be here in the next few months. Before you know it, Google Assistant will be able to book hotels, dinner reservations, hair appointments and more without you lifting a finger.
More: What is Google Duplex?
Updated July 2018: Added the Google Duplex and language support sections, as well as links to recent Assistant news.
OneDrive for Android now sports fingerprint authentication to lock your files

Now you can use biometrics to keep your OneDrive files a little more secure.
Microsoft is bolstering OneDrive’s security prowess on Android with the adoption of fingerprint authentication for locking down your files. The feature is now rolling out to everyone alongside a new grid view for photos (via MSPU).
Fingerprint authentication comes in addition to the PIN protection already offered by OneDrive. And as security features go, your fingerprint is the much more secure option. If you make a habit of keeping particularly sensitive files in OneDrive, this is a handy addition.
To get started with the new feature, you’ll have to navigate to the “Passcode” section of the Settings menu and make sure it’s enabled. From there, you can check the box next to “Use fingerprint to authenticate” to require verification whenever OneDrive is accessed from your Android device.
Additionally, the latest update includes a new grid view that’s available from the Photos section. Here’s a look at the official release notes:
- In addition to a PIN Code, you’ll now be able to use your fingerprint to lock the OneDrive app.
- We’ve improved our grid view to help your photos stand out and look their best as well as making it easier than ever to see what photos are getting backed up in the Photos tab.
If you’re a regular OneDrive user, you can grab these new features with the latest update available from Google Play now.
See at Google Play
Best Smart Locks that Support Amazon Alexa
Smart locks don’t have to be a pain to install or use, or prohibitively expensive.
Making your home smarter seems to be all the rage these days. There are smart speakers, smart TVs and other accessories to let you control your life with your voice. One of the most noticeable improvements in a home can be from installing smart locks, so you never have to fish a key out again.
These are the best smart locks that support Amazon Alexa!
- August Smart Lock, 3rd Generation
- Schlage Camelot Touchscreen Deadbolt
- Yale Assure Lock
- Kwikset SmartCode Deadbolt
- Kevo Convert
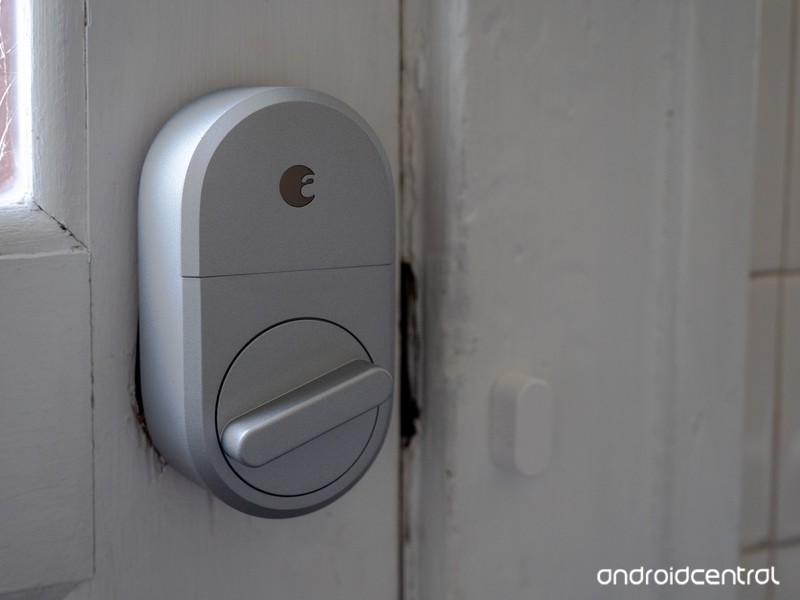
August Smart Lock, 3rd Generation
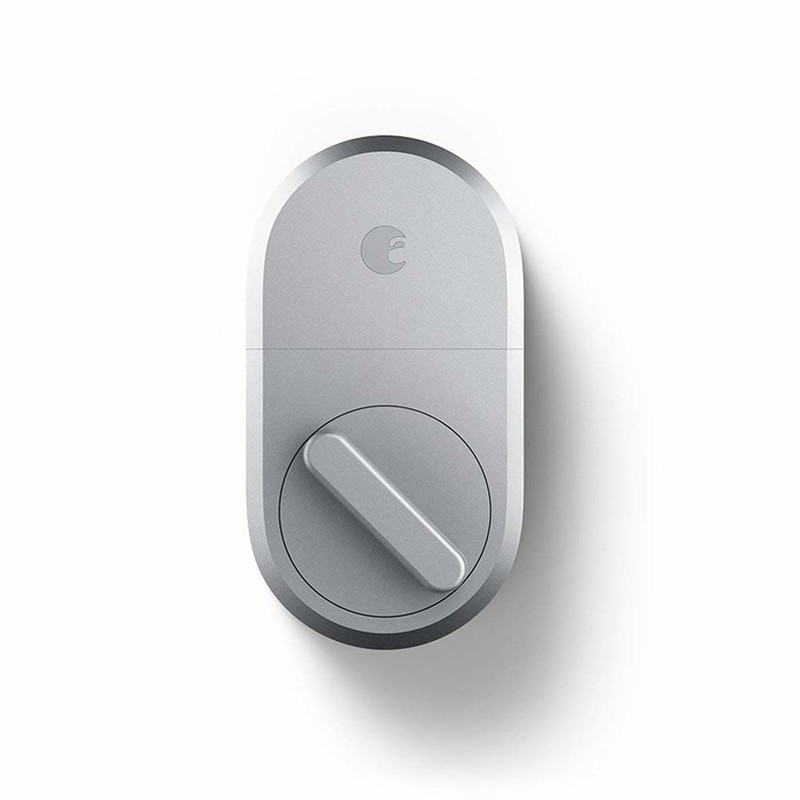
One of the highest rated choices comes courtesy of August. Its 3rd Generation Smart Lock looks the part of a standard deadbolt, provided you have a single-cylinder deadbolt; other designs unfortunately aren’t compatible. You can lock and unlock the door with an Alexa command, or the door will automatically unlock as your approach it with your smartphone. You can automatically create guest “keys” for friends’ phones, with a set expiration date. This makes the August Smart Lock an ideal choice for anyone who owns an Airbnb, or if you need to let a friend in so they can check on your pets. Installation is easy: you just need ten minutes and a screwdriver.
August’s 3rd Generation Smart Lock is available in silver for $129 or dark gray for $137.
See at Amazon
Schlage Camelot Touchscreen Deadbolt
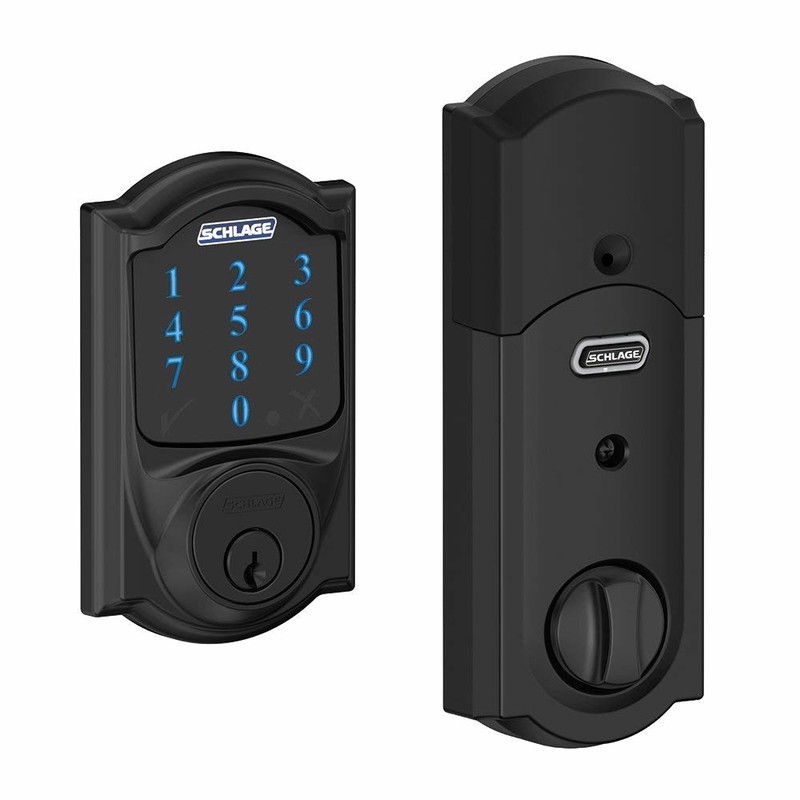
If you leave your phone at home often — say, if you only take your smartwatch out for a jog — having a backup way to get back in your house is important. A physical key is always a good backup, but a PIN may be more convenient. If that sounds like something that’s important, Schlage has the perfect smart lock for you. You can lock and unlock your door with Alexa (with a hub, sold separately), or lock and unlock it from anywhere in the world with a smartphone app. The touchscreen is fingerprint resistant, so you won’t give away the PIN you use to unlock the door. The lock runs off of four AA batteries, so you don’t need to mess with the wiring in your home. Finally, you can set up alerts to tell if someone is trying to tamper with the lock or force their way inside.
Schlage’s Camelot Touchscreen Deadbolt is available in aged bronze, bright chrome, matte black or satin nickel between $176 and $183.
See at Amazon
Yale Assure Lock

Another great option for those that want to enter a PIN comes from Yale. Its Asure Lock works perfectly with Alexa — with an additional purchase of a hub — and you can manage the lock from anywhere in the world with a smartphone app. The lock can remember 250 unique PIN codes, so you can assign codes to guests without worrying that they have your master PIN. You can also lock every code out of the lock at once, in case something goes wrong. The lock operates on four AA batteries, and users note this was enough to power the lock for at least a year. There are two physical keys included if you need them as well, and installation just takes a few minutes and a screwdriver.
The Yale Assure Lock is available in bronze, brass and nickel between $175 and $200.
See at Amazon
Kwikset SmartCode Deadbolt
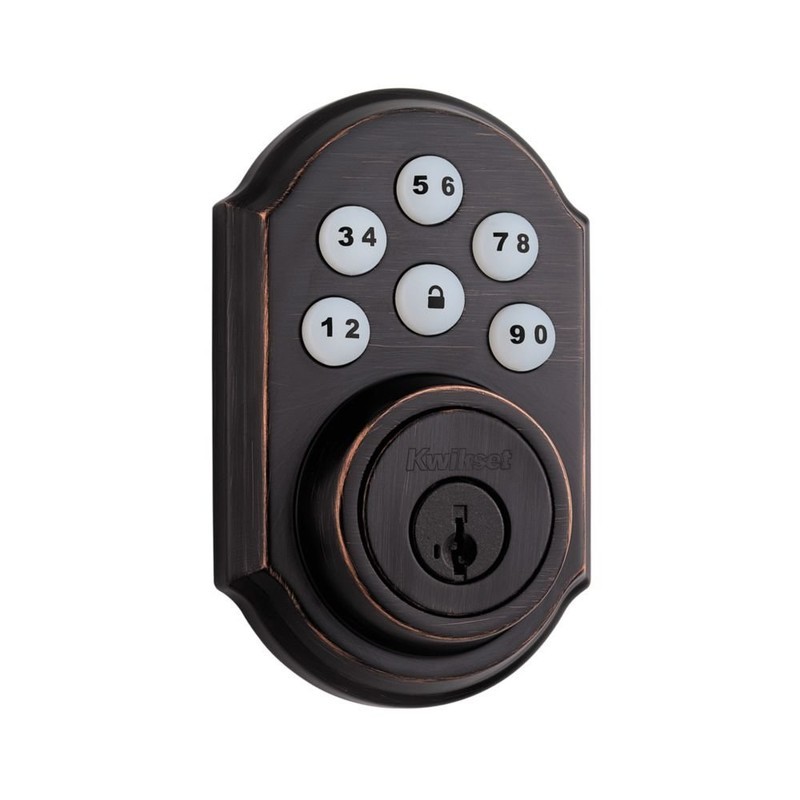
A more traditional — read: non-touchscreen — option is the Kwikset SmartCode deadbolt. Because it uses regular buttons, there’s less of a chance of someone guessing your PIN because of leftover fingerprints. As with the other options, you can control this lock with your voice with Alexa, provided you purchase a hub. You can use up to 30 codes for the door, so you can give out guest codes without worrying about master access. If you forget to lock the door, it will automatically lock itself after thirty seconds. The lock operates on four AA batteries, though these are not included. Installation takes only a few minutes and a screwdriver.
Kwikset’s SmartCode Deadbolt is available in brass, nickel and bronze between $144 and $156.
See at Amazon
Kevo Convert
If you can’t replace your entire lock because you’re renting your apartment or house, Kevo has the next best thing for you. The exterior lock stays the same, so your landlord can still access your space. But the interior lock can be switched out, so the whole system becomes smart. Pairing the lock with your smartphone will mean it will automatically unlock in Bluetooth range, and you can set it up to automatically lock after 30 seconds. If you purchase the Kevo Connected Hub, you’ll be able to operate the lock with Alexa, or control the lock from anywhere in the world. You can also send eKeys to your guests’ smartphones, or lock any guest out remotely.
The Kevo Convert is available in bronze or nickel for $120.
See at Amazon
What say you?
Which lock is the best for you? Let us know down below!
Amazon Testing Collaborative Shopping List Feature on iOS App and Website
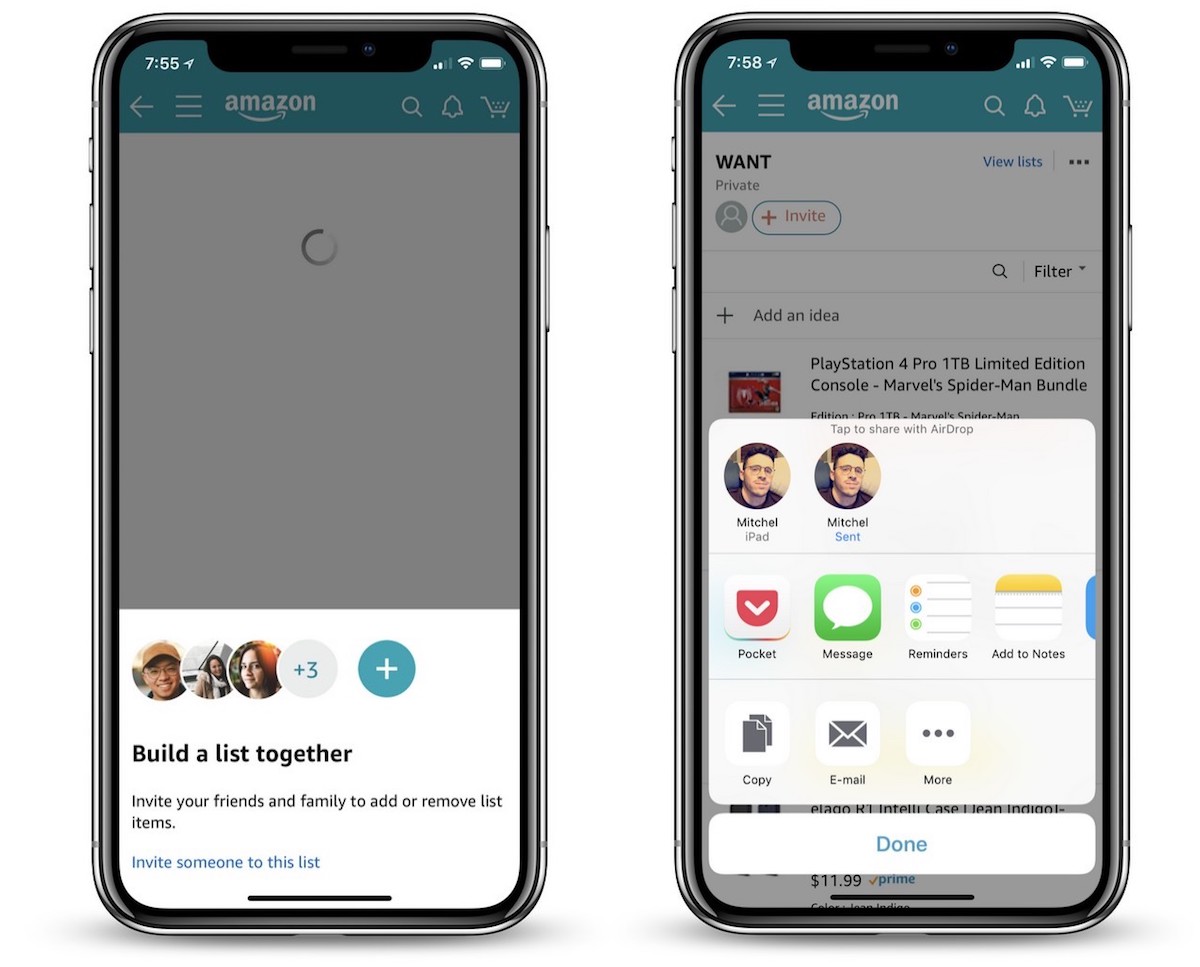
Amazon has begun testing a small but useful new feature across its iOS app and mobile/desktop websites, allowing users to invite friends and family members to collaborate on a shopping list together. Amazon customers have long been asking for such a feature, and it seems like a small set of them have been selected to test it out ahead of a potential wider launch in the future (via Android Police).
On iOS, after you open the Amazon app and navigate to one of your wish lists, you’ll see a new prompt that says “Invite others to add or remove list items.” If you tap this, you’ll get the usual iOS sharing sheet with options like AirDrop, Message, E-Mail, and simply copying a URL to share with someone.
Once the recipient gets the list invite, Amazon will open up in a browser (both mobile and desktop appear to work), and your list will now effectively appear as one of their own in their Amazon account. They’ll be able to view it, add items to it, remove items, edit quantity, and edit comments. Collaborative lists will be designated as such at the top of the list near its name with two user icons and a “Shared” banner.
Once multiple members are sharing a list, a new conversation icon will appear on the right of the list’s page and act as a hub for users to send messages and discuss items on the list. Above this is an ellipsis icon that lets the list’s original owner manage members and remove any they don’t want to be able to access the list anymore. It appears that a few of these features are missing for some users at the time of writing, likely due to the feature still being in a testing phase.
The feature is in testing on iOS and Amazon.com on mobile and desktop websites, but Android Central reports that it does not appear to be on the native Android app yet. As with all feature tests, it’s unclear when — or if — collaborative shopping lists on Amazon will roll out to all users.
Tag: Amazon
Discuss this article in our forums
Apple Offers Free Repairs of Products Damaged in Japan Floods
Apple has announced that it will repair any Mac, iPhone, Apple Watch, iPad, iPod, or Thunderbolt Display directly damaged by heavy rains in Japan in July, free of charge, so long as the product is actually repairable.
Affected customers can contact Apple by dialing 0120-27753-5 to arrange for pick up of any eligible products through the end of September, according to a notice on Apple’s website spotted by Japanese blog Mac Otakara.
Apple will service the damaged products free of charge and then return them to customers, although there may be delays, as delivery services by courier companies are suspended in some areas due to damage from the floodwaters.
Record rainfall in southwestern Japan in July resulted in widespread flooding, landslides, burst riverbanks, and collapsed buildings across the region.
Tag: Japan
Discuss this article in our forums
Moto E5 Play review

Research Center:
Moto E5 Play
Motorola’s G- and E-series smartphones have been the bedrock of budget phones for the past few years. This year, there’s plenty more competition to choose from, but many of our favorites still come from Motorola — ranging from the Moto G6 to the Moto E5 Plus. The latest budget addition we’re looking at is the cheapest phone the Lenovo-owned company has to offer, the Moto E5 Play.
You can’t buy the Moto E5 Play unlocked, but it is available at a variety of carriers including Verizon, and Sprint. Each carrier is charging a different price, from as little as $70 to $192. If it’s available at your carrier for under $150, and you don’t want to pay much for a smartphone, you should buy the E5 Play.
There are compromises — the camera isn’t great, and this phone won’t receive the upcoming version of Android. But with a full day’s worth of battery (that’s also removeable), a solid display, decent performance, and a nice design, the Moto E5 Play is a real bargain.
Basic design, satisfactory display
There’s nothing impressive or special about the Moto E5 Play’s design. It’s about as basic as a phone can look, with chunky bezels surrounding the screen on the front, and a textured, cheap-feeling plastic back.
Sitting up top is the front-facing camera and a flash, with the earpiece right in between. This is the only speaker on the phone, and while it sounds decent indoors, it’s easily drowned outside. A volume rocker is situated on the right side, and the power button is underneath it.


There’s thankfully a headphone jack at the top, and you’ll find a MicroUSB charging port at the bottom. We do wish Motorola went with the universal and convenient USB Type-C charging port, but the company confirmed to Digital Trends that all its 2019 phones will have a Type-C port.
The slightly curved edges help with grip, and the phone is lightweight, which helps make it comfortable to hold. Flip it around, and the back feels minimal and organized. There’s a circular single-lens camera module at the top, which sticks out from the back ever-so-slightly, and it also houses the flash. Below it is an indented fingerprint sensor, complete with Motorola’s logo.
There’s nothing impressive or special about the Moto E5 Play’s design.
The fingerprint sensor is placed in a comfortable spot, and it’s fairly responsive. You should know the Virgin Mobile, Cricket Mobile (Moto E5 Cruise), and Boost Mobile variants of the E5 Play don’t include a fingerprint sensor, which is disappointing.
We like how simple the back of the phone looks — the textured black pattern also adds a nice touch, even if it does feel cheap. You can pop the back on and off to access the SIM slot, removable battery, and MicroSD slot. Removable batteries are a dying fad with smartphones, but there’s still strong interest in them because it’s more convenient to swap out batteries instead of lugging around a heavy portable battery charger. That being said, we’ve yet to find a place that sells the Moto E5 Play’s battery.
Moto E5 Play Compared To

Cat S61

Alcatel Idol 5

Lenovo Moto G5S Plus

HTC U11 Life

Sony Xperia XZ1

Lenovo Moto G5 Plus

ZTE Axon 7 mini

Meizu Pro 6

Huawei Honor 8

Nextbit Robin

Huawei Honor 7

Huawei P8

Motorola Droid Turbo

Sony Xperia Z3

LG G2
The 5.2-inch LCD display on the front has a 16:19 aspect ratio with a 1,280 x 720 pixel resolution. The screen looks sharp and colorful, but we did have trouble seeing it outdoors in direct sunlight. We found ourselves often keeping the brightness on the higher side to comfortably see and read what’s on the screen. Despite the lower HD resolution, we didn’t have any issues or problems with video quality when watching movies and shows on the Moto E5 Play.
As for durability, there’s no IP rating for the phone so you’ll want to keep it away from water. Motorola does say there is a water-repellent coating for slight water exposure to protect it in the rain or from accidental spills. We did drop the E5 Play once on concrete (at a height of around 1 and a half feet), and the phone only suffered a minor ding on the side. Just to be safe, you’ll probably want to grab a case.
Decent performance
The Moto E5 Play is powered by Qualcomm’s Snapdragon 425 or Snapdragon 427, depending on the carrier it’s sold from. For example, Virgin Mobile, Boost Mobile, and Sprint sell the model with the Snapdragon 427, whereas the rest — including Verizon — sell the slightly-weaker Snapdragon 425 model. Ours has the Snapdragon 425, but all models come with 2GB of RAM.
Performance is average — apps will open slowly, and there’s a bit of stutter when scrolling in apps like Twitter or Facebook. But moving throughout the user interface, like the Settings menu and the home screen, didn’t pose any problems or lag.
Here are a few benchmark results:
- AnTuTu 3DBench: 43,358
- Geekbench CPU: single-core 651; multi-core 1,789
- 3DMark Sling Shot Extreme: 53
The Moto E5 Play actually scored higher than the Moto G6 Play (41,158 on AnTuTu), which is more expensive. Benchmark scores aren’t the best measure of real-world performance, though, and we didn’t run into any problems that would categorize the Moto E5 Play as unusable. We were generally able to complete day-to-day tasks without much frustration. It’s when you want to do multiple things within a short time period that the phone starts to frustratingly slow down. If you’re not a power user, we think you’ll be satisfied here.
 Brenda Stolyar/Digital Trends
When it comes to gaming, we didn’t run into any major hiccups playing The Sims Mobile. The game did lag a little when swiping through different parts of the map, but the graphics look great and we were still able to enjoy the game.
There’s only 16GB of storage on the Moto E5 Play, which is easy to fill up in a short amount of time. Thankfully, a MicroSD card slot lets you add up to 128GB of additional storage if you need it.
No Android P
The Moto E5 Play ships with Android 8.0 Oreo, and the only updates you can expect to see are for security. Motorola confirmed to Digital Trends that the Moto E5 Play will not receive Android P, so that might be something to consider before purchasing the device. Android P is the next version of Android that’s set to release around the end of August.
Regardless, the software experience is almost stock Android — uncluttered and simple to use. There’s very little bloatware, with just your standard suite of Google apps pre-installed, and you can swipe right from the home screen to access the Google Feed. Press and hold the home button to activate Google Assistant.
Not all the features are available here. We’re sad to see some of our favorite gestures not included.
There is the Moto app that’s standard on all Motorola phones, but not all the features are available here. We’re sad to see some of our favorite gestures not included — such as making a chopping gesture twice to turn on the flashlight, or twisting the phone twice to open the camera. You can touch the screen with three fingertips to capture a screenshot, put your phone face down to activate do not disturb mode, pick up the phone to stop ringing, and swipe down to the left or right of the screen to shrink the screen for one-handed mode. That’s about it. We didn’t use any of these features.
Thankfully Moto Display is available, so you can see notifications fading in and out of the lockscreen. There’s also access to the blue-light filter, and Attentive Display, which keeps the screen on while you’re looking at it.
Decent camera, poor low-light shots
As with most budget smartphones, the camera on the Moto E5 Play struggles in low-light environments. The 8-megapixel rear camera does take passable photos in broad daylight — they can look a little flat sometimes — but there are some surprisingly good photos that come through.
Previous
Next
1 of 9


But as soon as there isn’t enough light, the camera drops in quality. Even an overcast sky is enough to make the photos look dull, grainy, and lacking in detail. Things get worse indoors with low lighting, as the results can often look unrecognizable — adding flash only makes them look worse and washed out. The option to adjust the exposure in the viewfinder didn’t make much of a difference.
Previous
Next
1 of 4


The 5-megapixel front-facing camera isn’t too impressive for selfies either. Look close and every photo looks blurry and grainy. The built-in Face Beauty feature also made us look strange — it seemed to have airbrushed not only our skin (to make us look more pale) but also our eyebrows and pieces of our hair. Not very flattering.
While the camera app itself is quick to open, we saw some lag when snapping a photo, which we’ve often found to be a problem on Motorola phones.
Day-long battery
With a 2,800mAh battery powering the Moto E5 Play, we were able to get a full day out of the smartphone. This includes accessing email notifications, using social media and productivity apps, taking photos, along with text messaging. On average, we found that our device was at about 85 percent by noon (having taken it off the charger at around 8:30 a.m.), and by the end of the workday at 5 p.m., it was around 74 percent.
You don’t have to worry about it dying on you before the day is over.
By about 10 p.m., the phone hit 68 percent and that was after catching up on apps like Instagram, Twitter, and news on our commute home. With lighter phone usage, the phone could definitely last into the second day, so you don’t have to worry about it dying on you before the day is over.
It also comes with either 5-watt or 10-watt charger (depending on the carrier), which allows for better rapid charging capabilities.
Price, availability, and warranty information
The Moto E5 Play isn’t available unlocked yet, so you’ll have to purchase it through a carrier, where it varies in price. At Verizon, it’ll cost $70, whereas Boost Mobile sells it for $80. Under Cricket Wireless, it’s known as the Moto E5 Cruise, and it will only set you back $40, but you need to sign up for a new line or upgrade your existing device. By transferring your number, you could even get the device for free.
 Brenda Stolyar/Digital Trends
You can also purchase it from Best Buy — but it is a bit pricier — ranging from $95 to $130 depending on the carrier it’s locked in with. Xfinity Mobile sells it for $120, but it’s the most expensive on Sprint, which is carrying the phone for $192. Keep in mind that many of the more expensive versions have the Snapdragon 427 processor, which is slightly better. We don’t think the performance difference will be noticeable though.
Motorola offers a standard one-year warranty that protects against manufacturer defects. Accidental drops or water defects aren’t covered.
Our Take
For such a cheap price, the Moto E5 Play packs in all the basics you need for a solid smartphone experience.
Is there a better alternative?
Yes, if you’re eyeing a Moto E5 Play that’s more than $130, we recommend taking a look at the Moto E5 Plus. It has a massive 5,000mAh battery, more RAM, and a slightly better processor that should provide an overall better experience. It also comes with the useful Moto gestures.
Our favorite budget pick is the Nokia 6.1 for $270, with the standard Moto G6 following it swiftly behind. There’s also the Honor 7X worth considering, since it’s only $200. You can learn more in our best cheap phones guide.
How long will it last?
The Moto E5 Play should last you around two years. Since it’s made of plastic, you don’t have to worry about shattering it compared to all-glass phones.
It might receive a few security updates, but this is the only Android version you will get, so you will likely want to upgrade yourself by the two-year mark.
Should you buy it?
Yes, but it depends on the price from the carrier. We don’t think it’s worth purchasing if the carrier is selling a model without a fingerprint sensor, or if it costs more than $130. Otherwise, this phone is a really good bargain.
