


Moto Z Play on Verizon now being updated to Android 8.0 Oreo
The OTA update is rolling out now.
Android P might be the hottest thing in Android right now, but even so, there are still plenty of phones waiting for last year’s Oreo update. Most recently, the Moto Z Play on Verizon Wireless (the Droid Edition) is finally getting the Oreo treatment we’ve been waiting for.

Similar to the Oreo update that landed for the unlocked Moto Z Play in late-May, this brings the Verizon model up to Android 8.0.
Along with that number change, the phone gets picture-in-picture, support for adaptive icons, Google’s new emoji style, smart text selection, and a bunch more.
As for the build number, this is being upgraded to ODN27.76-12-30-2.
The over-the-air update is making its way to handsets now, but if you don’t feel like waiting, you can always manually check for it by going to Settings -> About Phone -> System Updates.
Moto Z3 Play: Everything you need to know!
Android Oreo
- Android Oreo review!
- Everything new in Android Oreo
- How to get Android Oreo on your Pixel or Nexus
- Oreo will make you love notifications again
- Will my phone get Android Oreo?
- Join the Discussion
How to connect Philips Hue lights to your music, movies, or games
You can do a lot more with your Philips Hue bulbs these days, as long as you have the right set up.

Connecting Philips Hue bulbs to my television has been a long-term dream of mine. We’ve seen some third-party apps try to make it work, but the experience has been limited and a little clumsy. With its big UI overhaul, the folks at Philips now have an official way to connect what is happening on your television to the behavior of the lights in your room.
The catch? It requires a PC or a Mac to have the most fun with it. Here’s how to get it set up right from your Android phone, and a quick look at everything you can play with right now!
Philips Hue Entertainment Mode
Any app can control all of the lights in a particular room, but to make it dynamic and interactive Philips created a new color sync mode that makes the app you are using aware of where the lights are in the room. These custom rooms are different from the normal room assignments, and are called Entertainment Areas. When setting up an Entertainment Area, you can choose the lights that are closest to the television and leave the other lights in their default settings, or you can choose a single light behind your television just to add a little depth to your experiences.
Here’s how you get an Entertainment Area set up:

Open the Philips Hue app and tap on the Settings gear at the bottom right of the app
Locate Entertainment Areas in the list and select that option
Choose the room you want to build and Entertainment Area in and tap Continue
Tap all of the lights in the room you want to add and tap Continue
Drag the lights to their relative position in your room based on the diagram on the screen
Tap Test Area to confirm the lights are set up on the diagram correctly
Tap Perfect Match when you have the lights set up correctly
Once you confirm the lights are set up correctly, the Entertainment Area is finished. From here, you can use Entertainment Mode apps to create dynamic lighting based on your experiences.
Using the Hue Sync app
Philips designed the Hue Sync for Windows and Mac to take the information on your screen and turning it into light instructions based on the things you are watching, playing, or listening to. For example, the colors at the top of the screen will be sent to the light behind the screen. The same with left, right, and bottom, all sending color information the lights nearest those positions.
Connect your Mac or PC to your television, and all of a sudden you have a TV which can control your lights. Here’s how to get it set up!

Open the Hue Sync app and select Search for bridge to connect to your Philips Hue bridge.
Tap the big button on your Hue bridge to complete the connection to the app.
Choose the Entertainment Area you want to control with the app and adjust the brightness to match your settings.
From here you have four options. You can use your PC or Mac to control light scenes just like the app on your phone, or you can use the app to pull from video, games, or music. The scene control works exactly the same as it does on your phone, but the other three settings have different rules.

Music mode allows you to choose a color palette and animate to the music you are playing based on that palette. As soon as you select Start Light Sync in the app this feature will animate lights based on all system sounds on your computer.
Games and Video mode take the information from your screen and color the lights, but include intensity modes for you to choose from. This impacts how quickly the lights shift colors, which can be important if flickering lights are a problem for you or those around you. These modes also include a Use Audio for Effect function, which allows you to turn loud bangs or sudden scares into light flashes. Depending on the game you are playing, this can be a lot of fun. It doesn’t work quite as well for all movies, but can be a lot of fun to play with.
How to turn Hue Sync off
Once you’re done with your fun, you can use the Hue Sync app to return everything in your room to normal just by clicking Stop Light Sync in the app. Once you disable the sync, you’ll be able to control the lights from your phone again just like before, so you can set the correct scene back up and no one will know any better. Enjoy!
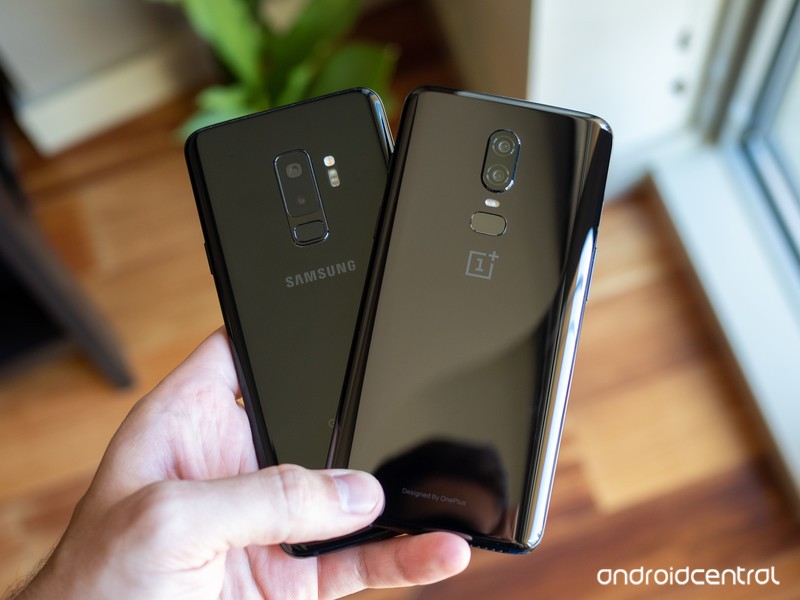
OnePlus 6 vs. Samsung Galaxy S9+ camera comparison: Closer than you’d think

Does an extra $300 buy you a much better camera?
We’ve already compared the OnePlus 6 to the Galaxy S9+ in general, and found the OnePlus 6 to be a formidable opponent to Samsung’s latest despite a $300 difference in price. But with the history of OnePlus phones having mediocre cameras and Samsung phones having great cameras, it’s a good idea to hone in on photography in particular.
OnePlus made a huge leap in camera quality from the OnePlus 5 to the OnePlus 6, but is it enough to also challenge one of the best cameras available today? That’s what we’re here to find out.
Daylight
OnePlus 6 (left) vs. Galaxy S9+ (right) — click to view larger, use ‘left’ and ‘right’ keys to compare
Considering the aggressively mediocre camera offerings in previous OnePlus phones, I’ll admit I had pretty low expectations for this comparison — but after taking daylight shots, I was pleasantly surprised with how well the OnePlus 6 compared to the Galaxy S9+. Scrolling through my Google Photos library or seeing the images I share on Instagram, you wouldn’t be able to tell which shots were from the OnePlus 6 and which were the Galaxy S9+. Both produce images that are fundamentally sound and visually pleasing, with no consistent aberrations or issues that were repeatable from shot to shot.
The Galaxy S9+ takes better daylight photos — but the difference isn’t dramatic.
When you set them side-by-side, as I’ve done here, you start to notice some of the more subtle differences that illustrate where the OnePlus 6 is slightly inferior. Across the board, the Galaxy S9 takes brighter, more colorful shots that take advantage of HDR to make a bit more of an opinionated photo. The OnePlus 6 is a bit simpler, still with strong colors but sometimes not leveraging HDR to the point where it brings out the color and details across an entire scene of mixed lighting (the shot of the monorail tracks above is a great example). When zooming in, you’ll notice the Galaxy S9+ has sharper lines and crisper fine details, which may not be immediately perceptible when viewed normally but do contribute to an overall cleaner look. The Galaxy S9+ is just insanely sharp, even when you get in and pixel peep.
The only knock you could put on the Galaxy S9+ in this comparison is that it still tends to overexpose sometimes, which can over-brighten images to the point where it’s distracting. The OnePlus 6 may not have the high brightness and colors across the board, but the upside is that it never over-brightens photos. The rest of the differences here really are subtle, but when you add them up I feel you still get better photos out of the Galaxy S9+ in daylight — the difference just isn’t dramatic, and that’s a great sign for the OnePlus 6.
Low light
OnePlus 6 (left) vs. Galaxy S9+ (right) — click to view larger, use ‘left’ and ‘right’ keys to compare
When comparing the OnePlus 6 to its predecessor, it was immediately clear that it made a huge stride in low-light photography. I would easily classify the OnePlus 6’s low-light performance as being above average (regardless of price), but that’s not enough to match the Galaxy S9+. The Galaxy S9+ is sharper and clearer across the board, and often brighter with better white balance as well. This applies to fully dark scenes, but also challenging indoor scenes with very dark areas in addition to lighter areas.
The OnePlus 6 has come a long way, but it can’t match the best in the business.
Unlike daylight photos where the differences were mostly in color and brightness, there’s a distinct difference in sharpness and details between these phones at night — zoom in a little on any of the photos and you’ll see why. The Galaxy S9+ is amazing at processing lines and flat surfaces to be incredibly sharp and smooth, sometimes to the point where they almost look unnatural. On the other hand, the OnePlus 6 just doesn’t process things very much, and you get a photo with soft or muddy details by comparison. Take a look at the photo of the flowers above — the OnePlus 6 shot is good, but it’s a little soft and doesn’t have sharp edges on the petals; the Galaxy S9+’s photo is so sharp you can actually see the individual fibers in the weave of the petals … because they’re fake flowers. You can’t even tell in the OnePlus 6 photo.
This is another situation where you wouldn’t likely be unhappy with the OnePlus photos on their own, but in this case if you set the Galaxy S9+ examples right next to them you’d take the GS9+’s shots every time.
Bottom line: Which one is best?
The OnePlus 6 has broken the mold of having a camera that’s “good for the money” — as this comparison has shown, the camera is good without any caveats or qualifications. In situations with ample light, the OnePlus 6 takes consistently great photos with a little punch of color, good details, and adequate brightness. At night, it’s a massive step beyond the OnePlus 5 and worthy of praise considering its basic components and sub-flagship pricing.
The OnePlus 6 deserves applause for what it can do for $529 — but the GS9+ is just better.
But if we start looking at the marginal differences that move the camera from “good” to “great,” like when comparing to a truly great camera in the Galaxy S9+, you can see the OnePlus 6 isn’t quite there yet. In good lighting, the Galaxy S9+ produces colors that really pop and a dynamic range that is outstanding. At night, the Galaxy S9+ has the same level of sharpness, smooth surfaces and fine edges that you get from the OnePlus 6 when it has good lighting — the GS9+ is just amazing at night, and the OnePlus 6 doesn’t match it.
The OnePlus 6’s camera is within a stone’s throw of the Galaxy S9+, and that’s darn impressive when you look at the $300+ price difference between these phones. If you buy a OnePlus 6, you have no reason to be disappointed by the camera — it can take fantastic photos in a variety of situations. But if you want the absolute best camera, the Galaxy S9+ is the one to get out of these two choices.
OnePlus 6
- OnePlus 6 review
- OnePlus 6 vs. OnePlus 5T: How much changes in six months?
- OnePlus 6 vs. OnePlus 5: Should you upgrade?
- These are the official OnePlus 6 cases
- The OnePlus 6 doesn’t work on Verizon or Sprint
- Join the discussion in the forums
Samsung Galaxy S9 and S9+
- Galaxy S9 and S9+: Everything you need to know!
- Galaxy S9 review: A great phone for the masses
- Complete Galaxy S9 and S9+ specs
- Galaxy S9 vs. Galaxy S8: Should you upgrade?
- Join our Galaxy S9 forums
Verizon
AT&T
T-Mobile
Sprint
Everything that’s new in the OxygenOS Open Beta
Wondering what’s new in the latest Open Beta? You’re in the right place.
There are a lot of reasons to like OnePlus phones, but one aspect that’s remained since the beginning is the excellent software experience they offer. All OnePlus phones now run OxygenOS, and if you want to test out new software features before anyone else, you can sign up for the OxygenOS Open Beta.

OnePlus updates the Open Beta quite frequently, with each new version including bug fixes, security patches, and feature galore.
To make sure you never miss a beat, here’s everything new in the beta right now.
July 3, 2018 — Project Treble and a new UI come to the OnePlus 5 and 5T!
Open Beta 13 and 11 for the OnePlus 5 and 5T is rolling out to users now, and it certainly sounds like one of the most exciting upgrades we’ve seen in a while.
Right off the bat, this Open Beta brings Project Treble support to both phones. This is the new update system from Google that allows for much faster turnaound times with new software, so it’s great to see that it’s making an appearance with the 5 series.
Some other big highlights include “a brand new user interface” for the phones and “supported accent colors” (some users think this means support for custom colors, but we aren’t entirely sure quite yet).
Here are some of the other goodies you’ll find:
- Improved search tags in the app drawer.
- A “New installs” category tag in the app drawer.
- Improved app list for hidden space and toolbox.
- Optimized log for the contacts page (Phone app).
- Brand new design + improved user experience for the Weather app and all forecasts are now integrated under a single interface leading to a fully immersive experience.
As always, Open Beta 13 and 11 are rolling out to users incrementally right now and will expand to everyone enrolled in the beta over the next few days.
June 13, 2018 — OnePlus 5/5T and 3/3T get June 2018 Android security patch and camera enhancements
There’s a new Open Beta in town for the OnePlus 5, 5T, 3, and 3T! Here’s what you need to know!
For all four phones, you’ll get the June 2018 Android security patch and bug fixes for the OnePlus Switch app.
Specifically for the 5 and 5T, there’s “camera clarity improvement and optimizations to reduce ‘oil painting effect.’”
How do you install the Open Beta?
If you’ve got a OnePlus phone, enrolling in the Open Beta is fairly simple.
You’ll need to manually download the latest available version for your device from OnePlus’s website and sideload it, but once you do this, any future versions will be sent to you as over-the-air updates.
Harish wrote up a step-by-step guide walking you through the whole process, and I highly recommend checking it out to ensure nothing goes haywire.
How to install the OxygenOS Open Beta on your OnePlus phone
What phones are supported?
Right now, the list of phones supported by the OxygenOS Open Beta include:
- OnePlus 3
- OnePlus 3T
- OnePlus 5
- OnePlus 5T
The Open Beta isn’t available for the OnePlus 6 quite yet, but that should be changing in the very near future.
OnePlus 5T and OnePlus 5
- OnePlus 5T review: Come for the value, not the excitement
- OnePlus 5T specs
- Should you upgrade from the OnePlus 3T?
- OnePlus 5T vs. Galaxy S8: Beast mode
- All of the latest OnePlus 5T news
- Join the discussion in the forums
OnePlus
Amazon
Android P Beta 3 (Dev Preview 4) released for Pixels with subtle design changes, stability fixes
The latest software is available right away for Pixels and coming soon to other phones in the Developer Preview program.
Plenty of us have gotten in on the Android P Beta fun already, but Google has released yet another update to improve stability and fix bugs in the yet-to-be-named new Android release. Android P Beta 3 is now available for Google’s own Pixel devices through the Android Beta Program, which will push out over-the-air updates to anyone who has enrolled or enrolls now. If you have one of the many phones from other manufacturers — like Vivo, Essential, OnePlus and Xiaomi — you’ll have to wait for a little bit to get your update; Google says they’ll be pushing out the latest version “in the coming weeks.”
So what’s in this update? Well as you can imagine at this point, things haven’t changed dramatically from Beta 2. Installing the new software you’ll see very subtle iconography changes throughout the system including the status bar, notification shade and setting screen. The back button is also now a thinner little arrow (but functions the exact same), and the scrub bar area when using the gesture navigation button is nearly the full width of the screen.


Google has already finalized all of the APIs in Android P, which is important for developers who are making their apps compatible with the latest version. (For the developers out there, Beta 3 is analogous to Developer Preview 4.) Google says Beta 3 is focused on “stability and polish,” as well as getting the latest July security patch out to phones running on the Beta software. Google says that the system is “near-final” and is labeling it as a “release candidate build” — so what we see here shouldn’t be far off from what’s finally unveiled as the official version.
If you’re clamoring to get Android P on your own phone, there are several ways to do it — the easiest is to simply wait a few hours and receive an OTA update. But you can also download and install the software manually if you wish — we have full instructions on how to do so.
Android P
- Android P: Everything you need to know
- Android P Beta hands-on: The best and worst features
- All the big Android announcements from Google I/O 2018
- Will my phone get Android P?
- How to manually update your Pixel to Android P
- Join the Discussion
How to manually turn on dark mode in Android P
Let’s do this thing.

Beta 3 / Developer Preview 4 for Android P is officially here, and while it’s not a drastic change over the previous version, there is one highlight feature worth pointing out — a manual dark mode. Google told us this was coming in mid-June, and now that that day has finally arrived, we’re here to tell you just how to enable it.
In order for this to work, you’ll need to have a Pixel phone running the latest available version of the Android P beta (currently Beta 3 / Developer Preview 4). Assuming you do, manually turning on dark mode is pretty simple.
Open Settings.
Tap Display.
Tap Advanced.
Scroll down and tap Device theme.
Tap Dark.


By default, the device theme is set to Automatic (based on wallpaper) like we’ve had since the Pixel 2 came out last October. However, with this latest version of the Android P beta, you can manually toggle the dark or light setup no matter what wallpaper you have.
As it stands, device theme changes the appearance of your app drawer, quick settings panel, folders, Google Feed page, the outline surrounding the Google Search bar and app shortcuts when viewing your recently opened apps, and the power menu/volume level popups.
Now, only one question remains — light or dark?
Android P features we love: Better, faster biometrics
Android P
- Android P: Everything you need to know
- Android P Beta hands-on: The best and worst features
- All the big Android announcements from Google I/O 2018
- Will my phone get Android P?
- How to manually update your Pixel to Android P
- Join the Discussion
Apple Seeds Third Beta of macOS 10.14 Mojave to Developers
Apple today seeded the third beta of an upcoming macOS Mojave update to developers for testing purposes, two weeks after releasing the second beta and a month after introducing the software at the Worldwide Developers Conference.
macOS Mojave introduces a new method of installing software updates, so after you’ve installed the appropriate profile from the Apple Developer Center, additional betas can be downloaded clicking on the Apple in the menu bar, choosing “About This Mac” and clicking “Software Update.” Alternatively, open System Preferences and choose the “Software Update” icon.
The macOS Mojave update brings a long-awaited systemwide Dark Mode, with Mojave users able to choose between a light theme or the new dark theme. Dark Mode is accompanied by Dynamic Desktops, aka wallpapers that subtly change throughout the day.
Stacks, a new Desktop organization system, keeps all of your desktop files neat and organized, while Finder has been enhanced with a Gallery View, a Sidebar, a revamped Quick Look option and Quick Actions, so you can do more in the Finder window than ever before.
Screenshots can now be edited using Markup tools, while Continuity camera, a new feature, allows you to import photos and document scans directly from the iPhone to the Mac.

Apple News, Stocks, Home, and Voice Memos apps have been ported from iOS to macOS as part of a multiyear project Apple is working on to make it easier to bring iOS apps to Macs, and Apple has introduced several privacy protections to keep your data safer.
Apple is also making it harder for websites to track you with a range of new tools, plus there’s an entirely revamped Mac App Store that makes it easier to discover apps.
Related Roundup: macOS Mojave
Discuss this article in our forums
How to Organize Your Mac’s Desktop With Stacks in macOS Mojave
If you’re someone that has a lot of files on your desktop, you’re going to love the new Stacks feature in macOS Mojave, which is designed to organize all of your files into neat little piles on your desktop, getting rid of clutter.
Unfortunately, Stacks is an option that’s limited to the desktop and not available within individual file folders.
Subscribe to the MacRumors YouTube channel for more videos.
Enabling and Disabling Stacks
Toggling Stacks on and off is done with just a couple of clicks on the desktop. When at the desktop, right click to bring up the desktop options menu, and then choose the “Stacks” option.

You can also use the Finder to enable Stacks.
Open a Finder window.
In the menu bar at the top of the Mac, go to View.
Check the “Use Stacks” option. 
Turning on Stacks will automatically organize your files by file type. Some of the available Stacks include documents, images, PDF documents, spreadsheets, other, and screenshots.
 Files on the desktop before enabling Stacks.
If you want to turn Stacks off and go back to a full view of all the files on the desktop, right click again and uncheck the Stacks option. Alternatively, reverse the Finder steps.
 Files on the desktop after enabling Stacks.
Viewing Files in a Stack
If you want to view all of the files that are contained within a Stack, just click, and it will expand the Stack and put a little arrow on the Stack’s name so that you know which Stack you’re viewing.
With the Stack expanded, if you click on a file, it will open up in whatever app is set to be the default app for that file type.
 Click on a stack to expand it to see the files inside.
When done, click the Stack again to collapse it back down into an organized pile.
To open up all of your Stacks at once, option click on the any Stack, which will expand all of the desktop Stacks at once. Option click again on any of the open Stacks to close them all.
 Option click on any Stack to expand all Stacks.
Tip: If for some reason you want to open up or close all of your Stacks with a slower expanding/collapsing animation, shift click instead of just clicking regularly.
Customizing Stacks
Stacks are organized by file type by default, but you can change the Stack organizational system, grouping your files by Date Last Opened, Date Added, Date Modified, Date Created, and Tags.
Open Finder.
In the menu bar, click on the View option.
Select the “Group Stacks By” option. 
Choose one of the available options to change the way your Stacks are sorted.
The most powerful sorting option in Stacks is of course Tags, which are user set and can be used to identify certain types of files, such as all documents relating to a specific topic.
When grouped by one of the date options, Stacks will be listed in increments of Today, Yesterday, Previous 7 Days, Previous 30 Days, and then after that, by year.
 Stacks when sorted by creation date.
Further Stacks Options
If you want to stick one of your Stacks into a folder, you can do so by right clicking on one of the Stacks and selecting the “New Folder With Selection” option.

Using the same right click options that are available when a Stack is selected, you can open the files, open them in a specified app, rename files, share files, compress files, send files to trash, and more. You basically have all of the same organizational options that you would have selecting any group of files on your desktop, but without the need to select them manually.
Related Roundup: macOS Mojave
Discuss this article in our forums
Huawei might be making a powerful phone for mobile gamers
Andy Boxall/Digital Trends
Razer wasn’t being crazy when it made the gaming-focused Razer Phone — turns out it was ahead of the curve, and making a smartphone that’s optimized for games is apparently the new hotness, with both the Asus ROG Phone and the Red Magic Phone on the horizon. Huawei is apparently looking to be the latest addition to that list, and rumors say that the Chinese company will be looking to release a gaming-themed smartphone. While details are scarce, here’s everything we know about Huawei’s gaming phone.
Software
It’s safe to expect that Huawei’s proprietary software will feature heavily in this phone, and we expect the recently released GPU Turbo addition will play a central role in keeping this gaming phone ticking. According to Huawei, GPU Turbo will boost the gaming efficiency of Huawei’s Kirin chips by 60 percent, while also cutting battery consumption by a third. That makes for impressive reading, and according to some sources, Huawei will be further optimizing and advancing that same tech for its gaming phone.
What could that mean for Huawei’s gaming phone? We haven’t had chance to get our hands on the GPU Turbo update yet, but if it’s anywhere near as a revolutionary as Huawei claims it to be, and can make a mid-range phone pulls the sorts of framerates you’re more used to seeing on a flagship device, then seeing it used on a device made just for gaming could be incredible.
Specs
As you might expect from a gaming-focused device, Huawei’s gaming phone is likely to have some pretty impressive specs. It’s safe to expect that it will either equal or exceed the specs of the Asus ROG Phone, and since that includes the extremely powerful Snapdragon 845 and 8GB of RAM, that’s already plenty powerful.
Since the Huawei gaming phone is expected in the later months of 2018 at the very earliest, it’s possible that the phone will come packed with a newly upgraded version of Huawei’s proprietary Kirin processor. The Kirin 970 chip, used on the Huawei P20 Pro, is already pretty darn powerful, sitting between the Snapdragon 835 and 845 in terms of benchmarking results, and delivering strong performance. An upgraded version of the Kirin chip could be enough to top the Snapdragon 845 in terms of raw power, and deliver a show-stopping performance.
Release date and price
Like most of this phone, we don’t know a huge amount about the planned release date yet. According to an interview with Huawei Consumer Business President Jim Xu, Huawei is aiming to have this phone released by the second half of 2018. That’s a pretty big ballpark, and considering we’re already more than halfway through the year already, it might be safe to assume that it’ll be further towards the tail end of the year.
We know even less about the planned price. Since it’s likely to be a device with high-end specifications, it’s not unfair to expect this device to push into the upper echelons of flagship pricing — $800-$900 might not be far off.
Editors’ Recommendations
- Huawei’s got a free way of turning your phone into a monster gaming machine
- Here’s everything you need to know about the Huawei P20
- Huawei MateBook X Pro review
- Asus ROG Phone shrinks your gaming PC and puts it in your pocket
- Huawei has a clever way to put Windows on phones
Microsoft’s Surface Tablet clears final hurdle before launch
The Federal Communications Commission (FCC) has cleared the way for Microsoft to launch its rumored low-cost Surface Tablet in the United States. The publication of the Surface Tablet’s regulatory filing documents by the agency suggests that not only is a launch imminent, but also reveals some details about the slate that we did not know before. Microsoft requested that the FCC keep details about its Surface Tablet under “short-term confidentiality” until December 28, 2018, so we can expect the slate to launch before the year is over.
Microsoft’s documents with the FCC simply refers to the device as Model 1824 and describes it as a portable computing device, a term that Microsoft had used in the past to describe its mobile Surface products. And although it was previously speculated that Microsoft would switch to Qualcomm’s ARM-powered Snapdragon processor for the low-cost Surface Tablet, this might not be the case. FCC documents show that Model 1824 comes with a separate Wi-Fi/Bluetooth communications module by Qualcomm, suggesting that this new device will use a separate processor, likely an Intel-based one. If a Qualcomm Snapdragon processor had been used, these radios would have been integrated into the system-on-a-chip (SoC) design, negating the need for separate radio modules, WinFuture commented.
Microsoft had used both ARM-based and Intel’s low-powered x86 architecture on its low-cost Surface in the past. The Surface RT debuted with an ARM-based Nvidia Tegra processor, but it failed to take off since it was not capable of running the full version of Windows 8 at the time. For the Surface 3, Microsoft switched to a low-powered Intel processor, which brought full Windows 8.1 support to the hardware, but users complained about the sluggish performance of the processor compared to faster mainstream Intel Core i-series chipsets.
Prior to the release of Microsoft’s FCC filing, the Surface Tablet was believed to have switched back to an ARM-based design as part of Microsoft’s Always-Connected PC push with optional LTE connectivity. Even if the Surface Tablet ships with an Intel processor, battery life shouldn’t be a concern. It’s revealed that the battery that ships in the slate will be the same model from last generation’s Surface Pro 4, but with a slight difference in voltage.
Microsoft is expected to launch its low-cost Surface Tablet later this year, and the device could help Microsoft compete against Apple’s recently launched iPad and Google’s Chromebook devices in the education market. In addition to the Surface Tablet, Microsoft was also widely expected to launch a dual-screen portable computing device with a codename of Andromeda, but that device was recently reported to have been canceled at the last minute to follow the same fate as Microsoft’s Courier project from nearly ten years ago. Microsoft is also expected to refresh its more powerful Surface Pro detachable hybrid, which could arrive either later this year or early next year. Some reports suggest that Microsoft may update the Surface Pro this year, giving it a more modern processor from Intel, and refresh the design next year with a major overhaul.
Editors’ Recommendations
- Microsoft leak hints dual-screen Andromeda device targets launch later this year
- 5 things the rumored Surface tablet will need to beat the iPad
- Is Microsoft planning a $400 Surface tablet?
- Everything we know about Microsoft’s Surface Pro 6
- Acer Switch 7 Black Edition vs. Microsoft Surface Pro
