


Best Cases for Nokia 2 in 2018

Protect your phone with the best available options
Now that you have your Nokia 2 you want to make sure it’s protected. Another bonus when looking for phone cases is to see if it has the ability to serve as a useful tool for your daily life as well. Sometimes that means sacrificing a bit of the extra protection you might get with other cases, but that is worth it to some of us.
Continue on below to weigh your options for these phenomenal phone cases to see which one is the best for you!
- Linkertech dual layer
- Feitenn Nokia 2 wallet case
- KuGi SS
- Screen protector
Note: This buyer’s guide is for the Nokia 2 (2017), not the newer Nokia 2.1 (2018).
Linkertech dual layer

This case is the closest you’re going to get to something like an Otterbox for your Nokia 2. It comes in two parts, where the inner piece is a thermoplastic polyurethane (TPU) and the outer piece is a hard plastic that clips onto it. TPU is a semi-hard silicone used in cases to protect your phone better from accidental drops by providing shock-absorption. One of the amazing parts is that you’ll be getting this dual-layer protection without the case making your phone too bulky.
While there isn’t much in the means of added features, the Linkertech case does come with a built-in kick-stand. That means you’ll be able to prop up your phone to watch some movies. But, the best part of this phone case is that you can get it for just $7.95 on Amazon in the colors black, red, or blue!
See on Amazon.
Feitenn Nokia 2 wallet case

Here we have the iconic phone case that also serves as a wallet. There is TPU inside of the case that is sealed in with leather, but it is much thinner than you would get in the Linkertech case. With two slots for cards and a larger slot to put some cash inside, the case makes it practical to keep all of your personal items in one holder. While you won’t have the same amount of protection as a thicker case, you’ll certainly be saving yourself a lot of anxiety knowing everything is all in one place.
The Feitenn is perfect for traveling or a night out with your friends. It even has a built-in feature for you to fold the crease and turn it into a kickstand for your phone. It comes in three different colors — black, blue, or orange — that you can find on Amazon for the great price of $8.79.
See on Amazon.
KuGi SS

Lastly, we have the KuGi SS phone case, which offers a decent amount of protection in an almost-unnoticeable design. KuGi SS has a thin layer of TPU coated with a soft material to ensure your case will be almost as thin as your phone and slick to the touch. If you’re the type of person that just wants a basic phone case that gives your Nokia protection and gets the job done, the KuGi is the one for you.
For $8.50 on Amazon you can get your hands on one that’s either navy blue, brown, white or orange.
See on Amazon.
Screen protectors

Last but not least, you want to complete your phone case with some tempered glass. These stick-on options act as a second form of protection to go over the screen of your phone and prevent scratches and cracks. Tempered glass will fit inside all options that were listed and you’ll hardly realize it’s there. This way, the next time you drop your phone and realize you’ve cracked the entire screen, you can take comfort knowing it’s just the second screen.
You can find a 2-pack on Amazon for $6.99 so when the first one gets ruined you already have a backup in your drawer. Trust me, the money spent on getting these cases are well worth the possible hundreds of dollars it will cost to replace the actual screen of your phone. It’s definitely worth the investment.
See on Amazon.
How to download YouTube videos to watch offline

There’s so much to watch on YouTube, you can’t possibly watch it all.
We can stay up from dawn till dusk and we will never run out of YouTube videos to watch, but what do you do when you have to stray from your faithful Wi-Fi? What do you do when you’re going to be out in the countryside with spotty data — or even worse, on a Wi-Fi-less plane? You download some YouTube videos for offline playback, of course.
Downloading YouTube videos to watch offline can save you oodles of data if you have the presence of mind to download while you’re on good Wi-Fi, and in areas where data connections can be spotty as best, offline might be the only real way to watch YouTube. Here’s how — and who — can download videos in YouTube for offline playback.
- Who can download videos to play offline
- How to download a video to play offline
- How to download a playlist to play offline
- How to change your download video quality
- How to schedule offline downloads for Wi-Fi
Who can download videos to play offline

There are two categories of YouTube users that offline playback are available to: YouTube Premium members and YouTube users in select developing countries.
YouTube accepts that in many countries of the world, mobile data is a precious commodity — assuming mobile data is available at all in some places — but YouTube still wants people in these countries to be able to enjoy YouTube. To that end, in over 120 countries/territories around the world, users can download YouTube videos for offline playback without a subscription. This includes most of Africa, Asia, the Middle East and the Caribbean, and in countries like India, YouTube’s offline features are widely used and have some extra features that YouTube offline in YouTube Premium countries do not, like Smart Offline.
See if you live in a country that can use YouTube offline without a subscription

YouTube Premium is YouTube’s subscription service that removes ads across YouTube’s apps and enables premium features, including background playback and offline playback. YouTube Premium also give users premium service on YouTube Music (except in South Korea) and Google Play Music, which makes YouTube Premium the best deal in streaming today. YouTube Premium is $11.99/month for individual subscribers and $17.99/month for a family plan with up to 6 users, and it’s available in the following countries:
- Australia
- Austria
- Canada
- Finland
- France
- Germany
- Ireland
- Italy
- Mexico
- New Zealand
- Norway
- Russia
- South Korea
- Spain
- Sweden
- United Kingdom
- United States
Read more: YouTube Premium is Google’s streaming future
If you’re not on either of these lists, then I’m sorry, but you cannot download videos for offline use through YouTube’s apps. There are third-party solutions of varying legality available to help you download YouTube videos on Android, but we cannot vouch for any of them.
How to download a video to play offline
Should you be lucky enough to have the option of saving YouTube videos for offline viewing, here’s how to start downloading videos.
Open YouTube.
Tap on a video you want to download for offline viewing.
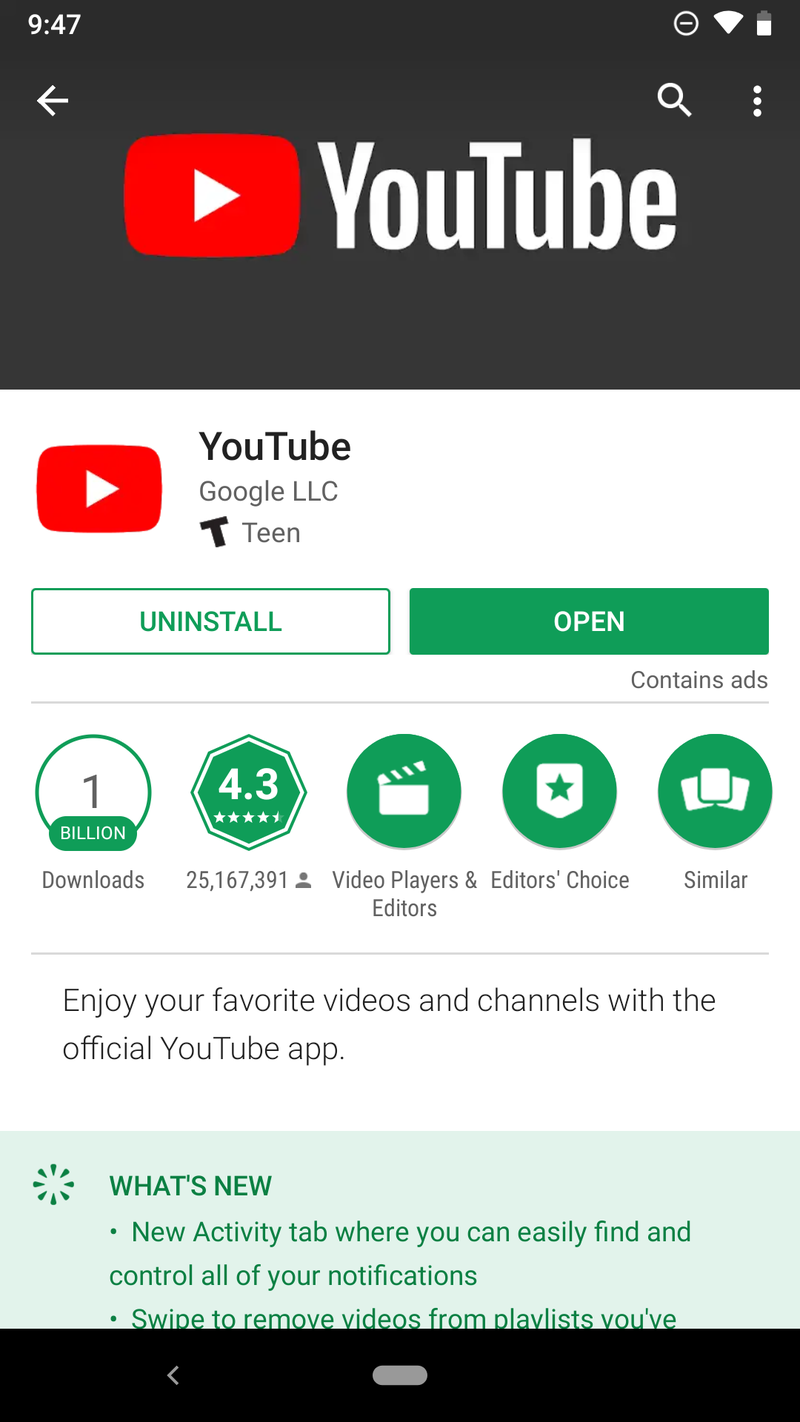

Tap Download, between the Share and Add to buttons below the video’s title.
Tap the video quality you wish to download your video in.
Tap OK.


Depending on the data settings you’ve set for offline videos, YouTube will automatically begin downloading the video or wait for Wi-Fi to begin downloading.
How to download a playlist to play offline
If you’ve got an entire playlist you want to watch offline, you can download that playlist without having to individually download every single video.
Tap on a playlist you want to download for offline viewing.
Tap Download, between the Shuffle and Edit buttons on the playlist screen.


Tap the quality you wish to download your video in.
Tap OK.
A pop-up will appear warning you that downloading a playlist can take a lot of time and data. Tap OK to proceed with the download.


How to change your YouTube download quality
By default, after you pick the video quality for your first downloaded YouTube video, all other videos will download at the same quality, but you can change that quality — or tell YouTube to ask you the quality every time — by taking a quick trip into YouTube’s settings. You can also tell YouTube to download on your SD card if your phone has one.
Open YouTube.
Tap your avatar in the top right corner.
Tap Settings.
Tap Background & downloads.


Under Download, tap Video quality.
Tap the quality you wish to download at, or if you’d prefer to choose every time, tap Ask each time.


If you have a phone with a microSD card, you’ll see a toggle on this same screen to Use SD card for YouTube downloads. If the toggle is blue, videos are downloading to the SD card. You can also see how much space your downloads are taking up by looking at the Available storage bars at the bottom of the screen.
How to schedule offline downloading for Wi-Fi
Not everyone can afford unlimited data plans, so if you want to download videos for offline viewing without burning precious mobile data, YouTube can wait to download that video until you’re off paid data and onto Wi-Fi.
Open YouTube.
Tap your avatar in the top right corner.
Tap Settings.
Tap Background & downloads.
Under Download, tap Download over Wi-Fi only to toggle it on.

Questions?
Let us know in the comments below.
Read more: Everything you need to know about YouTube
Updated July 2018: This article has been refreshed and expanded, especially in regard to what users in what countries can use YouTube offline features.
Grab the Yi Compact 1080p dashboard camera for just $26
You can never be too safe!

The Yi Compact 1080p dashboard camera is down to $25.99 with code COUM4NCB on Amazon. That is $14 off the normal price and the best we’ve ever seen. This deal beats other recent deals by a few bucks.
The Yi Compact has only been around for about a month now but it’s right in line with the other Yi dash cameras as great budget alternatives to far-more-expensive options like the Garmin 65W. With this camera, you get 1080p at 30 frames per second, a 130-degree wide angle lens, and night vision. It has a 2.7-inch LCD screen with easy-to-use navigation. The built-in Wi-Fi lets you connect to the smartphone app that lets you download and share videos. Users give it 3.8 stars based on 247 reviews.
You will need an SD card to record your footage onto, so grab the $23 Samsung EVO Select 64GB card with your new dash cam.
See at Amazon
HTC just had its biggest drop in sales in more than two years
Sales fell by 62% this past June.
It’s no secret that HTC has been struggling for quite some time, but the past few days have been particularly brutal on the company. On July 6, the Taiwan-based OEM announced that its sales for June have fallen by a whopping 62%.
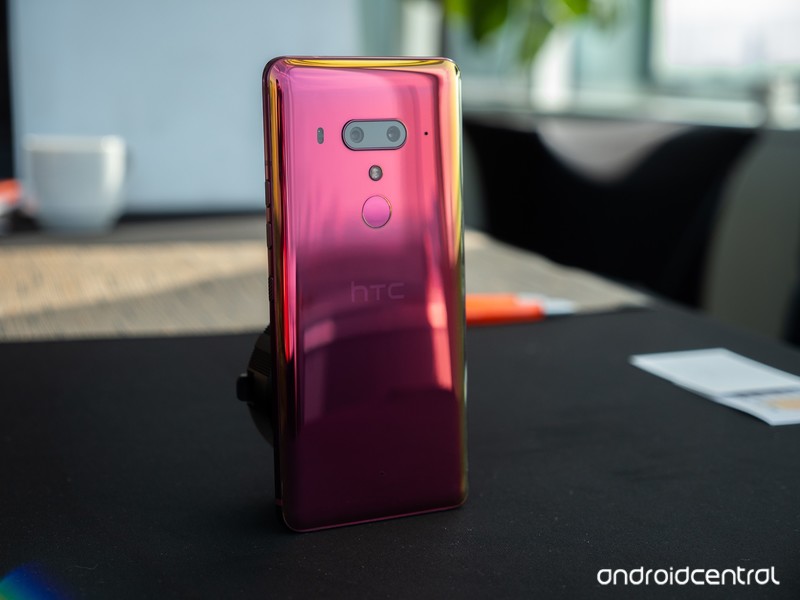
That drop in sales is the biggest HTC’s seen in over two years, with the exact number being $2.2 billion NT compared to $6.9 billion NT from June of last year.
Per an analyst from Trendforce:
In the high-end segment, the sales of their flagship phone this year has been lower than expected, leading to lower market share. As for HTC’s middle-end and entry-level series, the new models feature neither new specs nor high performance-price ratio, influencing the sales.
HTC’s most recent flagship, the U12+, proved to be quite the letdown in our full review. Although it’s a fast performer and has a great design, its poor battery life and game-breaking pressure-sensitive “buttons” result in a product that is far from justifying its $800 price tag.
Just four days ago, HTC also announced that it was laying off 1,500 employees from its manufacturing division in an effort to become profitable.
Things haven’t looked good for HTC for a while, but between the massive layoffs and dwindling sales numbers, the end might be sooner than we thought for the brand that used to be the king of the Android world.
HTC U12+ review: Buttonless blunder
V-Moda Crossfade 2 Wireless Codex Edition review: Exquisite sound, supreme comfort
V-Moda’s Crossfade 2 gets an upgrade for 2018.

V-Moda initially started out with headphones aimed at DJs and music producers, and got its first break in consumer tech making third-party headphones for iPhones and iPods. Over the years, the brand became associated with flamboyant designs that offered a high degree of customization, and that’s the case with its latest product as well.
The Crossfade 2 Codex is an upgraded variant of last year’s Crossfade 2 Wireless that offers AptX and AAC codec compatibility as standard. V-Moda is slotting in the headset at the same $350 price point as last year, and V-Moda is kicking off an upgrade program for those looking to make the switch from its earlier products. This is the Crossfade 2 Wireless Codex Edition.
V-Moda Crossfade 2 Wireless Codex Edition

Price: $350
Bottom line: The Crossfade 2 Codex Edition builds on the standard model by offering AptX and AAC support across all color options. Otherwise, this is the same great headset that V-Moda fans have come to love.
The Good
- Balanced sound signature
- AptX and AAC compatibility
- Extraordinary build quality
- Comfortable fit
- All-day battery life
The Bad
- Mushy volume controls
- Charges over Micro-USB
See at Best Buy

V-Moda Crossfade 2 Codex What I love
As the name suggests, the Crossfade 2 Codex is all about high-fidelity codecs. Unlike the standard Crossfade 2 — which limited AptX compatibility to the rose gold option — all models of the Crossfade 2 Codex feature AptX as well as AAC, bringing improved audio quality to both Android and iOS devices.
When paired with a device that has more than one codec, like the Pixel 2, the headphones will let you choose the codec you’d like to use. And in an event where neither codec is available, the Crossfade 2 Codex will fall back to SBC, the universal Bluetooth streaming codec that’s present on all phones.
Unlike V-Moda’s earlier offerings, the tonal signature is surprisingly balanced, with a wide soundstage comprising of tight lows, clear mids, and crisp highs. Kavinsky’s synthesized vocals in Nightcall are wonderfully detailed, and the bass is powerful while not being too overbearing. Listening to Queen’s A Night at the Opera is a delight — there’s clear instrument separation, and the headset manages to do a great job capturing Freddie Mercury’s remarkable vocal range.
The Crossfade 2 Codex gets incredibly loud — it’s one of the loudest headsets I’ve used — and thankfully the sound doesn’t get distorted at high volumes. I haven’t faced any issues with Bluetooth connectivity either in the week I used the headset.
The Crossfade 2 Codex is built like a tank and fits like a glove.
As for the design itself, the Crossfade 2 Codex features a metal frame with exposed screws on either ear pad. The headset is one of the most durable you’ll find in the market today — it even sports a MIL-STD-810G rating — and it can withstand a lot of abuse. The aluminum frame makes the Codex one of the heavier options in this segment, coming in at 309g.
That said, there’s more than adequate padding around the headband, and the ear pads offer memory foam cushioning that provides a comfortable fit. In fact, the Crossfade 2 Codex fits so snug that I didn’t face any discomfort even after prolonged listening sessions. V-Moda touts a 14-hour battery life, more than enough to last an entire day. I got well over 12 hours of music playback from a full charge, and the battery life should be more than adequate for most use cases.
A 30-minute charge provides up to four hours’ worth of music playback, and a full charge takes a smidgen under three hours. Of course, if you’re running low on battery life, you can always plug in the included audio cable and turn the Crossfade 2 Codex into a wired headset. The Codex becomes an even better headset thanks to the improved frequency response.
As the Codex edition is essentially an upgraded variant of the standard Crossfade 2, V-Moda is rolling out a Da Vinci Codex Upgrade Program that lets current Crossfade 2 owners make the switch for just $100. Those rocking a first-gen Crossfade will be able to get their hands on the Crossfade 2 Codex for $150.
V-Moda is also throwing in custom 3D printed or laser-engraved shields — valued at $70 — for free with every purchase of the Crossfade 2 Codex. You’ll be able to customize the shields over on V-Moda’s website, or walk into a Microsoft or Best Buy Magnolia store to choose from the options on offer.
Talking about customization, there’s a whole range of shields available for the Crossfade 2, ranging all the way up to $26,000 for a set of platinum shields. That may be a bit ostentatious on a $350 headset, but the sheer variety of options available means there’s something for everyone. The Crossfade 2 Codex comes with a standard one-year warranty, and like other V-Moda gear, it is covered by the brand’s Immortal Life program, which offers a 50% discount on a replacement pair should the headset get damaged while out of warranty.

V-Moda Crossfade 2 Codex What needs work
My main issue with the Crossfade 2 Codex is the fact that the music playback and volume buttons aren’t tactile enough. The buttons are located at the top of the right ear pad, and the single button that controls music playback is flanked by the volume buttons. The positioning of the buttons as well as their tactile feedback leaves a lot to be desired, and it’s the one area where the V-Moda lags behind its competitors.
I used Sony’s MDR-1000X for the better part of last year, and its touch-sensitive gesture scheme is still one of the best around. V-Moda could benefit with a similar implementation on upcoming Crossfade models.
Another issue on the Crossfade 2 Codex is that the headset doesn’t automatically power down when you end the Bluetooth connection. The power toggle is located at the bottom of the right ear pad, and unlike the MDR-1000X, you have to manually turn off the headset after a listening session. Having failed to do that the first day, I came back to a headset with a fully depleted battery.
I also dislike the fact that the headset charges over Micro-USB, but it looks like it will be another generation before audio manufacturers make the switch to USB-C.

V-Moda Crossfade 2 Wireless Codex Edition Review
The Crossfade 2 Codex is what the standard model should have been from the beginning. By offering AptX and AAC compatibility, V-Moda is making what is one of the best headsets in this segment even better.
If you already have the rose gold Crossfade 2 and use an Android phone, there’s little reason to pick up the Codex edition. But if you’re using the variant without AptX or use an iPhone along with Android, the Crossfade 2 Codex becomes a much more attractive option.
4.5
out of 5
The Crossfade 2 Codex is one of the best wireless options available today: it is built to last decades, the sound quality is exceptional, and the inclusion of AptX as well as AAC makes it a great choice for both Android and iOS users.
See at Best Buy
Apple Releases Second Beta of macOS Mojave to Public Beta Testers
Apple today seeded the second beta of an upcoming macOS Mojave update to its public beta testing group, one week after seeding the first macOS Mojave public beta. Today’s second public beta is the same as the third developer beta, released earlier this week.
Beta testers who have signed up for Apple’s beta testing program will be able to download the macOS Mojave beta through the Software Update mechanism in the Mac App Store. Subsequent betas are installed in a different way, using the Software Update icon in System Preferences.
Those who want to be a part of Apple’s beta testing program can sign up to participate through the beta testing website, which gives users access to iOS, macOS, and tvOS betas.
Potential beta testers should make a full Time Machine backup before installing macOS Mojave, and it should not be installed on a primary machine because betas are unstable and often have many bugs.
macOS Mojave’s main new feature is a systemwide Dark Mode, which gives Mac users a new way to view the operating system. A revamped Mac App Store makes it easier than ever to discover great apps, while Dynamic Desktops give you wallpapers that subtly change throughout the day.
An improved Finder window with Gallery View, Sidebar, Quick Look, and Quick Actions makes it easier to manipulate, edit, and organize your files, while Desktop Stacks organizes all of the files on your desktop.

The Apple News, Stocks, Home, and Voice Memos apps have made their way to the Mac in Mojave, and for the first time, you can use Siri on Mac to control HomeKit products. Group FaceTime, an iOS 12 feature, is also available in Mojave and lets you chat with up to 32 people at one time.
Apple is keeping your data safer than ever with new security and privacy improvements, and Safari in macOS Mojave makes it much easier to track you through share/like buttons and via your system configuration.
macOS Mojave is compatible with 2015 and newer MacBooks, 2012 and newer MacBook Air, MacBook Pro, Mac mini, and iMac models, the 2017 iMac Pro, and Mac Pro models from late 2013 and mid-2010 and mid-2012 models with Metal-capable GPUs.
Mojave will be available in a beta capacity for the next several months so Apple can work out bugs ahead of a fall release.
Related Roundup: macOS Mojave
Discuss this article in our forums
Review: Tap is a Futuristic Hand-Worn Keyboard That Lets You Type With Gestures
Tap is a hand-worn, futuristic replacement for a keyboard, mouse, and game controller that connects to iPhones and iPads, Macs, and PCs, and other devices using Bluetooth.
Tap fits over your fingers and can be used on any surface, meaning you can do away with a traditional desk, but mastering its use takes some intensive practice that may turn some people away.
Design
Tap is meant to be worn on the left or right hand, with an adjustable ring for each finger. There’s a flexible rubber material for the front of each finger (plus a sensor for detecting movement), with each finger connected via a soft woven cord.
The thumb piece of the Tap is the largest of the bunch and houses most of the electronics, while the adjustable rings for the other fingers are smaller. Tap is meant to fit snugly at the bottom of your fingers, where you would wear a ring. Side note: You’re probably going to have to take off rings to wear the Tap because of the way that it fits.

The woven cord that is between each ring can be pulled tighter or looser, so it’s able to fit a range of fingers. Tap comes in small and large sizes, and will fit many hand sizes.

I have small hands and with the small-sized tap, I was able to adjust the Tap to fit well on all of my fingers. Given that it fits my small hand, it should fit older children and adults alike.

Tap is comfortable to wear, even for longer periods of time, and I didn’t experience any discomfort when using it, aside from some mild cramping from holding my hand in a position it isn’t used to while I learned the Taps to create letters.
The Tap keyboard ships with a nicely designed carrying case that also doubles as a charger that powers the Tap over a micro-USB connection. Battery life in my experience was decent, and I only needed to charge once or twice a week even using it for a couple hours a day.

To charge the Tap, the thumb piece fits onto an inductive charger, while the other finger rings fit neatly onto ring-shaped holders within the case. Everything closes up magnetically for easy travel.

Functionality
Tap is in no way like a traditional keyboard, and learning to use it takes a lot of practice. It’s an entirely new input method that correlates different combinations of finger taps with letters and numbers of the alphabet.
For example, a single tap of the thumb creates an A, while a tap of the index finger is makes an E. Tapping the middle finger creates an I, tapping the ring finger makes an O, and tapping the pinky finger makes a U.
 An “N” gesture, which is a tap of the thumb and index finger.
Other letters are input through increasingly difficult tapping combinations that I’ve found hard to master. To type a K, for example, you tap your thumb and your ring finger, while a B is input using a tap of the index finger and the pinky.
There are some tap letter combinations that I’m not physically able to do. I can’t tap my middle finger and my pinky finger without my ring finger. I’m not sure if this is something that I’d be able to learn with time, but I don’t think so. I also can’t make the Vulcan salute, so I clearly have less finger dexterity than some people and others may not run into this issue.
 A “K” gesture, which is a tap of the ring finger and thumb
I’m not the only one with issues using the Tap with letters that involve the ring finger, because for all of the tricky ring finger letters, there are alternates. I can, for example, create a J by tapping my middle finger twice, a Z by tapping my thumb and pinky, or an A by double tapping my thumb.
Tap’s founder demos how to type with the Tap.
Punctuation and numbers are also built into the tap, with punctuation generally done through a double tap of a standard letter. A single tap of the index and ring finger together, for example, creates an M, but a double tap makes a comma. A single tap of the index finger makes an e, but a double tap makes an exclamation point.
As for numbers, you tap your middle, ring, and pinky fingers to enter number mode, and then the first five numbers correspond to the thumb, index finger, middle finger, ring finger, and pinky. A six is the thumb and the pinky together, a seven is the index finger and the pinky together, and so on. An eight, a gesture that I will never master, is the middle finger and the pinky finger. Unfortunately, there are no default replacements for difficult number gestures.
 The TapGenius app showing progress on learning numbers
Using this device requires a full range of hand motion and a good bit of dexterity, so as far as accessibility goes, it’s probably not suitable for people with a limited range of motion. For those with low vision, though, the Tap has the potential to be valuable because it’s entirely based on finger taps.

Learning to Use the Tap
There’s an iOS app, TapGenius, that’s designed to teach you the finger movements for each letter and number, as well as how to use the Tap as a replacement for a mouse or gaming controller.
TapGenius walks you through the different taps a few letters at a time with several rounds of practice to help you master them. I thought the TapGenius app was smartly designed, easy to use, and fantastic at teaching me how to use the Tap.

To be honest, when I first started practicing with the Tap, I thought that it would take a lot longer (like weeks) to learn than it did. I was impressed with how fast I was able to pick it up and how well I remembered the tap gestures from day to day. Memorizing 26 gestures along with the gestures for symbols and numbers sounded like a daunting task, but it wasn’t.

You’re technically supposed to be able to learn all the taps in about an hour, but it took longer for me. I spent 30 to 45 minutes a day for four days before I got through the entire tutorial system and learned the taps for letters, numbers, and common punctuation. Thanks to iOS 12’s Screen Time feature, I know that it took me just under three hours.
One of the TapGenius tutorials
I learned the Tap in increments of 30 minutes or so because I did sometimes get frustrated with the more complicated gestures, but I looked forward to the practice sessions every day because the TapGenius app is kind of fun. I kept practicing after learning the letters, but it’s still a slow process.
At this point in time, I can do all of the taps for all of the letters, but I can’t do all of them well. Learning the Tap is easy, but I think mastering it is going to be a much, much longer process. I can write with the Tap Keyboard, but it is a slow and tedious process and using the different taps without thinking about what I’m doing for each and every letter is going to take time.
Customizing Tap
Just recently, Tap Systems announced a new TapMapper tool, which is designed to let Tap users create their own custom layouts and TapMaps that can be loaded on the Tap or shared with other Tap users.
 The interface for making a Tap map.
TapMapper supports mappings for different languages, keybinds for games, triggers for controlling devices, shortcuts for coders, and custom inputs for enterprise apps, all of which is going to let the Tap do more than before.

Creating a custom mapping for the Tap can be done on the TapMapper website, and it doesn’t require coding experience. TapMapper supports mapping keystrokes and hotkeys to single taps, double taps, triple taps, and taps combined with shift and switch.
I haven’t delved into this because it’s not for beginning Tap users, but it’s a nice option to have for advanced Tap users.
Tap on iOS
The Tap works as a keyboard replacement just like any other Bluetooth keyboard that you might connect to an iPhone or an iPad, so you can use it for any text input, such as emails, Notes, messages, and more once you’ve learned all the letters, numbers, and punctuation.
 The TapManager app.
In addition to the TapManager app for iOS to manage the Tap, check battery level, changing hands, and other management features, and the app for learning to use the Tap, there are several games that you can download to use with the Tap.

On iOS, the Tap can be used a game controller in addition to a keyboard replacement, but game developers have to build in the functionality, so it’s all Tap-made games that work with the Tap.
Tap Bunny demo from Tap’s founder
There’s a game called TapLoops, where you need to clear rows of circles by using different taps, and TapChase, where you control an character in an endless runner and use taps to jump, dash, shoot, shield, and more. In TapBunny, the hardest of the bunch, you need to use different taps to guide a bunny through a maze, controlling the bunny’s jumps through taps.
Tap on Mac
Tap can be connected to a Mac like any other Bluetooth keyboard, but there are no Tap-specific apps on the Mac. You can use it to type as you normally would so long as you have all of the different taps memorized.
On the Mac, the Tap can be used in place of a mouse, but I gave up on this after about an hour of trying to use it. It’s not a comfortable way to use mouse gestures in lieu of a trackpad or a traditional mouse, and I just couldn’t get the accuracy down even after several attempts.
Using the Tap as a mouse requires your thumb (and the larger thumb Tap) to be in contact with a hard surface, and you drag the thumb piece around as you would a mouse. Clicking is done with various finger taps. For example, a single click is a tap with the index finger, while a right click is a tap with the middle finger.
Scrolling is done by tapping the ring finger or the pinky, while drag and drop can be done with the index finger and the middle finger.

It didn’t matter how I adjusted the mouse sensitivity, using the Tap as a mouse was uncomfortable, imprecise, and frustrating, plus leaving mouse mode on would occasionally interfere with keyboard mode, so I just turned it off all together.
With Tap on Mac combined with Tap maps, custom maps for games like Fortnite can be created, as seen in the Fortnite demo video below.
Tap Issues
At this point, I know all of the gestures to make a particular letter, and with a few notable exceptions, I’m decent at executing them. Unfortunately, the Tap isn’t always decent at recognizing them. There are instances where I am definitely using the right taps, but it’s not detecting the proper letter.
I don’t know if this is a Tap issue, an issue with how I happen to be holding my hand, a failure to do the gesture in exactly the way the Tap wants, or something else, but it’s definitely a frustration I’ve noticed.
In videos, Tap is demonstrated on both hard and soft surfaces, like a leg. I’m not sure if using Tap on soft surfaces is something that comes with practice, but I had a much harder time using it on a malleable surface than on a tabletop. On a soft surface, it wouldn’t register certain gestures or it would misread them, but it’s entirely possible that soft surfaces need to be adapted to much like learning the Tap in the first place.
I never was able to successfully or reliably use the Tap on a non-hard surface though, even after good two weeks of practice.
All of the Tap apps need updating and have rather poor interfaces. The TapGenius app, for example, hasn’t been updated for the iPhone X, and some features of TapGenius (word per minute count) don’t work for me on iPhone. TapGenius was, overall, still a great learning tool, though.

The games were a nice proof of concept, but nothing that I’d spend more than a few minutes playing. As far as the Tap apps go, the games had the best design for sure, especially Tap Loops.
Bottom Line
The average person probably isn’t looking to replace their current device keyboard with a wearable option that’s somewhat inconvenient, difficult to master, and slower to type with, so the Tap is definitely a niche product.
People who like unique keyboard setups, those interested in new technology, and people delving into wearable computing may want to take a look at the Tap, because this may be how we’re all going to be interfacing with our devices when wearable computing options like AR headsets become more common.

In a world where wearable computing is the norm, a gesture-based solution like the Tap has the potential to offer more utility and convenience than a tethered hardware option. Right now, though, the Tap is something of a novelty and it’s not a necessity for our devices with clear built-in hardware-based control methods. The exception, of course, is when it comes to accessibility — for people with low vision, the Tap could be an appealing keyboard alternative.
The Tap is not without problems, including its frustrating mouse mode, its trouble with soft surfaces, and its penchant for getting some letters wrong, but these are software issues, not hardware issues, and can likely be worked out as the Tap matures.
I enjoyed learning to use the Tap thanks to the clever tutorial software, but I can tell that it’s going to take me a lot more practice to type even a third as fast as I can with a traditional Mac keyboard. And, honestly, I don’t think I’ll ever reach Mac-like typing speeds (80-100WPM), but some people can type at speeds up to 60 words per minute.
For anyone interested in trying the Tap, it’s worth noting that a good amount of hand dexterity is required. I’m still learning to master certain gestures because my fingers just don’t work that way (I have no motor problems), and I can’t quite tell if that’s something that will improve with more practice.
Tap is difficult to recommend to the average person because of its learning curve (plan to spend weeks, if not months mastering it) and its price point ($180), but I think it’s absolutely going to appeal to some people out there, and it’s definitely an intriguing piece of tech for those who like novel products.
How to Buy
The Tap can be purchased from the Tap website for $179.
Discuss this article in our forums
What is white balance and how do you change it?
Gannon Burgett/Digital Trends
White balance is a term you’ll come across often while taking photos. To help you better understand what white balance is and isn’t, and how to set white balance, we’re breaking down the basics so you can snap better photos in whatever lighting conditions life throws your way.
What is white balance?
Before diving into what white balance is, let’s get straight what it isn’t. Sometimes the term white balance is used interchangeably with color temperature, but they’re not the same. Color temperature is the measurement, expressed in kelvin (K), of the color characteristics of a given light source — specifically, how warm (yellow/orange) or cool (blue) a light source is. White balance, on the other hand, is a setting within your camera and post-production software designed to ensure the colors in your images look as natural as possible — a difficult task to achieve, as cameras see the world different than we do.
For a little context on where certain light sources fall on the color temperature scale, candlelight measures in at roughly 1,500K while a clear blue sky will register somewhere around 9,500K.
Like any other aspect of photography, there’s no definitive right or wrong choice as to how your white balance should be set. It’s all up to personal preference and can be tweaked to better fit the mood of a particular image or scene. For example, a shot under the changing leaves of fall might be better suited for a warmer tone, while a late-night shot of the blue ocean might be better suited with cooler tones.
That said, there are some basic elements that will help guide you in the right direction so your photos aren’t too extreme in one direction or another.
Camera white balance settings
You may have noticed your camera has a barrage of various white balance modes. The most common are: Auto, Tungsten, Daylight, Cloudy, Flash, Shade, Fluorescent, and Custom. Below, we’re going to run through each of these modes, explaining what temperature they tend to be based on and how they act in various scenes when selected.
Auto (AWB) — As the name suggest, AWB will automatically adjust the color temperature using data pulled in by your camera’s sensors. AWB is a good option if you want versatility or plan on going from one lighting environment to another quickly, but rarely will it get you exactly where you want to be. For those times, you might find a more specific setting more appropriate.
Tungsten — Also referred to as “Indoor” by some manufacturers, Tungsten leans toward cooler tones, except for when used inside when only artificial light is illuminating the scene. Even then though, it can come out a bit cooler than you’d like, but it should get you closer to what you want. Tungsten tends to set the color temperature around 3,200K.
Daylight/Sunny — If you’re shooting anytime the sun is shining bright, be it outdoors or indoors (such as through a window), Daylight mode is your best bet. It’s considered the most neutral of the settings in terms of being on the kelvin scale. Daylight measures in at roughly 5,200K.
Cloudy — Considering cloudy days tend to have slightly cooler tones, the Cloudy setting on your camera will likely add a slight bit of warmth to your images. Cloudy assumes a temperature of approximately 6,000K.
Shade — Like the flash setting, Shade tends to warm the scene up to compensate for the cooler, blue tones that subjects tend to have when hidden away from the sun.
Flash — Whether it’s built into your camera or an external unit, flashes and strobes tend to err on the cooler side of things. It’s for this reason that the Flash preset will warm images up a bit to compensate for the cooler tones of the flash. The flash setting is usually set to somewhere around 6,000K.
Fluorescent — Fluorescent light is one of the more complicated lights to work with, as there are multiple types of bulbs — each with a slightly different color output, and change as they get older. In general, fluorescent bulbs tend to give off a cooler light, so the Fluorescent mode will add a little warmth to your images at around 4,000K.
Custom — Different camera manufacturers have different means of adjusting the custom white balance settings on cameras. Some opt for selecting a specific temperature while others rely on +/- scales on a spectrum. If you’re working in a stable, controlled environment, this is likely your best bet to achieve the most accurate colors possible. Note: Not all cameras offer this option.
For more detailed accounts for each camera manufacturer, be sure to check out the resources available. Sony, Nikon, and Canon offer dedicated sections regarding their respective approach to white balance settings, icons, and adjustments.
Using a gray card
One of the most proven solutions to getting accurate white balance is to use what’s called a gray card. As the name suggests, a gray card is a little piece of paper or plastic that’s 18-percent gray. Along the same lines, you can use a color chart to more accurately assess the white balance and colors in your photos.
They can cost as little as a few dollars (like this color and gray card set from Movo) and will vastly improve your workflow if you plan on editing white balance in post production, which we will explain a bit more below.
Using a gray card is simple. Once you have your card, take it along with you on all of your photo adventures. When you come to a location you plan on shooting, hold the card out in front of the camera, or have a subject hold it in front of themselves. Snap a photo of the card being used and you’re good to go for the rest of the shoot. Just be sure to take another photo with the card in the event the light changes or you switch locations.
How to set white balance
Getting white balance correct in-camera isn’t always easy, regardless of what mode you’re shooting in. Thankfully, white balance can be adjusted when editing images. In fact, even the most basic post-production software is capable of making the required changes, including the hundreds of apps available for download on both iOS and Android devices.
It’s worth noting that the accuracy of the screens and monitors on your devices is of great significance here. If your monitor isn’t calibrated, what looks a bit yellow might actually be more neutral and vice versa. Check out our monitor calibration guide for a rundown on how to get the best colors from your screens.
If you shoot in a RAW format, even on your smartphone, changing the white balance in post-production becomes even easier, as you can actually edit the temperature using kelvin, without losing any quality in the image. JPEG can also be changed, but you start at a central point and can only make it warmer or cooler, not set a specific temperature.
Regardless of whether you’re editing your photo on a desktop program or in a mobile app, the process of changing the white balance will essentially be the same — move a slider left and right to give the color cooler or warmer tones, respectively.
The slider used to adjust white balance will most often be referred to as “white balance.” But there are exceptions. For instance, Instagram calls its white balance setting “Warmth,” while Apple’s in-app photo editor refers to it as “Cast.”
As mentioned above, a gray card can further simplify the process. Most photo-editing programs can automatically change the white balance of an image when a dropper is placed over a black, gray, or white part of the scene. Using a gray card ensures you have a perfectly gray source from which to select the sample point from.
Once you have the correct white balance from the gray card image, you can then bulk edit the remaining images from that particular scene, as odds are it has the same white balance across the board.
A quick tip for perfect white balance
White balance, like many settings in photography, is just as much about personal preference as it is about getting it “right.” Some photographers prefer cooler tones, while others lean toward warmer tones.
If you’re struggling to get the white balance just right in editing software without the help of a gray card, here’s a little trick used by photographer Kirk Mastin. Change the white balance slider as far as possible in one direction. From there, slowly adjust the slider until you reach what you consider to be a natural balance. By seeing the extremes, it helps to isolate the most natural-looking option.
If you want a more advance rundown of white balance and how it affects your images, Pye Jars of SLR Lounge has a wonderful 25-minute video on YouTube. To better understand the other settings on your camera, be sure to take a look at our thorough guide of the buttons and settings available on your DSLR.
Editors’ Recommendations
- Tips on how to take jaw-dropping monochrome pictures with the Huawei P20 Pro
- Cheap plastic perfection: An ode to the MacBook that started it all
- Here are the best (and least likely to explode) hoverboards you can buy
- 13 best road trip cars, from the practical to the drool-worthy
- Red, white, or champagne: These wine fridges will help you sip in style
Watching the World Cup on your phone while at the theater isn’t a good idea
Before the age of mobile phones, perhaps the worst distraction for a theater actor would be an audience member coughing at a crucial moment in the performance.
Today, despite numerous warnings to switch smartphones off before a show begins, actors have to deal regularly with the excruciating annoyance of handsets suddenly going off.
Imagine: “To be or not to be, that is the — RIIIINNGGGG!!! RIIIINNNGGGG!!!”
News from the BBC this week suggests the situation has taken a turn for the worse, with people now happily following the trials and tribulations of their World Cup soccer team while sitting in the front row of a theater during a show.
It happened on Tuesday, July3 at the Theatre Royal in Nottingham, U.K., during a performance of Titanic: The Musical just as England embarked on a nail-biting penalty shootout against Colombia for a place in the quarter finals of the soccer tournament. And worse than simply watching the shootout, they celebrated each England penalty success with an enthusiastic “yesss!” … and fist pumps.
Whereas 15 years ago all actors would likely do about such an interruption was grumble in the dressing room, now they can take to social media to vent their anger.
And that’s exactly what they did.
One of the show’s performers, Niall Sheehy, hit Twitter to let everyone know what had happened, describing the two soccer fans as “the most ignorant audience members I have ever had the misfortune to perform in front of.”
To the two women in the front row tonight who not only followed the penalty shootout on their phone, but also said “yesss” on each goal scored, you are the most ignorant audience members I have ever had the misfortune to perform in front of.
— Niall Sheehy (@niallsheehy) July 3, 2018
In another, Sheehy was even more incredulous, telling the pair to “avoid attending any future theatrical productions.”
And when a cast member signalled “put your phone away” during the bows and you smiled, gave a thumbs up and replied “I know – we won!!”, I think you may have let us all know you are the stupidest woman on the planet. Please avoid attending any future theatrical productions.
— Niall Sheehy (@niallsheehy) July 3, 2018
That apparently caused him some social media strife, prompting another post:
Has a tweet ever been blown more out of proportion?
My phrasing may have been too aggressive re: the audience members. For that, I happily apologise, but I stand by my opinion that they were inconsiderate to others in the audience.
How any of this is newsworthy is crazy!
— Niall Sheehy (@niallsheehy) July 5, 2018
Another actor in the show, Kieran Brown, said he was “dumbfounded” that the two women could behave in such a way during one of the show’s most poignant moments.
Dumbfounded. 2 ladies, 1 older 1 middle aged, slap bang front row clearly watching football on phones during the most poignant moment of lifeboats scene, cheering & giggling like stupid schoolgirls. To say I’m raging is an understatement! They should be marched out in disgrace!
— Kieran Brown (@Kierbro) July 3, 2018
The theater also weighed in, apologizing to both the actors and to any audience members who may have been distracted by the front row shenanigans.
We’re sorry to hear that two audience members last night showed such disrespect by watching their phone during a performance, not only to the actors on stage but also to other audience members. Our stewards are always vigilant, but we also rely on people using their common sense https://t.co/IQGGISvnJD
— TRCH (@RoyalNottingham) July 4, 2018
The incident brings to mind a similar episode in 2014 when an audience member’s phone started ringing during a play featuring Kevin Spacey. The actor, who was on stage for a courtroom scene, reportedly stayed in character and barked at the culprit, “If you don’t answer that, I will.”
Someone’s noisy phone even halted a performance by the New York Philharmonic, while in 2015 actor Benedict Cumberbatch pleaded with audience members to stop filming him when he was on stage.
Pointing out that some smartphone users seem to spend much of their time experiencing one-off events through their smartphone display rather than enjoying them without holding their handsets in front of their face, Cumberbatch said, “I can’t give you what I want to give you, which is a live performance that you’ll remember, hopefully, in your minds and brains whether it’s good, bad, or indifferent, rather than on your phones.”
Editors’ Recommendations
- ‘Avengers: Infinity War’: Everything we know so far
- The best stand-up comedy on Netflix (June 2018)
- How the ‘Avengers: Infinity War’ VFX team made Thanos a movie star
- The best shows on Netflix right now (July 2018)
- Here everything we know about ‘Mission: Impossible — Fallout’ so far
Japan rocket team releases crash-tastic video of latest launch effort
Having witnessed the rise of SpaceX, Blue Origin, and other private space companies, Japan’s Interstellar Technologies decided it wanted to have a bit of that, and set about building their own rocket system.
The trouble is, it’s not very good. Not yet, anyway.
Highlighting just how challenging it is to develop such technology, Interstellar Technologies has so far suffered two rocket launch failures. Out of two rocket launches.
Fortunately, the rockets were unmanned and no one has been injured during the failed efforts.
The latest disaster occurred at the end of last month when its Momo-2 rocket ran out of puff just a few seconds after launch, leaving gravity to do what gravity does so well. Yes, it all ended in a spectacular fireball.
But at least the private space company — founded by Japanese internet entrepreneur Takafumi Horie — can’t be accused of trying to sweep the whole thing under the carpet, as it has just released a video showing the fiery event from pretty much every conceivable angle.
The edited footage shows Momo-2’s short-lived test flight from far away, close up, low down, and high up. There’s even a rocket’s-eye view of the incident, though the video cuts out just before it hits the deck.
Curiously, about halfway through, a dance track fades in, so you might even find yourself tapping your feet during the final couple of explosions.
Not giving up
Interstellar Technologies’ first rocket launch took place in 2017, but engineers lost contact with it after about a minute, prompting them to shut down its engine at an altitude of around 12.5 miles (20 km). It came down in the sea.
The company’s goal is to build a rocket system capable of deploying small satellites in low Earth orbit, a growing market that similar outfits around the world are also exploring.
Interstellar Technologies is the first private space company in Japan to attempt the feat, and despite the setbacks, appears determined to get it right.
“I feel that I would like to keep giving it a shot,” Interstellar Technologies president Takahiro Inagawa told reporters shortly after the early-morning, June 30 accident. Horie also said he was reluctant to throw the towel in, but added, “We have to find ways to improve.”
Editors’ Recommendations
- Japan’s latest attempts at a private aerospace industry goes down in flames
- Get your Sagan on with 60 awe-inspiring photos of the final frontier
- SpaceX nails another launch, but fails to catch the fairing
- SpaceX wins confidence-boosting Falcon Heavy contract with U.S. Air Force
- A luxury space hotel is now taking reservations — if you’ve got $10 million
