


Sonos Adds AirPlay 2 Support to Latest Speakers, Enabling Siri Control and Multi-Room Audio
Sonos today announced that its One, Beam, Playbase, and second-generation Play:5 speakers now support AirPlay 2, as promised.
This marks the first time Sonos speakers have supported AirPlay in general, enabling users to easily stream audio from iTunes on Mac, and virtually any app for iPhone, iPad, and iPod touch, including Apple Music, YouTube, Spotify, Hulu, Pandora, and Netflix, to compatible Sonos speakers over Wi-Fi.
AirPlay 2 in particular allows for Siri to control Apple Music or Podcasts playback on Sonos speakers via iPhone, iPad, iPod touch, HomePod, and Apple TV. For example, one could say “Hey Siri, play Beats 1 Radio in the bedroom,” after the speaker is added to the Home app and assigned to that room.
AirPlay 2 also enables multi-room audio playback for Sonos speakers paired with other Sonos speakers, HomePod, or Apple TVs. Sonos speakers appear in the AirPlay Picker within apps and Control Center on iOS devices.
Sonos said its older speakers do not support AirPlay 2 on their own due to processor limitations, but in the Sonos app, they can be paired with any of the aforementioned speakers to enable support for Apple’s new protocol. An older Playbar paired with a Playbase, for example, works with AirPlay 2.
Sonos initially held out on adding AirPlay compatibility to its speakers due to minor latency issues addressed by AirPlay 2.
Apple first enabled AirPlay 2 in iOS 11.4, released in late May. Sonos is the first third-party speaker maker to support the protocol, to be followed by Beoplay, Bang & Olufsen, Denon, Libratone, Marantz, Naim, and others.
AirPlay 2 support is available through a free software update via the Sonos Controller companion app on the App Store.
Tags: Sonos, AirPlay 2
Discuss this article in our forums
Apple Pay Expected to Launch in Austria in ‘Coming Months’
Apple Pay will launch in Austria in the “coming months,” according to well-known Austrian newspaper Der Standard. The report cites two unnamed sources and says Bank Austria could be one of the participating issuers.
Apple Pay first debuted in the United States in October 2014, and its availability has since expanded to over 20 countries and territories around the world, most recently including Norway, Poland, and the Ukraine:
- United States
- United Kingdom
- Australia
- Canada
- Singapore
- Switzerland
- Hong Kong
- France
- Russia
- China
- Japan
- New Zealand
- Spain
- Taiwan
- Ireland
- Guernsey
- Isle of Man
- Jersey
- Italy
- San Marino
- Vatican City
- Denmark
- Finland
- Sweden
- United Arab Emirates
- Brazil
- Ukraine
- Poland
- Norway
Apple Pay enables users to add a debit or credit card from participating banks to the Wallet app and pay with a compatible iPhone or Apple Watch at stores that accept contactless payments, or in apps and on the web.
(Thanks, Michael and Rudolf!)
Related Roundup: Apple PayTag: Austria
Discuss this article in our forums
Graphic Design App ‘Affinity Designer’ Launches for iPad With Apple Pencil Support
App developer Serif today launched Affinity Designer for iPad [Direct Link], a precise vector graphic design tool that aims to help users create marketing materials, websites, icons, user interface designs, concept art, and more, all without needing to be tied to a desktop computer.
The new app is based off the similarly titled Affinity Designer software available for Mac, and now optimized for iPad with Metal enhancements, full Apple Pencil support for drawing with pressure, tilt, and angle, and iCloud Drive integration for file storage and sharing.
When creating a design, Serif notes that panning and zooming is always live at 120 frames per second, and there are live gradients, transforms, effects, and adjustments available during the creation process. The app supports a split screen mode, wireframe view, and live pixel and retina view of vector artwork.
In terms of color and output features, Affinity Designer for iPad supports the professional CMYK, LAB, RGB, and Grayscale color models, as well as full 16-bit per channel editing and end-to-end ICC color management. Check out more of the app’s features below:
– Seamless switching between tools and editing modes for frustration-free design.
– Advanced Lanczos 3 image resampling plus Bicubic, Bilinear and Nearest Neighbor methods.
– Live effects, blend modes, image adjustments, and raster and vector masks for any part of your design.
– Use the strengths of vector and raster behaviours for the best of both worlds.
– The best pen tool, pencil tool, corner tool, curve editing, geometry operations, and smart shape tools available.
– High quality raster tools for texturing, masking and finishing artwork. Create your own brushes too.
– Artboards, symbols, constraints and stored assets give the ultimate flexibility for UI and graphic design.
In February, Serif updated its Affinity Photo iPad app with a suite of powerful features, including the ability to shoot in RAW or HDR video directly within the app. At the end of last year, Apple awarded Affinity Photo as iPad App of the Year for 2017.
Affinity Designer is available for iPad Pro, iPad Air 2, and iPad (early 2017 and newer) for $13.99 [Direct Link], and requires iOS 11 or later.
Tag: Affinity Designer
Discuss this article in our forums
Toyota picks Hawaii for its first app-controlled ridesharing effort
Toyota
Toyota is getting into the ridesharing game.
The automaker is launching its first service in Honolulu, Hawaii. Called Hui, it will offer customers 50 vehicles at 25 stations spread throughout the city.
It’s operated by Servco — Toyota’s distributor in Hawaii — and works with an app (iOS and Android) that reserves the vehicles and manages accounts.
You can choose from a decent range of cars, too, among them the Toyota Prius, Prius Prime, and Camry XSE, as well as the Lexus RX 350 and RX F Sport. The rental vehicles are parked in marked, reserved stalls for easy pick-up and drop-off, the company said in a message posted on Tuesday. Vehicles need to be returned to the same spot where they were picked up.
Hui vehicles utilize Toyota’s Smart Key Box, which generates a digital key that lets the driver lock and unlock the car via their smartphone, as well as start it up. Rates start at $10 an hour or $80 per day, and top out at $20/$160, depending on the vehicle. Prices include insurance, maintenance, and gas. A provided universal gas card can be used to top up the tank, and drivers are asked to return the car with at least a quarter-full tank so the next driver doesn’t have to waste time searching for a gas station the moment they begin their rental.
Toyota says it’s also considering offering a pay-as-you-go membership plan with higher per-hour and daily rates instead of monthly fees.
Local competition offering similar systems to Hui includes the likes of Zipcar and Enterprise.
Sharing different modes of transportation, whether bicycles, scooters, or cars, is becoming big business across the U.S. and beyond. And now Toyota wants a piece of the pie.
Zack Hicks, CEO and president of Toyota North America, described Hui as “a game-changing way to offer car sharing.”
Hicks added: “The program is simple to use and more convenient than a traditional car rental service, plus typical add-ons like gas and insurance are included in the reservation cost.”
Servco CEO Mark Fukunaga said Hui provides “a new option for Honolulu residents and visitors looking for vehicle access while complementing other existing mobility services such as bike share, ride share, and public transportation, and we are excited for consumers to utilize the technology.”
Editors’ Recommendations
- GM’s Maven car-sharing service is convenient, but we’re not giving up our keys
- Who pays for autonomous driving fatalities?
- Car-sharing service Car2go tootles into Chicago with an advantage over rivals
- Uber vs. Lyft: Which ridesharing app goes the distance?
- 2019 Honda Insight first drive review
iBeat Heart Watch detects when you go into cardiac arrest, is now available
While many wearables and health trackers on the market are capable of tracking heart rate, devices that can detect when there’s an emergency are extremely rare. With the iBeat Heart Watch, which is now available for purchase, users can wear it to not only monitor for cardiac emergencies but to alert first responders when there’s something wrong.
Think of the iBeat Heart Watch as an alternative to Life Alert that’s far better-looking and capable of more. Under the hood of the watch are optical sensors that continuously track a users’ heart rate, along with pulse strength, blood flow, and changes in oxygen — which alerts users when their heart or blood circulation begins to slow down or abruptly stops.
With those sensors, the Heart Watch can recognize when someone has gone into cardiac arrest. If a user is unconscious or unresponsive for more than 10 seconds, iBeat’s 24-hour dispatch team is notified, along with first responders and emergency contacts that the user lists. Thanks to built-in GPS and cellular LTE, both responders and contacts are notified of the user’s exact location.
The companion app features a user dashboard that works in real time to track overall health, activity levels, and a history of any incidents via the watch. You can also input information about any medication you’re on, allergies you have, and any other conditions, which paramedics will already be informed of upon arriving at the scene. This is also where you can set up emergency contacts, who will be alerted via a text message and provided with your current location whenever there’s a cardiac emergency.
You’ll also have access to the Heart Hero Network, which is an app that anyone can download to learn CPR. Once someone goes through its vigorous training, they’ll then be alerted via a push notification if you’re ever in need of assistance while waiting for first responders to arrive. A second person in your area will also receive a notification and will be directed to pick up a defibrillator nearby.
If the issue isn’t as dire, there’s also an Emergency Help Button on the device that can be pressed to get help from emergency services or family and friends. This will prompt the question “Are you OK?” If a user replies “No,” they can choose from several responses including “I’m in danger,” “I’m hurt,” or “I’m bleeding.”
In a demo with iBeat, we got to see the watch in person and thought it looked rather sleek. While the case itself was a bit thick, it fit comfortably on our wrists and felt rather light. It’s also versatile enough that it doesn’t look odd wearing it to the gym or even an evening out. We like that the emergency button is tucked away enough that it’s not an eyesore while also being easily accessible when needed. There’s a variety of watch faces to tailor the watch to your outfit or look. We found the display to be extremely responsive when swiping between menus.
When it comes to battery, the iBeat Heart Watch will last about four days and comes with a charging dock to put the device on when it runs out of juice. But since the device is designed to protect you at all times, there’s also a small battery pack that can be clipped to the watch that holds up to two full charges. Regardless of whether you charge it using the dock or the clip, both will take only an hour to bring the watch back up to 100 percent.
If you’re interested in purchasing the iBeat Heart Watch, it’s available via iBeat’s site. The device will cost you $249, while the app costs $17 per month.
Editors’ Recommendations
- The best fitness trackers with a heart rate monitor
- Polar M430 review
- Asus shows off VivoWatch BP with blood pressure monitoring, GPS, and more
- The Garmin Vivoactive 3 Music adds rockin’ tunes to your favorite workout
- Mobvoi Ticwatch E review
Which Amazon Kindle should you buy: Paperwhite, Voyage, or Oasis?
Looking for a new e-reader? We’re here to help.

There’s no dearth of choice if you’re in the market for an e-reader, with Amazon alone offering four Kindles across various price points. Amazon has been making e-readers for well over a decade now, and in that time the retailer has come to dominate this segment thanks to a combination of hardware chops and an outstanding e-book store.
The current Kindle lineup starts off at $79, and goes all the way up to $269. Whether you’re looking to get started with e-readers or are interested in upgrading to a more feature-rich model, these are the best Kindles you can pick up today.
Kindle

The $79 Kindle has a lot going for it: you get 4GB of storage, ability to stream audiobooks over Bluetooth — the only other Kindle where that option is available is on the top-end Oasis.
The current-generation Kindle is also thinner and lighter than its predecessor, but there are a few drawbacks: there isn’t a backlight, and the pixel density at 167ppi isn’t ideal. The base variant is a decent choice if you’re unwilling to spend over a hundred dollars on an e-reader, but you get so much with the next variant in the series.
See at Amazon
Kindle Paperwhite

The Paperwhite is the default option for a lot of people. It costs $129 — $40 more than the base model — and comes with a backlight, 6-inch 300ppi display, and there’s a cellular option available if you want to download books on the go. The 300ppi display on the Paperwhite is just as crisp as the costlier Voyage or Oasis, and you have the option to adjust the intensity of the backlight.
The back has a soft touch plastic coating that makes it comfortable to hold the Kindle for hours on end, but its weight could turn out to be an issue for some. The Paperwhite is the heaviest Kindle you can buy today, coming in at 205g, and a lot of that has to do with its design. The screen is slightly recessed from the frame, and the large bezels mean the screen is protected in the case of a tumble.
If you’re looking for a Kindle that offers the best value, then the Paperwhite is the one to get. Amazon has mentioned that it will offer the e-reader for just $79 on Prime Day — making it a particularly great choice if you’re looking to get started with the Kindle ecosystem.
See at Amazon
Kindle Voyage

The Voyage is a premium take on the Paperwhite. While it has the same screen size and pixel density as its more affordable sibling, the Voyage is all about refinement. It has six LEDs under the screen that deliver a more uniform backlight — the Paperwhite has four — and there’s an ambient light sensor that automatically adjusts the intensity of the backlight based on your environment.
The LEDs produce a warmer hue, making it more conducive to read on the device for an extended duration of time. The Voyage also has page press buttons that let you turn the page by pressing down on either side of the bezel — and you get decent haptic feedback. The back has an angled pattern that nestles in your hand, and up front, the screen is flush with the body of the device.
At $199, the Voyage isn’t exactly what you’d call affordable, but the form factor and the ambient light sensor make it a compelling option if you’re looking to move up from the Paperwhite.
See at Amazon
Kindle Oasis

The Oasis is Amazon’s flagship Kindle. It is the only one in the lineup to offer water resistance, with the IPX8 certification allowing it to be submerged in up to two meters of fresh water for 60 minutes. That makes the Oasis a great option if you’re looking to read by the pool or in the tub.
The Oasis doesn’t look like any other Kindle, and that’s because of a unique design that sees the internal components located on one side. The design brief for the Oasis was to mimic a book folded in half, and it excels at doing that. Unlike the rest of the series, the Oasis has a brushed aluminum finish at the back. While it isn’t as comfortable as the soft touch plastic, you have the option to accessorize with a fabric case.
The screen resolution on the Oasis is the same at 300ppi, but the e-reader has a larger 7-inch panel. It also has 12 LEDs as well as an ambient light sensor, and an accelerometer that switches the orientation of the screen based on whatever hand you’re holding the Oasis.
If you’re looking for the best e-reader available today, the Oasis should be at the top of your list.
See at Amazon
Pair your e-reader with Kindle Unlimited

Buying a Kindle is just half the story; you’ll want to pick up some books to read on the device. Fortunately, Amazon’s Kindle Unlimited is one of the best e-book lending services available today. You get to choose from over 1 million titles, thousands of audiobooks, and popular magazines.
You’ll be able to save ten books on your device at any given time, and you’ll have to return a book if you want to add more. Kindle Unlimited costs $9.99 a month, but Amazon is currently offering a three-month subscription for just $0.99. That’s a great way to see what the service has to offer and decide if you want to continue subscribing after the trial runs out.
Sign up for Kindle Unlimited
Best Prime Day deals
Amazon Prime

- Benefits of Amazon Prime
- Get a free 30-day Amazon Prime trial
- Top microSD cards
- Top-selling battery packs
- Top charging cables
How to change the theme and accent colors in OxygenOS
Have a OnePlus phone? Here’s how to make it look just the way you want it 👌

The software that comes on OnePlus phones — OxygenOS — does a lot of cool things you won’t find anywhere else. If you’re a customization geek like me, one of the best features is the ability to change the theme and accent color of the user interface to make it look just the way you want.
The default theme that comes equipped on OnePlus phones out of the box doesn’t look bad by any stretch of the imagination, but if you’re ready to start tweaking things to make everything look exactly how you’d like, here’s what you need to know.
Note: This guide applies to the OnePlus 3 and newer.
How to change the theme
Open Settings.
Scroll down and tap Display.
Tap Theme.


If you’ve never changed the theme of your phone, it’ll be set to Default.


OnePlus gives you two options to choose from — Light and Dark — and both change the appearance of your settings page, quick settings drop-down, app drawer background, app shortcuts, and multiple OnePlus apps (such as Phone, Messages, Contacts, Calculator, and more.)
How to change the accent colors
After you’ve selected a theme you like, it’s time to pick an accent color. Although not as drastic as the theme you choose, your accent color choice is reflected in the text/icons in settings, your quick settings icons, volume indicator, app shortcuts text, and in the app drawer.
To change your accent color:
Open Settings.
Scroll down and tap Display.
Tap Accent color.


OnePlus currently gives you eight accent colors to choose from, but the company is testing something in the OxygenOS Open Beta that gives users more pre-made colors and even allows them to create their own custom hue.


If/when this makes its way to the stable build of OxygenOS, we’ll update this post accordingly.
Also, take note that you can only change the accent color with the Dark or Light theme — not the Default one.
Keep on theming! 🎨
Now that you know how to change up the look of your OnePlus phone, what color combos are you going to rock? Let me know what theme and accent color you choose in the comments below!
Everything that’s new in OxygenOS
OnePlus 6
- OnePlus 6 review
- OnePlus 6 vs. OnePlus 5T: How much changes in six months?
- OnePlus 6 vs. OnePlus 5: Should you upgrade?
- These are the official OnePlus 6 cases
- The OnePlus 6 doesn’t work on Verizon or Sprint
- Join the discussion in the forums
The $40 Roav Viva brings Alexa and a 2-port car charger on the road with you
Bring Amazon’s Alexa along for the ride.

Anker’s Roav Viva, an Alexa-enabled 2-port USB car charger, is down to $33.99 for Prime members today at Amazon. This is the lowest we’ve seen it drop, beating previous coupon deals by $5.
The Viva connects to your phone via Bluetooth, and then you connect your phone to your car’s stereo either via Bluetooth or an auxiliary jack. It will use your phone’s Internet to access Alexa’s services and relay them through your car’s speakers. You can access the full-range of Alexa’s skills, including playing your favorite music, getting directions, or hearing the news. You can make and receive phone calls without taking your hand off the wheel. It also has voice isolation via two integrated mics that can accurately identify your voice over other car noises.
The dual charging ports have PowerIQ technology to detect what’s plugged in and deliver the fastest charge. The top of the device has a mute button that makes it easy to turn off the mics if you don’t want Alexa listening to everything you say. Users give it 3.9 stars based on 445 reviews.
This price is exclusive to Amazon Prime members, so if you aren’t already a member, you’ll want to sign up for a free 30-day trial right now.
See at Amazon
Philips Hue: Everything you need to know

Make your lights smarter and your world brighter — or darker.
Smart lights are one of the most simple and visible ways to add some smart home flair to your home, and the smart light system from Philips Hue is one of the best on the market. Philips Hue lights allow us to seamlessly change the brightness and color of a room’s lighting as easily as a tap of a profile on our smartphone or a voice command thanks to integration with Google Assistant and Amazon Alexa.
Whether you’re just beginning to look into purchasing a Philips Hue hub for your home or you’re looking for more new mind-blowing tricks for your Philips Hue to do, we’ve got everything you need to know right here.
What do you need to get started with Philips Hue?

The Philips Hue system offers tons of different sizes and styles of bulbs, but no matter how big your house or small your apartment, there are two things you need in order to get started with a Philips Hue system:
- A Philips Hue Bridge, which acts as the hub that all of your Philips Hue lights will connect to and connect to the internet through for updates and away-from-home control via the Philips Hue app. The Philips Hue hub connects to the internet via ethernet port, so make sure there’s one of those free on your router.
- At least one Philips Hue bulb.
Since the bulbs and Bridges can be expensive on their own, Philips Hue sells a variety of starter packs, but your best value will likely be found in the 4 White Bulbs starter kit or the 2 Bulb Dimmer starter kit. The Dimmer isn’t necessary, but it’s nice to be able to control the lights in a room without using your phone or voice, especially in a room like the bathroom or in a child’s room.
Both of these starter kits feature white bulbs rather than the traditional color bulbs, but the color starter kit is $120 more expensive, and considering Philips Hue color bulbs go down to $40 during sales at least once a quarter, so put the A19 Color Bulb on your Amazon Wishlist and wait for a sale.
Set the scene

While you can control individual lights, the best part of configuring Philips Hue lights to my mind is setting up complex scenes that can control all the lights in one room — or all throughout your home — and being able to change them all by activating a scene. Philips Hue lights come with several pre-made scenes, but making your own is a cinch. Here’s how!
How to create a light scene with Philips Hue bulbs
OK Google, kill the lights

Philips Hue lights are great, but having to pull out the app every time you want to change them is a pain. Thankfully, Google Assistant can trigger Philips Hue scenes and change rooms or individual bulbs on and off with ease. There are just a few things you should know before you tie them together.
How to enable Philips Hue scenes and commands with Google Assistant

Nest makes smart thermostats and home security systems, and through the “Works with Nest” ecosystem, Nest and Hue can team up in a lot of helpful ways. Set your thermostat to Away, and Nest can tell Hue to turn off any lights you left on. Nest sensors pick up suspicious activity? Hue will turn on the outside flood lights so the cameras can better see if its a deer or an ax murderer.
How Philips Hue lights work with Nest

Want your lights to tie into your music or movies while you’re entertaining some guests or just want to get super into the latest episode of Westworld? Philips Hue can do that, but there’s an extra device you’ll need for this technological magic.
How to connect Philips Hue lights to your music, movies, or games

There’s a lot of cool things Philips Hue has been adding recently, but not all of those features are going to be compatible with the original round puck that came with older Hue starter kits. Fortunately, Philips includes a feature in the Hue app that makes transferring your lights and settings super easy.
How to upgrade to a new Philips Hue Bridge

Smart lights are part of a smart home, but which smart home assistant works better with Philips Hue, Google Home or Amazon Echo? Here’s how they compare.
Amazon Echo vs. Google Home: Which works best with Philips Hue

Do smart lights sound amazing but you just can’t justify the exorbitant prices Philips charges for its Hue lights? Well, that’s okay, there are plenty of other smart light solutions out there. Here’s what you should get if you just can’t get Philips Hue.
Best Philips Hue Alternatives in 2018
How to Use Finder Quick Actions in macOS Mojave
In macOS Mojave, Apple has introduced a range of new Finder Quick Actions that make it easier for you to perform quick edits to files without having to open the apps associated with them.
To view available Quick Actions, you need to enable the Preview panel in Finder. To do this, open a Finder window and select the menu bar option View -> Show Preview, or press the keys Shift-Command-P.
Quick Actions for Images, Video, and Audio
Quick Actions are located in the bottom right of the Finder window, just under the preview of the selected file. These actions will change depending on the file: For images, clicking Rotate Left turns the image counterclockwise, while clicking Markup invokes an enhanced Quick Look window containing a set of markup tools.
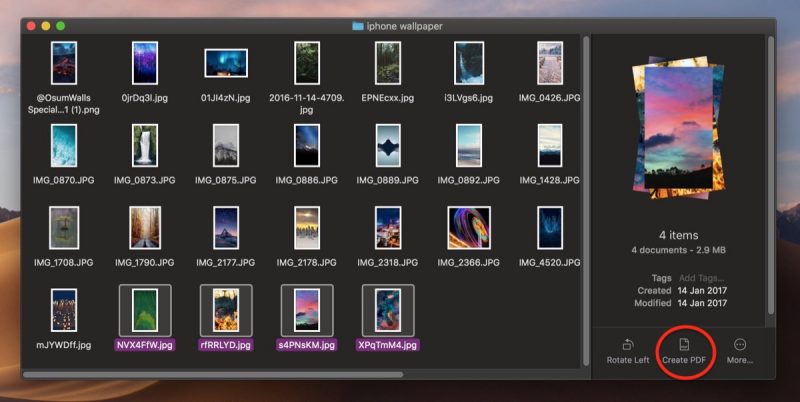
If two or more images are selected in Finder, the Markup button will change to Create PDF, allowing you to turn the images into a single portable document. If a QuickTime compatible video or audio file is selected, Markup will be replaced by Trim. Clicking this brings up a Quick Look window with an editing ribbon to trim the file.
How to Customize Quick Actions
You’ve probably noticed the More… button beside the default Quick Actions. Click this and then select Customize…, and you’ll be taken to the Extensions pane in System Preferences, where you’ll be able to select other actions to add to Finder’s Preview pane.

The actions available to you will depend on which applications you have installed and any pre-existing Apple scripts on your Mac. Apple is encouraging third-party developers to add support for more Quick Actions in their apps, but you can also create your own custom ones using the Automator app. For a useful example, check out our tutorial on how to quickly resize images using your very own Automator service.
Related Roundup: macOS Mojave
Discuss this article in our forums
