


Have a question? Ask it on Instagram with open-ended questions in a Story
Polling public opinion is getting easier than ever on Instagram. The photo-sharing app is constantly introducing new features and its latest is the ability to ask questions in Instagram Stories. While users already have the option of adding yes/no polls and multiple choice questions to their ephemeral content, as well as emoji sliders (where you literally slide an emoji on a scale to express your emotion), this is actually the first time that Instagram is letting folks pose open-ended questions to their followers.
Unlike the previous options, the question feature allows users to ask questions that could have extremely lengthy answers. Rather than asking your followers whether or not your outfit is flattering, you can delve deeper, perhaps inquiring as to the meaning of life (though you probably shouldn’t expect particularly illuminating answers … we are, after all, on Instagram). Your followers can also respond in as many characters as they like (because this isn’t Twitter).
As Android Police notes, the feature is not yet available to everyone quite yet, as only a handful of people seem to be experiencing the open-ended question option. That said, it does seem to be rolling out internationally — users in both Indonesia and Spain have spotted the open-ended question.
It’s not entirely clear as to exactly how responses are received. Do they land in your inbox? Will all answers be combined and then sent to you as part of the Story? Currently, if you post a Story, fellow users respond via direct messages (which are, of course, located in your inbox). But as Instagram continues to make its Stories more interactive, it could be the case that responses will be made somewhat collaborative, and turned into a Story of their own.
Instagram has not officially confirmed that it is testing the feature, but based on the reports we have seen thus far, it seems quite clear that the Facebook-owned platform is already well on its way to seeing what else it can do to improve its interface. Of course, we will keep you posted as we learn more about open-ended questions in Stories, and may just have a few questions of our own to ask.
Editors’ Recommendations
- U.S. senators question Amazon about transmission of recorded private conversation
- DNA link to Golden State Killer raises questions of privacy versus safety
- MoviePass moving back to 1-per-day model amid questions of profitability
- Police blame Tesla crash on distracted driving, not tech, though questions remain
- How to post GIFs on Instagram
Developers may have been reading your private Gmail messages
Even though Google does not allow its employees access to your private emails, the same stringent privacy policy does not extend to third-party developers. In addition to being able to read your full emails in Gmail, Google also gives developers access to details like the recipient’s address and time stamps, The Wall Street Journal reported. However, it doesn’t appear that any user information has been misused at this time.
If you have used a Gmail plugin for price comparison, travel planning, or other tools, your emails may have been exposed to outside eyes. Google claims that it vets all third-party developers before granting access to its users’ emails, and that the user’s permission is required. The problem is that the request for permission often doesn’t state whether you’re granting access to your emails to a human or a computer. “The vetting process involves checking whether a company’s identity is correctly represented by its app, its privacy policy states that it will monitor emails, and the data that the company is requesting makes sense for what the company does,” according to The Verge.
In one example, Google partner Return Path scans more than 100 million emails a day sent and received by Gmail users using its computer network, but its employees also read more than 8,000 emails to train the software, the Journal noted. Return Path claims that its algorithms can detect personal emails and discard those from its system. Initially, the algorithm mis-categorized personal emails, and so two data analysts spent several days reading 8,000 emails to train the system to properly label emails. Another Google partner, Edison Software, claims that it needed access to emails to develop the artificial intelligence to build its smart reply tools.
Gmail isn’t the only email platform that allows developers access to users’ emails. Microsoft and Verizon’s Oath — which owns Yahoo — also provide similar access to third-party developers. As with Gmail, developers tapping into Microsoft’s and Oath’s services must ask for user consent. Though privacy may be a concern, some of these apps provide a valuable service in exchange for access to emails. Earny, a partner of Return Path, offers an online price adjustment service when it finds a lower price. By being able to scan your inbox for receipts, Earny can save users money and time when comparison shopping.
Still, Gmail’s app crisis comes on the heels of Facebook’s Cambridge Analytica scandal, which brought public scrutiny to how platforms manage, maintain, and share data with third-party partners. For its part, Google announced last year that it would stop scanning your Gmail as part of its targeted ad service. Instead, Google said its computers will continue to scan your emails as part of its efforts to deliver artificial intelligence-powered features, like smart replies, as part of Gmail’s major overhaul.
Editors’ Recommendations
- Need a nudge? Gmail’s new email reminder system goes live
- Here’s how to get the new Gmail right this second
- Google will soon be able to write your emails for you
- Some Gmail users woke up to find spam sent from their accounts
- Gmail’s new confidential mode is finally rolling out. Here’s how to use it
Best Screen Protectors for Samsung Galaxy S9

Keep your Galaxy S9 display safe and scratch-free
With every unboxing of the Samsung Galaxy S9 comes the inevitable debate of the best way to keep this beautiful (and expensive) phone safe. Some people are content with just “being careful” with their phone to avoid scuffs and cracks, but the rest of us are better off staying safer than sorry.
But protecting the curved display of the Galaxy S9 is no easy task — tempered glass offers the best protection but a PET film can generally flex around to the edge of curved displays better. There’s also a price difference so there’s a lot to consider when you’re buying.
Whether you prefer tempered glass or a flexible film, these are the best screen protectors for the Samsung Galaxy S9.
- Whitestone Dome Glass
- Zagg InvisibleShield Glass Curve Elite
- amFilm Tempered Glass Screen Protector
- Spigen NeoFlex Screen Protector (2-pack)
- IQShield Case Friendly Film Screen Protector (2-pack)
Whitestone Dome Glass

The Whitestone Dome Glass screen protector is another option that’s been getting people talking. The big selling feature for this wet install screen protector is its unique curing process, which uses UV light.
It’s proven to be a very popular screen protector and is currently on sale for $45, down from $60. Check out this review and installation guide to get an idea of how this tempered glass screen protector uniquely adheres like no other screen protector you’ve seen before. If the worst case scenario has already occurred and your screen is cracked, think of this as a second chance screen before dropping hundreds of dollars on a proper replacement screen. With a UV light packaged to complete the curing process, this is a pricier option than other screen protectors out there, but based on video review and reviews on Amazon it’s an early favorite. I guess time will tell how well the Whitestone Dome Glass holds up in real-life use.
See at Amazon
Zagg InvisibleShield Glass Curve Elite

Zagg consistently delivers top-quality screen protectors for all the latest devices, and it’s no different for the Galaxy S9 and S9+.
If you want a tempered glass screen protector, check out the InvisibleShield Glass Curve Elite. Made with smooth tempered glass, these are precisely designed screen protectors that conform to the curved edges of the Galaxy S9 screen.
Zagg has even added a layer of shock absorbing material to add extra protection from drops. This is a $50 screen protector, but it’s backed by Zagg’s limited lifetime warranty, so if it wears out or gets damaged while you’re using it you can get a replacement sent to you for free!
Zagg also has the InvisibleShield HD film screen protector ($20) if tempered glass isn’t a top priority for you. Both are also available for the Galaxy S9+.
See at Zagg
amFilm Tempered Glass Screen Protector

Whereas the Whitestone Dome Glass might require the most complicated installation process, amFilm has tried to simplify the process by providing an installation guide so you can line up the perfect fit.
The offering here is a curved tempered glass screen protector that adheres to the phone using a silicone gel along the edges and a dot matrix along the majority of the display. amFilm says if you properly install this phone you will get a perfet fit with no clicking, no rainbow effect, and a strong adhesion that won’t peel up. This is a case-friendly option that can be yours for just $12.
See at Amazon
Spigen NeoFlex screen protector (2-pack)

Spigen always makes great cases so it only makes sense that they’d also offer screen protectors that are compatible with cases.
If you’ve got the patience to take the time for a film screen protector with a wet installation, you should be more than satisfied with this two-pack of reliable screen protectors. Because it’s a flexible film, the NeoFlex can offer full protection for your screen without affecting the touch responsiveness. Spigen provides a comprehensive installation video that actually recommends installing the screen protector with your phone in a case to help like things up on the first shot. Didn’t get it quite right? Just peel it back off and try again.
It will take 12 hours for the screen protector to fully adhere so make sure you give it enough time. Get this two-pack from Amazon for just $9.
See at Amazon
IQShield Case Friendly Film Screen Protector (2-pack)

IQShield offers a two-pack of plastic film screen protectors that have been updated to be completely compatible with even the most rugged cases. That’s in part due to these being PET film screen protectors rather than tempered glass.
This is a paper-thin screen protector that you will hardly notice after a clean installation. These screen protectors have an oleophobic coating to help prevent fingerprints and smudges and are easy to install. With over 100 5-star reviews on Amazon, you can buy with confidence. Get your two-pack of case-friendly screen protectors from IQShield for just $8.
See at Amazon
Where do you land on the screen protector debate?
Are screen protectors and cases a must-buy for any new phone you own or do you prefer the naked look and feel? Have you had hands-on experience with a screen protector that others should know about? Let us know in the comments!
Samsung Galaxy S9 and S9+
- Galaxy S9 and S9+: Everything you need to know!
- Galaxy S9 review: A great phone for the masses
- Complete Galaxy S9 and S9+ specs
- Galaxy S9 vs. Galaxy S8: Should you upgrade?
- Join our Galaxy S9 forums
Verizon
AT&T
T-Mobile
Sprint
Update July 2018: Updated pricing information for all of our picks, and removed the Ringke screen protector due to an increased number of poor reviews citing application and sticking problems.
Moto Z Play on Verizon now being updated to Android 8.0 Oreo
The OTA update is rolling out now.
Android P might be the hottest thing in Android right now, but even so, there are still plenty of phones waiting for last year’s Oreo update. Most recently, the Moto Z Play on Verizon Wireless (the Droid Edition) is finally getting the Oreo treatment we’ve been waiting for.

Similar to the Oreo update that landed for the unlocked Moto Z Play in late-May, this brings the Verizon model up to Android 8.0.
Along with that number change, the phone gets picture-in-picture, support for adaptive icons, Google’s new emoji style, smart text selection, and a bunch more.
As for the build number, this is being upgraded to ODN27.76-12-30-2.
The over-the-air update is making its way to handsets now, but if you don’t feel like waiting, you can always manually check for it by going to Settings -> About Phone -> System Updates.
Moto Z3 Play: Everything you need to know!
Android Oreo
- Android Oreo review!
- Everything new in Android Oreo
- How to get Android Oreo on your Pixel or Nexus
- Oreo will make you love notifications again
- Will my phone get Android Oreo?
- Join the Discussion
How to connect Philips Hue lights to your music, movies, or games
You can do a lot more with your Philips Hue bulbs these days, as long as you have the right set up.

Connecting Philips Hue bulbs to my television has been a long-term dream of mine. We’ve seen some third-party apps try to make it work, but the experience has been limited and a little clumsy. With its big UI overhaul, the folks at Philips now have an official way to connect what is happening on your television to the behavior of the lights in your room.
The catch? It requires a PC or a Mac to have the most fun with it. Here’s how to get it set up right from your Android phone, and a quick look at everything you can play with right now!
Philips Hue Entertainment Mode
Any app can control all of the lights in a particular room, but to make it dynamic and interactive Philips created a new color sync mode that makes the app you are using aware of where the lights are in the room. These custom rooms are different from the normal room assignments, and are called Entertainment Areas. When setting up an Entertainment Area, you can choose the lights that are closest to the television and leave the other lights in their default settings, or you can choose a single light behind your television just to add a little depth to your experiences.
Here’s how you get an Entertainment Area set up:

Open the Philips Hue app and tap on the Settings gear at the bottom right of the app
Locate Entertainment Areas in the list and select that option
Choose the room you want to build and Entertainment Area in and tap Continue
Tap all of the lights in the room you want to add and tap Continue
Drag the lights to their relative position in your room based on the diagram on the screen
Tap Test Area to confirm the lights are set up on the diagram correctly
Tap Perfect Match when you have the lights set up correctly
Once you confirm the lights are set up correctly, the Entertainment Area is finished. From here, you can use Entertainment Mode apps to create dynamic lighting based on your experiences.
Using the Hue Sync app
Philips designed the Hue Sync for Windows and Mac to take the information on your screen and turning it into light instructions based on the things you are watching, playing, or listening to. For example, the colors at the top of the screen will be sent to the light behind the screen. The same with left, right, and bottom, all sending color information the lights nearest those positions.
Connect your Mac or PC to your television, and all of a sudden you have a TV which can control your lights. Here’s how to get it set up!

Open the Hue Sync app and select Search for bridge to connect to your Philips Hue bridge.
Tap the big button on your Hue bridge to complete the connection to the app.
Choose the Entertainment Area you want to control with the app and adjust the brightness to match your settings.
From here you have four options. You can use your PC or Mac to control light scenes just like the app on your phone, or you can use the app to pull from video, games, or music. The scene control works exactly the same as it does on your phone, but the other three settings have different rules.

Music mode allows you to choose a color palette and animate to the music you are playing based on that palette. As soon as you select Start Light Sync in the app this feature will animate lights based on all system sounds on your computer.
Games and Video mode take the information from your screen and color the lights, but include intensity modes for you to choose from. This impacts how quickly the lights shift colors, which can be important if flickering lights are a problem for you or those around you. These modes also include a Use Audio for Effect function, which allows you to turn loud bangs or sudden scares into light flashes. Depending on the game you are playing, this can be a lot of fun. It doesn’t work quite as well for all movies, but can be a lot of fun to play with.
How to turn Hue Sync off
Once you’re done with your fun, you can use the Hue Sync app to return everything in your room to normal just by clicking Stop Light Sync in the app. Once you disable the sync, you’ll be able to control the lights from your phone again just like before, so you can set the correct scene back up and no one will know any better. Enjoy!
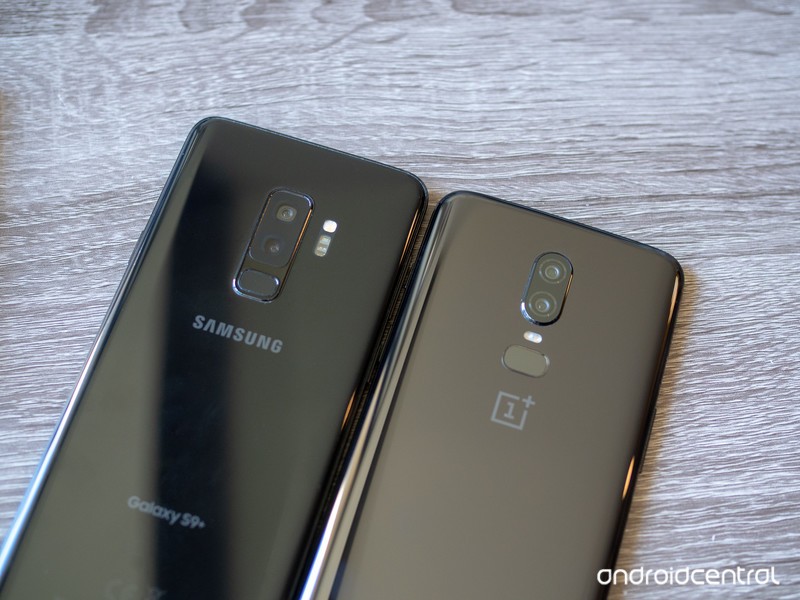
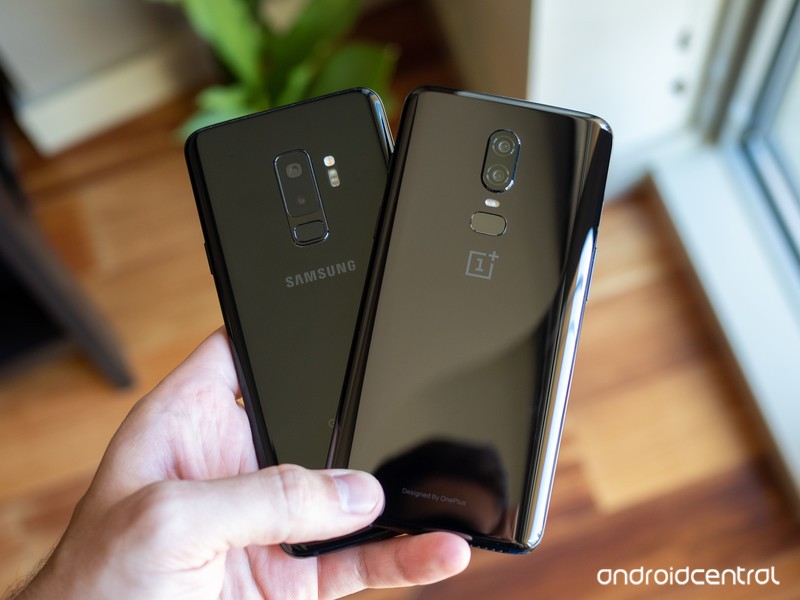
OnePlus 6 vs. Samsung Galaxy S9+ camera comparison: Closer than you’d think
Does an extra $300 buy you a much better camera?
We’ve already compared the OnePlus 6 to the Galaxy S9+ in general, and found the OnePlus 6 to be a formidable opponent to Samsung’s latest despite a $300 difference in price. But with the history of OnePlus phones having mediocre cameras and Samsung phones having great cameras, it’s a good idea to hone in on photography in particular.
OnePlus made a huge leap in camera quality from the OnePlus 5 to the OnePlus 6, but is it enough to also challenge one of the best cameras available today? That’s what we’re here to find out.
Daylight
OnePlus 6 (left) vs. Galaxy S9+ (right) — click to view larger, use ‘left’ and ‘right’ keys to compare
Considering the aggressively mediocre camera offerings in previous OnePlus phones, I’ll admit I had pretty low expectations for this comparison — but after taking daylight shots, I was pleasantly surprised with how well the OnePlus 6 compared to the Galaxy S9+. Scrolling through my Google Photos library or seeing the images I share on Instagram, you wouldn’t be able to tell which shots were from the OnePlus 6 and which were the Galaxy S9+. Both produce images that are fundamentally sound and visually pleasing, with no consistent aberrations or issues that were repeatable from shot to shot.
The Galaxy S9+ takes better daylight photos — but the difference isn’t dramatic.
When you set them side-by-side, as I’ve done here, you start to notice some of the more subtle differences that illustrate where the OnePlus 6 is slightly inferior. Across the board, the Galaxy S9 takes brighter, more colorful shots that take advantage of HDR to make a bit more of an opinionated photo. The OnePlus 6 is a bit simpler, still with strong colors but sometimes not leveraging HDR to the point where it brings out the color and details across an entire scene of mixed lighting (the shot of the monorail tracks above is a great example). When zooming in, you’ll notice the Galaxy S9+ has sharper lines and crisper fine details, which may not be immediately perceptible when viewed normally but do contribute to an overall cleaner look. The Galaxy S9+ is just insanely sharp, even when you get in and pixel peep.
The only knock you could put on the Galaxy S9+ in this comparison is that it still tends to overexpose sometimes, which can over-brighten images to the point where it’s distracting. The OnePlus 6 may not have the high brightness and colors across the board, but the upside is that it never over-brightens photos. The rest of the differences here really are subtle, but when you add them up I feel you still get better photos out of the Galaxy S9+ in daylight — the difference just isn’t dramatic, and that’s a great sign for the OnePlus 6.
Low light
OnePlus 6 (left) vs. Galaxy S9+ (right) — click to view larger, use ‘left’ and ‘right’ keys to compare
When comparing the OnePlus 6 to its predecessor, it was immediately clear that it made a huge stride in low-light photography. I would easily classify the OnePlus 6’s low-light performance as being above average (regardless of price), but that’s not enough to match the Galaxy S9+. The Galaxy S9+ is sharper and clearer across the board, and often brighter with better white balance as well. This applies to fully dark scenes, but also challenging indoor scenes with very dark areas in addition to lighter areas.
The OnePlus 6 has come a long way, but it can’t match the best in the business.
Unlike daylight photos where the differences were mostly in color and brightness, there’s a distinct difference in sharpness and details between these phones at night — zoom in a little on any of the photos and you’ll see why. The Galaxy S9+ is amazing at processing lines and flat surfaces to be incredibly sharp and smooth, sometimes to the point where they almost look unnatural. On the other hand, the OnePlus 6 just doesn’t process things very much, and you get a photo with soft or muddy details by comparison. Take a look at the photo of the flowers above — the OnePlus 6 shot is good, but it’s a little soft and doesn’t have sharp edges on the petals; the Galaxy S9+’s photo is so sharp you can actually see the individual fibers in the weave of the petals … because they’re fake flowers. You can’t even tell in the OnePlus 6 photo.
This is another situation where you wouldn’t likely be unhappy with the OnePlus photos on their own, but in this case if you set the Galaxy S9+ examples right next to them you’d take the GS9+’s shots every time.
Bottom line: Which one is best?
The OnePlus 6 has broken the mold of having a camera that’s “good for the money” — as this comparison has shown, the camera is good without any caveats or qualifications. In situations with ample light, the OnePlus 6 takes consistently great photos with a little punch of color, good details, and adequate brightness. At night, it’s a massive step beyond the OnePlus 5 and worthy of praise considering its basic components and sub-flagship pricing.
The OnePlus 6 deserves applause for what it can do for $529 — but the GS9+ is just better.
But if we start looking at the marginal differences that move the camera from “good” to “great,” like when comparing to a truly great camera in the Galaxy S9+, you can see the OnePlus 6 isn’t quite there yet. In good lighting, the Galaxy S9+ produces colors that really pop and a dynamic range that is outstanding. At night, the Galaxy S9+ has the same level of sharpness, smooth surfaces and fine edges that you get from the OnePlus 6 when it has good lighting — the GS9+ is just amazing at night, and the OnePlus 6 doesn’t match it.
The OnePlus 6’s camera is within a stone’s throw of the Galaxy S9+, and that’s darn impressive when you look at the $300+ price difference between these phones. If you buy a OnePlus 6, you have no reason to be disappointed by the camera — it can take fantastic photos in a variety of situations. But if you want the absolute best camera, the Galaxy S9+ is the one to get out of these two choices.
OnePlus 6
- OnePlus 6 review
- OnePlus 6 vs. OnePlus 5T: How much changes in six months?
- OnePlus 6 vs. OnePlus 5: Should you upgrade?
- These are the official OnePlus 6 cases
- The OnePlus 6 doesn’t work on Verizon or Sprint
- Join the discussion in the forums
Samsung Galaxy S9 and S9+
- Galaxy S9 and S9+: Everything you need to know!
- Galaxy S9 review: A great phone for the masses
- Complete Galaxy S9 and S9+ specs
- Galaxy S9 vs. Galaxy S8: Should you upgrade?
- Join our Galaxy S9 forums
Verizon
AT&T
T-Mobile
Sprint
Everything that’s new in the OxygenOS Open Beta
Wondering what’s new in the latest Open Beta? You’re in the right place.
There are a lot of reasons to like OnePlus phones, but one aspect that’s remained since the beginning is the excellent software experience they offer. All OnePlus phones now run OxygenOS, and if you want to test out new software features before anyone else, you can sign up for the OxygenOS Open Beta.

OnePlus updates the Open Beta quite frequently, with each new version including bug fixes, security patches, and feature galore.
To make sure you never miss a beat, here’s everything new in the beta right now.
July 3, 2018 — Project Treble and a new UI come to the OnePlus 5 and 5T!
Open Beta 13 and 11 for the OnePlus 5 and 5T is rolling out to users now, and it certainly sounds like one of the most exciting upgrades we’ve seen in a while.
Right off the bat, this Open Beta brings Project Treble support to both phones. This is the new update system from Google that allows for much faster turnaound times with new software, so it’s great to see that it’s making an appearance with the 5 series.
Some other big highlights include “a brand new user interface” for the phones and “supported accent colors” (some users think this means support for custom colors, but we aren’t entirely sure quite yet).
Here are some of the other goodies you’ll find:
- Improved search tags in the app drawer.
- A “New installs” category tag in the app drawer.
- Improved app list for hidden space and toolbox.
- Optimized log for the contacts page (Phone app).
- Brand new design + improved user experience for the Weather app and all forecasts are now integrated under a single interface leading to a fully immersive experience.
As always, Open Beta 13 and 11 are rolling out to users incrementally right now and will expand to everyone enrolled in the beta over the next few days.
June 13, 2018 — OnePlus 5/5T and 3/3T get June 2018 Android security patch and camera enhancements
There’s a new Open Beta in town for the OnePlus 5, 5T, 3, and 3T! Here’s what you need to know!
For all four phones, you’ll get the June 2018 Android security patch and bug fixes for the OnePlus Switch app.
Specifically for the 5 and 5T, there’s “camera clarity improvement and optimizations to reduce ‘oil painting effect.’”
How do you install the Open Beta?
If you’ve got a OnePlus phone, enrolling in the Open Beta is fairly simple.
You’ll need to manually download the latest available version for your device from OnePlus’s website and sideload it, but once you do this, any future versions will be sent to you as over-the-air updates.
Harish wrote up a step-by-step guide walking you through the whole process, and I highly recommend checking it out to ensure nothing goes haywire.
How to install the OxygenOS Open Beta on your OnePlus phone
What phones are supported?
Right now, the list of phones supported by the OxygenOS Open Beta include:
- OnePlus 3
- OnePlus 3T
- OnePlus 5
- OnePlus 5T
The Open Beta isn’t available for the OnePlus 6 quite yet, but that should be changing in the very near future.
OnePlus 5T and OnePlus 5
- OnePlus 5T review: Come for the value, not the excitement
- OnePlus 5T specs
- Should you upgrade from the OnePlus 3T?
- OnePlus 5T vs. Galaxy S8: Beast mode
- All of the latest OnePlus 5T news
- Join the discussion in the forums
OnePlus
Amazon
Android P Beta 3 (Dev Preview 4) released for Pixels with subtle design changes, stability fixes
The latest software is available right away for Pixels and coming soon to other phones in the Developer Preview program.
Plenty of us have gotten in on the Android P Beta fun already, but Google has released yet another update to improve stability and fix bugs in the yet-to-be-named new Android release. Android P Beta 3 is now available for Google’s own Pixel devices through the Android Beta Program, which will push out over-the-air updates to anyone who has enrolled or enrolls now. If you have one of the many phones from other manufacturers — like Vivo, Essential, OnePlus and Xiaomi — you’ll have to wait for a little bit to get your update; Google says they’ll be pushing out the latest version “in the coming weeks.”
So what’s in this update? Well as you can imagine at this point, things haven’t changed dramatically from Beta 2. Installing the new software you’ll see very subtle iconography changes throughout the system including the status bar, notification shade and setting screen. The back button is also now a thinner little arrow (but functions the exact same), and the scrub bar area when using the gesture navigation button is nearly the full width of the screen.


Google has already finalized all of the APIs in Android P, which is important for developers who are making their apps compatible with the latest version. (For the developers out there, Beta 3 is analogous to Developer Preview 4.) Google says Beta 3 is focused on “stability and polish,” as well as getting the latest July security patch out to phones running on the Beta software. Google says that the system is “near-final” and is labeling it as a “release candidate build” — so what we see here shouldn’t be far off from what’s finally unveiled as the official version.
If you’re clamoring to get Android P on your own phone, there are several ways to do it — the easiest is to simply wait a few hours and receive an OTA update. But you can also download and install the software manually if you wish — we have full instructions on how to do so.
Android P
- Android P: Everything you need to know
- Android P Beta hands-on: The best and worst features
- All the big Android announcements from Google I/O 2018
- Will my phone get Android P?
- How to manually update your Pixel to Android P
- Join the Discussion
How to manually turn on dark mode in Android P
Let’s do this thing.

Beta 3 / Developer Preview 4 for Android P is officially here, and while it’s not a drastic change over the previous version, there is one highlight feature worth pointing out — a manual dark mode. Google told us this was coming in mid-June, and now that that day has finally arrived, we’re here to tell you just how to enable it.
In order for this to work, you’ll need to have a Pixel phone running the latest available version of the Android P beta (currently Beta 3 / Developer Preview 4). Assuming you do, manually turning on dark mode is pretty simple.
Open Settings.
Tap Display.
Tap Advanced.
Scroll down and tap Device theme.
Tap Dark.


By default, the device theme is set to Automatic (based on wallpaper) like we’ve had since the Pixel 2 came out last October. However, with this latest version of the Android P beta, you can manually toggle the dark or light setup no matter what wallpaper you have.
As it stands, device theme changes the appearance of your app drawer, quick settings panel, folders, Google Feed page, the outline surrounding the Google Search bar and app shortcuts when viewing your recently opened apps, and the power menu/volume level popups.
Now, only one question remains — light or dark?
Android P features we love: Better, faster biometrics
Android P
- Android P: Everything you need to know
- Android P Beta hands-on: The best and worst features
- All the big Android announcements from Google I/O 2018
- Will my phone get Android P?
- How to manually update your Pixel to Android P
- Join the Discussion
Apple Seeds Third Beta of macOS 10.14 Mojave to Developers
Apple today seeded the third beta of an upcoming macOS Mojave update to developers for testing purposes, two weeks after releasing the second beta and a month after introducing the software at the Worldwide Developers Conference.
macOS Mojave introduces a new method of installing software updates, so after you’ve installed the appropriate profile from the Apple Developer Center, additional betas can be downloaded clicking on the Apple in the menu bar, choosing “About This Mac” and clicking “Software Update.” Alternatively, open System Preferences and choose the “Software Update” icon.
The macOS Mojave update brings a long-awaited systemwide Dark Mode, with Mojave users able to choose between a light theme or the new dark theme. Dark Mode is accompanied by Dynamic Desktops, aka wallpapers that subtly change throughout the day.
Stacks, a new Desktop organization system, keeps all of your desktop files neat and organized, while Finder has been enhanced with a Gallery View, a Sidebar, a revamped Quick Look option and Quick Actions, so you can do more in the Finder window than ever before.
Screenshots can now be edited using Markup tools, while Continuity camera, a new feature, allows you to import photos and document scans directly from the iPhone to the Mac.

Apple News, Stocks, Home, and Voice Memos apps have been ported from iOS to macOS as part of a multiyear project Apple is working on to make it easier to bring iOS apps to Macs, and Apple has introduced several privacy protections to keep your data safer.
Apple is also making it harder for websites to track you with a range of new tools, plus there’s an entirely revamped Mac App Store that makes it easier to discover apps.
Related Roundup: macOS Mojave
Discuss this article in our forums
