


Digital Offers: Light the way for $30
Have you ever been filling your butane lighter or picking one up from the convenience store and been like, “man, I wish you could light things without flames and accelerant?” No? Me either, but wouldn’t it be nice to carry around a handy lighter that doesn’t require fuel?
Set all the things on fire for $30 Learn more
The Plasma Torch lighter is a lighter that uses plasma wave technology to create a “flame” that’s even hotter than fire and can’t be snuffed out by the wind. It looks basically like a mini-taser. This is a two-pack, which usually retails for around $200, given the complex technology involved, but at Android Digital Offers, you can get it for $29.99, a savings of 85%.

The Plasma Torch runs off a rechargeable lithium-ion battery and it’s good for over 300 uses. Once dead, it charges up again in about an hour. The best part is that these convenient devices are TSA-approved, so travel is a breeze (you won’t have to chuck it out at security).
This lighter is chemical free, so there’s no harm to you or the environment (unless you touch the hot plasma, so don’t do that). You could pay $200 retail, or you could check out Android Central Digital Offers and save 85% and pay only $29.99.
Set all the things on fire for $30 Learn more
How hot does your Galaxy S8 get while it’s charging?

Several forum members have reported concern over how hot their devices are while plugged into the wall.
Following the Galaxy Note 7 debacle, it seems admittedly easy to cry wolf when any Samsung smartphone becomes even a little warm. But the way forum user, amyf27, describes how hot their Galaxy S8+ got while charging via a USB-C adapter, it’s hard not to be a little curious.
amyf27
05-31-2017 10:05 AM“
Yesterday I was charging my S8+ with a Samsung Micro Usb cord with UsbC adapter, Samsung wall end. Changed fine but got hot. Temp according to the app went to 104.5°. It’s been fine since but that raises a little concern.
Reply
One user noted that the cause for all this might be due to Samsung’s apparent use of QuickCharge 2.0, which is less efficient than later versions and causes more heat to build up.
flyingkytez
06-01-2017 08:26 AM“
It’s using the old version of quick charge, and the old version does got hot from what I remember. If you’re concerned, turn off quick charge and just leave it charging overnight.
Reply
Of course, it’s possible that the reason this user’s Galaxy S8+ is feeling hot is that it is physically hot outside. We’re nearing summertime, after all, and as the weather increases in heat, so will the electronics around us. Here’s your PSA to always use the charger that comes inside the box with your device.
What about you? Have you tried checking the Galaxy S8 or S8+ with an app like CPU-Z, which offers a readout of your device temperature?
Join the discussion in the forums!
Follow iMore for the best WWDC 2017 coverage this week!

See what the other side is doing.
We just had our fun at Google I/O 2017, and now it’s time for Apple to have its turn. WWDC 2017 — the company’s yearly developer conference — is kicking off on June 5, and much like I/O it’s an opportunity for Apple to both show off products and also talk to developers about the future.
Whether you’re seriously interested in what Apple has to show off or just want to get a feel for what’s going on with the iPhone, iPad, Apple Watch and Mac world, iMore will have all of the WWDC 2017 coverage you’ll want to see.
Be sure to check out their rumor round-ups ahead of the show, then check back for the keynote liveblog June 5 at 10:00 a.m. PT / 1:00 p.m. ET!
Follow iMore for its coverage of WWDC 2017!
How to manage the microphone and camera privacy settings on your Chromebook

Because nobody wants to accidentally see you in your underwear.
The WebRTC protocol is a really cool thing. It’s that thing a website can do that lets you use your microphone and camera on any website without installing any extra plugins or using Flash. This is the kind of stuff we need if we want everything on the web to just work everywhere.
But having a microphone and camera active is one of those things that you probably want to only happen when you want it to happen. It’s important to make sure your privacy settings are in order here since every Chromebook has both a mic and a camera. Thankfully, it’s also easy to do once you know where to look.
Finding the settings
By default, your Chromebook is set to ask you when a web page wants to use the mic and camera. That’s good because the setting is buried in the “advanced” section of the settings page. But you still might want to have a look to see what sites you’ve allowed or blocked and change things if they need to be changed.
Click the Notifications symbol inside the status area. That’s the bell in the bottom right corner where your account picture lives.
Click the Settings symbol (the gear), then click Advanced settings.
Click Privacy, you’ll see Content settings.
In the pop-up window that appears, scroll down to find Camera and Microphone. They each have their own settings page, but adjusting things is exactly the same for each.

Changing the settings
- At the top of the window that opens you can choose which device you’re changing settings for. If you have a separate mic or camera plugged into your Chromebook, make sure to adjust the settings for both it and the built-in one.
- Next, you see a switch that says Ask before accessing (recommended). If this switch is on it will be blue and when a website wants to use your mic or camera it will prompt you with a dialog popup that asks for permission before going any further. This is probably what you want to happen, so make sure it’s switched on.
- Next is the Block list and the Allow list. These are websites that you have previously blocked or allowed access to your mic and/or camera. You can remove websites from either list by clicking the X on their list entry.

Unfortunately, there is no setting to allow or block a site just once. When you choose to do either that site is put on the corresponding list and you’re not prompted the next time you visit and the site wants to access your mic or camera. This is convenient for a website like Google Hangouts, but not so great for privacy in general. We suggest that you have a look and which sites can have access every once in a while and remove any that you feel shouldn’t be there.
Chromebooks

- The best Chromebooks
- Should you buy a Chromebook?
- Google Play is coming to Chromebooks
- Acer Chromebook 14 review
- Join our Chromebook forums
Mars rover’s home crater was a potential hotbed for life
NASA landed the Curiosity rover in Mars’ Gale Crater precisely because it promised to be a sort of open book that revealed a lot about the planet’s history. Well, scientists have been busy reading… and it looks like the crater had an intriguing past. Two newly published research papers indicate that Gale was a warm lake for for a period of about 700 million years, ending about 3.1 billion years ago. In other words, it was habitable for a very long time. Even then, groundwater persisted for a long time afterwards.
Water is likely to have arrived in a cold climate, according to the data. When it warmed up, however, the lake split into layers with a warm, oxygen-rich mix near the top. Not surprisingly, life stood the best chance there. After that, you may know the rest — Mars lost most of its atmosphere and the water to match.
The findings suggest that the timeframe for potential life on Mars, at least in Gale Crater, is much longer than previously thought. This doesn’t guarantee that humanity will find fossilized microbes, but the odds are better than before. As Ars Technica observes, life on Earth took “just” a few hundred million years to form after the planet itself was born; 700 million years is a huge window by comparison.
Via: Ars Technica
Source: Science, AGU Publications
After Math: We’re on our own
It has not been a proud week for America, what with the current administration randomly deciding to remove us as signatories to the Paris Climate Agreement and all. Luckily, the United States is still a nation of self-starters and problem-solvers who are willing to stand up, as 100 cities and six states across the country did on Thursday, and pledge to tackle climate change themselves — with or without help from the Feds.
They’re not the only ones, researchers from Keio University have developed a pair of robotic arms to help their user out when nobody else is around while a team from Harvard University showed off robotic shorts that make you run faster. Numbers, because how else would you know which is the loneliest one?
The best immersion blender
By Christine Cyr Clisset & Michael Sullivan
This post was done in partnership with The Sweethome, a buyer’s guide to the best homewares. When readers choose to buy The Sweethome’s independently chosen editorial picks, it may earn affiliate commissions that support its work. Read the full article here.
After spending nearly 30 hours researching immersion blenders, considering 57 models, interviewing two soup-making pros, and then testing some of the blenders over two years (including pureeing gallons of soup, smoothies, salsa, and mayonnaise), we’re confident that you can’t buy a better immersion blender than the Breville Control Grip. It produces smoother textures than any other model we tried. Smart design features, such as a grippy handle, no-suction gasket, and a wider range of speeds, make it far easier to use than the competition.
Who should get this
It’s worth investing in an immersion blender if you make pureed soups. “If you’re pureeing a soup, you could use a blender or a food processor, but an immersion blender just makes it one pot cookery,” the Culinary Institute’s Rudy Speckamp told us, because it’s easy to puree soup directly in the stockpot. Immersion blenders also work well for small batches of mayonnaise, smoothies, pesto, or even baby food.
An immersion blender won’t work for heavier tasks or make the smoothest texture. A food processor, with its various blades and disks, works best for most chopping, dicing, or shredding, and a full-size blender makes much smoother purees and smoothies.
How we picked and tested

For our 2016 update, we looked at three new models: the OXO On Illuminating Digital, Cuisinart CSB-100, and All-Clad KZ750D. We tested these against our previous picks: the Breville Control Grip, KitchenAid 3-Speed, and Cuisinart Smart Stick. Photo: Michael Hession
An immersion blender’s motor needs to have enough torque to create a vigorous vortex so that food circulates in the mixing vessel and passes through the rotary blade multiple times. “If there’s a lot of movement, that’s good,” said Volker Frick, the former executive chef at Kettle Cuisine. “How deep does [the vortex] go? And how quickly does it spit it back up?” An effective vortex will create a smooth puree; a subpar one will leave stringy or chunky bits in soup or smoothies.
Nicer consumer immersion blenders have removable blending wands. For some, this allows you to put the wand in the dishwasher for easy cleanup and to connect different attachments (such as a food chopper or whisk). Higher-end models and those made for commercial use tend to have wands that don’t come off.
For this update, we tested six models–three new models from All-Clad, OXO, and Cuisinart, and three of our former picks from Breville, KitchenAid, and Cuisinart.
We tested each immersion blender by pureeing kale and almonds with frozen raspberries and peaches to make smoothies. We also pureed batches of fibrous parsnip-ginger-almond soup directly in a pot and timed approximately how long it took to reach a smooth consistency. We strained both the smoothie and soup through a fine-mesh sieve to see how much pulp was left over.
We also made small batches of mayonnaise to judge how efficiently the immersion blenders could emulsify, noting how easy they were to hold with one hand while pouring oil with the other. If the blender came with a chopper attachment, we diced a single onion to judge whether the machines could make an even chop without pulverizing it.
Our pick

Photo: Michael Hession
Though it’s on the pricier side (it’s currently about $100), we think that because the Breville Control Grip Immersion Blender is so much easier and more pleasant to use than other hand blenders, it’s more likely to get regular play in the kitchen. It processed the smoothest texture of all the blenders we tried and did it quickly. Rubber grips on the handle and a control button make it more comfortable to hold. It’s one of the only models we tried that didn’t suction to the bottom of a pot or mixing cup. The Breville’s 1,250-milliliter (42-ounce) cup is more than double the volume of cups from the other blenders we tested—enough for two smoothies. Its wider range of speeds and well-thought-out attachments also elevate it above the competition.
In addition to blending well, the Breville was the most comfortable to use, so it was easier to process things that took a few minutes. The pulse button and parts of the handle are covered in rubber, so they’re easy to grip. The Breville seemed to require less torque when moving around a pot of soup than other models.
Though not a necessity, the Breville comes with a selection of high-quality attachments, including a mini chopper, whisk attachment, and a guard for the blade. We’ve appreciated that guard over the past few years, as it makes stowing the blender in a utensil drawer without risking slicing a hand easier.
Runner-up

The OXO On Illuminating Digital Immersion Blender was one of the fastest models we tested. Photo: Michael Hession
We think that the Breville is much easier to use and that it will make you a happier cook in the long run, but we recommend the OXO On Illuminating Digital Immersion Blender as a decent runner-up. It doesn’t blend quite as smoothly as the Breville and it has trouble with fibrous ingredients like ginger, but it makes decently smooth purees quickly.
Because this model doesn’t come with attachments besides a 700-milliliter (24-ounce) cup, we recommend it for the minimalist who’ll use it mainly for pureeing soups and smoothies or making mayo. Its nylon cage can withstand high heat and won’t scratch delicate cooking surfaces. The silicone coating on the stick allows you to tap off excess food on the side of a pot without creating nicks and dings. It even comes with a two-year warranty.
Budget pick

Though the Cuisinart Smart Stick can’t achieve perfectly smooth purees, it does a decent job for a fraction of the price of the Breville or OXO. Photo: Michael Hession
At about a third of the price of the Breville, the Cuisinart Smart Stick CSB-75 is a surprisingly efficient blender if you don’t mind a slightly chunkier puree. To be clear, we’d still invest in the Breville for making daily smoothies or regularly pureeing soups or sauces. It might be three times as expensive, but it’s also three times the machine. But if you’re planning to use an immersion blender once a month or less, the Smart Stick makes a solid choice.
The Smart Stick blended soup on a par with the Cuisinart Smart Stick CSB-77, the KitchenAid 3-Speed, and the KitchenAid 5-Speed, which cost almost twice as much. And it makes a pretty good smoothie, though it left behind pieces of ginger and parsnip after pureeing soup.
The Smart Stick CSB-75 does feel cheap compared with the other models we tested, and we found that its plastic casing trapped food in the seams. Overall though, it’s adequate. If you’re planning to use an immersion blender only on rare occasions or you’re not quite ready to commit to a more expensive model, we think this is a great choice.
This guide may have been updated by The Sweethome. To see the current recommendation, please go here.
Note from The Sweethome: When readers choose to buy our independently chosen editorial picks, we may earn affiliate commissions that support our work.
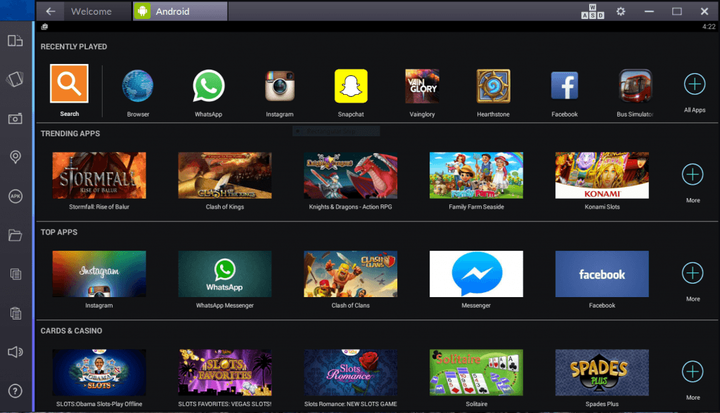
How to install Android apps on your Windows computer, the easy way
Apps on Windows have gotten better. But every once in a while, you stumble upon a really useful mobile app that hasn’t made its way to PC yet. If runs on Android, though, there’s good news. With the help of third-party software, you can probably run it on your Windows computer.
Unfortunately, getting apps from your phone or tablet to your PC isn’t as easy as installing a Windows program. To help simplify things, we’ve compiled a comprehensive guide on what software and utilities you need to install Android apps on almost any Windows computer.
Android emulators and how to use them
One way to run Android apps on a Windows computer is by using an Android emulator. Emulators run on complicated code, but the basic gist is this: They enable one computer to behave like another. Android emulators make your Windows machine appear as though it’s an Android device — right down to the processor, cameras, and sensors.
Android emulators act as hardware go-betweens, supplying apps with the memory, processing power, and storage they need to run on most any Windows computer. They map Android device hardware to your computer’s peripherals, too. You’ll hear an app’s sounds and music through your computer’s speakers, and chat apps like Skype will recognize your computer’s microphone and webcam.
Depending on your hardware, in fact, your computer might run Android apps better than your phone or tablet.
Perhaps the biggest benefit of Android emulators, though, is that they behave like regular Windows programs. You can launch them from the Windows desktop or start menu, and once they’re up and running, you can resize them, minimize them, maximize them, and move them wherever you please.
Bluestacks

The Bluestacks App Player is one of the most robust Android emulators around. It boasts a custom-designed interface that makes it easy to toggle emulation settings and launch apps, and “Layercake” technology that uses hardware accelerators to improve the performance of Android games in Windows.
It’s important to note that while Bluestacks is free, an optional subscription($2 per month) enables premium support and exclusive offers from app developers.
Hardware requirements
- 2GB of RAM
- 4GB of disk space
- Direct X 9.0 or higher
Installing Bluestacks couldn’t be easier. Because it’s entirely self-contained, you can install it just like any other Windows program.
Here’s how to install Bluestacks to your computer’s hard drive:
- Download the installer from the official Bluestacks website.
- Launch the install applications, and choose the storage location for app and data files. Unfortunately, you can’t change the Bluestacks directory — it will install on your boot drive by default.
- Once Bluestacks finishes installing, launch it. Enter your Google account credentials — you’ll log into the Google Play Store, where you’ll all of your installed and purchased apps.
Unique Bluestacks features
Bluestacks packs controls that are unique from other Android emulators.
A control sidebar on the left-hand corner of the screen is where you’ll find most of what you need. There’s a toggle for switching the Android window’s orientation from portrait to landscape, a screenshot tool, and a shortcut to the Bluestacks file transfer application, which lets you copy files from your desktop to Bluestacks’ virtual device’s storage.

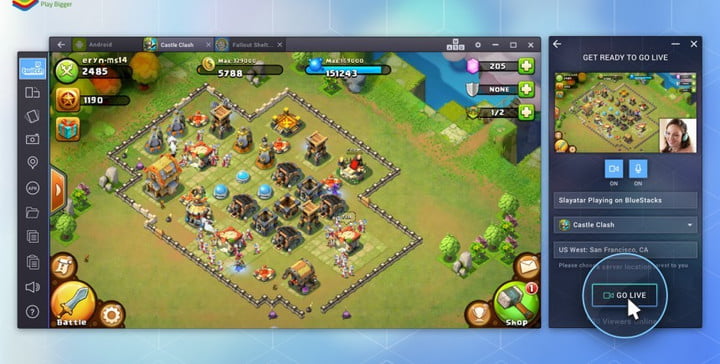
There’s more. Bluestacks has its own streaming platform: Bluestacks TV. If you have a Facebook or Twitch account and a PC with more than 8GB of RAM, you can broadcast apps and games directly from the Bluestacks window. The Bluestacks app lets you calibrate a connected mic, connect a webcam, and preview your stream before going live, and respond to Facebook comments and Twitch messages from a pop-out window. When you’re not streaming, you can watch other streamers, and view a curated list of games based on the apps you’ve installed.
Bluestacks also has plug-and-play support for gamepads. If you plug a wired or wireless Xbox controller into your PC or pair a Bluetooth controller, you’ll see a Bluestacks alert indicating it recognizes the device.
Bluestacks AppCast lets you launch games and apps using your phone. To take advantage, you’ll have to install the AppCast app on your smartphone and sign in with your Google credentials. You’ll see a list of applications you have installed on your phone, and tapping on one launches it on your computer.
Hardware requirements
- 2GB of RAM
- 4GB of hard drive space
DuOS
DuOS is an Android emulator developed by American Megatrends Incorporated, the company behind the BIOS firmware on millions of Windows computers. It runs Android Marshmallow in a resizable window, like Bluestacks, but offers a much less customizable experience. Most options reside in the Android Settings menu, and installing apps that aren’t from the Google Play Store requires downloading them on your PC, right-clicking on them, and selecting the “Apply to DuOS” from the Windows context menu.
But DuOS isn’t without advantages over stock Android. It has keyboard shortcuts for rotating the screen, zooming, swiping, and tilting, and it supports computer peripherals like microphones and webcams. A tool lets you set up folders that can be shared between Windows and the DuOS app, and you can set the amount of RAM that’s available to DuOS to prevent it from monopolizing system resources.
In our review of DuOS, we were pleasantly surprised by its performance on a computer with an Intel Core i5 clocked at 3.3GHz with 8GB of RAM. It never used more than 50 percent of the system’s resources, and ran about 95 percent of PC apps and games without issue.
DuOS isn’t free — it starts at $10. There is a 30-day trial period.
Hardware requirements
Intel x86 CPU
Hardware Virtualization Technology supported and enabled in BIOS
OpenGL 3.0
2GB of RAM, though 3GB recommended for optimal performance
2GB of hard drive space
Here’s how to install DuOS to your computer’s hard drive:
Download the DuOS installer from the official website.
Make sure you’re computer is connected to the internet, then open the installer file.
After DuOS has finished installing, launch it. The 30-day trial will activate automatically.
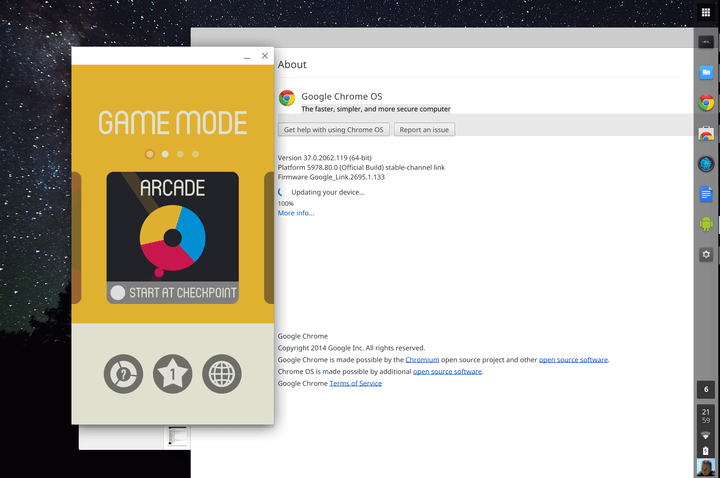
Google Chrome

If you don’t want to deal with the little annoyances that come with a full-blown Android installation on your computer, Google’s Chrome browser might float your boat. In 2014, Google introduced Android Runtime for Chrome, a compatibility layer and sandboxing technology for installing Android applications to desktop and laptop computers and it runs Android apps at near-native speeds.
Unfortunately, not every Android app is compatible, and converting apps to a format ARC can understand is an arduous undertaking. Then there’s the fact that apps which rely on third-party services — like Google’s Gmail client — won’t work properly.
The Chrome community maintains an unofficial list of apps that work with the ARC runtime.
Still, the ARC runtime is perhaps the most lightweight of Android emulators. And it’s the easiest to install — if you use Chrome to browse the web, you already have it.
Here’s how to install Android apps in Google Chrome:
ARC is designed to run on Google’s Chrome OS. To get it working on Windows, you’ll have to download a third-party tool: The ARChon Custom Runtime. You’ll also need version 37 of Chrome or newer.
First, download the ARChon Custom Runtime.
Unzip the archive, and install it from Chrome’s Extensions page by heading to Menu > More Tools > Extensions.
Enable Developer mode in the top-right corner.
Select “Load unpacked extensions.”
Choose the folder containing the unzipped ARChon runtime files.
Now, you’ll need Android apps that are compatible with the ARChon runtime. The Android community has packaged a few, but they’re a far cry from the roughly 2.8 million apps available from the Google Play Store. Still, they’re easier to install than Android apps that you have to convert yourself.
Check this list for compatible apps. Once you find one you want to install, follow these steps:
Unzip the file.
Open the Extensions page in Chrome.
Click “Load unpacked extensions.”
Select the folder with the app you downloaded.
To launch the app, open the Extensions screen — you’ll see it on the list.
If there is an app that isn’t available for your system, you can use a utility called chromeos-apk to repackage it. It’s a little involved, but it will work on most Android apps that don’t depend on native Android or Google services.
Here’s how to convert Android apps with chromeos-apk:
Download the installation file.
Install node.js, a dependency you will need to run it.
Open the Windows command line in the folder you downloaded the file. Type, “npm install chromeos-apk -g” (without quotes).
That’s it — you’ve installed chromeos-apk.
Now, you will need an app to convert. Obtaining one isn’t too hard — this free tool lets you pull applications from the Play Store.
Once you’ve downloaded an app, running it through chromeos-apk is a straightforward affair. Open the Windows command line in the folder where you’ve placed the application file — APK — and enter the following commands:
Type, “chromeos-apk [name of APK file]” (without quotes), and hit enter.
You might be asked to provide the package name of the application. The easiest way to find it is to check the URL of the Play Store listing — specifically the portion after “?id=.” In Evernote’s case, for example, it’s “com.evernote.”
Now that you’ve modified an application to work with Chrome’s chromeos-apk tool, installing it is as easy as opening the Extensions page, clicking “Load unpacked extensions,” and following the instructions in the previous step.
How to install Android apps on your Windows computer, the easy way
Apps on Windows have gotten better. But every once in a while, you stumble upon a really useful mobile app that hasn’t made its way to PC yet. If runs on Android, though, there’s good news. With the help of third-party software, you can probably run it on your Windows computer.
Unfortunately, getting apps from your phone or tablet to your PC isn’t as easy as installing a Windows program. To help simplify things, we’ve compiled a comprehensive guide on what software and utilities you need to install Android apps on almost any Windows computer.
Android emulators and how to use them
One way to run Android apps on a Windows computer is by using an Android emulator. Emulators run on complicated code, but the basic gist is this: They enable one computer to behave like another. Android emulators make your Windows machine appear as though it’s an Android device — right down to the processor, cameras, and sensors.
Android emulators act as hardware go-betweens, supplying apps with the memory, processing power, and storage they need to run on most any Windows computer. They map Android device hardware to your computer’s peripherals, too. You’ll hear an app’s sounds and music through your computer’s speakers, and chat apps like Skype will recognize your computer’s microphone and webcam.
Depending on your hardware, in fact, your computer might run Android apps better than your phone or tablet.
Perhaps the biggest benefit of Android emulators, though, is that they behave like regular Windows programs. You can launch them from the Windows desktop or start menu, and once they’re up and running, you can resize them, minimize them, maximize them, and move them wherever you please.
Bluestacks
The Bluestacks App Player is one of the most robust Android emulators around. It boasts a custom-designed interface that makes it easy to toggle emulation settings and launch apps, and “Layercake” technology that uses hardware accelerators to improve the performance of Android games in Windows.
It’s important to note that while Bluestacks is free, an optional subscription($2 per month) enables premium support and exclusive offers from app developers.
Hardware requirements
- 2GB of RAM
- 4GB of disk space
- Direct X 9.0 or higher
Installing Bluestacks couldn’t be easier. Because it’s entirely self-contained, you can install it just like any other Windows program.
Here’s how to install Bluestacks to your computer’s hard drive:
- Download the installer from the official Bluestacks website.
- Launch the install applications, and choose the storage location for app and data files. Unfortunately, you can’t change the Bluestacks directory — it will install on your boot drive by default.
- Once Bluestacks finishes installing, launch it. Enter your Google account credentials — you’ll log into the Google Play Store, where you’ll all of your installed and purchased apps.
Unique Bluestacks features
Bluestacks packs controls that are unique from other Android emulators.
A control sidebar on the left-hand corner of the screen is where you’ll find most of what you need. There’s a toggle for switching the Android window’s orientation from portrait to landscape, a screenshot tool, and a shortcut to the Bluestacks file transfer application, which lets you copy files from your desktop to Bluestacks’ virtual device’s storage.
There’s more. Bluestacks has its own streaming platform: Bluestacks TV. If you have a Facebook or Twitch account and a PC with more than 8GB of RAM, you can broadcast apps and games directly from the Bluestacks window. The Bluestacks app lets you calibrate a connected mic, connect a webcam, and preview your stream before going live, and respond to Facebook comments and Twitch messages from a pop-out window. When you’re not streaming, you can watch other streamers, and view a curated list of games based on the apps you’ve installed.
Bluestacks also has plug-and-play support for gamepads. If you plug a wired or wireless Xbox controller into your PC or pair a Bluetooth controller, you’ll see a Bluestacks alert indicating it recognizes the device.
Bluestacks AppCast lets you launch games and apps using your phone. To take advantage, you’ll have to install the AppCast app on your smartphone and sign in with your Google credentials. You’ll see a list of applications you have installed on your phone, and tapping on one launches it on your computer.
Hardware requirements
- 2GB of RAM
- 4GB of hard drive space
DuOS
DuOS is an Android emulator developed by American Megatrends Incorporated, the company behind the BIOS firmware on millions of Windows computers. It runs Android Marshmallow in a resizable window, like Bluestacks, but offers a much less customizable experience. Most options reside in the Android Settings menu, and installing apps that aren’t from the Google Play Store requires downloading them on your PC, right-clicking on them, and selecting the “Apply to DuOS” from the Windows context menu.
But DuOS isn’t without advantages over stock Android. It has keyboard shortcuts for rotating the screen, zooming, swiping, and tilting, and it supports computer peripherals like microphones and webcams. A tool lets you set up folders that can be shared between Windows and the DuOS app, and you can set the amount of RAM that’s available to DuOS to prevent it from monopolizing system resources.
In our review of DuOS, we were pleasantly surprised by its performance on a computer with an Intel Core i5 clocked at 3.3GHz with 8GB of RAM. It never used more than 50 percent of the system’s resources, and ran about 95 percent of PC apps and games without issue.
DuOS isn’t free — it starts at $10. There is a 30-day trial period.
Hardware requirements
Intel x86 CPU
Hardware Virtualization Technology supported and enabled in BIOS
OpenGL 3.0
2GB of RAM, though 3GB recommended for optimal performance
2GB of hard drive space
Here’s how to install DuOS to your computer’s hard drive:
Download the DuOS installer from the official website.
Make sure you’re computer is connected to the internet, then open the installer file.
After DuOS has finished installing, launch it. The 30-day trial will activate automatically.
Google Chrome
If you don’t want to deal with the little annoyances that come with a full-blown Android installation on your computer, Google’s Chrome browser might float your boat. In 2014, Google introduced Android Runtime for Chrome, a compatibility layer and sandboxing technology for installing Android applications to desktop and laptop computers and it runs Android apps at near-native speeds.
Unfortunately, not every Android app is compatible, and converting apps to a format ARC can understand is an arduous undertaking. Then there’s the fact that apps which rely on third-party services — like Google’s Gmail client — won’t work properly.
The Chrome community maintains an unofficial list of apps that work with the ARC runtime.
Still, the ARC runtime is perhaps the most lightweight of Android emulators. And it’s the easiest to install — if you use Chrome to browse the web, you already have it.
Here’s how to install Android apps in Google Chrome:
ARC is designed to run on Google’s Chrome OS. To get it working on Windows, you’ll have to download a third-party tool: The ARChon Custom Runtime. You’ll also need version 37 of Chrome or newer.
First, download the ARChon Custom Runtime.
Unzip the archive, and install it from Chrome’s Extensions page by heading to Menu > More Tools > Extensions.
Enable Developer mode in the top-right corner.
Select “Load unpacked extensions.”
Choose the folder containing the unzipped ARChon runtime files.
Now, you’ll need Android apps that are compatible with the ARChon runtime. The Android community has packaged a few, but they’re a far cry from the roughly 2.8 million apps available from the Google Play Store. Still, they’re easier to install than Android apps that you have to convert yourself.
Check this list for compatible apps. Once you find one you want to install, follow these steps:
Unzip the file.
Open the Extensions page in Chrome.
Click “Load unpacked extensions.”
Select the folder with the app you downloaded.
To launch the app, open the Extensions screen — you’ll see it on the list.
If there is an app that isn’t available for your system, you can use a utility called chromeos-apk to repackage it. It’s a little involved, but it will work on most Android apps that don’t depend on native Android or Google services.
Here’s how to convert Android apps with chromeos-apk:
Download the installation file.
Install node.js, a dependency you will need to run it.
Open the Windows command line in the folder you downloaded the file. Type, “npm install chromeos-apk -g” (without quotes).
That’s it — you’ve installed chromeos-apk.
Now, you will need an app to convert. Obtaining one isn’t too hard — this free tool lets you pull applications from the Play Store.
Once you’ve downloaded an app, running it through chromeos-apk is a straightforward affair. Open the Windows command line in the folder where you’ve placed the application file — APK — and enter the following commands:
Type, “chromeos-apk [name of APK file]” (without quotes), and hit enter.
You might be asked to provide the package name of the application. The easiest way to find it is to check the URL of the Play Store listing — specifically the portion after “?id=.” In Evernote’s case, for example, it’s “com.evernote.”
Now that you’ve modified an application to work with Chrome’s chromeos-apk tool, installing it is as easy as opening the Extensions page, clicking “Load unpacked extensions,” and following the instructions in the previous step.
Master the HTC U11 with these handy tips and tricks
If you’re about to get your hands on the HTC U11, you’re going to want to unlock its secrets and take full advantage of its capabilities. There are unusual functions and hidden features galore, alongside a host of useful Android options designed to enhance your smartphone use.
We’re here to help you get to grips with everything, from the squeezable Edge Sense to the performance enhancing Boost+. If you haven’t had a chance, take a look at our full review of the U11 for more information about HTC’s latest flagship.
HTC U11 Tips
We’re mostly focusing on U11 tips that are unique. As it runs the latest flavor of Android, you can also try out our Android 7.1 Nougat tips and tricks with the HTC U11.
How to use Edge Sense

One of the most eye-catching features of the HTC U11 is its squeezability. The sides of the phone can be squeezed to launch apps and trigger functions. This is not a feature you’ll find in any other phone. You’ll have the option to set up Edge Sense the first time you power on the U11, but you can always pull down the notification shade and tap the Edge Sense icon, or head into Settings > Edge Sense to change what it does.
By default, a short squeeze launches the camera and another squeeze will snap a shot. You can change that via Settings > Edge Sense > Customize squeeze action. You can also add a second function, triggered by a squeeze and hold, if you tick the box next to Enable advanced mode. By default, this will add the ability to launch Google Assistant with a squeeze and hold. If you find it difficult to use, then recalibrate the force required to trigger it via Adjust your squeeze force level.
Both the short squeeze and the squeeze and hold actions can be configured to do a variety of other things including launch apps, take screenshots, turn the flashlight on or off, record your voice, launch HTC Sense Companion, or turn your Wi-Fi hotspot on or off.
How to use HTC Sense Companion

Julian Chokkattu/Digital Trends
If you look in your app drawer, you’ll see an app called Sense Companion. It’s an unusual smartphone assistant that tries to offer up bits and pieces of useful information, such as weather reports, suggestions for places to eat nearby, and reminders to charge up your phone before you go out. When it has something to suggest, you’ll hear an alert and a small bubble, like a Facebook chat head, will pop up on your home screen, or on top of any app you might have open. Tap on it to see what the suggestion is, or ignore it and it will go away within a couple of seconds.
You can also check suggestions by opening the app. Tell it whether you liked a suggestion, give some reasoning, and it should learn over time and improve recommendations for the future. If you expect it to be useful, then you need to grant it access to your data. This is split into four areas: Location, usage, device, and activity data, which you can set in the app by tapping the three vertical dots at the top right and then Permissions.
How to use gestures


There are a few gestures you can use with the HTC U11 as handy shortcuts. To find them, go to Settings > Display, gestures & buttons and scroll down to the bottom. The Media gesture simply launches HTC Connect when you swipe up the screen with three fingers, so that you can connect to any DLNA devices in the vicinity and share content on a big screen, or stream audio to a music system. You can also choose to Press power button twice for camera, though we much prefer the squeeze shortcut for launching the camera.
At the very bottom of Settings > Display, gestures & buttons you’ll find Motion Launch gestures. There are five to choose from with short animations to explain how they work. We recommend the Double tap to wake up & sleep, but the usefulness of these options is somewhat limited if you have lock screen security in place, as you should.
How to get great audio

Simon Hill/Digital Trends
The U11 does have BoomSound speakers, though the main speaker is on the bottom edge, so be careful how you hold your U11 to avoid covering it up. When you start playing content, you’ll usually see a pop-up asking if you want Music mode or Theater mode. It’s worth choosing the appropriate mode for the best sound. You can also change this via Settings > HTC BoomSound for built-in speakers.
We also recommend using the HTC USonic earphones that come in the box with your U11. They have excellent active noise cancellation, which drowns out background noises. You’ll be prompted to create a personal audio profile when you first plug them in. If you want to re-calibrate for any reason, then go to Settings > HTC USonic with Active Noise Cancellation and plug them in again. It’s a quick process and it does improve audio clarity.
How to use Night Mode


We’re pleased to see that options for filtering out blue light, which can keep you up at night, are becoming standard on smartphones. If you’re reading in bed and plan to get some shuteye soon, then pull down the notification shade and tap the Night mode icon. You can also find it in Settings > Display, gestures & buttons > Night mode, where you have the option to set the color temperature and schedule it to turn on automatically. It turns itself off again automatically at sunrise.
