


After Math: We’re on our own
It has not been a proud week for America, what with the current administration randomly deciding to remove us as signatories to the Paris Climate Agreement and all. Luckily, the United States is still a nation of self-starters and problem-solvers who are willing to stand up, as 100 cities and six states across the country did on Thursday, and pledge to tackle climate change themselves — with or without help from the Feds.
They’re not the only ones, researchers from Keio University have developed a pair of robotic arms to help their user out when nobody else is around while a team from Harvard University showed off robotic shorts that make you run faster. Numbers, because how else would you know which is the loneliest one?
The best immersion blender
By Christine Cyr Clisset & Michael Sullivan
This post was done in partnership with The Sweethome, a buyer’s guide to the best homewares. When readers choose to buy The Sweethome’s independently chosen editorial picks, it may earn affiliate commissions that support its work. Read the full article here.
After spending nearly 30 hours researching immersion blenders, considering 57 models, interviewing two soup-making pros, and then testing some of the blenders over two years (including pureeing gallons of soup, smoothies, salsa, and mayonnaise), we’re confident that you can’t buy a better immersion blender than the Breville Control Grip. It produces smoother textures than any other model we tried. Smart design features, such as a grippy handle, no-suction gasket, and a wider range of speeds, make it far easier to use than the competition.
Who should get this
It’s worth investing in an immersion blender if you make pureed soups. “If you’re pureeing a soup, you could use a blender or a food processor, but an immersion blender just makes it one pot cookery,” the Culinary Institute’s Rudy Speckamp told us, because it’s easy to puree soup directly in the stockpot. Immersion blenders also work well for small batches of mayonnaise, smoothies, pesto, or even baby food.
An immersion blender won’t work for heavier tasks or make the smoothest texture. A food processor, with its various blades and disks, works best for most chopping, dicing, or shredding, and a full-size blender makes much smoother purees and smoothies.
How we picked and tested

For our 2016 update, we looked at three new models: the OXO On Illuminating Digital, Cuisinart CSB-100, and All-Clad KZ750D. We tested these against our previous picks: the Breville Control Grip, KitchenAid 3-Speed, and Cuisinart Smart Stick. Photo: Michael Hession
An immersion blender’s motor needs to have enough torque to create a vigorous vortex so that food circulates in the mixing vessel and passes through the rotary blade multiple times. “If there’s a lot of movement, that’s good,” said Volker Frick, the former executive chef at Kettle Cuisine. “How deep does [the vortex] go? And how quickly does it spit it back up?” An effective vortex will create a smooth puree; a subpar one will leave stringy or chunky bits in soup or smoothies.
Nicer consumer immersion blenders have removable blending wands. For some, this allows you to put the wand in the dishwasher for easy cleanup and to connect different attachments (such as a food chopper or whisk). Higher-end models and those made for commercial use tend to have wands that don’t come off.
For this update, we tested six models–three new models from All-Clad, OXO, and Cuisinart, and three of our former picks from Breville, KitchenAid, and Cuisinart.
We tested each immersion blender by pureeing kale and almonds with frozen raspberries and peaches to make smoothies. We also pureed batches of fibrous parsnip-ginger-almond soup directly in a pot and timed approximately how long it took to reach a smooth consistency. We strained both the smoothie and soup through a fine-mesh sieve to see how much pulp was left over.
We also made small batches of mayonnaise to judge how efficiently the immersion blenders could emulsify, noting how easy they were to hold with one hand while pouring oil with the other. If the blender came with a chopper attachment, we diced a single onion to judge whether the machines could make an even chop without pulverizing it.
Our pick

Photo: Michael Hession
Though it’s on the pricier side (it’s currently about $100), we think that because the Breville Control Grip Immersion Blender is so much easier and more pleasant to use than other hand blenders, it’s more likely to get regular play in the kitchen. It processed the smoothest texture of all the blenders we tried and did it quickly. Rubber grips on the handle and a control button make it more comfortable to hold. It’s one of the only models we tried that didn’t suction to the bottom of a pot or mixing cup. The Breville’s 1,250-milliliter (42-ounce) cup is more than double the volume of cups from the other blenders we tested—enough for two smoothies. Its wider range of speeds and well-thought-out attachments also elevate it above the competition.
In addition to blending well, the Breville was the most comfortable to use, so it was easier to process things that took a few minutes. The pulse button and parts of the handle are covered in rubber, so they’re easy to grip. The Breville seemed to require less torque when moving around a pot of soup than other models.
Though not a necessity, the Breville comes with a selection of high-quality attachments, including a mini chopper, whisk attachment, and a guard for the blade. We’ve appreciated that guard over the past few years, as it makes stowing the blender in a utensil drawer without risking slicing a hand easier.
Runner-up

The OXO On Illuminating Digital Immersion Blender was one of the fastest models we tested. Photo: Michael Hession
We think that the Breville is much easier to use and that it will make you a happier cook in the long run, but we recommend the OXO On Illuminating Digital Immersion Blender as a decent runner-up. It doesn’t blend quite as smoothly as the Breville and it has trouble with fibrous ingredients like ginger, but it makes decently smooth purees quickly.
Because this model doesn’t come with attachments besides a 700-milliliter (24-ounce) cup, we recommend it for the minimalist who’ll use it mainly for pureeing soups and smoothies or making mayo. Its nylon cage can withstand high heat and won’t scratch delicate cooking surfaces. The silicone coating on the stick allows you to tap off excess food on the side of a pot without creating nicks and dings. It even comes with a two-year warranty.
Budget pick

Though the Cuisinart Smart Stick can’t achieve perfectly smooth purees, it does a decent job for a fraction of the price of the Breville or OXO. Photo: Michael Hession
At about a third of the price of the Breville, the Cuisinart Smart Stick CSB-75 is a surprisingly efficient blender if you don’t mind a slightly chunkier puree. To be clear, we’d still invest in the Breville for making daily smoothies or regularly pureeing soups or sauces. It might be three times as expensive, but it’s also three times the machine. But if you’re planning to use an immersion blender once a month or less, the Smart Stick makes a solid choice.
The Smart Stick blended soup on a par with the Cuisinart Smart Stick CSB-77, the KitchenAid 3-Speed, and the KitchenAid 5-Speed, which cost almost twice as much. And it makes a pretty good smoothie, though it left behind pieces of ginger and parsnip after pureeing soup.
The Smart Stick CSB-75 does feel cheap compared with the other models we tested, and we found that its plastic casing trapped food in the seams. Overall though, it’s adequate. If you’re planning to use an immersion blender only on rare occasions or you’re not quite ready to commit to a more expensive model, we think this is a great choice.
This guide may have been updated by The Sweethome. To see the current recommendation, please go here.
Note from The Sweethome: When readers choose to buy our independently chosen editorial picks, we may earn affiliate commissions that support our work.
How to install Android apps on your Windows computer, the easy way
Apps on Windows have gotten better. But every once in a while, you stumble upon a really useful mobile app that hasn’t made its way to PC yet. If runs on Android, though, there’s good news. With the help of third-party software, you can probably run it on your Windows computer.
Unfortunately, getting apps from your phone or tablet to your PC isn’t as easy as installing a Windows program. To help simplify things, we’ve compiled a comprehensive guide on what software and utilities you need to install Android apps on almost any Windows computer.
Android emulators and how to use them
One way to run Android apps on a Windows computer is by using an Android emulator. Emulators run on complicated code, but the basic gist is this: They enable one computer to behave like another. Android emulators make your Windows machine appear as though it’s an Android device — right down to the processor, cameras, and sensors.
Android emulators act as hardware go-betweens, supplying apps with the memory, processing power, and storage they need to run on most any Windows computer. They map Android device hardware to your computer’s peripherals, too. You’ll hear an app’s sounds and music through your computer’s speakers, and chat apps like Skype will recognize your computer’s microphone and webcam.
Depending on your hardware, in fact, your computer might run Android apps better than your phone or tablet.
Perhaps the biggest benefit of Android emulators, though, is that they behave like regular Windows programs. You can launch them from the Windows desktop or start menu, and once they’re up and running, you can resize them, minimize them, maximize them, and move them wherever you please.
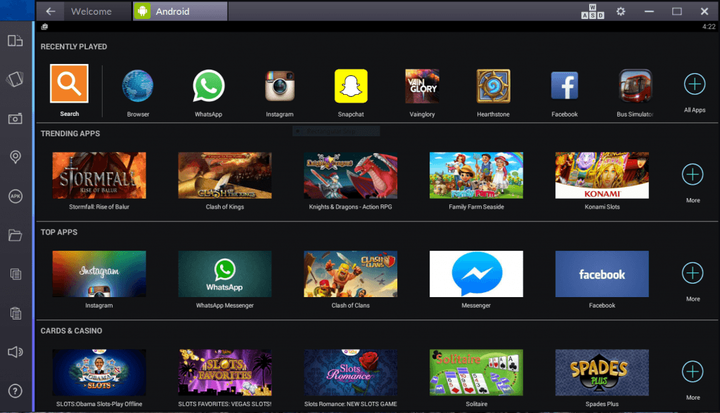
Bluestacks

The Bluestacks App Player is one of the most robust Android emulators around. It boasts a custom-designed interface that makes it easy to toggle emulation settings and launch apps, and “Layercake” technology that uses hardware accelerators to improve the performance of Android games in Windows.
It’s important to note that while Bluestacks is free, an optional subscription($2 per month) enables premium support and exclusive offers from app developers.
Hardware requirements
- 2GB of RAM
- 4GB of disk space
- Direct X 9.0 or higher
Installing Bluestacks couldn’t be easier. Because it’s entirely self-contained, you can install it just like any other Windows program.
Here’s how to install Bluestacks to your computer’s hard drive:
- Download the installer from the official Bluestacks website.
- Launch the install applications, and choose the storage location for app and data files. Unfortunately, you can’t change the Bluestacks directory — it will install on your boot drive by default.
- Once Bluestacks finishes installing, launch it. Enter your Google account credentials — you’ll log into the Google Play Store, where you’ll all of your installed and purchased apps.
Unique Bluestacks features
Bluestacks packs controls that are unique from other Android emulators.
A control sidebar on the left-hand corner of the screen is where you’ll find most of what you need. There’s a toggle for switching the Android window’s orientation from portrait to landscape, a screenshot tool, and a shortcut to the Bluestacks file transfer application, which lets you copy files from your desktop to Bluestacks’ virtual device’s storage.

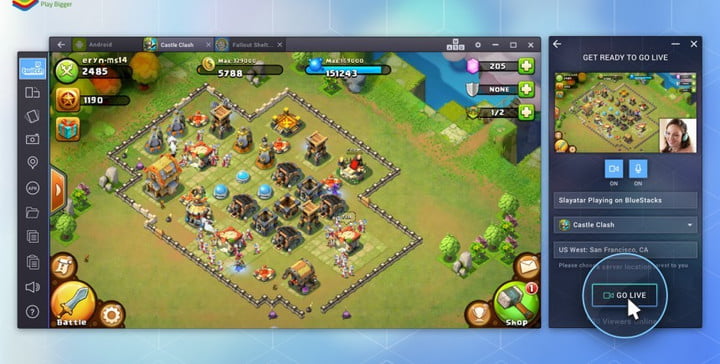
There’s more. Bluestacks has its own streaming platform: Bluestacks TV. If you have a Facebook or Twitch account and a PC with more than 8GB of RAM, you can broadcast apps and games directly from the Bluestacks window. The Bluestacks app lets you calibrate a connected mic, connect a webcam, and preview your stream before going live, and respond to Facebook comments and Twitch messages from a pop-out window. When you’re not streaming, you can watch other streamers, and view a curated list of games based on the apps you’ve installed.
Bluestacks also has plug-and-play support for gamepads. If you plug a wired or wireless Xbox controller into your PC or pair a Bluetooth controller, you’ll see a Bluestacks alert indicating it recognizes the device.
Bluestacks AppCast lets you launch games and apps using your phone. To take advantage, you’ll have to install the AppCast app on your smartphone and sign in with your Google credentials. You’ll see a list of applications you have installed on your phone, and tapping on one launches it on your computer.
Hardware requirements
- 2GB of RAM
- 4GB of hard drive space
DuOS
DuOS is an Android emulator developed by American Megatrends Incorporated, the company behind the BIOS firmware on millions of Windows computers. It runs Android Marshmallow in a resizable window, like Bluestacks, but offers a much less customizable experience. Most options reside in the Android Settings menu, and installing apps that aren’t from the Google Play Store requires downloading them on your PC, right-clicking on them, and selecting the “Apply to DuOS” from the Windows context menu.
But DuOS isn’t without advantages over stock Android. It has keyboard shortcuts for rotating the screen, zooming, swiping, and tilting, and it supports computer peripherals like microphones and webcams. A tool lets you set up folders that can be shared between Windows and the DuOS app, and you can set the amount of RAM that’s available to DuOS to prevent it from monopolizing system resources.
In our review of DuOS, we were pleasantly surprised by its performance on a computer with an Intel Core i5 clocked at 3.3GHz with 8GB of RAM. It never used more than 50 percent of the system’s resources, and ran about 95 percent of PC apps and games without issue.
DuOS isn’t free — it starts at $10. There is a 30-day trial period.
Hardware requirements
Intel x86 CPU
Hardware Virtualization Technology supported and enabled in BIOS
OpenGL 3.0
2GB of RAM, though 3GB recommended for optimal performance
2GB of hard drive space
Here’s how to install DuOS to your computer’s hard drive:
Download the DuOS installer from the official website.
Make sure you’re computer is connected to the internet, then open the installer file.
After DuOS has finished installing, launch it. The 30-day trial will activate automatically.
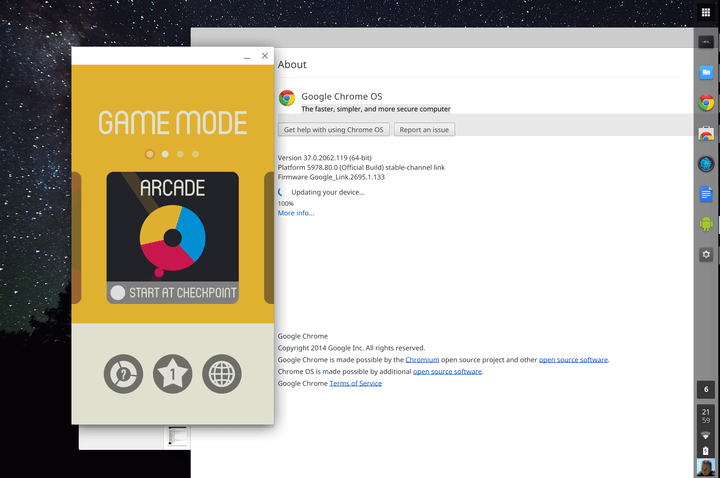
Google Chrome

If you don’t want to deal with the little annoyances that come with a full-blown Android installation on your computer, Google’s Chrome browser might float your boat. In 2014, Google introduced Android Runtime for Chrome, a compatibility layer and sandboxing technology for installing Android applications to desktop and laptop computers and it runs Android apps at near-native speeds.
Unfortunately, not every Android app is compatible, and converting apps to a format ARC can understand is an arduous undertaking. Then there’s the fact that apps which rely on third-party services — like Google’s Gmail client — won’t work properly.
The Chrome community maintains an unofficial list of apps that work with the ARC runtime.
Still, the ARC runtime is perhaps the most lightweight of Android emulators. And it’s the easiest to install — if you use Chrome to browse the web, you already have it.
Here’s how to install Android apps in Google Chrome:
ARC is designed to run on Google’s Chrome OS. To get it working on Windows, you’ll have to download a third-party tool: The ARChon Custom Runtime. You’ll also need version 37 of Chrome or newer.
First, download the ARChon Custom Runtime.
Unzip the archive, and install it from Chrome’s Extensions page by heading to Menu > More Tools > Extensions.
Enable Developer mode in the top-right corner.
Select “Load unpacked extensions.”
Choose the folder containing the unzipped ARChon runtime files.
Now, you’ll need Android apps that are compatible with the ARChon runtime. The Android community has packaged a few, but they’re a far cry from the roughly 2.8 million apps available from the Google Play Store. Still, they’re easier to install than Android apps that you have to convert yourself.
Check this list for compatible apps. Once you find one you want to install, follow these steps:
Unzip the file.
Open the Extensions page in Chrome.
Click “Load unpacked extensions.”
Select the folder with the app you downloaded.
To launch the app, open the Extensions screen — you’ll see it on the list.
If there is an app that isn’t available for your system, you can use a utility called chromeos-apk to repackage it. It’s a little involved, but it will work on most Android apps that don’t depend on native Android or Google services.
Here’s how to convert Android apps with chromeos-apk:
Download the installation file.
Install node.js, a dependency you will need to run it.
Open the Windows command line in the folder you downloaded the file. Type, “npm install chromeos-apk -g” (without quotes).
That’s it — you’ve installed chromeos-apk.
Now, you will need an app to convert. Obtaining one isn’t too hard — this free tool lets you pull applications from the Play Store.
Once you’ve downloaded an app, running it through chromeos-apk is a straightforward affair. Open the Windows command line in the folder where you’ve placed the application file — APK — and enter the following commands:
Type, “chromeos-apk [name of APK file]” (without quotes), and hit enter.
You might be asked to provide the package name of the application. The easiest way to find it is to check the URL of the Play Store listing — specifically the portion after “?id=.” In Evernote’s case, for example, it’s “com.evernote.”
Now that you’ve modified an application to work with Chrome’s chromeos-apk tool, installing it is as easy as opening the Extensions page, clicking “Load unpacked extensions,” and following the instructions in the previous step.
How to install Android apps on your Windows computer, the easy way
Apps on Windows have gotten better. But every once in a while, you stumble upon a really useful mobile app that hasn’t made its way to PC yet. If runs on Android, though, there’s good news. With the help of third-party software, you can probably run it on your Windows computer.
Unfortunately, getting apps from your phone or tablet to your PC isn’t as easy as installing a Windows program. To help simplify things, we’ve compiled a comprehensive guide on what software and utilities you need to install Android apps on almost any Windows computer.
Android emulators and how to use them
One way to run Android apps on a Windows computer is by using an Android emulator. Emulators run on complicated code, but the basic gist is this: They enable one computer to behave like another. Android emulators make your Windows machine appear as though it’s an Android device — right down to the processor, cameras, and sensors.
Android emulators act as hardware go-betweens, supplying apps with the memory, processing power, and storage they need to run on most any Windows computer. They map Android device hardware to your computer’s peripherals, too. You’ll hear an app’s sounds and music through your computer’s speakers, and chat apps like Skype will recognize your computer’s microphone and webcam.
Depending on your hardware, in fact, your computer might run Android apps better than your phone or tablet.
Perhaps the biggest benefit of Android emulators, though, is that they behave like regular Windows programs. You can launch them from the Windows desktop or start menu, and once they’re up and running, you can resize them, minimize them, maximize them, and move them wherever you please.
Bluestacks
The Bluestacks App Player is one of the most robust Android emulators around. It boasts a custom-designed interface that makes it easy to toggle emulation settings and launch apps, and “Layercake” technology that uses hardware accelerators to improve the performance of Android games in Windows.
It’s important to note that while Bluestacks is free, an optional subscription($2 per month) enables premium support and exclusive offers from app developers.
Hardware requirements
- 2GB of RAM
- 4GB of disk space
- Direct X 9.0 or higher
Installing Bluestacks couldn’t be easier. Because it’s entirely self-contained, you can install it just like any other Windows program.
Here’s how to install Bluestacks to your computer’s hard drive:
- Download the installer from the official Bluestacks website.
- Launch the install applications, and choose the storage location for app and data files. Unfortunately, you can’t change the Bluestacks directory — it will install on your boot drive by default.
- Once Bluestacks finishes installing, launch it. Enter your Google account credentials — you’ll log into the Google Play Store, where you’ll all of your installed and purchased apps.
Unique Bluestacks features
Bluestacks packs controls that are unique from other Android emulators.
A control sidebar on the left-hand corner of the screen is where you’ll find most of what you need. There’s a toggle for switching the Android window’s orientation from portrait to landscape, a screenshot tool, and a shortcut to the Bluestacks file transfer application, which lets you copy files from your desktop to Bluestacks’ virtual device’s storage.
There’s more. Bluestacks has its own streaming platform: Bluestacks TV. If you have a Facebook or Twitch account and a PC with more than 8GB of RAM, you can broadcast apps and games directly from the Bluestacks window. The Bluestacks app lets you calibrate a connected mic, connect a webcam, and preview your stream before going live, and respond to Facebook comments and Twitch messages from a pop-out window. When you’re not streaming, you can watch other streamers, and view a curated list of games based on the apps you’ve installed.
Bluestacks also has plug-and-play support for gamepads. If you plug a wired or wireless Xbox controller into your PC or pair a Bluetooth controller, you’ll see a Bluestacks alert indicating it recognizes the device.
Bluestacks AppCast lets you launch games and apps using your phone. To take advantage, you’ll have to install the AppCast app on your smartphone and sign in with your Google credentials. You’ll see a list of applications you have installed on your phone, and tapping on one launches it on your computer.
Hardware requirements
- 2GB of RAM
- 4GB of hard drive space
DuOS
DuOS is an Android emulator developed by American Megatrends Incorporated, the company behind the BIOS firmware on millions of Windows computers. It runs Android Marshmallow in a resizable window, like Bluestacks, but offers a much less customizable experience. Most options reside in the Android Settings menu, and installing apps that aren’t from the Google Play Store requires downloading them on your PC, right-clicking on them, and selecting the “Apply to DuOS” from the Windows context menu.
But DuOS isn’t without advantages over stock Android. It has keyboard shortcuts for rotating the screen, zooming, swiping, and tilting, and it supports computer peripherals like microphones and webcams. A tool lets you set up folders that can be shared between Windows and the DuOS app, and you can set the amount of RAM that’s available to DuOS to prevent it from monopolizing system resources.
In our review of DuOS, we were pleasantly surprised by its performance on a computer with an Intel Core i5 clocked at 3.3GHz with 8GB of RAM. It never used more than 50 percent of the system’s resources, and ran about 95 percent of PC apps and games without issue.
DuOS isn’t free — it starts at $10. There is a 30-day trial period.
Hardware requirements
Intel x86 CPU
Hardware Virtualization Technology supported and enabled in BIOS
OpenGL 3.0
2GB of RAM, though 3GB recommended for optimal performance
2GB of hard drive space
Here’s how to install DuOS to your computer’s hard drive:
Download the DuOS installer from the official website.
Make sure you’re computer is connected to the internet, then open the installer file.
After DuOS has finished installing, launch it. The 30-day trial will activate automatically.
Google Chrome
If you don’t want to deal with the little annoyances that come with a full-blown Android installation on your computer, Google’s Chrome browser might float your boat. In 2014, Google introduced Android Runtime for Chrome, a compatibility layer and sandboxing technology for installing Android applications to desktop and laptop computers and it runs Android apps at near-native speeds.
Unfortunately, not every Android app is compatible, and converting apps to a format ARC can understand is an arduous undertaking. Then there’s the fact that apps which rely on third-party services — like Google’s Gmail client — won’t work properly.
The Chrome community maintains an unofficial list of apps that work with the ARC runtime.
Still, the ARC runtime is perhaps the most lightweight of Android emulators. And it’s the easiest to install — if you use Chrome to browse the web, you already have it.
Here’s how to install Android apps in Google Chrome:
ARC is designed to run on Google’s Chrome OS. To get it working on Windows, you’ll have to download a third-party tool: The ARChon Custom Runtime. You’ll also need version 37 of Chrome or newer.
First, download the ARChon Custom Runtime.
Unzip the archive, and install it from Chrome’s Extensions page by heading to Menu > More Tools > Extensions.
Enable Developer mode in the top-right corner.
Select “Load unpacked extensions.”
Choose the folder containing the unzipped ARChon runtime files.
Now, you’ll need Android apps that are compatible with the ARChon runtime. The Android community has packaged a few, but they’re a far cry from the roughly 2.8 million apps available from the Google Play Store. Still, they’re easier to install than Android apps that you have to convert yourself.
Check this list for compatible apps. Once you find one you want to install, follow these steps:
Unzip the file.
Open the Extensions page in Chrome.
Click “Load unpacked extensions.”
Select the folder with the app you downloaded.
To launch the app, open the Extensions screen — you’ll see it on the list.
If there is an app that isn’t available for your system, you can use a utility called chromeos-apk to repackage it. It’s a little involved, but it will work on most Android apps that don’t depend on native Android or Google services.
Here’s how to convert Android apps with chromeos-apk:
Download the installation file.
Install node.js, a dependency you will need to run it.
Open the Windows command line in the folder you downloaded the file. Type, “npm install chromeos-apk -g” (without quotes).
That’s it — you’ve installed chromeos-apk.
Now, you will need an app to convert. Obtaining one isn’t too hard — this free tool lets you pull applications from the Play Store.
Once you’ve downloaded an app, running it through chromeos-apk is a straightforward affair. Open the Windows command line in the folder where you’ve placed the application file — APK — and enter the following commands:
Type, “chromeos-apk [name of APK file]” (without quotes), and hit enter.
You might be asked to provide the package name of the application. The easiest way to find it is to check the URL of the Play Store listing — specifically the portion after “?id=.” In Evernote’s case, for example, it’s “com.evernote.”
Now that you’ve modified an application to work with Chrome’s chromeos-apk tool, installing it is as easy as opening the Extensions page, clicking “Load unpacked extensions,” and following the instructions in the previous step.
Master the HTC U11 with these handy tips and tricks
If you’re about to get your hands on the HTC U11, you’re going to want to unlock its secrets and take full advantage of its capabilities. There are unusual functions and hidden features galore, alongside a host of useful Android options designed to enhance your smartphone use.
We’re here to help you get to grips with everything, from the squeezable Edge Sense to the performance enhancing Boost+. If you haven’t had a chance, take a look at our full review of the U11 for more information about HTC’s latest flagship.
HTC U11 Tips
We’re mostly focusing on U11 tips that are unique. As it runs the latest flavor of Android, you can also try out our Android 7.1 Nougat tips and tricks with the HTC U11.
How to use Edge Sense

One of the most eye-catching features of the HTC U11 is its squeezability. The sides of the phone can be squeezed to launch apps and trigger functions. This is not a feature you’ll find in any other phone. You’ll have the option to set up Edge Sense the first time you power on the U11, but you can always pull down the notification shade and tap the Edge Sense icon, or head into Settings > Edge Sense to change what it does.
By default, a short squeeze launches the camera and another squeeze will snap a shot. You can change that via Settings > Edge Sense > Customize squeeze action. You can also add a second function, triggered by a squeeze and hold, if you tick the box next to Enable advanced mode. By default, this will add the ability to launch Google Assistant with a squeeze and hold. If you find it difficult to use, then recalibrate the force required to trigger it via Adjust your squeeze force level.
Both the short squeeze and the squeeze and hold actions can be configured to do a variety of other things including launch apps, take screenshots, turn the flashlight on or off, record your voice, launch HTC Sense Companion, or turn your Wi-Fi hotspot on or off.
How to use HTC Sense Companion

Julian Chokkattu/Digital Trends
If you look in your app drawer, you’ll see an app called Sense Companion. It’s an unusual smartphone assistant that tries to offer up bits and pieces of useful information, such as weather reports, suggestions for places to eat nearby, and reminders to charge up your phone before you go out. When it has something to suggest, you’ll hear an alert and a small bubble, like a Facebook chat head, will pop up on your home screen, or on top of any app you might have open. Tap on it to see what the suggestion is, or ignore it and it will go away within a couple of seconds.
You can also check suggestions by opening the app. Tell it whether you liked a suggestion, give some reasoning, and it should learn over time and improve recommendations for the future. If you expect it to be useful, then you need to grant it access to your data. This is split into four areas: Location, usage, device, and activity data, which you can set in the app by tapping the three vertical dots at the top right and then Permissions.
How to use gestures


There are a few gestures you can use with the HTC U11 as handy shortcuts. To find them, go to Settings > Display, gestures & buttons and scroll down to the bottom. The Media gesture simply launches HTC Connect when you swipe up the screen with three fingers, so that you can connect to any DLNA devices in the vicinity and share content on a big screen, or stream audio to a music system. You can also choose to Press power button twice for camera, though we much prefer the squeeze shortcut for launching the camera.
At the very bottom of Settings > Display, gestures & buttons you’ll find Motion Launch gestures. There are five to choose from with short animations to explain how they work. We recommend the Double tap to wake up & sleep, but the usefulness of these options is somewhat limited if you have lock screen security in place, as you should.
How to get great audio

Simon Hill/Digital Trends
The U11 does have BoomSound speakers, though the main speaker is on the bottom edge, so be careful how you hold your U11 to avoid covering it up. When you start playing content, you’ll usually see a pop-up asking if you want Music mode or Theater mode. It’s worth choosing the appropriate mode for the best sound. You can also change this via Settings > HTC BoomSound for built-in speakers.
We also recommend using the HTC USonic earphones that come in the box with your U11. They have excellent active noise cancellation, which drowns out background noises. You’ll be prompted to create a personal audio profile when you first plug them in. If you want to re-calibrate for any reason, then go to Settings > HTC USonic with Active Noise Cancellation and plug them in again. It’s a quick process and it does improve audio clarity.
How to use Night Mode


We’re pleased to see that options for filtering out blue light, which can keep you up at night, are becoming standard on smartphones. If you’re reading in bed and plan to get some shuteye soon, then pull down the notification shade and tap the Night mode icon. You can also find it in Settings > Display, gestures & buttons > Night mode, where you have the option to set the color temperature and schedule it to turn on automatically. It turns itself off again automatically at sunrise.
How to set up Android Pay

How to set up Android Pay and add your preferred payment and loyalty cards.
Since it was first introduced back in 2015, Android Pay has been steadily rolling out around the world, most recently arriving in Canada. With more shops supporting Android Pay via NFC and more banking institutions offering the service to its clients, there’s no better time to start setting up Android Pay on your phone. Here’s how to get started.
Setting up Android Pay the first time
When you load up Android Pay for the first time and log into your preferred Google account, the app will automatically recognize any credit cards associated with your Google Play account and request to add them to Android Pay. Depending on the banking institution, you may need to go through a verification process to confirm things.
You’ll also be asked to allow Android Pay a slew of permissions as you’d expect, including NFC which you’ll absolutely need to turn on if you want to use Android Pay’s tap-to-pay features. The app will also request to be your primary payment method. You may only see that notification if you’ve previously used Samsung Pay or another banking app.

How to add a credit or debit card
While Android Pay will automatically add any credit cards associated with your Google Play account, chances are you have other credit or debit cards you’d also like to use. You can find out which banks are supported in the USA. In Canada, most major banks offer Android Pay support but it is currently unavailable to Canadian credit union members.
Tap to launch the Android Pay app.
Tap the add card icon, which looks like a “+” symbol.
Tap add a credit or debit card
Follow along with the onscreen instructions. You’ll have the option to scan your card using your phone’s camera or manually enter your card information.

Once your card has been added you will be required to activate it via your financial institution.
How to add a loyalty program card
Android Pay is also a great way to keep all your loyalty cards in one convenient place.
Tap to launch the Android Pay app.
Tap the add card icon, which looks like a “+” symbol.
Tap Add a loyalty program.

Use the search bar to find the loyalty card you wish to add.
Use your phone’s camera to scan your card’s barcode or manually enter your card’s info to add it to Android Pay.

How to add a gift card
On top of your debit, credit, and loyalty cards, you can also use Android Pay to store all your gift cards digitally and in one place.
Tap to launch the Android Pay app.
Tap the add card icon, which looks like a “+” symbol.
Tap Add a gift card

Use the search bar to find the associated business for the gift card you wish to add.
Enter the gift card information and tap Save.

Your gift card along with the remaining balance will be displayed amongst your other cards.
Ben Heck’s Super Glue Gun: Programming and electronics

Armed with some early insight from his Great Glue Gun project, Ben goes heads down on redesigning a 3D-printed mount for the motor using Autodesk Fusion 360. Still, it makes sense to check these things before committing to a 3D print, so Ben laser-cuts a paper pattern first to see if fits. It’s not all about physical design, though — it’s time to start programming the ATTiny microcontrollers with AtmelStudio and C++. Thanks to a bit of Boolean logic and binary arithmetic, Ben can control the motor with a technique called “pulse width modulation,” or PWM! Make sure you follow along with the build over on the element14 Community and chime in with any ideas you have.
SpaceX triumphs with its first-ever launch of a recycled cargo ship
Why it matters to you
This latest achievement brings SpaceX’s goal of manned missions to Mars that little bit closer.
After a couple of days’ delay because of poor weather, it was all systems go for SpaceX at Florida’s Kennedy Space Center on Saturday.
Its latest mission — this one sending supplies and equipment to the International Space Station (ISS) — got underway at 5.07 p.m. ET when the Falcon 9 engines fired up to send the unmanned rocket spaceward.
The mission, a success on all fronts, marked another milestone for Elon Musk’s private space company as it was the first re-flight of one of its Dragon spacecrafts. The cargo ship first traveled to the ISS back in September 2014.
Dragon confirmed in good orbit. https://t.co/gtC39uBC7z
— SpaceX (@SpaceX) June 3, 2017
The accomplishment comes two months after Space X successfully completed the first re-flight — and landing — of an orbital class rocket.
Saturday’s effort also saw the Falcon 9 rocket make a perfect landing back at Florida’s Cape Canaveral Air Force Station 7 minutes and 40 seconds after leaving terra firma. It’s the eleventh time SpaceX has performed a perfect landing with one of its Falcon 9 rockets
On June 5, the Dragon spacecraft is set to dock with the ISS, where it will stay for the rest of the month. After that it will leave the space station and head back to Earth, splashing down in the Pacific Ocean off the coast of Baja California.
Saturday’s flawless mission highlights the impressive progress being made by the SpaceX team in its ongoing quest to create a reliable and cost-effective reusable rocket system that could one day carry humans on trips into deep space.
The entire event was broadcast live on SpaceX’s YouTube channel, with commentary provided throughout explaining the mission’s multiple stages as it proceeded.
In the video above, you can see the Falcon 9 rocket lift off at the 29:55 mark, and also the spectacular rocket landing at 37:25.
Sony is building a full-frame digital camera for pro filmmakers
If you’ve ever shot video with a full-frame DSLR, you know how alluring it can be — that large sensor can be perfect for low-light shots and soft backgrounds. However, pro cinematographers have generally had to “settle” for Super 35mm and smaller sizes, even when using top-tier 8K cameras. Sony doesn’t think pros should have to compromise, though. It’s developing a brand new CineAlta camera (not pictured) with a 36mm x 24mm sensor — the first full-frame sensor in a high-end movie camera, in fact. The company isn’t divulging all the cam’s capabilities just yet, but it is setting some expectations beyond the “exceptional” image quality.
To begin with, the as yet unnamed CineAlta is “aspect ratio-agnostic.” You can shoot 4K RAW footage in 4:3, 17:9 or other relatively uncommon video ratios. Sony is also promising that you won’t have to ditch your existing workflow you’re already used to its movie-grade formatting, and it’ll work with both existing and upcoming CineAlta accessories. In short: filmmakers won’t have to disrupt their production methods just to go full frame, at least not if they’re Sony fans.
The camera arrives in early 2018, and it’s likely to be expensive compared to other high-end cameras (Sony’s own F65 sold for $65,000 when new in 2011). We wouldn’t be surprised if some studios are willing to pay that premium, mind you. It could prove indispensable for nighttime scenes and close-ups. Also, the image quality may be a boon for online video services that want to produce as much 4K HDR content as they can — it may be easier to nab subscribers with eye-popping visuals.
Via: RedShark, Cinema5D, News Shooter
Source: Sony
Android Pay is your new shopping BFF in Taiwan
Google has been bringing Android Pay to new regions in an attempt to expand its limited availability. After landing in the UK last year and in Canada more recently, the mobile payment system has now made its way to Taiwan, where you can use it in places that have contactless payment terminals and to pay for online purchases from local stores. If you’re traveling to the country in the near future, it’s probably wise to download the app and to link a card in case you run out of New Taiwan dollars and need to pay for some Asian make-up at Watsons or a coffin bread at a restaurant.
However, the Taiwanese version of Android Pay is far from complete, just like the version that came out in Canada. According to Engadget Chinese, the tech titan has yet to roll out support for a number of major Asian banks and cards. Google has apparently integrated Google Maps into the Android Pay app, though, so you can get promos and deals from partner retailers in real time based on your location. It’s unclear if the feature will be available everywhere Android Pay is, but we’ll keep an eye out for you.
Via: CNET
Source: Engadget Chinese, Google
