


SpaceX re-launches a Dragon capsule for the first time
SpaceX is no longer limited to reusing rockets — it’s reusing capsules, too. The private spaceflight outfit has launched a refurbished Dragon cargo capsule (namely, one last used in September 2014) as part of a resupply mission to the International Space Station. While the vehicle isn’t as complex as a Falcon 9, this shows that it can endure multiple launches (SpaceX is targeting three) without a hitch. That’s important for reducing the overall costs of spaceflight, especially when manned Dragon missions become a reality.
The team also successfully landed the Falcon 9’s first stage at Cape Canaveral, although these touchdowns are becoming nearly routine at this point. SpaceX wants to land as many rockets as possible going forward, but it’s limited until Falcon Heavy arrives and it can routinely expect to have enough fuel for return trips.
It’ll be a while before SpaceX can reuse every last inch of a rocket. Elon Musk is aiming for 2018. If and when that happens, though, it could mean a lot for space travel. Rather than throwing away millions (if not billions) of dollars’ worth of equipment with every launch, both SpaceX and government agencies would only have to worry about replacements when the hardware either fails or reaches the end of its usable lifespan. That, in turn, could open the door to both more frequent launches and missions that would otherwise be too expensive to justify.
Source: SpaceX (YouTube), NASA
Verizon beefs up its prepaid plans’ data allowance
Verizon’s prepaid plans will look a lot more enticing come June 6th: the mobile carrier has tweaked its current offerings, giving each tier a bigger data allowance. You’ll now get 3GB of data instead of 2GB for $40 and 7GB instead of 5GB for $50. The 10GB tier will stay, but it will now cost you $60 rather than $70 — makes sense, considering Big Red recently introduced an unlimited tier for $80. Like the new unlimited plan, though, these revamped options come with a downside. You won’t be able to stream videos in their full glory and will be limited to 480p, no matter which tier you choose.
In addition, the company says it “may prioritize your data behind other customers” in case of network congestion. Not to mention, your speeds will be throttled to 128kbps once you’ve used up your data allowance for the month, unless you’re on the unlimited plan. (The good news is that if you still have some unused data left by the end of a billing period, it will carry over.)
If those “gotchas” don’t faze you one bit, you can use any Verizon-compatible smartphone with the plans, including top-of-the-line choices like the latest iPhone and the Galaxy S8. The company is also giving away a $100 store credit if you sign up, but only for a limited time.
Source: Verizon
Unihertz Jelly review: a tiny phone with huge aspirations
Unihertz claims its new Jelly device is a “4G smartphone for everyone”. Similar statements have been thrown around before, but in an industry where a 5-inch screen is now considered “small” we have to ask ourselves if this 2.45-inch handset can keep up. Fortunately, it is extremely affordable, with the base price set at $79 from Kickstarter.
This tiny phone sure has huge aspirations. And whether you think it is a worthy purchase or not, it is getting plenty of attention from the press. We even covered it in our weekly ‘Crowdfunding project of the week’ series. Why? Mostly because it is not made with the same cookie-cutter strategy the industry has fallen into. It is unique, and has surprisingly good capabilities for its price range and form factor.
See also:
Crowdfunding project of the week: Jelly is a tiny phone running Android Nougat
4 weeks ago
We have now spent some quality time with it and can tell you it is definitely an interesting experience. Let’s jump right into the nitty gritty to see if it is a phone any of you would be interested in.
Design & build quality

If there is anything that stands out about this phone, it is that it doesn’t stand out. At least not in terms of form factor. This little guy is meant to hide away in any pocket. It can even bring a purpose back to that coin pocket no one really knows what to do with anymore. The Jelly is minuscule by today’s standards, measuring in at 92.4 x 43 x 13 mm. This means it can easily fit in a kid’s hand palm.
The Jelly is the king of one-handed operation.
The Jelly is so diminutive you almost forget there is a smartphone in your pocket. I would just throw the thing anywhere.
And let’s not forget the confident grip and ability to reach any part of the screen with your thumb. The Jelly is the king of one-handed operation, that’s for sure. But of course, the smaller design also comes with its downsides.

My chubby fingers sure had a hard time typing. I quickly downloaded Swiftkey and heavily relied on its corrections to type more efficiently. By the way, any full keyboard will take up at least half of the screen, meaning you will have to sacrifice some content visibility. And pray you won’t ever have to tap on a small link, because it will be no easy feat. Overall, the phone’s small size is both a blessing and a curse.
Now, in terms of build quality you can’t really expect too much. This is a super affordable handset, and it looks and feels like one. It is completely made of fingerprint-loving plastic, but Unihertz did a pretty good job with what they were given. It does feel pretty sturdy and nothing is loose. This is a good accomplishment considering the phone doesn’t tout a unibody design. And some of you will actually love this. Not only is the back removable, so is the battery! Under it there are also a couple SIM card slots and a microSD card slot.

The Jelly has everything you can expect out of a smartphone, to one degree or another. There are cameras in the back and front, a flash in the rear, two volume buttons on the left, a power button and microUSB port on the right, a 3.5 mm headset jack up top and three capacitive navigation buttons right below the 2.45-inch screen. Pretty standard stuff, but still impressive considering no components were removed from the equation in the making of this miniature phone.
Display (or lack thereof)
The second most important highlight here is the screen… yes, that itty bitty thing. Having a smaller display makes it possible to reduce resolution without sacrificing too much quality, but keep in mind this is still a super low-end handset. This panel has a 240 x 432 resolution, and you can really tell that’s the case. Unihertz definitely didn’t go out of its way to provide an outstanding experience in this department.

While we are not saying the screen is horrendous, it just isn’t up to par with current standards. Pixels can be noticed effortlessly, thanks to that 201.7 ppi. In comparison, most smartphones nowadays tend to surpass the 400 ppi threshold (even affordable 1080p ones). Colors are a bit washed out too.
Clearly, the Jelly phone is not made for media consumption.
Clearly, the Jelly phone is not made for media consumption. Content will look small and pixelated. But hey, the thing costs 79! For that price you can’t really complain too much, and the experience is definitely not dreadful.
Sound
Once again, this little guy is not meant to keep you too entertained. It offers the basics, and basic sound it has. The speaker is not too loud or high quality, but it gets the job done. Just don’t expect it to fill up a room with your favorite tunes. For that you will have to use either Bluetooth or a wired connection to your headphones/speaker.
Performance & Software
Is the Jelly usable? Well that depends on your standards and expectations. The phone is not too demanding, so the 1.1 GHz quad-core processor and 1/2 GB of RAM don’t have a hard time pushing through simple tasks. Swiping through home screens and navigating through the Android UI is surprisingly smooth. Data won’t be a problem either, as this little guy supports 4G LTE.
Swiping through home screens and navigating through the Android UI is surprisingly smooth.
You do start noticing the device’s lackluster power once you throw more serious applications at it though. Try to open Facebook, Instagram or even Gmail and you will find yourself waiting several seconds.
Flappy Bird works like a charm though, so at least you can get some gaming done with the Jelly. Just don’t try playing any graphics intensive titles: most won’t even open.

Heck, you don’t really even have sufficient internal storage to spare for true mobile games. So you’ll need to be careful with how you use your available memory. The base version of the Unihertz Jelly has only 8 GB of internal storage. The Pro iteration makes things a little better with 16 GB, but that is still not too much.
As for software, there is one nice big surprise in store: it comes with near-stock Android 7.0 Nougat out of the box, which is definitely a nice treat from Unihertz. Only 7.1% of devices are currently running Google’s latest Android version and we know plenty of you have bought 10x more expensive devices that still don’t have Nougat.
Despite rocking the latest version of Android, you should expect to make many concessions to use it on the Jelly phone.
There is a little elephant in the room, though. The Jelly’s size makes software a bit janky at times. Though we always expect Android to scale to all screen sizes, this doesn’t go well all the time. For example, go to the Google Play Store and check out your app library; you will see icons and an “install” button very clearly, but the writing between them gets cut off to just a couple letters (good luck trying to read that). Certain icons and UI elements will often overlap each other too and large images and writing are often cut off.


Android is not exactly optimized to run on a screen this size, so we wouldn’t exactly blame Unihertz for all of this, but it is definitely a factor to consider. Sometimes things will look a bit off and other times they will be near unusable. Despite rocking the latest version of Android, you should expect to make many concessions to use it on the Jelly phone.
Camera

These days, cameras are among the most important components in a smartphone. Consumers are often looking for the phone that can take the best shots and we’ve put together a shootout of the most popular smartphones in the market. The Unihertz Jelly won’t ever be making it to that competition, but can it still take a decent enough photo all things considered?
See also:
Photo Fight: Galaxy S8 vs LG G6, Xperia XZs, Huawei P10, Pixel XL, OnePlus 3T
April 21, 2017
It has an 8 MP shooter in the back and a 2 MP selfie camera, but we all know megapixels don’t mean too much in terms of picture quality. How good are these sensors? They are… alright. And what about that image processing? Ummm…
Pictures are a bit washed out, often blurry and pretty noisy. Higher levels of light don’t help the camera much, either. At least the colors from the rear camera have good color reproduction, though. One weird thing to note, I did feel like the front-facing camera did a better job getting crisper images, but it washed out the colors a little more.


Overall, neither camera is really good, but this phone is not made for demanding photo enthusiasts. It is for the very basic user who might want to take a casual shot from time to time. I wouldn’t recommend the Jelly for camera use, but it has the shooters there, just in case you need to capture a good moment.
Battery life
One thing about under-powered devices is that they are also resource-friendly and can make a battery last for much longer. Unihertz states that its 950 mAh battery can stay alive for up to three days on a single charge, but our experience shows otherwise.
During my time with the Jelly, at best I was able to make it last a bit over a full day. I didn’t have to struggle to keep it alive for a full work day, either. It never died on me before going to bed, and ultimately that is what people expect from smartphones nowadays. I wouldn’t advise that you rely on it for a weekend trip without outlets, though.
At best I was able to make the Jelly phone last a bit over a full day.
Pricing and final thoughts
 The Unihertz Jelly is portable, easy to use and insanely affordable. But of course, affordability comes with its sacrifices, which is why it may sound like I was bashing this phone a little too much. Unihertz had to cut plenty of corners to accomplish making the Jelly at this price. The real question is whether the phone is worth its low price tag or not.
Those who back the Kickstarter campaign can get the Jelly or Jelly Pro with a $30 discount on the expected retail price. This takes you down to $79 for the base version, while the Jelly Pro goes for $95 (retail: $109 and $125, relatively). Making a decent smartphone at this price point is not easy, and we believe Unihertz is definitely up to something here.
It was refreshing to forget about the struggles of fitting a modern phone in an average pocket. It was certainly a blast to the past, and we can’t deny we miss that level of portability. The screen, speaker, cameras and performance may not be amazing, but they are not meant to be. And the device can definitely get the job done. Someone who doesn’t need all the bells and whistles of a more expensive handset will definitely be happy about keeping a healthy wallet.
Unfortunately for the Jelly, there is already a lot of much fuller featured competition in the $100 price range. Very little of that competition runs the latest version of Android, but there are far fewer compromises to make. For example, you can get a second generation Moto E for just $69.99 with none of the software jankiness and a two inch larger display than the Jelly phone.
Is it the Jelly phone for everyone? We wouldn’t say so, but there is definitely a market for it. Some people do prefer a simpler experience with the ability to download just a few extra applications. It’s kind of like a smart feature phone of sorts… or a good secondary device for the glove compartment. And while it won’t be making anyone jelly, it is probably worth the asking price if its uniqueness piqued your interest.
Check out the Jelly phone
Protect your BlackBerry KeyOne with one of these cases
Update: Added new cases from Incipio and BlackBerry.
The BlackBerry KeyOne may be an Android smartphone manufactured by TCL, but it also sports a traditional QWERTY keyboard, which has been generating excitement among those who continue to long for that tactile sensation afforded by a physical keyboard. If you can’t wait to get your hands on one, or your new BlackBerry device has just arrived, then you should be thinking about how to safeguard that aluminum body and 4.5-inch screen. Thankfully, we’ve rounded up the best BlackBerry KeyOne cases we’ve found so far, whether you prefer something sleek or stylish.
Incipio Octane Pure Case ($30)

You’ll enjoy decent drop protection with this case from Incipio. The Octane Pure Case combines hard, polycarbonate backing that allows the BlackBerry logo to shine through, with a flexible TPU bumper made from Incipio’s impact-resistant Flex2O material. The latter component comes in clear or black varieties, but regardless of which you go with, the fit is perfect. There are also pronounced button covers that are easy to find without looking, as well as cut-outs that provide easy access to your phone’s camera and various ports. If you prefer something slimmer, check out Incipio’s NGP cases.
Buy one now from:
Incipio Amazon
Official BlackBerry KeyOne Smart Flip Case ($58)

Crafted from genuine leather, this official BlackBerry KeyOne case is stylish and functional. There’s a handy window in the front cover that enables you to see the time and check notifications at a glance. Inside, a minimalist shell hugs your phone and generous openings provide unfettered access to your phone’s buttons and ports. There’s also a cut-out at the top, so you can take calls without removing the case, and a cut-out on the back, so you can still use KeyOne’s camera. The Smart Flip Case is expensive, yes, but it should guard against minor bumps. There’s even a soft, inner lining to keep your KeyOne looking good.
Buy one now from:
Mobile Fun
Noreve Tradition B Leather Case ($55)

Easily the best BlackBerry KeyOne case currently available, Noreve’s luxurious, folio-style, real leather wallet is extremely well made. The soft, padded leather exterior comes in a range of different textures and colors and has a secure magnetic closure. Inside there’s room for a couple of credit cards and a slim plastic shell, which holds your KeyOne snugly and securely. There are generous openings for easy access to ports and controls, and you’ll find a cut-out on the back which allows you to use the main camera.
Buy one now from:
Noreve
CoverON TPU Bumper Case ($9)

With a hard, polycarbonate back panel, and a flexible TPU bumper, this affordable, slim case offers some protection without cramping the KeyOne’s style too much. We like the patterned version with the teal bumper, but you can also get a completely clear case, or opt for the clear back with a black or teal bumper section. It has tactile button covers and openings for your camera and ports.
Buy one now from:
Amazon
TopACE Transparent TPU Case ($9)

If you like the idea of a clear case that showcases BlackBerry’s design, but you prefer soft, malleable cases, then this could be the one for you. It’s a simple, soft TPU case that’s easy to fit. It has precise cut-outs for your ports and camera, and pronounced button covers for volume and power. The matte finish adds some grip and it should guard against minor falls and bumps.
Buy one now from:
Amazon
ONX3 Faux Leather Pouch ($5+)

Maybe you prefer a pouch, or you want something cheap to tide you over until some better BlackBerry KeyOne cases are released? In that case, you might want to opt for one of these fake leather pouches. The interior is soft and velvety and there’s a tab you can pull to slide your phone out easily. It comes with a set of earphones, but we wouldn’t expect much from them at this price. The pouch itself comes in a wide variety of different colors.
Buy one now from:
Amazon
Need to clean up your Mac? Here’s how to quickly uninstall apps
Sometimes we can use computers for days, weeks, or even years before we need to do something — and realize we have no clue how to do it. You may know this feeling, for example, if you’ve recently discovered there are some programs on your Mac that you want to delete. While MacOS has many benefits, it isn’t always obvious how to get rid of apps that you no longer need, and the operating system doesn’t come with an instruction manual to tell you what to do. So lets look at the easiest ways to uninstall apps on your Mac, and what apps you cannot delete.
How to uninstall apps you downloaded from the App Store
This applies to pretty much any app you’ve downloaded from the App Store — Evernote, Pixelmator, Plants vs. Zombies, etc. If you’re looking to uninstall one of these apps from your system, here’s the quickest and most efficient way to go about it.
Step 1: Head over to the Dock and look for an option that says Launchpad — the icon showcases a silver rocket ship. Apple’s proprietary keyboards also have a dedicated Launchpad key (F4), and swiping three fingers and your thumb together using an Apple trackpad will allow you to launch the program. Point being: You have several options if one is causing you trouble.

Step 2: Once open, Launchpad will replace any current windows with a grid of apps, listed in alphabetic order. You can view, open, and rearrange apps here if you want, but you’re mostly using Launchpad as a tool for deleting unwanted software.
Step 3: Click the app you want to delete, and hold until the icon starts to jiggle. If you’ve ever used iOS, you know what this is about — the jiggle motion indicates that an app is ready to be moved or deleted. This is easy to do on touchscreen or with a mouse, but it may take you a few tries with the a trackpad, so be patient.

Step 4: When the icon starts jiggling, you should see an “X” appear in the upper-right corner of each icon. Now, simply click this button and confirm your decision with the Delete button to rid your machine of the app in question.
That’s it! Also, don’t worry about accidentally deleting an app that you want to keep. You can reinstall any of the apps you’ve deleted — without having to pay for them again — by going to the App Store and downloading them as you normally would.
How to uninstall apps that aren’t in Launchpad
If you don’t see the program you want to get rid of in the Launchpad, don’t worry! There’s still probably a way to uninstall it. However, you’ll have to work a little harder this time around. Here’s what you do.
Step 1: First, click Finder in the Dock — the icon resembles a smiling computer screen. Afterward, either search for the app that you want to get rid of, or head over to the Applications folder and scroll through until you find the app in question.

Step 2: Check to see if the app has its own folder. If it does, select this folder to look inside. Many larger or older apps are typically bundled with an Uninstaller, which will get rid of the app for you. If the app folder includes one of these Uninstallers, click it. This will automatically run the Uninstaller, which will give you a unique set of instructions for deleting the software.
 Step 3: If the app doesn’t have its own folder or an Uninstaller, you still have options! Click the application icon in Finder, hold it, and drag it to your Dock. Toward one end of your Dock you should see a wastebasket icon, which signifies the Trash. Drag the app icon here, and it should transport the app to the Trash. You can program your Trash to auto-delete after a certain amount of time, or you can Ctrl-click the Trash and select Empty Trash to delete the contents immediately.
Apps that you can’t remove
Keep in mind that there are a number of apps that you will not be able to uninstall. These are apps that are part of MacOS, play an integral role in Apple services, and generally represent the Apple brand to such an extent that Apple won’t let you get rid of them. These include Safari, Mail, and many of the other apps that naturally appear in your Dock.

While there is no getting rid of these apps, that doesn’t necessarily mean you have to keep looking at them. If you want to pretend that they aren’t there, Ctrl-click these apps in the Dock. Then, select Options in the resulting menu and click Remove from Dock. This is a nice little way to clear up space in your Dock, even if you can’t permanently delete this software.
Custom bike shop combines motorbike and surfboard rack, creates the Sea Sider
Why it matters to you
If you live near where you surf, this custom ride might inspire your own surfer bike.
Here’s the simplest take on the Sea Sider: It’s a lightweight motorbike with select bicycle parts and custom-built front basket and surfboard rack. The bike’s purpose is clear, carry one or two people and a surfboard to and from the water. Once you mention its origin, custom bike shop Deus Ex Machina, however, the story gets more complicated.
The Sea Sider remains a statement about surfing and highly functional two-wheeled mobility. Deus Ex Machina, however, or “Deus,” is much more than a one-off custom bike shop.
Deus’ headquarters is in Sydney, Australia, but there are also locations called “flagships” in Bali, Tokyo, Milan, and Los Angeles, plus a second Australian location in Byron Bay. Each flagship has a nickname. For example, the Tokyo store is the “Residence of Impermanence.” You’ll find “The Emporium of Postmodern Activities” in Venice, California, “The Portal of Possibilities” in Milan, Italy, and “The Warung of Simple Pleasures” in one of two locations in Bali. Each location’s name speaks to Deus Ex Machina’s creative intention.
In addition to creating custom motorcycles and sponsoring annual global custom bike “Build Off” competitions, Deus sells bicycles, surfboards, wetsuits, and accessories. The company produces and sells music on vinyl in limited pressings, creates videos, and distributes its t-shirts at hundreds of locations worldwide.
Clearly a firm with a mission, Deus has created a culture of creativity. At Deus flagship locations you can munch on a panini and drink an inventive barista creation as you choose a wetsuit or buy bicycle tires — all while listening to music few others have heard in the background.
But back to the Sea Sider, which was created by the artisans at Deus’ store in Canggu, Bali, Indonesia, The Temple of Enthusiasm. Deus sourced and restored the vintage bicycle handlebars and front light. The crew hand-built the front basket, inspired by one they saw on another old bicycle.
The donor motorcycle, which appears to be a Honda Supersport 125cc, was stripped of all unnecessary parts. Everything that remained was restored and polished. The exhaust and surf racks were handmade and the seat was constructed by a neighboring leather shop. The lightweight rims were imported from Japan.
The resulting ride can take one or two people and a surfboard to the beach, maybe with a packed lunch in the front basket, but it represents so much more.
Cosmo Connected Review
Almost every car or truck driver who ever collided with a motorcycle typically retorts with, “I just didn’t see them.” Although this response irritates those on two-wheels, there’s no question motorcyclists (and bicyclists, for that matter) are harder to see than cars simply because they’re smaller. That’s where the Cosmo Connected comes in.
Available via the crowdfunding site Kickstarter for $79, the Cosmo Connected is a helmet-mounted LED brake light that uses an internal accelerometer to sense deceleration, triggering a bright oval of red LEDs. It has a magnetic mount for easy installation and removal and connects via Bluetooth to a free companion app on an iOS or Android smartphone — of which allows users to configure a variety of custom emergency alerts. It comes in several colors and finishes including black, white, and silver.
Digital Trends was given an early prototype of the Cosmo Connected to try out. None of the advanced features were ready yet, but we nonetheless got a feel for what it was like to ride with it. Here’s our first take.
Dead simple
Simply put, a helmet is the only logical place to place a brake light. It’s the highest (therefore, the most visible) point on a rider and in most countries and states, it’s required by law to wear one. The Cosmo Connected uses a magnetic mount that adheres to the back of a helmet with a non-damaging adhesive, and the brake light housing snaps into place as soon as it’s a few inches away.
 Simon Cohen/Digital Trends
 Simon Cohen/Digital Trends
 Simon Cohen/Digital Trends
 Simon Cohen/Digital Trends
There’s no on button as a user simply gives the housing a solid tap on one side and the LEDs light up twice when on. It turns off after two minutes of inactivity, but don’t worry – it’s very sensitive and won’t turn off simply because you’re resting at a long red light. For its primary mission as a highly visible extra brake light, that’s all there is to it — you’re good to get on the road and let the Cosmo’s sensors determine when you’re slowing down. Because the brake light comes on during any deceleration (and not just when you apply the brakes) it gives following drivers a much more accurate sense of your change in speed.
We found that the Cosmo was bright enough to be seen clearly even during the day, though we did not get a chance to see it in full, direct sunlight.
There’s an app for that
If the brake light function were the only benefit to using the Cosmo Connected, we’d argue it’s already worth the price of admission in terms of the extra visibility it offers. But the free app turns the device into a fall sensor, with the ability to set three levels of response based on the severity of the fall. We didn’t get a chance to try this feature out as it’s still under development, though it does sound promising. In theory, you could arrange for emergency responders to come to the last known GPS location of your phone if no further movement is detected after a fall. Or, if the fall wasn’t that bad, an alert could be sent to a friend or family member who could then decide what action should be taken if they can’t get in touch with you.


The app also shows you remaining battery life and lets you control how the LEDs on the brake light behave. You can choose to have them come on only while braking, activated all the time for extra visibility, or set them to flashing for emergency signaling (handy if you’re stuck at the side of the road).
Not perfect
It’s hard to find fault with the Cosmo’s design. It’s weatherproof, easy to operate, highly visible when braking, and can quickly swap between helmets if you buy additional magnet mounts. However, it simply won’t work for all riders. The curved shape and rubber gasket are designed to work with helmets that have a smooth, continuous radius on the rear surface; not every helmet does. Our three-quarter Daytona helmet was nearly a perfect match for the Cosmo’s curves, with only a tiny gap between the helmet and the gasket. However, our Schuberth M1 proved to be incompatible thanks to its integrated rear vent and non-continuous surfaces.
We’d love to see a lower-profile version in the future.
The biggest oversight, however, is that the Cosmo Connected doesn’t act like a true rear light. Normally, a rear light is always lit for general visibility and then glows brighter to indicate braking. Not so with the Cosmo, which can turn on for braking or be set to always-on (at the same intensity as the braking mode), but it can’t do both. During a briefing phone call, Digital Trends discussed this with Cosmo Connected COO, Laurent de Bernede. Impressively, in a follow-up email, he told us that this would be fixed by the time the product is ready to ship to backers.
The Cosmo is a bit on the bulky side. When attached, the large profile isn’t a problem — you won’t even notice it’s there. We think it looks a little goofy sticking out as far as it does but that’s hardly a deal-breaker unless looks are everything (in which case you probably aren’t interested in a helmet-mounted brake light at all). We’d love to see a lower-profile version in the future.
The company is also working to strengthen the magnets used in the mounts. The prototype we tested certainly seemed to be well anchored and didn’t come off unless intentionally removed, but neither did we hit any major potholes in an attempt to dislodge it. Stronger magnets could only improve this.
There’s also no indicator that the brake light is charging when connected to a micro-USB power cord, and thus no way to know when it’s done charging unless you consult the app. Yet another feature de Bernede told us may be addressed in a future version.
Not alone
If a better braking indicator for motorcycles seems like something that ought to already exist, you’d be right — it does. The $99 GearBrake, for instance, offers the same accelerometer-based deceleration detection and response as the Cosmo Connected but alters the behavior of your bike’s existing rear light. The company claims it gives following drivers an extra one-second warning, which is good in theory but if a driver fails to notice it, it won’t help. We think the Cosmo’s extra high mounting position is far more visible.

Simon Cohen/Digital Trends
Then there’s the $99 BrakeFree — another crowdfunded device — which has the same, magnet-mounted helmet position and accelerometer-triggering as the Cosmo. While it lights up the same way as a regular tail light, it lacks the Cosmo’s app-enabled emergency functions.
The $72 CDN EZC Smartlight places the brake light anywhere on a rider’s clothing, giving it good visibility but it requires wiring it into the vehicle, and some light damage to the apparel in question. It’s not designed to be moved from location to location and only responds to brake application, not other kinds of deceleration.
We even found a shockingly inexpensive $17 helmet light on BangGood.com that not only acts as a brake light but also as a turn signal, too. It mounts directly to a helmet with adhesive and requires the included transmitter to be wired into your bike’s lighting system.
Should you back it?
Plain and simple, we really like the Cosmo Connected. It provides a simple, affordable, and flexible solution to a problem that’s plagued bikers forever. Its helmet-mounted position is ideal for enhanced visibility, giving the driver behind you — and likely several more behind them — a much better sense of your slowing speed.
We can’t speak to its emergency contact functions but so far, the Cosmo Connected looks like a great, if not perfect, add-on for any safety-minded rider. Our short time with the prototype suggests this device is almost ready for production, which should ease the minds of those who may not want to back a crowdfunded project.
This weekend’s comments thread is now open
It’s time to be unproductive and have fun!
Even a short work week ends in a weekend. And since it’s Saturday, that means it’s time to fire up the post where you get to say anything about anything. Almost anything. You still need to be kind to each other.
There are plenty of things to talk about if you’re out of ideas. A new phone from MotoroLenovo, Andy Rubin’s Essential phone, or all the reasons you don’t care that Bixby Voice Assistant is delayed. Or you can just talk about a Nintendo theme park complete with a Mario Kart ride. Whatever.
 Image courtesy of Nintendo
I have the house to myself this weekend so I plan on drinking too much, playing the music too loud and not wearing pants until Sunday night. So, a normal weekend here.
What y’all up to?
New hardware as far as the eye can see [#acpodcast]
It’s all hardware this week, folks.
This week, Andrew, Jerry, Flo and Russell get back to the roots talking about all of the new hardware. We get into the merits of buying an unlocked HTC U11 or Galaxy S8 or Xperia XZ Premium, the new Moto Z2 Play replacing its predecessor, and everything we know so far about the Essential Phone.
And of course, you’ll never guess what Jerry has to say!
Show notes:
- The U.S. unlocked HTC U11 doesn’t support Verizon’s CDMA network, and that’s okay
- The U.S. unlocked Galaxy S8 is available
- Sony Xperia XZ Premium is up for pre-order at $799
- Moto Z2 Play review
- Moto Z2 Play announced as Verizon exclusive until July, unlocked this summer for $499
- Essential Phone is now official
- Essential Phone will have near-stock Android, expand to U.S. carriers soon
This episode of the Android Central Podcast is brought to you by Thrifter, the best place to get great deals in your inbox every day!
Podcast MP3 URL: http://traffic.libsyn.com/androidcentral/androidcentral338.mp3
How to set up peripherals to use with Samsung DeX
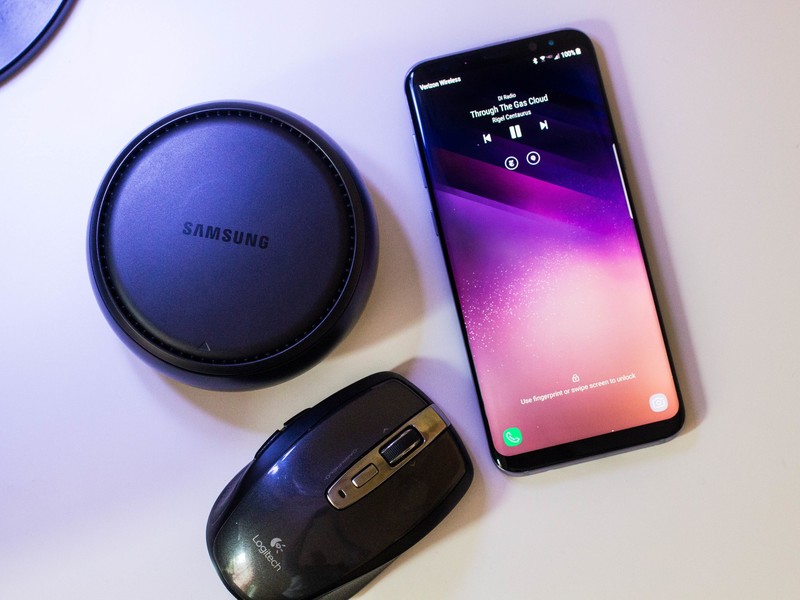
It’s easy to do, though you’ll want to pair your Bluetooth peripherals first.
The Samsung DeX isn’t a replacement for your laptop, but it does make a nice little companion computer for when you’re on the go. Don’t forget the peripherals, however, which you’ll need if you want to actually use the desktop mode to get things done. If you’re curious about what kind of peripherals to actually purchase for the device, we’ve got suggestions for that, too.
If you’re planning to use Samsung DeX on the road, make sure that you pair all of the Bluetooth-connected peripherals before you leave the house. This way, everything will be raring to go once you plug the Galaxy S8 into the DeX dock at your final destination.
How to pair Bluetooth peripherals to Samsung DeX
You can save yourself a ton of headache if you elect to pair all of your Bluetooth peripherals to the Galaxy S8 or S8+ before you play it into the DeX dock. This is all possible from the Settings panel.
In the notification shade, tap the Settings icon.
Tap Bluetooth.
Tap the toggle to turn on Bluetooth.
Tap the device you want to pair under Available Devices.
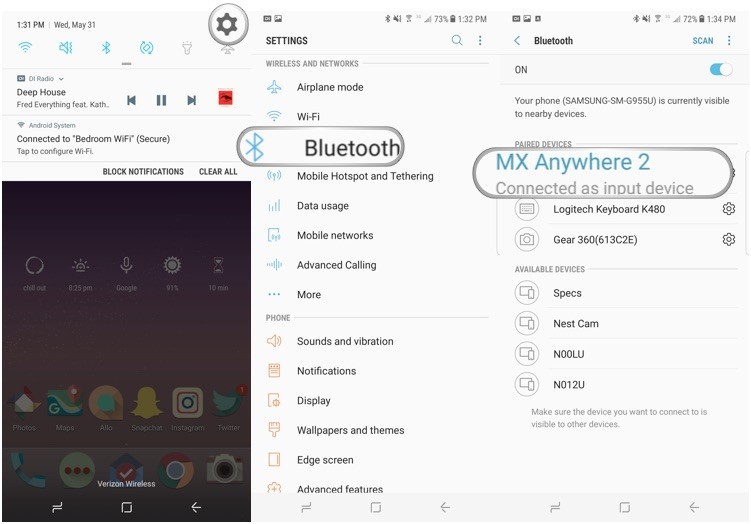
Once the peripheral is paired, you’ll see it appear under Paired Devices. Tap the Settings icon in the same line for more options, including the ability to rename the peripheral or unpair it entirely. Now that everything is paired, the Bluetooth peripherals that tag along on your journey will work instantly with the Galaxy S8. You can even test what you’ve paired while the device is in phone mode before plugging it into DeX.
How to set up USB-connected peripherals
The nice thing about the Samsung DeX is that you can use almost any USB-connected peripherals you might have lying around. All you have to do is plug them in while the DeX dock is operating and they should be instantly recognized.
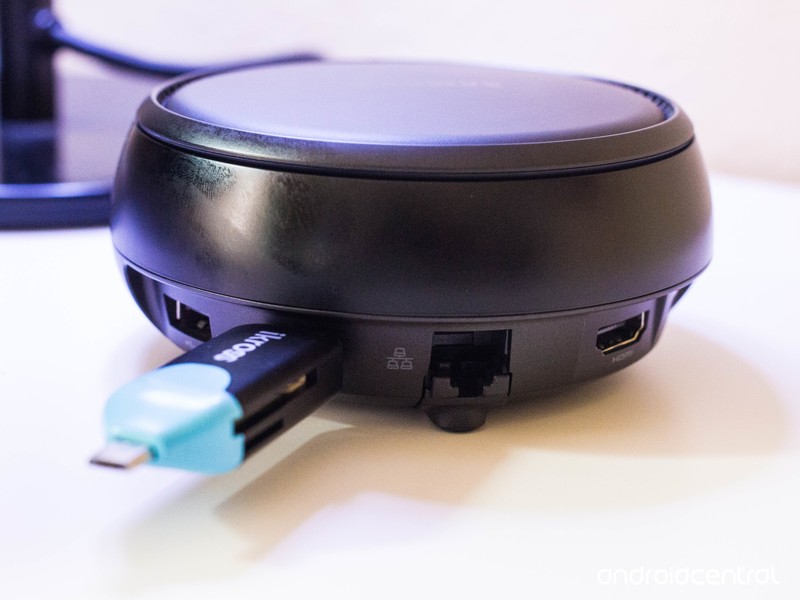
Plug anything that’s USB-connected in and it just works.
I tested the ability with both a wired mouse and a USB-connected one. The latter was of the Logitech Unifying receiver variety, and I didn’t have to install software to have the scroll wheel and back buttons properly work. You can also an external webcam or high-performance microphone if you have the appropriate third-party apps installed. By default, the Galaxy S8 supports OTG, so it theoretically accepts anything that’s USB-connected. You can also use DeX to offload files and apps from external flash drives.
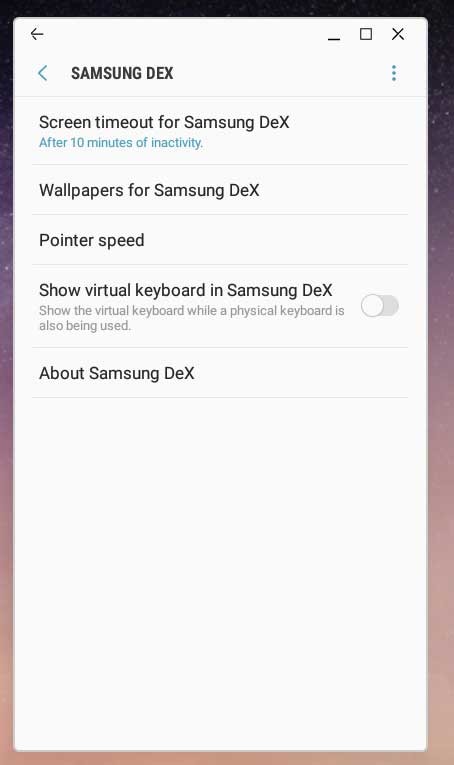
The DeX options screen.
Note that some keyboards may require a bit of a learning curve as you figure out which keys correspond to what. Under Language and input, select Physical keyboard to take a peep at the keyboard shortcuts. You can also adjust the Pointer speed in the DeX settings panel.
