


Vivo shows off Qualcomm’s cool new under-display fingerprint tech
Vivo gets early access to Qualcomm’s ultrasonic fingerprint technology.
Earlier today, Qualcomm announced that it was developing an ultrasonic fingerprint technology that allows manufacturers to integrate a fingerprint sensor directly into the display of a phone. Under-display fingerprint scanning won’t be ready until early 2019, but Chinese manufacturer Vivo showed off the tech in action on a prototype unit of the Xplay6 at Mobile World Congress Shanghai.
As noted by Engadget, Vivo’s prototype had a limited recognition area, but in theory, Qualcomm’s ultrasonic fingerprint sensing can be applied to the entire screen. The tech itself works on OLED panels with thickness of 1200μm or lower.

Along with under-display fingerprint scanning, Qualcomm is rolling out glass and metal-based sensors that can be embedded at the back of a phone. The first phones to feature fingerprint sensors embedded into their chassis will be debuting sometime next year, and it’s possible Vivo will be the first out of the gate with a device. Check out the video below to see what’s in store:
Nougat update finally rolling out to ZenFone 3 Zoom and ZenFone 3 Laser
Nougat update brings much-needed features to the ZenFone 3 Zoom and ZenFone 3 Laser.
ASUS is finally rolling out Android 7.1.1 Nougat to two models in the ZenFone 3 lineup — the ZenFone 3 Zoom and the ZenFone 3 Laser. The update comes in at roughly 1GB, and increments the version number of the ZenFone 3 Zoom to V20.31.49.2 and that of the ZenFone 3 Laser to V30.41.12.1.

Along with Nougat-specific changes — split-screen multitasking, improved Doze mode, and notification replies — the update brings a Portrait Mode, ability to shoot in RAW, tweaks to the ZenUI launcher (Google Assistant is now baked in), and a Google Now feed to the left of the home screen.
The update is being rolled out in stages, so it may take up to a week for all variants of the ZenFone 3 Zoom and ZenFone 3 Laser to receive it. If you’re rocking either device, head into your phone’s settings to see if the update is available.
Tablo brings OTA TV directly to the NVIDIA Shield TV with a dedicated tuner and app

The new app for Android TV pairs with the Tablo Tuner to put OTA TV on the Shield without the use of a local network.
Tablo is a pretty terrific product for cord cutters in North America, and the company’s most recent product, Tablo Dual, was its first to incorporate a built in DVR. Now, they’re back with another hot new product and this time it’s for the NVIDIA Shield TV.
Tablo Engine and Tablo Tuner are available starting today. The former is an app that installs on the Shield TV, the latter is a USB TV Tuner that plugs directly into the box.
The Tuner is a simple dongle with a USB connection at one end and the hook up for your OTA TV antenna on the other. It just connects to a spare USB port on the Shield TV and interacts then with the Tablo Engine app to give you your live television channels.

That’s not all either. Here’s a rundown of what to expect:
- Live TV: Watch, pause and rewind live TV in stunning full HD quality
- Fast Channel Changes: Tune to live TV in seconds from the live TV grid guide
- Recording & Time Shifting: Watch, pause, rewind and fast forward completed and in-progress recordings
- 14-Day Live TV Grid Guide: Browse and set recordings for shows airing over the next 14 days
- 5.1 Surround Sound: Enable Dolby 5.1 Surround Sound pass-through for a premium audio experience
Tablo Engine will also work with the ‘Hauppauge WinTV-dualHD USB tuner stick. The dual-tuners built into Tablo Tuner should also allow for watching and recording a different channel at the same time. Naturally, to record TV, you’re going to need plenty of storage. On the Shield TV Pro it’ll store its MPEG2 recordings on the internal hard drive first, on the 16GB model you’ll need external storage attached. There’s also a web app to help you manage recordings when you’re not in front of the TV.
The Tablo Tuner is available starting today for $69.99 USD/$89.99 CAD from the Tablo store. The Tablo Engine app is a free download from the Play Store, and buyers of a Tablo Tuner will get a free 6-month subscription to the guide data package. After this you’ll be paying $3.99 USD/$4.99 CAD monthly or $39.99 USD/$49.99 annually for this package.
At the end of the day, the Tablo Tuner package is another great way to watch television on the Shield TV. Eventually it’ll be available to other Android TV boxes, but for now there’s no denying it’s another feather in the Shield cap. Most other solutions to watching TV on the Shield require the use of a local network connection, but this idea from Tablo really does just turn it into a ‘proper’ TV box and DVR system. The drawback is the rest of the world can’t indulge right now, but it’s a compelling option for U.S. and Canada-based cord cutters.
See at Tablo
NVIDIA Shield Android TV
- Read our Shield Android TV review
- The latest Shield Android TV news
- Shield vs. Shield Pro: Which should I buy?
- Join the forum discussion
- Complete Shield Android TV specs
Amazon
Deal: Get a 5GB plan for as low as $11 your first month with Tello
Try out Tello and save 70% on your first month!
Here at Android Central, we’re always looking to pass along great deals to our readers, and that includes saving you money on your wireless bill. We’ve written about the advantages of using a mobile virtual network operator (MVNO) before, which piggyback on the Big Four carriers’ networks and offer service at huge discounts to consumers.

Today, we’re passing along a great deal for Tello, an alternative carrier that operates on Sprint’s nationwide LTE network. Tello lets you completely customize your monthly plan to precisely fit your needs. Choose the talk, texts and data amounts that fit your lifestyle and only ever pay for what you use. Modular ftw!
You can check out and compare the full list of Tello plans available right here:
Until the end of June, you can save 70% on your first month’s bill by using the promo code 2HOT. The promotion is only available for new plans activated this week with a monthly value of $10 or more. Since Tello operates on the Sprint network, you have the option of bringing your own CDMA device developed for Sprint, or buy a new phone through Tello.
This deal ends on June 30, so be sure to sign up at Tello and use promo code 2HOT to save 70% off your first monthly bill.
See at Tello

OnePlus 5 update eats all the small bugs prior to wide release
OxygenOS 4.5.3 is here, and it’s nice to see OnePlus working so hard.

Chances are, unless you ordered a OnePlus 5 the day it was announced you probably don’t have your unit yet. But that isn’t stopping the company from rolling out updates to fix nagging bugs on the new flagship.
When I received my review unit, it was running OxygenOS 4.5 and there were some very obvious issues with it. Prior to announcement — on the 19th of June, I believe — I got OxygenOS 4.5.1, which smoothed things over. A few days later, OxygenOS 4.5.2 fixed some camera issues and some more bugs. And now we have OxygenOS 4.5.3, which has largely eliminated two of my biggest complaints with the phone while addressing even more generalized maladies.
The update introduces a curious “Recommendation index”, which may be a joke but we’ll see. At the very least, it could just be an importance qualifier — “We really think you should download this update ASAP” kind of thing. The 54MB update also addresses an ongoing Wi-Fi problem that seemed to affect a number of people, as well as a brightness issue that caused me to have to turn off automatic brightness in low-light settings.
Fast, direct updates are one of the benefits of not having to go through carriers, and it’s nice to see OnePlus take advantage of this in the early days of its new device.
To download the update, head to Settings —> System updates.
OnePlus 5
- Complete OnePlus 5 review
- OnePlus 5 specs
- Which OnePlus 5 model should you buy?
- Camera comparison: OnePlus 5 vs. Galaxy S8
- The latest OnePlus 5 news
- Join the discussion in the forums
OnePlus
How to take better photos with the Huawei Mate 9
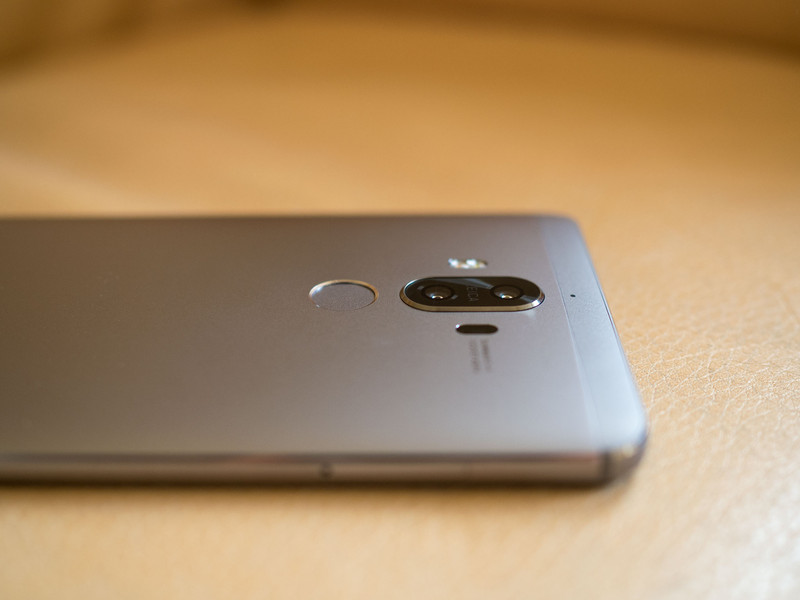
Are you Mate 9 photos not looking so good? Try these tips.
The Huawei Mate 9’s dual rear-facing cameras are a ton of fun to shoot with, made even better by their bundled in camera modes and extra features. But maybe you’re feeling a little overwhelmed by it all and you’re not sure where to start — that’s okay. Here’s are some quick tips for putting the Mate 9’s cameras to proper use.
Swipe up, swipe around
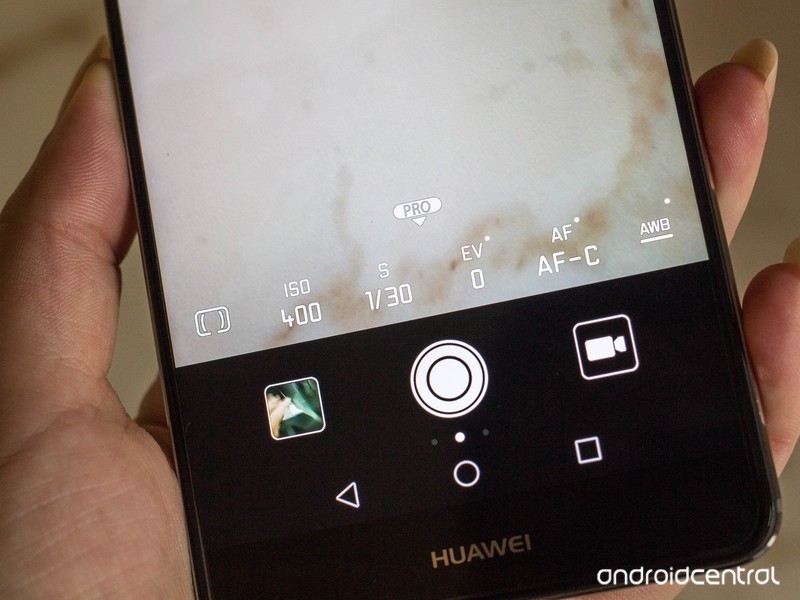
The best way to control the Huawei Mate 9 is to get used to swiping around the camera interface, as that will reveal all the extra functionality you need to get more control over the composition of your photo. For instance, swiping up will reveal the Pro settings, which allow you to control the ISO, shutter speed, exposure, focal length, and white balance. You can also swipe to the right to reveal the page of preprogrammed camera modes, or to the left for more settings.
If you’re stuck on what all those options are, tap the Info icon on the main camera screen to bring up a cheat sheet, This little resource is extremely helpful if you’re stuck on some of the different terminology.
Take advantage of the modes
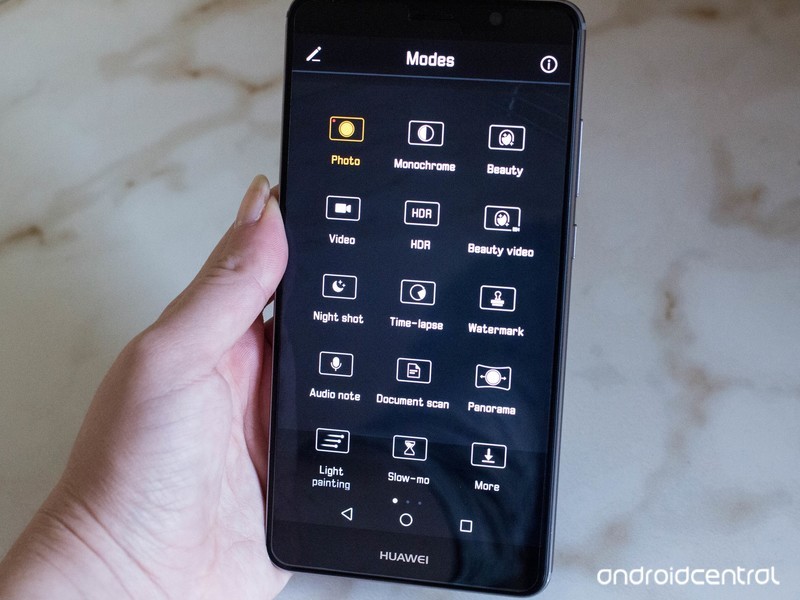
Take advantage of those extra camera modes if you can as they’ll help you get more creative with the Mate 9. It’s here that you can enable HDR, switch to the settings for a night shot, and set up the smartphone for a time-lapse. You can even choose from a light trail mode, which is really quite something.
Get a tripod
If you’re trying to be taken seriously as a smartphone photographer, you’ll definitely want to consider investing in a smartphone tripod of some sort. The Mate 9 lets you adjust the shutter speed from the Pro mode and set it up to do a time-lapse, but you’ll barely be able to take advantage of it unless you keep the smartphone still. The Huawei tripod selfie stick is a good accessory to consider for this reason exactly.
Use flash as an aid
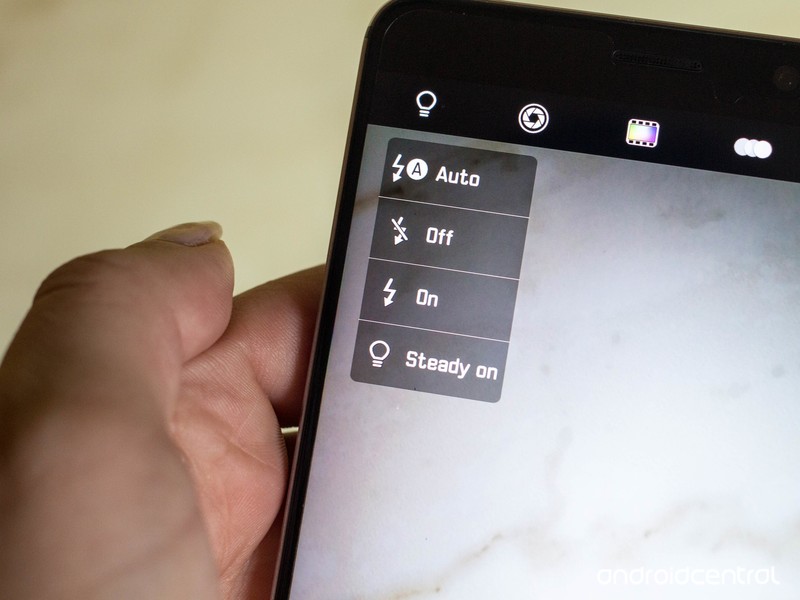
Do not rely on flash to help you populate your photos with the best scene. Sometimes, you’ll end up with a nasty glare, especially if you’re inside a bar where there are plenty of surfaces for which the light can reflect off of. However, if you’re attempting to compose a night shot, or maybe you do want to shoot some friends and you’d rather avoid making them look blown out, you can use the Steady on option in the flash menu.
Set your volume button to be a helper
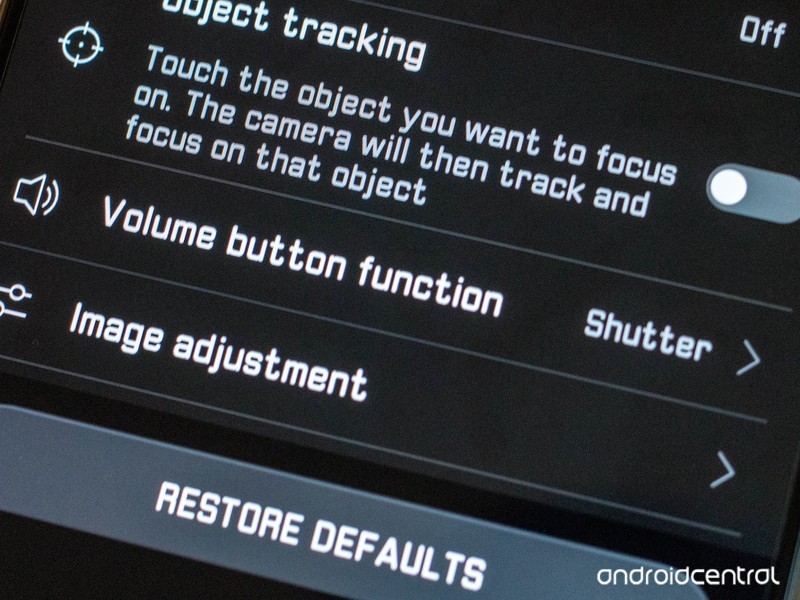
There’s nothing worse than when the volume button is working against you, especially as you’re attempting to shoot a photo. Avoid this annoyance by setting the volume shutter button to shoot when you press it. You can find this in the camera settings by swiping to the left and scrolling down to the Volume button function option. It’ll also make the relatively large phone easier to grip in weird photo-shooting situations.
Avoid using unnecessary filters
The Mate 9 comes bundled with eight built-in photo filters, but just because they’re there doesn’t mean you have to use them. They’re a hoot to use if you’re shooting a video, for example, but you might want to steer clear of them if you’re going to pop the photo into Instagram, anyway.
Be sure you’re shooting at the right resolution
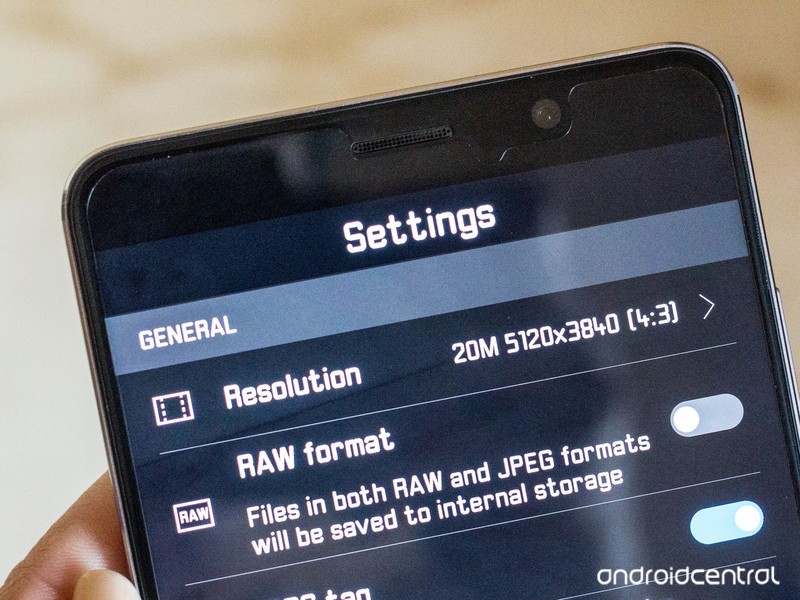
By default, the Huawei Mate 9 doesn’t shoot at its full camera resolution. You’ll want to head into the resolution settings upon launch of the camera app and ensure that it’s shooting at 20-megapixels.
Take advantage of the adjustable aperture
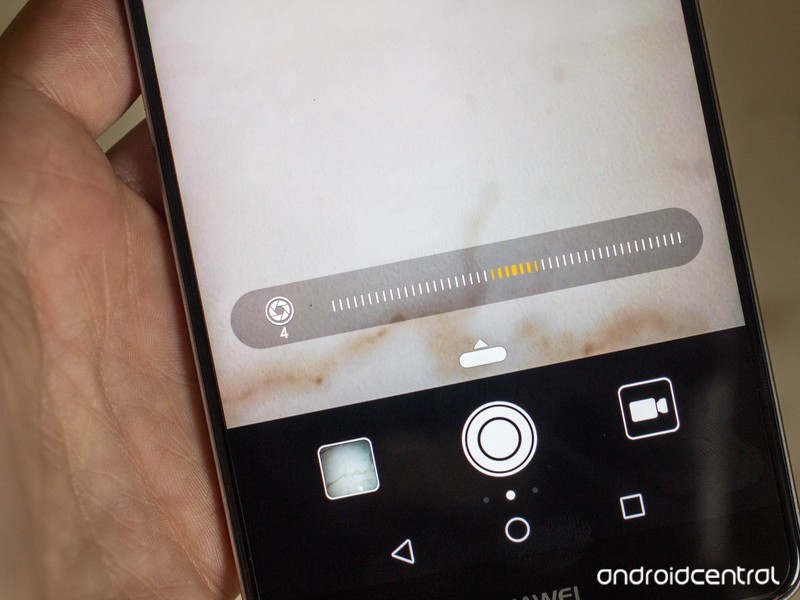
The Mate 9’s “wide aperture” mode lets you slide to adjust the camera aperture at will. It’s quite impressive, and you can use it to help achieve a bokeh effect, or simply take a fantastic landscape shot.
What do you do to take better photos?
Share your tips and tricks for others in the comments!
Huawei Mate 9
- Huawei Mate 9 review
- Huawei Mate 9 specs
- Where to buy the Mate 9 in the U.S.
- Porsche Design Mate 9 unboxing
- All Huawei Mate 9 news
- Join the discussion in the forums
Jet.com
Amazon
How to get the most from Amazon Alexa in Canada

“Alexa, play O, Canada!”
Amazon hasn’t officially brought its Echo speakers to Canada yet, but that hasn’t start eager early adopters from getting their hands on them. The good news is you can set it up to work in Canada, although it takes a bit of work to do so, including manually downloading the Alexa app and tweaking some settings in your Amazon account.
But once you’ve got things set up, you’ll be able to enjoy the full benefits of having Alexa at your beck and call.
Setting up Alexa for the first time
There are a couple ways to initially set up Alexa — either by using the Alexa website or through the Alexa app. Since the Alexa app is not yet officially available in Canada, the website will be the preferred method for most.
Before you go through the setup process, you need to change some settings in your Amazon.com account. The main goal is to trick Alexa into thinking you’re in the US, which will unlock most of the functionality and features.
For me, this was a two-step process which required changing my default shipping address to a US address (I went with the address of a border shipping service I’ve previously used), and then going into your Amazon.com account settings (not Amazon.ca) to change your country setting for your Amazon content and devices.
Click on Accounts & Lists.
Click Your Content and Devices.
Click the Settings tab.
Under Country Settings, click the Change button and select the United States.
Once you’ve tweaked your Amazon account settings, the actual process for setting up your Echo speaker is pretty intuitive — simply plug the speaker in and follow the onscreen instructions to finish setup.
If you don’t do the tweaks to your Amazon.com account you’ll find that nearly all the settings are grayed out which means you won’t be able to customize your music and media accounts.
Alternatively, you can set things up using the Alexa app. Since Alexa is not currently available in the Google Play Store to go down this route requires downloading the Alexa app APK from a third-party source and manually installing it on your phone. There are always risks associated with installing an APK you’ve downloaded from the internet, so make sure you’re downloading it from a trusted source. Better yet, ask an Amerifriend to use something like ML Manager to extract and share their Alexa APK.
Tweaking Alexa for Canada
Once you’ve gone through the initial setup process, it’s time to tweak your Alexa settings. All the basic functionality like setting timers and alarms, creating lists, and controlling your smart home products will work out of the box as you would expect, but there are some settings, skills, and tricks to keep in mind to try for a more Canadian experience.
Changing measurements to metric
By default, Alexa uses imperial units for distance and temperature measurements, but you’re able to switch over to metric units in the device settings.
From the Alexa menu, tap Settings
Tap your device.

Swipe up to scroll down to Measurement Units.
Flip the switches next to Temperature Units and Distance Units.
It’s just that easy! Now Alexa will give temperatures in Celsius, and distance in kilometers.
Canadian skills
There are already thousands of skills available for Alexa, and most will work. Now, the actual quality of the skills varies, so you’ll want to spend some time browsing through the Skills section on Amazon.com or from within the app.
For skills specific to Canada, you may be interested in checking out the following:
- CBC News hourly updates: Gives you the latest news from our national broadcaster as you would hear on Radio-Canada. Once the skill is added, you can get the latest news by asking for your flash briefing. There are plenty of (unofficial) skills for other Canadian news outlets, but CBC’s is the most polished by far.
- Hey, Toronto: For those who live in T.O., the Hey, Toronto skill lets you use Alexa as a voice interface to access Toronto Open Data. Alexa will send the results to the Hey, Toronto website on your phone. You will need to create an account and link it to Alexa, but once you’ve done this you’ll be able to ask about city services and directions around Toronto.
Expect more Canadian-specific skills to become available once Amazon officially launches the Echo in Canada.
Six Awesome Amazon Alexa Skills You Might Not Know
Tips and tricks for using Alexa in Canada
- You’ll need to mention your city when asking for weather. Since you need to set your country to the U.S. to get things set up, you’ll need to remember to include your city when asking for a weather update.
- Spotify Premium is your best bet for streaming music. Alexa has a somewhat limited support for music streaming, which is even more limited for Canadians. Amazon Music and Pandora are not available in Canada, which leaves you with Spotify, iHeartRadio, or TuneIn as your only remaining options. Of those three, Spotify is the superior option although you’ll need to be subscribed to Spotify Premium to link your account to Alexa.
- Features that rely on location services won’t work. For instance, if you ask Alexa for movie showing times in your city, it won’t work because Canada is not yet supported.
How has Alexa been treating you?
Are you rocking an Amazon Echo in Canada? How did your setup go? Any Skill recommendations for your fellow Canadians? Let us know in the comments!
Amazon Echo

- Amazon Echo review
- Echo Dot review
- Top Echo Tips & Tricks
- Tap, Echo or Dot: The ultimate Alexa question
- Amazon Echo vs. Google Home
- Get the latest Alexa news
Amazon
Best VR Headsets Under $50

What are the best budget VR headsets?
The high price of the big VR headsets, including HTC Vive, Oculus Rift, and PlayStation VR, put them out of reach for many people. There is a huge market for affordable VR, and many companies are pumping out mobile headsets that work with modern phones. Wading through these budget headsets can be a bore, so we put together a list of the best you can buy that won’t cost more than $50.
Read more at VR Heads!
What is Tinder and how does it work?
Dating isn’t what it used to be.
Over the past couple decades, online dating has revolutionised the game. You no longer have to hit on people at bars and get rejected face-to-face. You can now carefully construct your virtual profile with coy details and selfies taken at the perfect angle, and you can look for someone who matches your preferences, then ping him or her a brief message and wait for a response.
- There’s now a Tinder-like dating app for Pokemon Go players
- Top 20 GIFs on Tinder: Use these to woo and you’ll likely get a response
But Tinder has taken this now-normal process and twisted it a little by adding one key gesture: swipes. Now, when looking for someone to ask out, you’re literally swiping through an endless bucket of selfies that the app surfaces on your screen. These selfies are of real people located near you. With a quick swipe to the left, you can reject them, or with a swipe to the right, you can ‘like’ them, and hopefully match and send them a message.
It sounds simple, but that gesture has catapulted online dating into mainstream norm, where now you’d be hard pressed to find a single person who hasn’t at least tried using Tinder to find a date. If you’re new to the dating scene and want to try Tinder, here’s what you need to know.
What is Tinder?
Tinder, which launched in 2012, is a social app that facilitates communication between mutually interested users.
Users use left or right swipes to ‘like’ or ‘dislike’ photos of other users and potentially match with them. Chatting on Tinder is only available between two users who have swiped right on one another’s photos and matched. Tinder is therefore commonly used as a dating services app. As of 2017, Tinder is registering about 1.6 billion “swipes” per day and producing about 26 million matches.
Where is Tinder available?
Tinder is available in more than 190 countries around the globe, though it’s not the most popular dating app available. London-based Badoo is the top dating app across 21 of the world’s biggest countries, according to data released by App Annie to the BBC, with Tinder topping the charts in 18.
How do you sign up for Tinder?
Ready to join Tinder? Follow these steps:
Download the Tinder mobile app on your Android or iOS device. It’s free to download. However, some features cost money to use.
Login with Facebook. You therefore need a Facebook account, but Tinder won’t ever post to your Facebook.
Grant access to your device location.
And that’s it.
How does Tinder work?
Once you download and join Tinder, follow these steps to master the app:
Set up profile
When you open Tinder for the first time, you’ll want to set up your profile before you begin swiping. Tap the Profile icon at the top of the screen (in the nav bar) to access the Profile screen.
You’ll see a pencil button on your Profile screen. Click it to access the Edit Profile screen and add your profile photo (the first photo of you that people will see when swiping) as well as other photos (people can tap on your profile to see more photos beyond your profile one) from your camera roll. When adding photos, you’ll be able to select a Smart Photos option that tests all your photos and picks the best one to show first.
Beneath the photos area on the Edit Profile screen, you can add details about yourself, including where you work and where you went to school. You can also connect your Instagram account and Spotify account so you can show others more photos and the music you like. You can also designate your gender and choose to hide your age and your distance.
Adjust settings
On the Profile screen, you can tap the Settings button to access the Settings screen, where you can adjust which gender you’d like to see on Tinder, your searching distance, the age range you’d like to see on Tinder, whether you want your profile to appear in Tinder’s feed, etc. You can also add your anthem, claim your username, and enable Tinder features like Super Likes, Boosts, and Tinder Plus. A new feature, Tinder Gold, is being tested in select countries, before being rolled out. More on this feature later.
Start swiping on individuals
Tap the Fire icon at the top of the screen (in the nav bar) to see a feed of individuals you can swipe left or right on. Remember, swiping left is a reject, while swiping right indicates you’re interested. You can also tap the red X button below photos to reject, or you can press the green heart button below photos to indicate you’re interested. When you’ve matched with someone, Tinder will alert you.
If you’d like to learn more about an individual before swiping, tap on his or her’s profile photo. You will then be able to see their entire profile with details, linked accounts, and more. You can also slide through their photo carousel to see more photos. Again, if you like what you see, tap the heart button on their profile, or tap the X button on their profile to reject.
To indicate you’re super interested in someone, tap the blue star button beneath their photos or on their profile.
If you’ve accidentally rejected or liked someone, you can tap the yellow rewind button below photos to reverse your action. However, this requires a subscription to Tinder Plus, which costs £4.99/month, £2.50/month for six months or £1.92/month for 12 months. You will be asked subscribe, if you haven’t already, and your payment method on Apple’s App Store or Google Play Store will be charged.
To ensure everyone in your area will see your profile when swiping, you can buy boosts. Tap the purple lightning button below photos and then select Boost Me. Buying a boost will make your profile the top profile in your area for 30 minutes, and you should get more matches as a result. A single boost costs £3.99, while five boosts costs £3 each, and 10 boosts costs £2.54 each.
Start swiping on groups
You can also find groups of people to hang out with on Tinder. Simply tap the People icon at the top of the screen (in the nav bar). You will then see a Group screen with a feed of groups you can swipe left or right on. When you’ve matched with a group, Tinder will alert you.
If you’d like to learn more about a particular group before swiping left or right, tap on profile photos in the group’s photo collage. You will then be able to see the profiles of each person in the group.
Before you swipe left or right on groups, you’ll need to create your own group of at least one other person. On the Groups screen, tap the orange arrow button at the bottom. You’ll then see options to form a group.
Start chatting with people
Whenever Tinder alerts you to a new match with an individual or group, you will be given the opportunity to start a chat with the match, keep swiping, or tell your friends. Tap Send a Message to access the chat experience, where you can send text replies or GIFs from GIPHY.
To see a feed of all your chats, simply tap the Chat icon at the top of the screen (in the nav bar). You can then tap on any individual or group to start or resume your chat with them.
What are Tinder’s biggest features?
We’ve already discussed how to use these key features above, but here’s a little more detail in case you’re confused:
- Swipes: Tinder lets you swipe left (reject) or right (like) on individuals and groups of people. This is free to do.
- Super Likes: Tinder lets you indicate you really like individuals with Super Likes. You only get a few of these before you run out, and then you’ll have to wait to get more. If you don’t want to wait, you can upgrade to Tinder Plus (costs money) and instantly get more Super Likes.
- Boosts: Buying a boost will make your profile the top profile in your area for 30 minutes, and you should get more matches as a result. A single boost costs £3.99, while five boosts costs £3 each, and 10 boosts costs £2.40 each.
- Tinder Plus: Tinder Plus is the premium version of Tinder. It unlocks most features, including the ability to rewind on swipes, which is handy if you accidentally swiped. Tinder Plus costs £4.99/month, £2.50/month for six months or £1.92/month for 12 months. Tinder Plus also lets you discover people in areas you’re currently not located in, among other things.
- Swipe with Friends: Tinder has recently become more social, by adding the free ability to find other a group of friends to hang out with. But first you need to set up your group of at least one other friend (go to the Profile screen and tap the Create Your Group option).
- Chat: Once you’ve matched with individuals and groups, you can start chatting with them or send them GIFs. This is free to do.
What is Tinder Select?
Tinder Select is a members-only version of the app. It’s meant for elite users, like “CEOs, super models, and other hyper-attractive/upwardly affluent types” or “celebrities and people who do really well on Tinder”, according to TechCrunch, which claimed to have obtained photos depicting the feature and how it works. It’s not a completely separate app, but rather a separate option found in Tinder.
Towards the end of 2016, Tinder invited people to use Tinder Select. Those people reportedly also have the ability to “nominate” others to join, though those who were nominated can’t nominate anyone else, because Tinder doesn’t want the members-only feature to spread uncontrollably. It’s unclear exactly how Tinder decides who gets an invite and who doesn’t.
You can learn more about Tinder Select and how it works from here.
Tinder
What is Tinder Gold?
Tinder Gold is a new feature that Tinder is introducing, but initially only testing in Argentina, Australia, Canada and Mexico. It’s believed it will roll out to more countries soon.
The main feature of Tinder Gold is to let you see which users have liked you, something that many users have been wanting for some time.
Tinder hasn’t said how much Gold will cost, but anyone currently subscribed to Tinder Plus will only need to pay a small amount more to upgrade their subscription, whilst those on the free tier will need to pay more.
To see the other users that have ‘liked’ you, you’ll need to go to the screen where you currently see your matches and then click on the first circle that appears. This circle will be surrounded in gold to separate it from your other matches. You’ll then go to a new screen, where you can see all the other users that have swiped right on you, making it easier and quicker to find a potential match.
Want to know more?
Check out Pocket-lint’s Tinder hub for related news and reviews.
Nintendo N64 Classic Mini: Rumours, games and everything you need to know
After the phenomenal success of the Nintendo Classic Mini: Nintendo Entertainment System in 2016, with stock selling out almost immediately as pre-orders became available, the same seems to have happened again with the follow-up: the SNES Classic Mini.
It took mere minutes after Nintendo UK opened its own pre-order page for the 2017 retro games machine to sell out too.
With such incredible interest in them both, we don’t think it’s too far a stretch to believe that Nintendo will aim for third-time lucky next year, and extend the line further, with a micro version of the next console in the chain: the N64.
Indeed, we’re willing to bet our grandmothers on a Nintendo Classic Mini: N64 Edition – otherwise known as N64 Classic Mini – being announced in summer of 2018. That’s why we present everything you need to know about the prospective device, including our wish list of games we’d like to see on it.
We’ll update this feature as and when new information comes to light.
What is the Nintendo Classic Mini range of consoles?
At the end of 2016, Nintendo released a small, self-contained version of its original 80s games console, the NES Classic Mini. Priced at £49.99, it came with a single controller and 30 legendary NES games preinstalled, plus an all-new front end to flick through them.
Pocket-lint
It sold out quickly and received rave reviews, including from ourselves: NES Classic Mini review. However, the cable on the controller was far too short, leading many to invest in an extension lead or third-party wireless control pad.
A follow-up, based on Nintendo’s second major home games console, the Super Nintendo, will be available globally on 29 September. Priced at £69.99, the SNES Classic Mini will come in different variants for Europe, North America and Japan, to ape the styles of the originals, and pre-orders have already been selling like hot cakes.
Nintendo
The Western versions come with 21 games preinstalled, including the previously unreleased Star Fox 2, and two controllers with longer cables this time around.
If Nintendo is to have a third bite at the cherry, we suspect it will be the last. The N64, originally released in 1996 in the US, 97 in the UK, was the last Nintendo home console to feature game cartridges rather than discs – until the Switch, of course. Its games, therefore, would be easier to emulate than those for its successor, the GameCube. Indeed, there are plenty of N64 emulators around that work well on other machines.
Nintendo N64 Classic Mini release date, price and availability
If Nintendo is to follow-up the NES Classic Mini and SNES Classic Mini consoles with an N64 Classic Mini, it will likely announce it in a similar time frame to the previous models.
The NES Classic Mini was announced on 21 July 2016 and released 11 November 2016 in the UK and US. The SNES Classic Mini was announced on 27 June 2017 and will be available from 29 September 2017.
- Nintendo SNES Classic Mini: Release date, pre-order details, price, games and more
- Nintendo SNES Classic Mini official pre-orders open then sell out in minutes
- Can’t buy a SNES Classic Mini? How to build your own retro console for just £50
It is likely therefore that an N64 Classic Mini would be announced in June or July 2018, if it indeed is part of Nintendo’s future plans.
We would also expect it to be available from September 2018. However, pre-orders would likely begin on the same day as it is announced or a day later – as was the case with the SNES version. And it will likely sell out quickly too.
As for price, the NES Classic Mini was $59.99 in the States, £49.99 in the UK. The SNES Mini $79.99/£69.99. Considering the $20/£20 rise each time, presumably for more complex innards and the extra controller, it is safe to guess an N64 version would be $99.99/£89.99 respectively.
Nintendo N64 Classic Mini games
Here’s the crunch. Any future Classic Mini console will be defined by its games. Both the NES and SNES Mini consoles have a large selection of first-party games from Nintendo, plus some from third-party partners, such as Capcom and Namco Bandai.
Here then are N64 games we’d like to see amongst the 20-30 we’d expect to be preinstalled.
Super Mario 64
Nintendo
Not just one of the best N64 games but one of the best games of all time. It changed the platform game genre for ever, adding 3D puzzles and a more open world feel to platforming.
Super Mario Odyssey for the Nintendo Switch is reportedly based on its formula.
1080° Snowboarding
Nintendo
Easily our favourite snowboarding game of all time, it used the unique N64 controller to its max – providing easy to grasp but difficult to master stunts. But the races themselves are also unsurpassed.
Mario Tennis
Nintendo
There were plenty of fun tennis games before Mario made his racquet-based mark, but this is the most fun of all. Crazy on-court antics made for a super multiplayer experience.
Kirby 64: The Crystal Shards
Nintendo
As the only Kirby game to be released on N64 it’s a shoo-in if the Mini version materialises. It’s a 2.5D platformer featuring the round, pink ball o’ fun.
Yoshi’s Story
Nintendo
Another classic platformer (there were many on the N64), Yoshi’s Story was the last game starring the wee dinosaur until Yoshi’s Woolly World many years later.
Pokemon Stadium
The Pokemon Company
Its not the best Pokemon game of all time, but it does sate that Pocket Monsters battling urge with turn-based skirmishes with 42 of the Pokemon from the series early days.
Paper Mario
Nintendo
Basically a follow-up to Super Mario RPG, this role-player was the first to star the 2D version of Mario in a 3D world. It’s well worth a play.
Donkey Kong Country 64
Nintendo
With Mario’s transition into 3D a huge success it stood to reason that Donkey Kong would soon follow. One thing we remember about this game is how much more difficult it was than most of its time.
Star Fox 64
Nintendo
Star Fox and Star Fox 2 are pre-installed games on the SNES Classic Mini so, should Nintendo opt for a reimagined N64 release, this should be one of the first on the list.
Mario Kart 64
Nintendo
To be honest, of all the generations of Mario Kart, this is our least favourites. The tracks were a little to wide in our opinion. Still, it’s a Mario Kart game and. as such, is worthy nonetheless.
Banjo-Kazooie
Rare
It is unlikely that Banjo-Kazooie or sequel, Banjo-Tooie, will make it onto any Nintendo console, let alone the N64 Classic Mini. It was developed by Rare, which is now part of Microsoft Studios and currently making Sea of Thieves for Xbox One. Both original platformers were also rereleased for Xbox recently, further hampering their chances.
The Legend of Zelda: Ocarina of Time
Nintendo
Like Mario 64, Ocarina of Time is one of the greatest games of all time, not just for the N64. The 3D RPG was the direct inspiration for every home console Zelda since, with Breath of the Wild owing much to it.
The Legend of Zelda: Majora’s Mask
Nintendo
Some believe that Majora’s Mask was even better than Ocarina of Time. This was exemplified by the original cartridge being in high demand, yet with few copies manufactured. It was therefore hard to get hold of, which amplified its cult status.
Super Smash Bros.
NIntendo
Nintendo’s excellent beat-em-up, starring many of its own characters, became a huge hit and has subsequently spawned a few sequels. This is where it started.
Wave Race 64
Nintendo
Alongside 1080° Snowboarding, this was our favourite N64 racing game. It offered four-player split-screen action, which we used at many a gathering. Great fun.
Pilot Wings 64
Nintendo
While not as good as the Super Nintendo original, Pilot Wings 64 still offered a great collection of air-based mini-games to pit your wits against.
And finally, of course…
GoldenEye 007
Rare
Even though it is widely regarded to be one of the best games ever, this will never happen sadly. Not only was it made by Rare, which we explain above is now part of Microsoft, but the licensing mess that has put it into limbo for almost 20 years are unlikely to ever be resolved.
