


Tap Numbers: An almost too-simple Android game (review)

If you’re looking for a deep, intensive, complex gaming experience… you’ve come to the  wrong review. For this is a review for Tap Numbers, a well-done but very, very simple gaming experience on your Android device.
The game comes from the developer MateriUp. It’s a type of match game that is very friendly for all ages. Let’s take a fairly quick tour of this game.
Setup
 Like the rest of this game, setup is dead-simple. Just download from the Google Play Store, and click on your shiny new icon. From there you jump right into the game. Done.
There are some simple settings (sound effects, music on/off, etc.), and an achievements screen; but there really won’t be much use for these for most folks.
Gameplay
How to explain this and give the game the credit it deserves? Upon entering play, you are given a random number which immediately begins counting up. Directly above is a static number within a circle. You only job is to tap the screen when the ascending bottom number matches the static one above. 
That’s it; that’s your only job.
If or when you do stop the count-up so both numbers match, you are immediately transferred to a new screen with an new static number to match. The goal is to survive, matching the number you’re given and moving on. The risk is either tapping too soon or too late, missing the number-match. You are scored a point for each match you make. If you do miss, your game is immediately over and you must begin from zero.
There is a bit of variation to the game, but it lies specifically with the speed of the counting-up of the numbers. When you begin play, the game moves very steady, and fairly pedestrian in its pace. This allows you to get used to the game and find your groove.
But, after a few rounds of this easy speed, the pace begins to waver. At first it will speed up slightly with each round, and though the increase is incremental and rather expected, it does a good job in ramping up the tension.
Then the game changes a bit; the speed will begin to vary in its increase and decrease. If you would record the speed on a scale of 1 to 10, one round would be a 3, then the next a 5, then a 9, then a 4, 7, 6, 2, 8, and so on.
The real challenge lies in once you get to the upper levels of your game. With this variation in speed also comes a variation in the difference between your goal number and the number you start with.
In the beginning most/all of your numbers are at least separated by 5; this gives you a decent amount of time to gauge the speed in which to anticipate your tap. But as you progress through the levels, this difference in numbers you start with starts to vary. One level you may have a difference of 7, then 4, then 11, then 3, then 6, 2, 8, 3, etc.
Coupled with the speed variation, getting to higher levels drastically increases the difficulty of this game – as simple as it seems. Sometimes the best tweaks to a game lie in its simplicity, and that’s what you have here. The upper levels are just as difficult for adults as it is for kids, and that makes Tap Numbers a great game for family members to challenge each other with.
 What We Liked
- Simple game, and doesn’t apologize for what it is.
- Sneaky-good variations as you progress.
- Nice color palette.
- Easy pick-up and replay value.
- Very responsive to your taps.
What We Didn’t
- Very simple gameplay; perhaps seemingly too simple for experienced gamers.
- Replay can get repetitive quickly.
Download Tap Numbers from the Play Store here.
Forza Football: Stop using other football apps and download this one right now (review)

Being from Ecuador, you might safely assume that I’m very passionate about football. The sport is so deeply tied to our culture; it controls our plans and our mood. Football makes you travel throughout the country to watch your local team and, to me, it is as relevant as other stuff that is supposed to actually be important. That’s why Forza Football is one of the first apps I install on any device I own.
I can’t remember when the first time was that I used it, but it’s definitely more than two years ago. This app is, in my opinion, one of the best apps available on the Play Store. It doesn’t matter if you know all of your team’s chants or if you just follow Real Madrid because you like Cristiano Ronaldo, Forza Football will make your experience so much better.
Developer: FootballAddicts
Price: Free
Setup
After the splash screen, Forza will automatically detect the country you’re in and show you the leagues available there. This will add them to your favorite leagues, an essential feature of Forza, since it will let you follow them in the app itself.
I’ve always thought that this part of the setup is actually in disorder, since I have always expected to be able to choose a team from my local league afterwards. Instead, Forza redirects you to popular leagues around the world. This include the Premier League (UK), La Liga (Spain), Bundesliga (Germany), and even the Primera División from Argentina.
Immediately after, you’re allowed to choose international competitions. Important events such as the Champions League, Europa League, World Cup Qualifiers, European Championship, and Copa America are included here. Some of them are pre-selected for you – namely the really important competitions, so you don’t need to go and look for them yourself. The selection here is truly astounding.
Forza’s Setup Process
1 of 6

First, you choose your local leagues.

Then you can choose leagues from around the world.

Also international tournaments!

You can follow local teams and your national team.

Other popular teams are suggested to you.

Finally, you configure notifications for the selected teams.
After this, you get to choose your home country’s national team, as well as your local team. See what I mean? The order is kind of weird. The national team comes pre-selected for you, and it also can include U21 and women national teams, which is cool. Choosing a team from this list, either local or national, will turn on notifications for the matches of that team (more on this later). You can choose more than one local team, of course, but do you seriously want to do that?
Forza’s setup seems like forever, right? Now it’s the time to choose teams from all around the world. There are some popular options here, such as Juventus, Arsenal, Barcelona, Real Madrid and Bayern München. If your favorite team is a bit more obscure though, you’ll have to go to the settings page later and add it manually.
Finally, the last screen of the setup shows a list of all the teams with a little bell to the side. This lets you configure the kind of notifications you want to receive for each team. If you don’t want to receive notifications for Manchester United (live in San Francisco and the match time is too early for you), but you still want to see their results easily, then you can leave it as a favorite team but turn off notifications here. There’s also a granular control over the kind of notifications you receive.
Overview
 Forza’s Football main screen.
Finally! Forza will show you the screen you’ve longed for since we started this setup. A calendar strip is at the top, in which the current week will be displayed starting from Tuesday. This actually makes a lot of sense, since some leagues play some of their matches on Monday.
The rest of the screen is divided in two: your favorite teams and your favorite leagues. If a team you follow plays on the selected date, it will appear first and foremost so you won’t miss it.
If there are matches on the competitions you’ve followed, then they will appear below your favorite teams. These won’t filter by teams or anything: all of the matches played on that day valid for that league will appear here.
Tapping on the calendar icon at the top right will take you to a list view of the matches your favorite teams play in the next weeks. If you want to stop filtering your favorites at the top and just show everything according to their league, you can do that by tapping the switch at the top. If you only want to see live matches, there’s a button for that. There’s something for everyone here.
Match View
Tapping on a match will take you to the match view screen. This area is focused on a specific match, and the amount of information it shows is impressive. Also, it changes according to the phase of the match: fixture, currently playing, or played.
The screen itself is divided in five sectors: statistics, table information, match details, videos, and lineups. As you can figure, statistics, videos, and lineups are not available until the match is actually being played.
Statistics show live information such as possession, shots on target, yellow cards, and such. Table information shows the current standings in the table for the tournament this match is being played for. For example, if Arsenal plays Tottenham for the Premier League, then this tab will show the full Premier League standings.
This is updated live: this means that if Arsenal is winning, the table will already have the three points added to them. Both teams playing are shown in bold so it’s easier to spot them.
Forza’s Match View Screen
1 of 5

The statistics tab lets you see live data about the game.

Standings are updated in real-time in this tab.

Want to know exactly what’s going on in the game? This tab is for you.

You can watch highlights through the videos tab.

Standings, subs, and injuries are all under the standings tab.
The match details tab is the most complex of them. It shows information such as the managers, age average, tendency, and stadium. When the match is being played, information such as yellow cards, red cards, goals, penalties and substitutions will also appear here. When the match is over, you can choose players of the match, and a small poll on confidence on chairman, squad, and manager of the team you support.
The videos tab will show you highlights (such as goals, failed penalties, and other important actions) from Dailymotion. This tab’s quality obviously depends on the match you’re watching. If you are looking at a Barcelona vs Real Madrid, then expect to see a lot of them. If you’re following a match from two obscure teams from Ecuador, then don’t expect any videos (even people in Ecuador don’t care about them anyways).
Finally, the squad tab does exactly what you expect of them, showing the starting 11, then showing substitutions and injured players. Special mention to Jack Wilshere, who always finds his way to this last section.
Options
 There’s a wide selections of options you can choose from. You can change your favorite leagues and competitions, manage what content you see on the details of a match, app language, notifications, and even support for themes.
The favorite leagues and competitions aspect is pretty much what you would expect. You can choose between every league and competition the app has to offer, and then mark it as favorite so you can see it on the main screen. The option of adding new teams is there too, in case you need it.
Themes range from really good to really ugly, but the fact that there’s actually an option for changing the colors of the app is nice. This is not a quick attempt of doing things either; when you change your theme, even the smallest of details change. It’s amazingly implemented and consistent throughout the app.
Notifications
This is one of the biggest aspects of this app, without doubt. In a nutshell, they work flawlessly. Remember all of those teams we chose on the setup and options screens? Well, you can get push notifications when these teams play.
There’s also the option of choosing with notifications you get: match reminder, lineups, match start, match end, goals, half time result, final result, yellow cards, red cards, video highligts, and even questions and transfer news about the team. You can do this for every individual theme or just set the default options on settings and use that here too.
 You can change your teams at any time.
The robustness and granularity of this system is something admirable. As I said before, I’ve used this app for approximately two years and I’ve had issues with it exactly once. It’s amazing how well it works, how each setting is remembered correctly and reflected immediately, how prompt the notifications are, and how every event is in fact picked up and reported.
Clicking on the notification itself takes you to the match details screen. Don’t want to receive notifications right now? Is your homework more important than that North London derby? You can turn off notifications for the match right from the notification, so you can do that Ruby on Rails homework while Arsenal and Tottenham draw yet again.
Conclusion
Forza Football provides a wide array of options, features, customizability, and robustness that is rarely seen on an app, let alone a free one. It sounds cliche, but, considering the amount of stuff you can do, I can safely say that this is an app from football fans for football fans. Seriously, just go and download it right now if you’re a fan of football. I’m sure you wont regret it and your experience will be better.
Download Forza Football from the Google Play Store.
Put an end to dead spots and slow internet in your home with the AmpliFi HD mesh network (review)
There’s a battle going on for control of your home. It’s not just for control of smart devices like the Google Home or Amazon Echo. It’s for everything in your home that’s related to technology.
Arguably the most important battle is over your Wi-Fi network. While wireless routers have stayed relatively unchanged for the past decade, we are quickly seeing rapid development in mesh network technology. Google even entered the mix this year but still has people waiting on its waitlist for the next generation networking hardware.
It makes a whole lot of sense to fight for our networks. We rely more now on our Wi-Fi than ever. We watch videos on Netflix, Youtube, Hulu. We stream endless hours of music to our computers, tablets, smartphones and wireless speakers. Smart home products like the Nest, Google Home, Amazon Echo, and security cameras all rely on a powerful Wi-Fi signal.
When using the internet at home, there’s nothing worse than a dead spot, or laggy speeds when you move further away from your router.
Wi-Fi problems are more noticeable now because of our heavy dependance on the internet. Decade old technology just doesn’t cut it anymore.
Walls, electrical signals, competing networks, microwaves, and a wide variety of things can slow your internet down. Consumers have attempted to solve their networking problems with extenders or repeaters, but most have found those to be nothing short of inadequate.
That’s where AmpliFi aims to solve your Wi-Fi problems.
How does AmpliFi work?
AmpliFi uses enterprise networking technology for the home. It uses multiple radios and access points to amplify your wireless signal.
 Basically plug in the AmpliFi wireless router into your existing modem, and then connect mesh points around your home to create a network as large as you like.

You no longer need to be an IT expert in home networking with next generation Wi-Fi technology. AmpliFi has an app in the Apple App Store for iOS devices and an Android app in the Google Play Store.
It walks you through the entire setup. Novices can set up this network in no more than five minutes. That’s if they’re slow. I’m a novice and it literally took me three minutes.
Once the main router is setup, you simply plug in the two piece boosters into any standard wall outlets. Depending on how many you purchase will determine the size of your mesh network. The three piece system I have is designed to work on home up to 20000 square feet. My home isn’t that big even in my dreams!

What’s nice about the boosters are the two-piece magnetic construction. You can point them in any direction based on your plug.

It creates on heck of a reliable and fast network
I used the AmpliFI HD (high-density) system for over a month and absolutely loved it. Admittedly it was a bit of overkill for my 1500 square foot town home, but every single room had 100mbps download which is what I would get if I sat within 10 feet of the original modem. My place has cement walls which really make my wireless a challenge to use in places like my bedroom which is the furthest room from the base station.
 I would frequently get Netflix buffering or skipping and dropping on my Wi-Fi speakers in my office and bedroom in the past. The AmpliFi HD home system fixed all of those problems.
I also take my dog outside several times a day and can walk up to 50 yards away while still maintaing a usable Wi-Fi signal. Normally without the AmpliFi HD, I could walk maybe one tenth of that distance and lose signal.
It’s ridiculously easy to use
The days of needing to know your IP address or crazy password provided by your internet company are over with next generation systems. Through the app is where you set up your password, monitor the mesh points, and even control the devices that are connected. You can pause the internet on your entire home. It shows every single device connected to your network so you can keep track of your internet security. The last thing you want is a rogue device that is attempting to break into your personal files.

You can create a separate network for guests too. That way you can limit what they have access to in your home. Turning the guest network on and off literally takes seconds. You also have the ability to set the guest network to shut off after a predetermined time.

I have an embarrassing amount of devices connected to my network at peak times. I have an Android TV, several laptops, five Wi-Fi high-definition speakers, three Google Homes, three Amazon Dots and one Echo, too many smartphones to count, and several tablets. With AmpliFi I never once experienced slow internet except for the time that Time Warner went down.
I opened the AmpliFi app and it showed I had no internet connection. To verify there wasn’t a problem with my home network, I called Time Warner and they confirmed that a switch went down a block away from me.
Once it was back on, my network came right back on.
The AmpliFi next generation Wi-Fi solution also updates itself with new firmware and software. It’s a great solution for those who are looking to get the most out of their internet.
It’s a great investment

The AmpliFi HD system I tested is designed for homes over 20000 square feet. You certainly don’t need that much horsepower if you live in a home as small as mine. If you ever plan on moving or expanding your home, you can rest easy knowing that the AmpliFi starter system can be expanded at anytime and it is listed at $149.99. All you need to purchase is an additional router to expand your mesh network.
The wireless router even has a gorgeous look to it that will fit anywhere in your home. It has a touch screen that offers real-time status, and even offers a clock.
 The HD system isn’t cheap at $349.99 but it is an investment in your home, but it’s one of the best you can make. Wireless internet is almost as essential as electricity these days.
You can order the AmpliFi HD at Amazon for $349.99 or at http://www.amplifi.com.
Product description:
- Wi-Fi Mesh Technology for Complete Home Coverage
- Plug and Play High-Density Mesh Points to Eliminate Dead Spots
- Dual-Band 802.11ac Wi-Fi System Delivers Up to 5.25 Gbps Aggregate Speed
- Convenient Smart-Touch Display for Real-Time Status
- Easy Setup and Powerful Wi-Fi Management using the AmpliFi App
- Secure WPA2-PSK AES/TKIP Wi-Fi Encryption; (5) Gigabit Ethernet Ports (1 WAN and 4 LAN)
- System Includes: AmpliFi Router HD, (2) AmpliFi Mesh Points HD, Ethernet Cable, Power Adapter, Quick Start Guide

Oodles: A solid e-book reader, if you can ignore its looks (review)
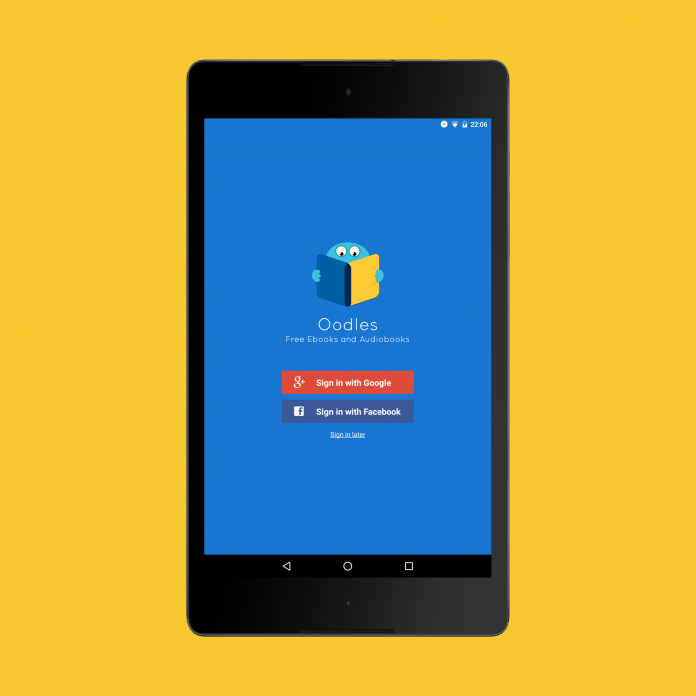
It’s amusing to know that, even with the rise of e-books, tablets, and Amazon’s Kindle services and devices, recent studies show that Americans are reading less than in previous years. The media probably blames millennials, as they always do, but what are you going to do? I figure people can’t stop scrolling through their Facebook timelines in search of memes.
Books are easier to get and read than ever, thanks to improved channels of distribution and the ubiquity of connected devices. For those who want to read but are on a budget, there are several free alternatives in the Play Store ready for your reading pleasure. One of these options is Oodles, which offers quality e-books and audiobooks for the always-welcome price of zero. Nada!
Developer: Oodles
Price: Free
Setup
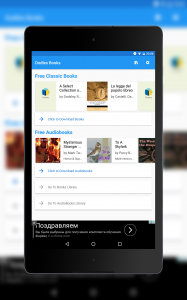 The main screen gives you quick access to the available e-books and audiobooks, while also allowing you to access your library.
When you first open the app, it asks you to create an account. Fortunately, for those of us who don’t like to create accounts, especially when the only account creation methods are Google and Facebook, there’s a “Sign-in later” option. It makes you wonder why the app asks you to create an account so early in the first place, especially if it isn’t required at all for the app to work properly. After this, you’re ready to use the app.
Overview
The main screen of Oodles shows two carousel-style sections: one for free e-books and another one for free audiobooks. Clicking on either will yield a grid (or list, it depends on the screen) with the available options. You’ll also have the option to swipe between different views, such as Categories, Top Books, and Top Authors. Think of the way the Play Store is organized and you’ll get an idea of what you will find here. Everything looks neat and works quickly enough.
When you choose a specific book, you’ll be directed to the book’s detail page. This will show the cover at the top, along with detailed information about the book and the option to download it. There’s also suggestions at the bottom, based on the book you chose. Since the available books here are probably not well-known, this is a crucial option and it’s nice that the developer decided to add it.
You can also browse your library of e-books and audiobooks, all neatly organized and with a percentage bar that shows you your current progress on that specific book. You can also import books you already own but are stored in your SD card or internal memory.
E-books
There’s a lot to say about this part of the app, so much that it merits a section of its own. When you finally download your books and are ready to consume them, you are treated with the reading screen.
I have mixed feelings regarding this specific activity, since some things work so well but, on the other hand, it looks outdated and out of place in a world where Android apps have gotten much more beautiful than they were just a couple of years ago.
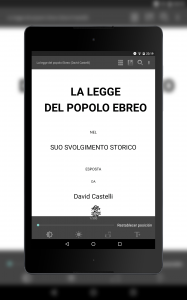 Gingerbread called. It wanted its interface back.
The screen has a top and a bottom bar, each one with different controls and options. The problem is that these icons look like they were brought in a time machine right from the days of Gingerbread.
Some buttons even have a gradient color, something that is frowned upon in today’s design. Actually making things worse is the fact that not all of them are gradients. There’s no consistency between design languages here.
Anyways, regarding the functionality of the buttons themselves, they all work more or less like you would expect. At the top, you’ll find a list button which will let you browse the chapters of your book and jump to any of them directly. There’s also a button to save bookmarks (actual bookmarks, you know, not the browser-related ones).
Next to it you’ll find a search function that works rather well. There’s also an overflow menu for getting to the app’s settings (I will come back to this later), book information, and increase/decrease font size (even though there’s a dedicated button for that at the bottom).
At the bottom you’ll find more useful stuff, such as brightness control, toggle between day and night modes (awesome), rotation lock, and the aforementioned font size changer. There’s also a slider to move between pages, and a button to return to the page you were reading before acting on this slider.
The book part is invisibly divided in three columns. Hitting the center part will toggle the top and bottom bars, leaving more screen state for reading your book. Touching the right side will take you to the next page, while the left region will take you to the previous page. Swiping will also move you through the pages. These gestures and tap recognitions work swiftly enough, although swiping too fast generates a wonky animation.
 Specific book information is available in one click. There’s also the option of browsing similar books.
Just as a Lannister always pays his debts, I am fulfilling my promise of coming back to the settings section. The options available here are actually richer than the options for the app itself. There’s options for changing appearance, margins, page turning, dictionary, colors, text, etc. Possibly every aspect that can be configured has some kind of entry. That’s really cool, but what’s with the design? If the icons weren’t Gingerbread enough, this settings app looks completely out of date.
The whole reading screen looks (and probably is) a library written by other developer and integrated to this app. There’s nothing wrong with that, but at least some additional work could have been made in order to avoid such an inconsistent experience.
Audiobooks
You can download your audiobooks in different parts (as opposed to a single big file) to make it lighter for your internet connection. The player for audiobooks works exactly as expected, with the book cover front and center, and then your regular buttons to play, pause, rewind, and similar events that you expect. There’s very little to say about it other than it works and audio quality is decent enough for an audiobook.
Ads
Being a free app by an independent developer, ads are expected. These come in two different flavors: a banner at the bottom of the screen, and a full-screen ad when you leave the reader screen.
I never hide my hate for full-screen ads, and I won’t start today. It’s really unfortunate that user experience has to be interrupted in such an abrupt manner in order to get the revenue to pay the bills. That’s the way the current market is, however, and there’s nothing in the near future that will change this. At least I haven’t seen a full-screen video ad yet.
Options
 Here’s the option screen, where you can configure the two of them.
Touching the gear button at the top of the main screen will take you to the app’s settings screen. Even though it seems full, it’s probably the settings screen with the least amount of options I’ve ever seen.
You can change your language, although it’s limited to English and another language that I can’t understand (sorry for the ignorance).
A kind of cool feature comes in the form of reminders. You can ask the app to remind you at a specific time that you need to stop being lazy and read those books you downloaded. These can be configured for any time of the day, any day of the week.
There’s also the option to remove ads (thankfully) and share the app with your friends. Other than that, there’s no noteworthy aspects to analyze further.
Conclusion
Oodles does a good job in categorizing and providing a nice one-stop place to download e-books and audiobooks. The problems start to show up when you’re reading the books themselves, with a really outdated library to handle the situation.
If you can ignore the fact that the reading interface looks like the apps you used on your Samsung Galaxy S2 back in 2011, then you can use Oodles to satisfy your reading needs.
Download Oodles from the Google Play Store.
Joby Griptight POV Kit: The selfie stick has evolved (review)

Everyone has a friend whose face is always in front of their phone. You can usually sniff that person out by going to eat at a restaurant and seeing who pulls their phone out to Instagram their food. Selfies have increased exponentially with apps such as Snapchat, where sending pictures through text messages has become obsolete. Companies like Joby have taken advantage of the selfie game and have come out with accessories to capture the perfect picture. Let me introduce you to Joby’s Griptight POV Kit.
Build
- Product dimensions: 4 x 6 x 9 cm
- Weight: 60 grams
The package contains a Griptight POV, universal flash shoe, and an Impulse Bluetooth remote.
 The Griptight POV is a portable smartphone mount that is built with a lightweight, plastic design. It will fit most phone sizes using an adjustable locking clamp. The clamp contains a jagged grip to ensure a secure fit on your phone.
 This versatile mount has multiple viewing angles that are adjusted with the black screw towards the back. The multiple viewing angles can be achieved by rotating the handgrip, which will rotate 180 degrees. This allows everything from taking a selfie, all the way to a grip that will give you a camera-like feel. The mount can also be angled so that your smartphone will stand up on its own like a tripod.
 Located at the top of Griptight POV is the Impulse Bluetooth remote that can be removed by sliding it out. The remote is paired by long-pressing the Joby button and then pairing it to your phone. This allows you to take a picture by simply pressing the Joby button.
 The Griptight POV’s handgrip can be unscrewed and put onto a GoPro mount. You can capture all your action-packed moments by attaching it a wide array of GoPro mounts.
 Usage
Usage
I was under the impression when I first saw the Joby Griptight POV that it was going to be just a portable selfie stick. I was pleasantly surprised at the versatility of this smartphone mount after using it for the past couple of weeks. I must admit the selfie game was pretty strong while I was using the Griptight POV mount. The Bluetooth remote worked effectively, especially when I put the mount in the tripod position to take a picture of my family.
I have a friend who uses a GoPro frequently while skateboarding. I had no trouble hooking it up to the GoPro helmet mount and caught a couple of laughable attempts at my inability to skateboard. I wouldn’t recommend using this for hardcore activities like on a motorcycle. The clamp is tight on the phone but I don’t know how it will hold up when you are flying at 85 miles per hour.
My favorite use for this mount was in the smartphone stand position. My biggest first world problem is having to hold my phone while watching Netflix before I go to bed. My arm gets tired holding the phone up to my face. I’ve tried leaning it against my alarm clock but it falls over all the time. This handy smartphone mount made my first world problems go away by letting me watch my favorite shows hands-free.
 Conclusion
The Joby Griptight POV kit is so much more than just a selfie stick. This portable smartphone mount has so many functions, despite its small size. Multiple viewing angles combined with a removable Bluetooth remote ensures that you will always capture the perfect picture. The kit is compatible with GoPro mounts, so you will never miss another action shot. The Griptight POV kit can be found on Joby’s website for only $49.95. With the holidays coming around the corner, make sure your friends have all the right tools for their selfie-obsession.
Unitek 60W 5 Port USB Car Charger: Keep your backseat passengers happy with a USB charging extension hub (review)

The dreaded low battery symbol shows up on my phone at least four times a week. You would think that I would learn to plug in my phone before going to bed every night, but I guess I subconsciously enjoy making my life difficult. There seems to be a correlation to my phone dying only when I am following directions from Google Maps. Luckily, Unitek offers an inexpensive car charger that will keep you fully charged at all times. Let me introduce you to the Unitek 60W 5 port USB car charger.

Build
The package contains a USB car charger and a USB extension hub
 The main USB car charger that plugs into your car is equipped with two USB ports. The top port supports QC3.0 technology. QC3.0 is a technology developed by Qualcomm that allows your phone to be charged from 0% to 80% in 35 minutes. This relatively new technology is only supported by a limited number of phones. However, the QC3.0 port will automatically detect if it is compatible and if it isn’t it will change to the correct power output. The great thing about QC3.0 is that it is backwards-compatible with QC2.0 and QC1.0 which supports many more phones.
 The bottom port on the main car charger is a standard 2.4A USB port. There is a light indicator at the top of the main charging unit that lights up green when quick charge is detected or blue when regular charging is detected.
The USB extension hub connects at the bottom of the Unitek Smart Car Charger. The extension hub is aimed towards backseat passengers so everyone can have the option of charging their devices. The extension hub features two standard 2.4A USB ports and one USB Type C for those that have newer devices.

 Usage
Usage
My car comes with a USB port so that I can charge my phone. However, over the past year, I’ve noticed the charging wasn’t as quick as I would like it to be. The Unitek car charger was a great addition to my car. The QC3.0 port was extremely useful because it decreased the charging time significantly. I have the LG G5 and found that it only takes around 40 minutes to charge my phone from 0% to 80%. Rapid charging is extremely convenient for me because I do not take many car trips longer than 20 minutes. Its ability to charge my phone to at least 50% in that time span is really crucial because of my bad habit of not charging my phone.
The extension hub is a nice addition for road trips with friends. It measures 22 inches which isn’t that long, but it should reach the backseat with the additional length of the charging cable. I took a trip up to Big Bear with my buddies for the weekend and had no problem charging four phones at one time.
 Conclusion
Smartphone companies aren’t focusing on increasing battery life in phones so it is absolutely imperative to have various options of being able to charge your phone on the go. Many newer cars have a USB port that comes standard; however, these USB charging ports do not charge our smartphones fast enough. There are better options available such as the Unitek 60W 5 port USB charger.
Five ports allow for many devices to be charged at the same time. There is one port that has QC3.0 charging capability, which is also backwards-compatible with QC2.0 and QC1.0. The fifth port is strictly for USB Type C. Amazon is having a sale on the Unitek 60W 5 port USB charger for only $21.99 with free shipping. If you are like me and always forgets to charge your phone, then this charger will be a great addition to your car.

Apps to watch the upcoming college football championships and bowl games

With only a few weeks left in the college football season, it’s the all-important time for your favorite teams to buckle down. One (more) loss and your guys could be knocked out of contention. Given the way things have transpired as of late, we wouldn’t be surprised if there were a few more shakeups before things wrap up.
Regardless of how the standings look when the season ends, the conference championships and bowl games are going to be fun to watch. As we see it, there are few things on TV as enjoyable as two top teams going head to head.
One area where would-be cord-cutters sometimes balk is on the topic of live sports. To them, getting rid of cable or satellite is a risky proposition, especially at this time of year. As it turns out, there are plenty of ways that one can get their football fix on smartphones, Android TV, and Fire Stick devices.
Below is a list of key games and apps to help you watch college championships and bowl games. We’ve listed Amazon and Google Play Store links, respectively.
Dec 2:
● PAC-12 Conference Championship (FOX Sports Go) (FOX Sports Go)
Dec 3:
● American Championship (WatchESPN) (WatchESPN)
● SEC Championship (CBS Sports) (CBS Sports)
● Big Ten Championship (FOX Sports Go) (FOX Sports Go)
● ACC Championship (WatchESPN) (WatchESPN)
● MWC Championship (WatchESPN) (WatchESPN)
Dec 30:
● Capital One Orange Bowl (ESPN on the Sling TV app) (Sling TV)
Dec 31:
● Chick-fil-A Peach Bowl (WatchESPN) (WatchESPN)
● Fiesta Bowl (ESPN on the Sling TV app) (Sling TV)
Jan 2:
● Parade of Roses (ABC, NBC, and HGTV) (ABC, NBC, HGTV)
● Rose Bowl (ESPN on the Playstation Vue app)
● Allstate Sugar Bowl (ESPN on the Sling TV app) (Sling TV)
● Goodyear Cotton Bowl (WatchESPN) (WatchESPN)
Image Source
MobiKin Assistant for Android: Fast, easy device management (review)

Overview:
MobiKin Assistant for Android is a PC-based device management tool for Android devices that offers easy to use data backup tools but doesn’t come cheap.
- Developer: Mobikin
- Cost: $29.95 for full version (free trial version is available)
Setup
The application itself works with any Android or iOS device and is fairly easy to work with. Android devices generally work better, however, as they can enable USB debugging easier through the developer options. There are two ways to connect your device to MobiKin Assistant for Android: USB or WiFi. The WiFi option works surprisingly well, but for the sake of more consistent connection, I’d suggest sticking with USB.
 Setup is fairly easy, all you need to do is run the app, plug in your phone and let it work. MobiKin Assistant for Android installs a .APK file to your device for facilitating the transfer of data, and that’s all it takes.
Once your device is recognized, the program gives you a nice visual menu that lists all your data by category and allows you to import and export them, delete them, or make save files for backup and restore. It’s simple, straightforward, and does everything quickly.
Impressions
Everyone should back up their data from time to time. It helps keep your device safe, and also allows you to clear out storage so you can add even more. Those without expandable storage phones could especially benefit from data backup and device management software. That is the primary focus of MobiKin Assistant for Android. It is a PC application for device management that allows you to backup everything from contacts and text messages to applications and photos to an easily recoverable file for safe-keeping or as a device restore option.
MobiKin Assistant works well and has a good set of features for managing the storage space on your device, including external storage on supported devices. It does, however, come at a price, and the free trial version really doesn’t give the full picture on what this software can really do.
MobiKin Assistant for Android can be a powerful tool for a lot of people who want to make a reliable local copy of their data, and the free trial should do a better job of showing just how useful it can be.
The user interface is simple and doesn’t have a lot going on. It just has a few tabs for your assorted data, and what you can do with it. Also, it offers some extensions that you can download to add additional functionality but I don’t necessarily think you’d need them.
There is not too much to say about the actual look and feel of the program, as it just does the job plain and simple. The mobile app the PC version installs does even less, as it only runs when your phone is plugged in and in USB debugging mode, only showing you a static screen. You can’t use it to do any sort of data management from your device itself, which is a bit of a disappointment.

One other thing I have to complain about is the price, as the free version only lets you see the data and not manipulate it in any way, so in order to get any features, you have to shell out thirty bucks or more.
I would have liked to see a bit more from the free version, especially since there are definitely other options out there for Android data management. Also, a lot of people may not see the point of a backup program in general, seeing as there are other options as well as built-in backup from Google and other apps through the cloud. A physical backup is never a bad idea, however, and this app is a great tool for those who like to have a reliable local backup of all their data and info.
Really, this app may be the most beneficial for those who root their devices and want to create a more easily accessible backup of their data in case they mess up. For those who are just looking to make space, I’d recommend the cloud storage options available as they are easier and can be set to back up automatically.
Conclusion
MobiKin Assistant for Android is a fine option for those looking to back up data or increase their storage capacity in their devices. However, it’s definitely not the cheapest option for data backup, and the cloud is slowly becoming more popular and is a reliable, usually more affordable way to back up your data.
If you need to use your PC to manage your Android device data and don’t mind dropping the cash on some decent software, then I’d definitely recommend MobiKin Assistant for Android. It works, and it’s easy enough for almost everyone to use.
Download MobiKin Assistant for Android from their website here
Todoist uses AI to suggest deadlines for your tasks
The folks at Doist, the company behind the popular productivity app Todoist, regularly add features to help boost its users’ workflows. After tasking Alexa with the ability to add items to lists last month, the company has an update for its stable of apps that will help you stay on top of your obligations with the help of AI. The latest version of Todoist includes Smart Schedule, a feature that analyzes factors like task urgency, how you’ve completed items in the past and your upcoming workload before suggesting a due date for an item.
Doist says it researched how users postpone tasks in what it calls a “snowball,” constantly pushing things to the next day or week until their to-do list is packed with dozens of items. This editor is certainly guilty of that. Once you hit a certain point, that list becomes much less effective in helping you prioritize your day or ensuring that you’re completing tasks in a timely fashion.

To help keep the amount of things in your Todoist at a manageable sum, Smart Schedule uses AI to help plan your day and week. What’s more, it can help you reschedule those items you don’t get around to finishing on time. With Smart Schedule any overdue tasks can be rescheduled as a group and all the stuff that hasn’t been given a due date can be slotted in where it fits best. And yes, you’ll always have the option of accepting, editing or rejecting the timeline the app suggests.
In addition to your work habits, task urgency and upcoming schedule, Todoist Smart Schedule also factors in things like minor items you might be able to take care of over the weekend. Based on how you cross off items in the app, the new tool estimates when you stop completing tasks and will no longer suggest that day as a due date. Last but not least, Todoist will let you set and track goals in terms of how many things you want to get done in a day. The app can suggest due dates to help you meet that mark.
The new Smart Schedule feature is available inside Todoist for Android, iOS, Mac, Windows and the web starting today. If your device hasn’t alerted you to the update yet, head over to your respective app store to nab the latest version.
Source: Todoist
Tired of getting telemarketing or spam calls to your cell number? Give the Truecaller Dialer app a try (app review)

Getting an unsolicited cell phone call is one of the most annoying habits human beings have invented. If you own a phone line that goes to your house (landline), I am sure you’re used to getting dozens of spam calls a week. Even with the government with the National Do Not Call Registry, run by the FTC, telemarketers break the law daily by calling your registered number. Your cell phone is personal though. It almost feels as if you’re being violated when you get a spam caller.
At least there is a way to identify the person on the other end with caller ID. Some people avoid answering any unknown numbers, but for people like me, who use their personal cell as a business line too, we take all calls. The sad part about caller ID is some phone companies charge a fee to identify who is on the other end of the line. Like they don’t charge us enough to begin with.
That’s where Truecaller ID & Dialer comes in. It’s an app available at the Google Play Store and the iOS App Store and is free to download and use.
About the App
This app isn’t rocket science. It’s a phone dialer app that replaces your stock app once installed. If you want to go Pro it will cost $1.99 a month. Going Pro removes ads within the app, but they aren’t intrusive. Everyone has to monetize their products somehow.
I’d love to show screenshots of the app, but it contains personal information that I’d like to keep private. I’m sure my friends, business associates, and family appreciate that too.
Just like other phone dialer apps, it keeps track of who you call, and missed calls. The dialer itself is very clean and basic.

There’s nothing confusing about it. There’s a contacts folder, a dialer and a search option to look up specific numbers from a database of 2 billion contacts. The contacts folder reminds me of the Google Dialer where it shows a picture of your contact, if you have it associated to your account, next to their name.
How to make it your default dialer
The beauty of Android is you’re free to change out any apps you want. That includes the app that makes phone calls.
Once downloaded and installed, go to your Settings:
Enable “Allow notification access” within Truecaller > menu > settings > general.
You can then drag your stock dialer icon off the screen to delete it and then replace it with the Truecaller Dialer.
How did it perform?
I admit, I wasn’t in the know about the app even though over 100M users have downloaded the app. After three solid weeks of using the Truecaller ID and Dialer app as my default dialer, I fell in love with it. I cancelled the $2.99 fee that AT&T was charging me for caller identification.
The app uses a network of over 200M users to identify fraudulent or spam numbers, and I got over a dozen calls in three weeks that it picked up. There were a few instances where it didn’t identify the caller when my phone was ringing and I let the number go to voicemail. Within about a minute, the app did identify the number though and it helped me decide if I needed to call back.
In more important cases though it did help identify SPAM callers.

After testing the caller ID functionality, I then enabled the Auto Block feature which doesn’t allow for calls to come through that are identified as Spam.

The app wasn’t perfect but in more cases than not, it performed admirably. While there are in app purchases to go Pro, you really don’t need to pay for the fee. The ads are minimal, and understandable for a company that needs to support its developers. I highly recommend the True Caller ID & Dialer app.
Get the Truecaller ID & Dialer App at the Google Play Store.
