


New-found Icon in iOS 12 Supports iPad Pro Redesign Rumors
A newly discovered icon in iOS 12 appears to confirm recent rumors surrounding Apple’s redesigned iPad Pro, which is expected to be unveiled on Tuesday.
Similar to a previous icon found in iOS 12 beta 5, the new icon discovered by 9to5Mac’s Guilherme Rambo features a tablet with slimmer bezels and no Home button, and more importantly, no notch.
A recent case maker’s rendering of the upcoming iPad Pro displayed many of the same design elements shown in the icon, including the rounded corners and a small top and bottom bezel, with the top bezel housing the TrueDepth camera system for Face ID.
Dimensions sourced from the same case maker indicate the smaller iPad Pro will be 7 inches wide and 9.7 inches tall, while the larger model will be 8.5 inches wide and 11 inches tall.
Icon elements aren’t always proportional relative to the physical dimensions they represent, but the way the iPad Pro’s bezels are drawn suggests Apple has also left plenty of room for holding the device without unintentionally triggering the touchscreen.
The new iPad Pro models are said to be equipped with an A12X Bionic processor that’s even faster than the A12 chip in the new iPhone lineup, with a USB-C connector potentially replacing the Lightning port, and a new version of Face ID that works in both portrait and landscape orientation.
The new iPad Pro devices are expected to be announced at Apple’s second fall 2018 event, set to be held on Tuesday, October 30 in New York City at 10:00 a.m. Easter Time.
Apple is planning to live stream the event on its website and through the Events app on the Apple TV, but for those unable to watch, MacRumors will have live coverage both here on MacRumors.com and on our MacRumorsLive Twitter account.
For more details on everything we could see at the product unveiling, check out our comprehensive What to Expect event roundup.
Related Roundup: iPad ProBuyer’s Guide: 10.5″ iPad Pro (Don’t Buy), 12.9″ iPad Pro (Don’t Buy)
Discuss this article in our forums
Mission to Mercury successfully launched by Japanese and European space agencies
A spacecraft with a mission to explore the planet Mercury has been launched from French Guiana in a combined effort by the European Space Agency (ESA) and the Japan Aerospace Exploration Agency (JAXA). The aim of the mission is to study Mercury’s inner core and perhaps even to discover information about the formation of our solar system.
As the planet closest to the sun, Mercury has been little explored, with only two spacecraft ever visiting it before. The Mariner 10 probe passed by the planet in 1974 and again in 1975, and the MESSENGER robotic spacecraft orbited the planet between 2011 and 2015. These NASA missions succeed in capturing data and images from Mercury, but now Japanese and European scientists hope to gain more information about the least explored inner planet.
Due to its proximity to the sun and the fact that the planet spins very slowly, temperatures on Mercury are extremely variable, ranging from 427 °C (801 °F) to −173 °C (−279 °F). In addition, the planet is bombarded by solar rays leading to high levels of radiation on the surface. This makes collecting data from the planet challenging, although it is known that Mercury has a huge iron core. The current mission aims to learn more about this core through the use of probes.
The BepiColombo spacecraft that was launched is named after the Italian scientist Giuseppe “Bepi” Colombo, and was built in a partnership between the ESA and JAXA. It has an unusual design: it is a “stacked aircraft” consisting of a transport module and two orbiters. One orbiter was built by ESA, and the other by JAXA. The orbiter built by ESA has a special coating of ceramics and insulation designed by the aircraft company Airbus, which should protect it from the high temperatures and harsh conditions on the planet.
The trip to Mercury will take seven years, so we won’t be seeing results from the probes any time soon. The craft will follow an elliptical path and its journey will include one fly-by of Earth, two of Venus, and a total of six of Mercury to allow the craft to slow before the probes are released. If all goes well, the craft should arrive at Mercury in December 2025.
Editors’ Recommendations
- We’re going to the Red Planet! All the past, present, and future missions to Mars
- A Japanese spacecraft just landed two rovers on an asteroid
- Europe’s space agency plans to build its own “low-gravity” moon base — on Earth
- NASA’s planet hunter satellite gets first hit in its search for another Earth
- NASA’s Parker Solar Probe sets out to try and ‘touch’ the sun
Moto brings Android 8.1 Oreo to the G5 and G5 Plus
Who’s ready for some Oreo?
Android Pie has been out for over two months now, so when Moto G5 and G5 Plus users in the US were notified that there was a system update for them, they might have gotten their hopes up for getting a slice of the latest and greatest Android has to offer.
Well, sorry to steal your dessert, but Android 8.1 Oreo is still an upgrade, right?
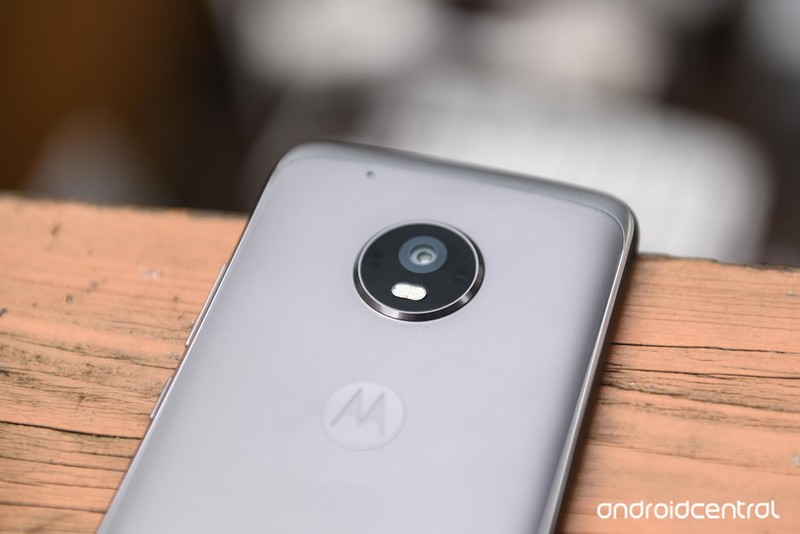
Android 8.1 Oreo may not be the newest Android on the block anymore, but there are still plenty of upgrades in there for users who have been stuck on Nougat. The official release notes on the Motorola support site for the Moto G5 Oreo 8.1 update and Moto G5 Plus Oreo 8.1 update list its improvements as:
- Android™ 8.1 Oreo™: many enhancements including new multitasking features, more efficient notification controls and improved data saver, battery features, new power menu UI and Bluetooth improvements.
- Android security: includes the updates of Android security patches through June 1st 2018.
- Stability improvements: includes changes that fix bugs and improve the stability of your phone.
You may have noticed that monthly security patch is still a few months old, but at least it’ll be slightly less outdated. The OTA update is rolling out to US models of both devices. If you’ve gotten the update, tell us if you’ve noticed any improvements with it — or if any bugs have surfaced after updating.
Chrome OS 70 comes to Stable Channel with floating keyboard, new system UI

Not sure what’s new in Chrome OS? We’ve got you covered!
Chrome OS, Google’s own desktop operating system, receives regular updates to outfit it with new features, bug fixes, and more. There are three main levels of Chrome OS (Stable, Beta, and Developer) and while you can learn more about what these mean here, this guide will be updated regularly to highlight the main additions with each new release.
Since Google releases updates so frequently, we’ll only share them when something significant is added or patched as new builds are rolled out.
Without further ado, here’s what’s new in the Stable, Beta, and Developer Channels for Chrome OS!
Stable
September 19, 2018 — Stable Channel starts getting Chrome OS 70 with floating keyboard, centered dock, and combined notification and quick settings panel

The centered dock we’ve seen popping up on Beta and Dev Channels is finally arriving on the Stable Channel with Chrome OS 70, and with it comes a newer, slicker, and slightly weirder Quick Settings panel, as well as a floating keyboard similar to the one we saw on Gboard’s beta last week. It’s easy to toggle the floating keyboard on and off — the icon resembles a picture-in-picture screen — and even easier to slide the keyboard around the screen with the navigation dot at the bottom of the floating keyboard, but unlike Gboard, this floating keyboard does not turn transparent after a few seconds of inactivity. There’s still no option to theme the on-screen keyboard, either.
The new dock features rounded a rounded pill shape around the time time and connectivity icons on the right, the app drawer icon still on the left — I’m playing with Chrome 70 on my old ThinkPad 11e Chromebook since it’s not available for the Pixelbook yet — and in the middle is a centered bevy of app icons, with pinned apps on the left and open, unpinned apps on the right. This will take some getting used to, but nowhere near as much as the newly combined quick settings/notification panel.


This newly combined panel features rounds corners, a deliciously dark UI, and the Quick Settings portion of it now has two modes: condensed and expanded. I dig the new look — #DarkThemesForever — and it puts the DND for notifications with the rest of the Quick Settings instead of hiding by itself in the Notification panel. The slider for brightness is also a now permanent fixture here, as previously the slide would only appear in the Quick Settings panel when in tablet mode. You can’t re-order or pick which settings you see here yet, but I truly do hope that feature with make the jump from Android to Chrome OS before long.
When a notification appears, you open the Quick Settings panel and the notification will be sitting there above your settings. This makes notifications sit much higher than before and leaves less space for multiple notifications, so I’m not a huge fan so far. The Clear all option is hidden now, too; you’ll have to pull up on the bottom-most notification to reveal it.
Chrome OS 70 also brought with is some security upgrades with it, such as the ability to restrict which websites your installed extensions get to see, as well as updates to Autofill and text-to-speech. The update is rolling out to dozens of models already, and if you’ve got a Chromebook, it’s probably waiting for you.
September 19, 2018 — Stable Channel now getting Chrome OS 69 with Material Theme UI, easy emoji access, and more!
After making its way to the Beta Channel last month, users in the Stable Channel are now receiving their official update to Chrome OS 69.
All of the changes we were introduced to last month are included here, meaning there’s a new UI for the Files app, refreshed Material Theme design for the Chrome browser, the night light feature can be enabled without having to mess with flags, and using a Chrome OS device in tablet mode should now feel a lot better.
Chrome OS 69 also brings something we’ve been waiting for for years — easy access to emojis! Just right-click on any open text field, click “Emoji”, and a virtual keyboard will pop up at the bottom so you can quickly find what you want.
The update is rolling out to everyone on the Stable Channel now, so be sure to keep your eyes peeled!
June 7, 2018 — Progressive Web Apps can be installed and Tablet Mode gets split-screen support
Chrome OS’s Stable Channel was updated to 67.0.3396.78 on June 7, and it comes equipped with a host of new features.
One of the big highlights is the ability to download Progressive Web Apps as standalone applications — similar to how you’d download Android or regular Chrome OS apps. Progressive Web Apps are technically portals to websites but come with refined user interfaces and increased performance. They essentially give you desktop apps for things like Spotify, Flipboard, and more without developers having to create apps specifically for Chrome OS, meaning that we’ve just about ended the complaint that Chrome OS doesn’t have enough applications available for it.
Another big addition is that you can now use apps/websites in split-screen while in Tablet Mode. With devices like the HP Chromebook X2 and Acer Chromebook Tab 10 now around, a feature like this couldn’t have come at a better time.
Other goodies include a cleaner list of your Bluetooth devices, the ability to zip files on Google Drive via the built-in Files app, and new shortcuts that pop up when holding down your power button.
Read through the full changelog here
Beta
August 24, 2018 — Chrome OS 69 adds a blue light filter, Linux app support, and Material Theme UI
Chrome OS 69 is rolling out now to the Beta Channel for “most” Chrome OS devices, and there’s a lot of cool stuff to check out.
First of all, Linux app support is finally included! This is something that’s been limited to the Developer Channel for quite some time, so it’s exciting to see it now be ready for Beta users. Linux support is only available for select Chromebooks, including the Pixelbook, HP Chromebook X2, Samsung Chromebook Plus, and more.
Also new is a night light / blue light filter mode right in the quick settings. This is something that previously required you to enable a flag, so while not an entirely new feature, it’s much easier to access now.
Lastly, this update brings an updated UI with elements from Google’s Material Theme aesthetic and changes to the BIOS and trackpad firmware.
June 7, 2018 — All HTTP sites are now labeled as “Not Secure”
HTTPS is the future of website security, but for whatever reason, there are still some sites that continue to use the old HTTP standard.
As it stands right now, sites using HTTPS show a green “Secure” badge to the left of the domain. Starting with the Chrome OS 68 beta, that “Secure” badge is being removed and all HTTP sites wil show a “Not Secure” label so users can more easily identify if they’re on a site that’s not as safe as it should be.
Read through the full changelog here
Developer
October 21, 2018 — ‘Better Together’ Android phone pairing feature rolling out
Pairing and syncing between Chromebooks and Android phones has been something we’ve all wanted for a while, and Google has been working on the Better Together feature to do it for quite a while, but until now, we’ve only had placeholders, rumors, and strings of Chromium. Well, some users are getting the chance to actually test out Better Together as the service rolls out on the Chromeook Dev channel.
 Source: Android Police
If your Chromebook is eligible, you’ll receive a notification about the service asking you to set it up and manage your device preferences in the new Connected Device settings. Currently, those settings include two of the three features that Better Together was reported to include back in the summer: SMS syncing through the Android Messages desktop client and Smart Lock to keep your Chromebook unlocked when your phone is nearby.
The last feature was Instant tethering — something that the Pixelbook and Pixel phones already do — but as the feature is just beginning its time on the Dev channel, there are plenty of changes that could happen in the coming weeks and months.
July 11, 2018 — Android Nougat’s app shortcuts are now live!

App shorcuts, first introduced with Android Nougat, are finally making their way to Chrome OS.
On July 11, 2018, Chrome OS evangelist François Beaufort announced that they are now live in the Chrome OS Dev Channel.
To start using them, simply enable the flag chrome://flags/#enable-touchable-app-context-menu. Once that’s done, right-click on an Android app that’s pinned to your shelf or in your app drawer and you’ll see the app shortcuts menu pop up.
The flag is still experimental, so don’t be alarmed if things are a bit buggy right now.
June 8, 2018 — The Pixelbook’s power button can act as a physical two-factor authentication key
Two-factor authentication is a great way to secure your online presence, and one way to go about this is by using a USB key. If you’ve got a Pixelbook running the Developer Channel, you can now mimic the functionality of a USB U2F key with its power button.
To enable this, simply open a Chrome Shell and enter u2f_flags g2f. As with everything in the Developer Channel, this feature isn’t the most stable so consider having a USB key anyways just in case something goes wrong.
June 5, 2018 — Chrome OS’s emoji shortcut is now available!
Chrome OS has long been in need of an easy way to access emojis, and if you’re running the Developer Channel, there’s a new tool that allows you to do just that.
After enabling the flag chrome://flags/#enable-emoji-context-menu, right-click on a text field and you’ll see a new “Emoji” option. Click on this, and you’ll be able to insert whatever emoji you’d like.
It’s reported that the implementation is still a little wonky, but it should smooth out as it makes its way through the Beta and Stable Channels.
How to change your software channel on Chrome OS
Chromebooks
- The best Chromebooks
- Chromebooks in education: Everything you need to know
- Should you buy a Chromebook?
- Chromebook Buyers Guide
- Google Pixelbook review
- Join our Chromebook forums
Keezel review: wireless portable VPN made easy
Internet security is a top priority for many these days, especially for those who travel a lot and regularly work on untrustworthy public Wi-Fi networks. Threats of tracking, monitoring, and data theft have seen an increasing number of the general public head for the reassurance of a VPN provider, but managing multiple phones and computers can be a hassle. Keezel, a portable VPN networking hub, aims to tackle these problems with a dash of convenience thrown in.
Editor’s Pick
The best VPN routers of 2018
If you use a VPN service, you’ve likely already encountered the annoyance of having to install the VPN software onto all of your devices. The advantages to going the VPN route are obvious: you get …
Launched with an Indiegogo campaign back in 2015, Keezel is essentially a portable Wi-Fi hotspot with built-in VPN encryption capabilities. The idea is to offer protection on public WiFi networks, such as a coffee shop or airport, while also streamlining the connection process for multiple devices. It even acts as a power bank too, which is always a great backup to have when you’re on the road.
The hub’s main selling point is that rather than installing VPN software on each of your devices and manually connecting each to public Wi-Fi, the Keezel acts as a secure middleman for all your gadgets. Configure the Keezel and everything connected to it is secure and ready to go. I’ve been using the Keezel on and off while traveling for work for the past couple of months, so here are my thoughts.
The device used in this review was provided to Android Authority by Keezel, along with a premium tier VPN subscription.Show More

What’s in the box
In the box, you’ll find the Keezel itself, which is rather nicely designed — it’s neither too bulky nor heavy. There’s also a reversible USB Type-A to Micro USB connector (a nice touch), a carry pouch, and a couple of manuals to get you up and running.
Keezel packs in 802.11 b/g/n Wi-Fi support with both 2.4 and 5GHz modes available, with AES256 encryption used as standard. There’s a Micro USB port for charging the Keezel and a second USB Type-A port for powering up other devices, such as your smartphone. The little hub packs in an 8,000mAh battery, which is certainly enough to fully charge up any smartphone in addition to its regular duties.
The power bank feature is great for business and power users
The company expects the battery to last 20 hours or more on a single charge. Although this will vary on how much you download and the number of connected devices. I obtained multiple days of use on every charge, so battery life is certainly nothing to worry about.
Keezel offers a range of purchasing options. The basic package is priced at $179/199 euros, and comes with unlimited basic VPN use which is capped at 500kbps. There are one and two-year premium VPN options priced at $229/249 euros, and $289/289 euros respectively, which offer HD streaming speeds and many more global VPN locations. After your premium subscription ends, you can pay $60/60 euros for each additional year, which is reasonably competitive. Alternatively, a Keezel with lifelong premium costs $499/499 euros up front.
Secure public Wi-Fi made simple(r)
If you’re fed up of logging into public Wi-Fi over and over again for your laptop, and personal and business phones, Keezel is a breath of fresh air. It eliminates the tediousness of connecting up multiple devices while simultaneously keeping them all secure at no extra hassle.
Setting up for the first time on all your devices takes the same time as connecting to any other Wi-Fi network. It’s a familiar process — turn on your Wi-Fi, connect to your Keezel, enter your password and you’re connected. The hub pays dividends when connecting to unfamiliar networks thereafter, as all of your other devices automatically connect to the Keezel when you turn it on and all you have to do is configure the Keezel once to connect to the public Wi-Fi.
Keezel pays dividends when keeping multiple devices secure over public WiFi
However, Wi-Fi connections can sometimes be slow to connect to devices and occasionally drop out just after powering on. This was only noticeable in busy public places.


Connecting to public Wi-Fi is a simple enough procedure too. Head into any browser on a device connected to the Keezel and enter 192.168.11.1 or type Keezel. From there you can configure the network you want to connect to, log in through a portal if necessary, and change your VPN settings.
My only real complaint with the Keezel is connecting to public networks and swapping over to new VPN locations can be sluggish. It’s certainly slower than performing the equivalent function just once on your phone or laptop. Between 20 and 30 seconds might not sound like a lot of time, but it’s long enough for you to start questioning whether the Keezel is actually connecting.

Keezel easily handles five devices connected to it at once.
How it compares to a VPN app
First up, Keezel works with virtually anything that can connect to Wi-Fi. You can connect your SmartTV, Chromecast, and even Xbox to Keezel for secure browsing and streaming. That’s a lot more options than any regular VPN app, though given the lack of a plug socket it’s definitely not intended for home use in that way. Perhaps I’ll have to start bringing a Chromecast with me for hotel room TVs.
Keezel partners with ProXPN, Le VPN, NordVPN, and PureVPN to offer a wide range of locations and plenty of bandwidth as part of your subscription. You can’t pick which partner your connection goes through, just which country the server is in. This relationship offers an extra layer of protection with the VPN providers though because to them you’re just an anonymous Keezel user rather than a potentially identifiable subscriber.


The premium tier VPN options are bountiful, with 160 different countries to choose from. Although the number drops off quite substantially with the basic service. Speeds are generally very good too, but as I mentioned before, connection times can be a bit slower than other VPN solutions.
Video streaming is certainly possible with the premium tier subscription. However, I found Netflix and some other U.K. streaming services didn’t work abroad when connecting back via the U.K. This is probably the result of new VPN detection systems rather than an issue on Keezel’s end, but it’s something to consider, since you can’t manually configure any VPN settings should you find an alternative provider that better suits your needs.
Keezel’s premium subscription is very competitive, and there’s a free option for light users too

Keezel is almost the perfect solution
As a portable VPN hub, Keezel does everything you could want. It’s simple enough to set up and configure, connects to everything you can throw at it, and streamlines connecting multiple devices to a public Wi-Fi source. The longterm subscription costs are good value compared with the competition too. I can live with the occasional slow login and VPN location switch times, though it takes the sheen off an otherwise streamlined experience.
Editor’s Pick
15 best Android VPN apps
Virtual Private Networks (VPNs) are among the best security tools a web surfer can have. You can use them to surf otherwise seedy public WiFi with more security and privacy. They can even get around …
The Keezel certainly isn’t for everyone though. The lack of VPN provider settings will be a bugbear for more advanced users. Single device owners are better off with a dedicated VPN app, as Keezel has a high setup cost compared with subscription-only services. However, the wider range of providers and locations, superior device compatibility, and power bank functionality will bring Keezel into great value territory for some.
Ultimately, Keezel is targeted towards frequent travelers, business, and power users looking for extra security for multiple devices on the go. If that’s you, Keezel is certainly worth considering.
- Best VPN routers
- How to use a VPN
How to make a Discord bot
Update 8/21/2018: Made some changes to code, added some additional instructions to resolve two common errors some readers encountered during the tutorial.
The rise of Discord, a chat and voice program favored among gamers, has made it fairly common for Internet denizens to find themselves hanging around “Discord servers” based on a variety of topics. One of the best things about Discord, in fact, is that you can easily make a free server of your own, deck it out with channels, and invite whoever you want to take part in it.
(If you’re not up on Discord, read our full rundown of what the service is and how it works.)
One of Discord’s coolest features is the ability to create automated users — bots — that can perform various functions. Those bots are coded in JavaScript, and can become rather complex. They do things like play music for users in a server, greeting new users when they arrive, and more.
Creating your own Discord bot doesn’t take much effort, even if you’re new to coding and JavaScript in general. Here’s everything you need to know to make a (super, super simple) Discord bot of your own.
Step 1: Download Node.js and set up a Discord account if you haven’t
Node.js is a JavaScript runtime that’s free and open source, and you’ll need it to actually make your bot, uh, work. Download it at nodejs.org and install it before you get started on anything else.
Obviously, you’ll also need a Discord account, and your own server to use to test your bot. If you haven’t created one yet, go to Discordapp.com and create one. If you do have one, login to your account and open up the server in which you want your bot to live.
You’ll also need a text editor program, like Notepad++ on Windows, to code with.
Step 2: Create your bot
Now you’ll need to create an “application” on Discord to make your bot work. This takes a little doing, but it’s not too complex. The goal here is to get an “authorization token” for the bot so that Discord recognizes your code and adds it to the bot on its servers.
First, head to discordapp.com/developers/applications/me. Your account should be logged in, so you’ll go straight to your account’s list of applications. Hit “New Application” to get started. Give the bot a name, then hit the button marked “Save Changes.”
Now, on the right-hand menu, click “Bot.” Once in the new menu, click “Add Bot” under the Build-a-bot option. If you only have one application — the one we just made — it should appear automatically. Otherwise, select it.
Step 3: Get your bot’s authorization token
In the box marked “App Bot User,” look for the words “Token: Click to reveal.” Click that link and you’ll reveal a string of text. That’s your bot’s authorization token, which allows you to send it code. Don’t share it with anyone — that token allows whoever has it to create code for the bot, which means whoever has it can control your bot. If you think the token has been compromised, the good news is that you can easily generate a new one with the link right under the token, which reads “Generate a new token.”
You’ll need that token in just a second.
Step 4: Send your bot to your server
Now scroll up to the box marked “App Details” and find your “Client ID,” a long number. Copy the number and add it to this URL, in the place of word CLIENTID.
https://discordapp.com/oauth2/authorize?&client_id=CLIENTID&scope=bot&permissions=8
The final URL should look like this, but with your client ID number in it instead of this fake one:
https://discordapp.com/oauth2/authorize?&client_id=000000000000000001&scope=bot&permissions=8
Copy the URL with your client ID number in it into your browser. That’ll take you to a website where you can tell Discord where to send your bot. You’ll know it worked if you open Discord in an app or in your browser and navigate to your server. The channel will say a bot has joined the room, and you’ll see it on the right side menu under the list of online members.
Step 5: Create a “Bot” folder on your computer
While you’re doing that, you can also take a moment to create a folder in an easy-to-reach place on your computer where you can store all your bot’s files. Call it something simple, like “DiscordBot” or “MyBot” so you know exactly what it is.
Step 6: Open your text editor and make your bot’s files
You’re going to create three files for your bot from your text editor. In the first, paste this code:
“token”: “Your Bot Token”
Replace “Your Bot Token” with the token you generated earlier on your bot’s application page. Make sure the token is inside the quotation marks. Then save the file into the Discord bot folder you made on your desktop, using the filename “auth.json.” Remember not to save it as a .txt file — it won’t work if it’s .txt instead of .json.
Make a new file, and put in this code:
“name”: “greeter-bot”,
“version”: “1.0.0”,
“description”: “My First Discord Bot”,
“main”: “bot.js”,
“author”: “Your Name”,
“dependencies”:
Replace the author name with your name if you want; you can also change the “description” to something other than “My First Discord Bot” if you want something more in line with what you’re making, which will be handy for remembering what your bot is supposed to do.
Save this file as “package.json” in your Discord bot folder.
Step 7: Define your bot’s code
There’s one more text file to make, and this is the important one that controls your bot’s behavior. You’ll want to be familiar with JavaScript to really have full control of your bot and know what you’re doing, but if you’re new to coding and just want to make something, you can copy and paste this code into the file to make a simple bot that will greet you in your server.
(Thanks to Medium user Renemari Padillo, whose bot tutorial helped us create this one. Check out his tutorial for code troubleshooting and other advice.)
var Discord = require(‘discord.io’);
var logger = require(‘winston’);
var auth = require(‘./auth.json’);
// Configure logger settings
logger.remove(logger.transports.Console);
logger.add(new logger.transports.Console,
colorize: true
);
logger.level = ‘debug’;
// Initialize Discord Bot
var bot = new Discord.Client(
token: auth.token,
autorun: true
);
bot.on(‘ready’, function (evt)
logger.info(‘Connected’);
logger.info(‘Logged in as: ‘);
logger.info(bot.username + ‘ – (‘ + bot.id + ‘)’);
);
bot.on(‘message’, function (user, userID, channelID, message, evt)
// Our bot needs to know if it will execute a command
// It will listen for messages that will start with `!`
if (message.substring(0, 1) == ‘!’)
var args = message.substring(1).split(‘ ‘);
var cmd = args[0];
args = args.splice(1);
switch(cmd)
// !ping
case ‘ping’:
bot.sendMessage(
to: channelID,
message: ‘Pong!’
);
break;
// Just add any case commands if you want to..
);
This code sets up a Discord bot that will respond to certain messages: Specifically, anything that starts with a “!” character. In particular, we’re programming the bot to respond to the command “!intro”, so if anyone types that in your server while the bot is in it, the bot will respond with a programmed message. In our code, we defined the message as “Greetings! Welcome to the server!” You can change both the prompt message and the response message by redefining them in the code above. Just make sure to maintain the single quotation marks around the messages.
Save this last text file as “bot.js” in your Discord bot folder.
Step 8: Open your computer’s “Command Prompt” and navigate to your Discord bot folder
On a Windows PC, you can easily get to the Command Prompt by clicking the Windows icon and typing “Command Prompt” in the field. Once it’s open, type “cd” followed by the file path to your folder. On my computer, the command looks like this: “cdUsersPhil’s DesktopDesktopDiscordBot”. That should change the command prompt line to include the file path to your folder.
Alternatively, you can navigate to your folder in Windows and hold Shift while right-clicking on a blank area of the folder, and choosing “Open Command Prompt.”
Step 9: Use the Command Prompt to install your bot’s dependencies
Now it’s time to make use of Node.js. In the Command Prompt, with your Discord bot folder in the file path line, type “npm install discord.io winston –save.” This will automatically install files you need to for your Discord bot into the folder directly.
Also use the following command line prompt to install additional dependencies: npm install https://github.com/woor/discord.io/tarball/gateway_v6
That should provide you with all the files you need.
Step 10: Run the bot
That should be everything. To try running your bot, type “node bot.js” in the Command Prompt (make sure you’re still navigated to your Discord bot folder).
Now head back to your Discord server and try testing your bot by typing “!intro,” or “!” followed by whatever you made your prompt message in your “bot.js” file. If everything went correctly, your bot should immediately return the message you coded for it.
Congrats! You just made a Discord bot!
Step 11: Figure out if your bot has been made by someone else
Discord has a big community of people making stuff for the greater good of the service all the time, and that includes bots. There are whole databases of bots other people have made that perform a variety of functions, and often their creators make those bots available for anyone to download and use. Save yourself some time and some coding by checking out some of the usual places where Discord bots are found, to see if someone has already done your work for you.
Some handy places to search for Discord bots are discordbots.org and bots.discord.pw, but you’re also likely to have luck googling for what you need, as well.
Editors’ Recommendations
- How to rip a Blu-ray or DVD
- How to add external games to your Steam library
- How to download Instagram photos from any device
- How to reset your Apple ID password
- How to make emoji
Hubble Telescope functioning again after activation of backup gyro
The Hubble Space Telescope has been responsible for some of the most stunning and informative pictures of deep space since it was launched in 1990, but the telescope suffered a failure on October 5 that placed it into safe mode. Now NASA has announced that the telescope has been fixed and will return to normal operations.
The failure occurred due to a problem with one of the six gyros which measure the speed at which the spacecraft turns. The Hubble instruments had to be deactivated when the third gyro malfunctioned, which caused the telescope to have problems with turning to new directions and locking on to new targets. Fortunately, there was a backup gyro onboard the spacecraft which the NASA team was able to activate remotely. Although the backup gyro was activated the day after the failure, there were issues with the data that it was sending, as it suggested that the craft was rotating far faster than it actually was.
It took three weeks to rectify the problem with the backup gyro, during which time the NASA scientists commanded the craft to perform various turns and maneuvers, and switched the gyro between different operational modes. The scientists believe that this fixed the problem by clearing a blockage between parts inside the gyro which was causing the inaccurate readings. With the gyro operating effectively, NASA then performed more tests to ensure that the gyro was stable and installed additional safeguards should the problem arise again in the future. The gyro was recalibrated by setting the telescope to rotate to point at various locations in the sky and by instructing it to lock on to targets, all of which were performed effectively.
The last stage of fixing the telescope was reactivating the instruments which had been powered down, and checking that it was sending back data correctly. All went well, and the telescope started transmitting data back to Earth for the first time since the problem arose on October 5.
Now the gyro is running correctly and the instruments have been reactivated, so Hubble can resume its data collection, capturing beautiful images of space objects.
Editors’ Recommendations
- Giant NASA space laser satellite to gauge impact of climate change on ice sheets
- 11 common Google Pixel problems and how to deal with them
- Did your Windows 10 audio stop working after the update? Microsoft has a fix
- Windows’ October 2018 update wants to be best buds with your phone
- Joby’s tiny tripods double as selfie sticks and hide four different modes
Downloading Google Chrome through Microsoft Edge is dangerous
New Windows 10 PC owners should be careful about downloading Google Chrome through Microsoft Edge, as Bing is apparently returning search results that contain malware and adware.
There is a running joke that the only purpose of Microsoft Edge is to download Google Chrome, but it appears that the tables could easily turn for users who are not careful. Fortunately, Twitter user Gabriel Landau did not fall prey to a fake Google Chrome download page returned by a Bing search.
Brand new Win10 laptop. Attempt to install Chrome. Almost get owned with my very first action. Why is this still happening in 2018, @bing? Please explain. pic.twitter.com/uYJhu7xa9H
— Gabriel Landau (@GabrielLandau) October 25, 2018
In a video that Landau posted on his Twitter account, he showed how he searched for “download chrome” on Bing through the Microsoft Edge browser. He clicked on the first link that appears, which is marked as from “google.com,” leading to what appears to be the legitimate Google Chrome download page.
However, upon closer inspection, the URL for the page is “googleonline2018.com.” The page is not an exact replica of the official Google Chrome landing page, but it looks real enough to trick users. In addition, clicking on the Download Chrome button starts the download for ChromeSetup.exe, but checking the file’s properties reveals that it is digitally signed by a company named Alpha Criteria, which is obviously not Google. It is very likely that the fake file contains malware.
An investigation by How To Geek revealed that the fake website is actually marked as a “deceptive site” by Google Chrome, but it is not flagged as such by Microsoft Edge and Bing. The Bing search query was reproduced on some systems, not all, but it was only appearing on Microsoft Edge.
The major issue here is that Bing is apparently not checking the URL of the search result, allowing what is likely malware to be downloaded by unsuspecting users. Making matters worse is that Bleeping Computer reported the same advertisement in April, so this is a recurring issue.
A Microsoft spokesperson reached out to How To Geek to say that the fake ad has been removed from Bing, and that the account associated with the malicious content has been banned. However, there was no explanation on why the ad was marked as from “google.com,” and no assurance that the ad will not reappear again after a few months.
The issue drives home the point that users should always be extra careful about downloading anything from the internet. Even if websites and links look legitimate, it is always best to check everything thoroughly to prevent headaches from malware infections.
Editors’ Recommendations
- How to change your Windows 10 login screen background and desktop wallpaper
- Canon and Nikon’s new mirrorless cameras impress. Should Sony start worrying?
- Cord-cutting 101: How to quit cable for online streaming video
- Colby Brown isn’t afraid to fail (or fall) in pursuit of the perfect travel shot
- Google plans crackdown on tech-support scams appearing in search ads
Let your case pull double-duty protecting your Pixel 3 and your money
Wallet cases are a great option if you want to cut down on your pocket carry. Because the Pixel 3 supports wireless charging, it’s doubtful you’ll find too many wallet case styles with the card slots on the back, but there are a growing number of folio-style wallet cases to choose from. We’d recommend the ProCase Genuine Leather Wallet Case ($26) but we’ve got more affordable and more premium options to choose from, too.
Always reliable
ProCase Genuine Leather Case

Available in three colors, ProCase delivers a classic wallet case design made with genuine leather. The inside flap features two card slots and a pocket for storing cash and receipts and the whole thing folds up into adjustable kickstand. Keeps your phone safe and stylish.
$26 at Amazon
Budget folio case
Abacus24-7 Flip Cover Wallet Case

Made of synthetic leather with a clear ID pocket and a hidden money pocket, this folio-style wallet case may just check all your boxes. It can store up to three cards along with some cash and the front cover doubles up as a kickstand.
$10 at Amazon
Stylish and affordable
Maxboost Magnetic Wallet Case

This case from Maxboost is made of synthetic leather to keep the price down but has a nice look to it with white stitching and a stylish magnetic flap. On the inside, you get three card slots and a pocket for cash. Backed by a lifetime warranty.
$10 at Amazon
Real fancy
ProCase Mirror Wallet Case

On top of the three card slots, money pocket, and folding kickstand functionality, this ProCase wallet also includes a small mirror that lets you check on your look without turning on your selfie camera. All in all, a very stylish and functional case.
$11 at Amazon
Premium, dude!
Bellroy Leather Phone Wallet

Bellroy’s premium leather case four card slots — two on the front cover, and two more hidden between the case and the back of your phone. Made from environmentally certified leather and available in five beautiful colors, this case is expensive but the best option for those who want a genuine leather case for the smaller Pixel 3.
$84 at Bellroy
We’ll be updating this list with other wallet-style case options as they emerge, but for now we’ll continue to swoon over that beautiful Bellroy Leather Wallet case. It’s definitely worth picking up if it fits in your budget, even if our needs are satisfied by with the ProCase Genuine Leather Wallet Case.
Microsoft Surface Buying Guide: Which is for you?
It’s been just over six years since Microsoft introduced its very first personal computer, the original Surface tablet. While that device wasn’t terribly well-received, the company persevered, releasing the Surface Pro and staying the course until the Surface Pro 3 finally broke through to commercial success. Flash forward to today, and Microsoft has a full range of Surface PCs that appeal to all kinds of buyers.
If you’re in the market for a new Windows 10 machine, especially if you’re willing to spend premium dollars, then you’re probably giving at least some thought to a Surface device. If so, then this guide is for you. We break down each of Microsoft’s offerings and provide an idea of who it’s good for.
What’s the best?
Before we go into the details, let’s get the obvious question out of the way. What’s the best device?
The Microsoft Surface Pro 6.
It’s a bit silly to pick just one, of course, because these devices all aim at different users. However, the Surface Pro 6 excels above all others because it’s undeniably the best device in its class. If you want a 2-in-1, you should look at the Surface Pro 6 first. The Surface Book 2 is a close second. It fits in a tighter niche, however, and is quite a bit more expensive.
Microsoft’s other devices are competitive, but not our first pick in their respective categories. The Surface Go and Surface Laptop 2 are weakest; both have numerous competitors that might be a better choice.
Best 2-in-1: Surface Pro 6
The Surface Pro has seniority in Microsoft’s hardware lineup, having been first introduced in 2013 as a follow-up to the poorly received original Surface. The latest and greatest iteration is the Surface Pro 6, recently announced, that updated to 8th-generation Intel Core processors and thus offers quad-core computing in one of the thinnest Windows 10 tablets available.
We already loved the Surface Pro’s design, and the latest version does nothing to diminish it. It’s made of magnesium and enjoys the kind of fit and finish that comes with years of refinement. Microsoft didn’t change the aesthetics or the build this time around, and that’s for a good reason — it’s already just about perfect, with great balance and the best fold-down kickstand in the business.
Performance should be significantly improved with the CPU upgrade, and battery life is better. Whereas the previous generations struggled to last an entire working day, the Surface Pro 6 might finally go the distance. Our full review praised the Surface Pro 6 for delivering a nice boost in battery life.
You’ll enjoy the excellent Signature Type Cover option, pricey at $160, but offering Alcantara fabric for a splash of color and with an excellent keyboard mechanism that’s quiet and precise. The touchpad is on the small side, but it’s comfortable when swiping and kicking off Windows 10’s full range of multitouch gestures.
Like its peers, the Surface Pro 6 also serves up a lovely display, coming in at 12.3-inches with a 2,736 x 1,824 (267 PPI) resolution and a 3:2 aspect ratio. You’ll get the same high contrast and brightness to go with good but not great colors, and some of the best touch and pen support on a modern tablet.
The Surface Pro 6 starts at $899 for a Core i5, 8GB of RAM, and a 128GB SSD, but that doesn’t include the $160 Signature Type Cover or the $100 Surface Pen. You can spend as much as $2,299 for a Core i7, 16GB of RAM, and a 1TB SSD. Obviously, the Surface Pen 6 is a premium Windows 10 detachable tablet.
Who it’s good for? Anyone who wants a 2-in-1 device, either for tablet use, or as a laptop replacement.
What’s an alternative? Nothing.
Best Powerhouse Laptop That’s Also a 2-in-1: Surface Book 2
Mark Coppock/Digital Trends
Next up is the Surface Book 2, a 2-in-1 notebook that introduced a novel convertible mechanism: a tear-off display that plugs into a stable keyboard base weighed down by extra batteries and, in some configurations, a discrete GPU. The original Surface Book was the first of its kind, and the Surface Book 2 updated the internals for more power and better battery life while adding a new 15-inch version to go with the smaller 13.5-inch Surface Book 2.
View the Surface Book 2 from across a room, and you’re sure to notice the “fulcrum hinge” first of all. It’s what enables the 2-in-1s ability to morph from a traditional clamshell notebook that’s eminently stable in one’s lap to a remarkably thin and light tablet complete with Surface Pen support in all its precise, tilt-enabled goodness. The hinge folds out and leverages the heavy keyboard base to keep the display/tablet portion, which contains the main PC components, well-balanced.
The Surface Book 2 also received an update to 8th-generation Intel processors in October 2017, as well as a high-end 15-inch configuration packing an Nvidia GeForce GTX 1060 into the base. The 13.5-inch version can be equipped with a GTX 1050 or without a discrete GPU at all for a lower price. All versions enjoy one of the best keyboards around, with deep travel and a satisfying bottoming action, to go with a large and precise Microsoft Precision touchpad.
We mentioned the additional battery life that included in the keyboard base, and when combined with the portion in the tablet section provides some of the longest battery life in each version’s respective class. The Surface Book 2 lasts a long time on a charge, and will easily get you through more than a full working day. The tablet doesn’t last so long, though, and is best used for shorter bursts.
We would be remiss if we failed to highlight the Surface Book 2’s display. Not only does it tear off, but it is, of course, touch-enabled and provides full support for the latest and greatest Surface Pen. It can also match up with the Surface Dial for more precise controls. Regardless of size, you get a 3:2 PixelSense panel with high resolution (3,000 x 2,000 or 267 PPI on the 13.5-inch, 3,240 x 2,160 or 260 PPI on the 15-inch), some of the highest contrast in a notebook, and solid colors and brightness.
As with most of the Surface line, the Surface Book 2 falls in extreme premium territory. The 13.5-inch model starts at $1,199 for a Core i5, 8GB of RAM, and a 128GB SSD, and that’s without a discrete GPU. You can spend as much as $2,999 for a Core i7, 16GB of RAM, a 1TB SSD, and the GTX 1050. The 15-inch version starts at $2,499 for a Core i7, 16GB of RAM, and a 256GB SSD and tops out at $3,299 with a 1TB SSD.
Who it’s good for? Mobile geeks, professionals, and artists who want a powerful notebook paired that can be used as a tablet in a pinch.
What’s an alternative? The Surface Book 2 is the best large 2-in-1. If you just want a powerhouse laptop, though, the Dell XPS 15 is a better choice.
Best for Artists: Surface Studio 2
At the very top of Microsoft’s Surface line is its innovative all-in-one (AIO) desktop, the Surface Studio 2. With its seemingly magical “Zero Gravity” hinge that allows the display to adjust from upright to the perfect drawing angle with just a touch, the Surface Studio 2 is a standout among modern AIO PCs.
As the name implies, the Surface Studio 2 is in its second generation, which built on the original Surface Studio design with improved performance thanks to a 7th-generation Intel Core i7-7820HQ CPU that’s a real step up from the previous version. Graphics performance was also significantly improved, with a choice between Nvidia GeForce GTX 1060 and 1070 GPUs that promise to drive its gorgeous display at a much faster clip.
Speaking of that display, it’s the real star of the show. It’s a 28-inch PixelSense touch- and pen-enabled display running at 4,500 x 3,200 (192 PPI) resolution in Microsoft’s favorite 3:2 aspect ratio. But specs only tell part of the story — the display is also individually calibrated for color accuracy, with profiles for the sRGB and DCI-P3 color spaces, and it’s been tweaked to provide even better colors, brightness, and contrast.
It’s a beautiful display for photographers and videographers for sure, but don’t leave out users whose artistic talents tend toward drawing. The Surface Studio 2 is an excellent platform for the a very precise active Surface Pen with 4,096 levels of pressure sensitivity and tilt control, along with the innovative Surface Dial input device that was literally designed for that expansive drawing surface. If you’re looking for a platform for digital artistry, then the Surface Studio 2 is designed for you.
You’ll pay for the privilege of using such an elegant AIO. With 16GB of RAM, a 1TB solid-state drive (SSD), another speed improvement, and a GTX 1060, the Surface Studio 2 starts at a whopping $3,495. Pick up the most potent configuration with 32GB of RAM, a 1TB SSD, and a GTX 1070, and you’re looking at $4,799. That’s a lot of cash — though less expensive than an iMac Pro.
Who it’s good for? Artists with big budgets who want a reasonably fast, hugely innovative, and expansive digital drawing platform
What’s an alternative? The iMac and iMac Pro are stiff competitors and arguably better if you don’t want a touchscreen. A standard desktop is also far more powerful at the same price, though artists will need to pair such a PC with a third-party device to use it for digital art.
Best Budget Device: Surface Go
The Surface Go is the newest member of Microsoft’s Surface stable and it’s also the least expensive. In fact, it’s something of an outlier, competing as much on price as it does that iconic Surface industrial design.
Don’t get us wrong: the Surface Go is a nicely built detachable tablet. It’s made up of the same magnesium alloy as the rest of the Surface line (except the Surface Laptop, see below), and it enjoys the same kind of build quality. It’s also much less expensive, making it a bargain when you consider just how robust it is.
It suffers in the performance department, though, utilizing an Intel Pentium Gold 4415Y processor that keeps things running but won’t win any races. That’s particularly true if you opt for the entry-level 4GB of RAM, which won’t do Windows 10 any favors. You can choose up to 8GB of RAM to speed things up. Storage also matters, with a choice between 64GB of slow eMMC storage and a faster 128GB SSD.
Like the build quality, the display punches above its weight. It’s a 10-inch 3:2 PixelSense display at 1,800 x 1,200 (217 PPI) that offers high contrast, excellent brightness, and good colors and accuracy. The Surface Go might cut costs, but it doesn’t cut corners on display quality.
You’ll want to add a Signature Type Cover at $130, which has the same excellent feel as the Surface Pro’s version but is necessarily slightly more compact. The touchpad is good as well, and the display supports touch and the Surface Pen. Input on this low-cost tablet is competitive with anything on the market.
Most important, though, is the price. The Surface Go represents your one chance to get into a Surface device without breaking the bank, starting at just $399 for 4GB of RAM and 64GB of storage, and jumping to $549 for 8GB of RAM and 128GB of storage. To be fully functional, you’ll want to add the $130 Signature Type Cover and $100 Surface Pen.
Who it’s good for? Anyone who doesn’t want to spend a lot of money but still wants a high-quality Windows 10 tablet.
What’s an alternative? An iPad or iPad Pro would work better if you want a tablet. The Lenovo Miix line can be a good alternative if you need to stick with Windows. You might even find an older model Surface Pro for a competitive price.
Best Boring (Yet Useful!) Laptop: Surface Laptop 2
Microsoft doesn’t just make 2-in-1s and AIOs that can serve as science fiction props. It also makes a traditional clamshell notebook, the Surface Laptop, that doesn’t fold, disconnect, or float. Instead, it makes do with a thin, light, and robust all-aluminum chassis, an excellent keyboard and touchpad, and a high-quality display — that, yes, does support touch and the Surface Pen (a dubious distinction in a clamshell) in a nod to Microsoft’s creative professional audience.
The Surface Laptop 2 was recently introduced, and its most important update was to Intel’s 8th-generation Core processors. The injection of speed and efficiency is important to keeping the Surface Laptop 2 in the running against a very competitive crop of 13-inch class notebooks.
But what makes the Surface Laptop 2 stand out most are its color schemes, which mate painted aluminum with the same Alcantara fabric that adorns the Surface Pro’s Type Cover. This fabric is matched with the chassis to create a unified aesthetic that adds a real splash of color to what’s otherwise a typical clamshell design. The combination of materials is all robust, fitting well into the Surface lineup in this regard, and the Alcantara does more than just improve aesthetics — it also makes for a comfortable place to rest your palms while typing.
The keyboard is also comfortable, offering copious travel and a precise and snappy mechanism. The bottoming action offers plenty of feedback without being harsh, making the Surface Laptop 2’s keyboard overall one of the best around. The touchpad is large and also precise, with good support for the full range of Windows 10 multitouch gestures.
Of course, the Surface Laptop 2 is a Surface device in spite of it’s more traditional form factor, and that means its display is also simply high-quality. It’s a 13.5-inch PixelSense display in the usual 3:2 aspect ratio at 2,256 x 1,504 (201 PPI) resolution. As usual, contrast is excellent, and its colors are good but not great. It’s a display that’s made for productivity workers, and if that’s you, then you’ll love it.
The Surface Laptop 2 is a bona fide premium notebook, starting at $999 for a Core i5 CPU, 8GB of RAM, and a 128GB SSD. Fully configured with a Core i7, 16GB of RAM, and a 1TB SSD, the machine costs a hefty $2,699.
Who it’s good for? Anyone who wants a well-made notebook with a bit of panache, and isn’t afraid to pay for it
What’s an alternative? The Dell XPS 13 is always a fantastic pick.
Editors’ Recommendations
- Microsoft Surface Pro 6 vs. Surface Laptop 2
- HP Envy x2 vs. Microsoft Surface Pro 6
- Microsoft Surface Laptop 2 vs. Dell XPS 13
- Surface Pro 6 vs. Surface Book 2
- Microsoft Surface Pro (2017) review
