


Grab the $70 TP-Link 6-outlet power strip or two smart plugs for $30
All the smart outlets you could want.
The TP-Link Kasa Smart Wi-Fi 6-outlet 3-USB port surge protection Power Strip is down to $69.99 on Amazon. This power strip is a new product from TP-Link and has never dropped from its $80 retail price before, which you can still find it for at other retailers like B&H. This is a first-time discount.

If you need to add a couple individual smart plugs around the house, you can also get a 2-pack of Kasa Smart Plug Lite for just $29.99, which is on sale from a street price around $50.
Read more about this strip here. This is essentially a surge protector with six outlets that can all be controlled independently. The free Kasa app gives you control over each independent plug. Name each plug based on what’s plugged in, too, so you don’t forget. It also has three USB ports.
See on Amazon
Smartphone tips for hurricane season
 Hurricane Michael, as of 5 p.m. EDT October 8. (Image credit: Colorado State University)
Ed. Note: We’re re-upping this with Hurricane Michael headed to the Gulf Coast this week. Stay safe out there, everybody. And if you’re told to evacuate, DO IT! For the latest on any storm, visit the National Hurricane Center.
When a storm threatens, your smartphone is now one of the most important tools in your preparedness kit.
You don’t want to be caught unaware when a hurricane hits, and as we’ve learned recently, they can arrive unexpectedly, and in unexpected places. Hopefully anyone in the direct path of Hurricane Irma has already gotten out of the way. For folks on the outskirts, though — and everyone else who lives where a hurricane or typhoon can happen, there’s still plenty of storm season left. And there’s no better time than now to bone up on some of the best ways to keep current on what’s out there, and how to stay safe if a storm comes your way.
And just like with everything else, our smartphones now play an integral part with that.
I’ve lived on the Gulf Coast my entire life. I’ve been through storms. God willing, I’ll never go through another. But either way, I’ll be ready. Let’s take a look at a few ways you can be, too.
Websites and apps
If you only use one website for tracking tropical activity, it needs to be the National Hurricane Center’s site, found at http://www.nhc.noaa.gov. (They’ve got a mobile version, too, if you’re into that sort of thing.)
I also recommend Weather Underground’s site, too, and the blog written by Jeff Masters.
What about apps, though? I’ve used a few over the years. Mostly they’re wrappers for the NHC website, and for the most part the apps themselves are pretty crap. And you don’t really need them. They can, however, be good for notifications of new updates, which the NHC puts out every six hours. If you don’t want to spend a few bucks, you could just hit up the NHC site, or follow their Twitter feed, or use RSS or e-mail. (The NHC has a lot of ways to stay informed.)
The one app I’ve used off and on during hurricane season is SeaStorm Hurricane Tracker, which costs $1.99. Even then, I only really use it for the alerts.
And if you just don’t want to bother committing all of these tips to memory, go for the American Red Cross’ hurricane app.
More: The best weather apps for Android
Your phone
There’s almost nothing worse than knowing a hurricane is headed your way. They’re big. They’re often slow. You could have days or even weeks of warning. That gives you plenty of time to prepare. And our phones make it easier than ever.
A few tips I’ve picked up the hard way:
Inventory your home and car. Use notes apps that sync to the cloud (that’s the really important part) to keep track of everything you own, for insurance purposes. If it’s not documented, it might as well have never existed.
Take pictures. Lots of pictures. The outside of your home. The inside of your home. Pets. Kids. Anything of value. Insurance fraud, unfortunately, is a thing. You’ll want to prove your car didn’t already have that tree on it. Again, make sure your pictures are uploaded to a cloud service like Google Photos or Dropbox.
Charge early and often. When the power goes out, it goes out.
That said, data could well be down after a strong storm. (Though operators will be quick to tell you they’ve been hardening against storms.) If that’s the case enjoy the silence, and don’t waste battery if you don’t have to.

Speaking of charging …
Batteries are our lifeblood. I mean, our phones’ lifeblood. If you want any hope of communicating after a storm, or keeping up with folks during a storm, you’ll need to stay charged. The good news is that even if you don’t (or can’t) use a full-blown generator, we’ve got options.
We’ve seen an explosion (figuratively, that is) of small and inexpensive external batteries. This very much changes the game for post-storm charging. You should have a few on hand. We’re fans of this 20,000 mAh battery from Anker. USB-A and USB-C, so it’ll charge pretty much everything. (And, yes, it’s on that “good” list for USB-C.)
A good bit more expensive, and maybe a little crazy (in a good way) is the Anker PowerHouse — a 434Wh (that’s somewhere in the neighborhood of 120,000 mAh) gianormous AC or solar-powered backup battery/inverter.
Unfortunately for most of us, it’s still a little early for this future-tech solution.
Other random things worth buying
Batteries are obvious. So are lamps of some sort. And food that doesn’t spoil.
I also recommend picking up a sun shower of come sort. These are large PVC bags that use the sun to heat the water within, and gravity to rain it down upon your body. I used them on boats growing up, but they’re perfect for post-storm showers. You don’t need electricity to heat the water, they’re portable, and they’re easy to store.
This one looks just fine — but you’ve basically got your pick on Amazon. If you’re buying locally, any sporting goods store or boat store should have them in stock.
I’d also recommend picking up a battery-powered AM/FM Weather radio. Again, you need to conserve things like your phone for when you really need them. These ancient little radios run on batteries and will keep you up with important local info as well with NOAA weather radio. They’re indispensable once the power goes out. (It’s what us old people had before Twitter, and with less trolling.)
Be safe out there.
How to Electronically Sign a PDF Using Preview on Mac
When you receive a PDF document by email that you must sign, the process of printing out the file, signing on the dotted line with a pen, scanning the signed document and sending it back can be a rather tedious task. Fortunately, Apple has added the ability to electronically sign a PDF document using Preview, a program that comes preinstalled on every Mac running OS X Lion or later.
The steps involved to electronically sign a PDF using Preview on Mac are quite simple and will save you valuable time, especially if you have multiple documents, contracts, forms or other paperwork to sign. If you are worried that your virtual signature will look bad, rest assured that you can create your signature by using the trackpad or holding up your signature on paper to a Mac’s built-in iSight camera.
Steps to Electronically Sign a PDF Using Trackpad
Open the PDF file you need to sign in Preview.
Click on the Markup icon ( ) and then the signature (
 ) icon.
Click on Create Signature > Click Here to Begin. Draw your signature on the trackpad. Click any key when finished. Click Done.
Click on the signature created to insert it into the PDF document. The signature can be moved or resized like a regular image.
Steps to Electronically Sign a PDF Using Camera
Open the PDF file you need to sign in Preview.
Click on the Markup icon () and then the signature () icon.
Click on Create Signature > Camera. Sign your name on white paper and hold it to be visible to the camera. Preview will draw a virtual signature. Click Done.
Click on the signature created to insert it into the PDF document. The signature can be moved or resized like a regular image.
Tips
- If you are using the trackpad to create your electronic signature, it is recommended that you look at Preview and go slow and steady with your finger to achieve the best result. For an even more precise signature, you can use an iPhone or iPad stylus, preferably one with a fine-tipped ending, to draw your signature on the trackpad.
- Signing a piece of white paper and holding it up to the camera is the easiest way of creating an electronic signature in Preview, although this method does not always yield the best results. The signature will appear inverted when you hold it up to your Mac’s camera, but Preview will automatically ensure that it reads properly from left to right.
- You can create an electronic signature in Preview by following steps above even if you do not have a PDF document opened. By default, all electronic signatures that you create are automatically stored in a list on Preview so that you can insert them into future PDFs documents and other files without needing to repeat these steps. Preview can store multiple signatures at once.
- Apple also provides markup tools in the Mail app in macOS to create electronic signatures that can be directly inserted into your emails.
Tags: Preview, PDF, signature
Discuss this article in our forums
How to Use Do Not Disturb While Driving
Starting with iOS 11, Apple introduced a Do Not Disturb While Driving Feature that’s designed to mute incoming calls, texts, and notifications while you’re driving to cut down on accident-causing distractions.
Do Not Disturb While Driving is not a feature that’s enabled automatically, but you will see a popup prompting you to turn it on when Apple detects the motion of a car after installing iOS 11 or later for the first time. Despite the notification, you’ll still need to choose how you want to use the feature if you miss the initial setup process.
Do Not Disturb can be set to turn on manually, automatically when the iPhone detects a car’s acceleration, or when an iPhone connects to a car’s Bluetooth.
Enabling Do Not Disturb While Driving
Open the Settings app.
Tap Do Not Disturb.
Scroll down to “Do Not Disturb While Driving.” 
Tap on “Activate” to choose how you want Do Not Disturb While Driving to be turned on. If you don’t want to use Do Not Disturb While Driving, set it to manual.Whenever Do Not Disturb While Driving is activated, you’ll see a bar at the top of the screen letting you know incoming notifications are being muted.
Do Not Disturb While Driving Control Center Toggle
If you don’t want to have Do Not Disturb While Driving turn on automatically but still want to use it, there’s a Control Center setting for activating it.
Open the Settings app.
Choose Control Center.
Select Customize Controls. 
Add Do Not Disturb While Driving, which has an image of a car.
This adds the Do Not Disturb While Driving toggle to your Control Center. To turn it on or off, you just need to swipe to open the Control Center and tap it.
If You’re a Passenger
When the automatic setting is enabled, Do Not Disturb While Driving will turn on whenever your iPhone detects the acceleration of a vehicle. This can be inconvenient if you’re a passenger, so you’ll need to turn it off through the Control Center or by tapping the persistent Do Not Disturb While Driving popup at the top of the display to let Apple know you’re a passenger.

Choosing Your Auto Reply Options
When you’re driving, all of your incoming text messages are muted. You can choose an automatic text message that lets people know you’re in the car and will text later, and you can customize who sees the message.

Open the Settings app.
Choose Do Not Disturb.
Scroll down to “Auto-Reply To” and tap it.
You can choose for automatic texts to be sent to Recents, Favorites, All Contacts, or No one, if you would rather not have your phone send automatic replies.
Customizing Your Auto Reply
Open the Settings app.
Choose Do Not Disturb.
Scroll down to “Auto-Reply” and tap it.
Apple sets a default message in this section, but you can change it to say whatever you want. This is the message people will receive when texting you when Do Not Disturb While Driving is enabled.
If there’s an urgent issue and someone needs to get in contact with you immediately, they can break through Do Not Disturb While Driving by texting you “urgent.” This will override your Do Not Disturb settings and will notify you of the text immediately.

An ideal setup is to set auto replies to your favorites, which likely translates to close friends and family. This will let them text you in an emergency situation, but will prevent other less urgent messages from being a distraction.
Phone Calls
If your iPhone is connected to your car’s Bluetooth system, iOS is smart enough to know you have a hands-free calling method available. In this situation, calls will continue to come through even when Do Not Disturb While Driving is enabled. Texts and notifications from apps will continue to be muted, though.
If you’re not connected to Bluetooth and have no hands-free accessory, calls will be blocked like text messages and notifications.
Parental Restrictions
For parents of teenagers, there’s an option to enable a restriction that will prevent Do Not Disturb While Driving settings from being changed or toggled off, guaranteeing children are using the feature whenever they’re in the car. Here’s how to turn it on (iOS 12 or later):
Open the Settings app.
Choose Screen Time.
Tap on Content & Privacy Restrictions.
Tap on the Content & Privacy Restrictions toggle to turn on restrictions.
Scroll down to Do Not Disturb While Driving and tap it.
Choose Don’t Allow.On devices running an earlier version of iOS, there are different steps to follow to access device restrictions. Open the Settings app, choose General, scroll down to Restrictions and then tap it. Enter your passcode and then find the “Do Not Disturb While Driving” option and choose “Don’t Allow Changes.”
Tag: Do Not Disturb While Driving
Discuss this article in our forums
Apple Stops Signing iOS 11.4.1 Following iOS 12 Launch, Downgrading No Longer Possible
Following the release of iOS 12 on September 17, Apple has stopped signing iOS 11.41, the previous version of iOS that was available to consumers.
iPhone, iPad, and iPod touch owners who have upgraded to iOS 12 will no longer be able to downgrade to the iOS 11 operating system.
Apple routinely stops signing older versions of software updates after new releases come out in order to encourage customers to keep their operating systems up to date.
iOS 12 and today’s iOS 12.0.1 release are the only versions of iOS that can be installed on iPhones and iPads by the general public. Developers and public beta testers can download iOS 12.1, an iOS 12 update that’s being beta tested.
Discuss this article in our forums
JBL Link View review: A smart display with lots of potential not yet realized

These days smart speakers are nothing new but they are still evolving. Just as with the Echo and later the Echo Show, Amazon was first to the party. Now, Google is once again playing catch up with their very own smart displays hitting the market. First came the Lenovo Smart Display which was quickly followed by the JBL Link View. At this moment they are the only two players in the market for a Google Assistant powered smart display. For the past few weeks, I’ve been using the JBL Link View with much delight and a few gripes.
Design
The JBL Link View comes in an oblong pill shape that seems more like a display has been slapped on a speaker than a display with speakers attached. This should come as no surprise since JBL is first and foremost an audio company. Upon opening the box, I found the design to be wider and bulkier than I expected. I can’t say I was immediately a fan of the design but as time went on it grew on me.
One aspect of the design that really stood out to me is the size of the bezels around the display. In a world where bezels are constantly shrinking on our phones, computers, and TVs it is a bit strange to see such large bezels on a new device. If it were a tablet the bezels might make sense but smart displays are not tablets and not designed to be held during usage. JBL isn’t the only one guilty of this, as every smart display that I’ve seen so far includes large bezels.
The next thing that stood out to me was the privacy switch. If you’ve been concerned about bringing a connected camera into your home, the privacy switch is a nice reassuring feature. The privacy switch is a one hundred percent manual slider switch that completely covers the camera with an orange piece of plastic. This makes it easy to see whether or not your camera is blocked.

As with other smart speakers on the market, there is also a mute switch on the back and volume controls. Even though you’ll most likely be controlling the volume with voice commands or by using the on-screen controls these controls are still handy to have.

One of the reasons you’ll most likely be using the voice commands is if you decide to put this in the kitchen. After using the JBL Link View for the past week I found that is one of the best rooms for a smart display to live. In order to make the Link View even more kitchen friendly, it comes with an IPX4 rating making it splashproof. That’s not quite as good as many new phones but it should stand up to the occasional splash in the kitchen without issue.

A small and often overlooked design element is the power plug. If you’re like me with a house full of gadgets crowding your outlets, then you’ll be happy to know the Link View doesn’t feature a large boxy plug. It was really refreshing to see the power cable used a normal sized plug instead of some oddly shaped large rectangle. Thankfully, JBL saw fit to hide all the components in the Link View itself and provide you with a small normal sized power plug that wouldn’t crowd your surge protector.
Display
I was a little disappointed at first when I read that the 8-inch display on JBL Link View would only have a 720p resolution. In a world of QHD phones and 4K TVs, the thought of using a 720p screen seemed like a big step backward.
However, in practice, I found this was not an issue at all. Most times you’ll be at least three feet or more from the display and at this distance, you won’t notice the lower resolution. During my time watching YouTube videos or movies from Google Play I found no issues with the video quality.

It definitely was not as good as my phone, tablet, or TV screen but a smart display isn’t really designed around media consumption. It is there to help give you visual results and information and it does this well.
I did find some light leaking around the top and bottom bezels and that was unfortunate. Overall it was only a minor issue because it is only visible when the ambient display is on.
How Good is the Screen?
Personally, I have loved having a screen on my smart speaker. I’m a visual person and getting visual feedback from my commands and questions is quite satisfying. The animations were all smooth and flowing, reminiscent of the material design we’ve come to know and love.
I enjoyed asking for the weather and seeing the forecast pop up on the screen. Controlling your smart home is also made easier by providing extra controls on screen whenever you turn the lights on or off. Besides the ability to toggle lights on or off, you’re also presented with controls for brightness and color. These controls will linger on the screen for a while giving you plenty of time to access them which is a nice touch.


Using it for recipes in the kitchen is fantastic since it gives you step by step instructions that you can advance hands-free. Even better you can bring up a recipe video on YouTube with ease.
Another way it makes a great kitchen companion is by allowing you to watch movies through Google Play or catch up on your YouTube videos.
While it plays music just like any other Google Assistant speaker with the screen it also allows you to watch the music videos via YouTube. If you happen to have YouTube TV you’ll even be able to watch TV on it. Beyond watching videos I also appreciated the other ways it would show information.
Whether that be showing a picture related to my question or providing follow up questions at the bottom of the screen. Often times it leads me to click on related questions and learning more about the subject.


I also enjoyed some of the added touches such as providing a breakdown of scoring quarter by quarter when asking for the football score. Little additions such as this show how Google put thought into how to utilize the display in useful ways, providing an improved experience over an audio-only device. That doesn’t mean it still doesn’t have a long way to go.
So Much Potential
There is still a lot of room for improvement and innovation. For instance, when turning on a light it was fantastic to see the controls pop up on the screen. I loved that I could toggle the light on/off, change the color, or brightness of the bulb. Features like this would make a smart display the perfect smart home hub. Unfortunately, there is no way to bring up some sort of hub to give you full control over your smart home devices.
I found myself giving variations of “show me my lights” commands hoping to get a screen for controls over every light in my home. Sadly, there was no way to do this. There is also no way to view my Arlo cameras at this time.
READ MORE: What are smart displays and what good are they?
Another feature that would have been beneficial is viewing the weather radar. I tried several commands but could never get this to work.
Making video calls using the JBL Link View worked well but you are limited to only using Duo. Unfortunately, not many people use Duo and support for some other video calling apps would be much appreciated.
Speaking of video calls, the Echo Show offers the ability to “drop in” and view your home through the camera. This is yet another feature I wish Google smart displays included. Having the ability to call my smart speaker through Duo or view it through the Google Home app would be such a convenient way to check on things while I’m away.
The ambient display also leaves much to be desired. This comes on after the display has been idle for a while showing only a small clock in the bottom left-hand corner. If this clock were larger it would be easier to read from several feet away or even from across the room. Furthermore, I’d love if it offered some more info or customization. Perhaps allowing you to adjust the clock to the size you see fit and show more information like the weather.
Sound Quality
With JBL’s audio prowess it should be no surprise that the JBL Link View has outstanding audio quality. The two speakers on the front provide stereo sound while a passive radiator on the back makes sure you feel the bass. This helped give a balanced sound with plenty of clarity in the mids and highs along with hard hitting bass.

Final Thoughts
After weeks of using the JBL Link View, I’ve come to love having a screen on my smart speaker, but it’s not yet essential. I use smart speakers every day and I’ve been a big fan of them since my first Echo speaker and later my Google Home speaker. Similar to when the Google Home was first launched smart displays right now are full of potential which isn’t yet realized.
Even if they only have a limited use, for now, the JBL Link View has sold me on smart displays. The great thing about smart displays or speakers is they will continue to evolve and improve over time. When I first got the Google Home it couldn’t do half of what it is capable of now. The same will be true for smart displays.
Over time it will improve and gain new abilities becoming a vital part of your smart home. As long as you don’t need the larger screen size offered by the Lenovo smart display, the JBL Link View is the clear way to go. No other smart display currently offers this level of sound quality and you’ll be grateful for that every time you start your favorite playlist or queue up a video to watch.
Buy from JBL Buy from Best Buy Buy from B&H Photo
How to Force Restart or Hard Reset the iPhone 8 and iPhone 8 Plus
Apple in 2017 changed the method to force restart or hard reset an iPhone 8 or iPhone 8 Plus.
While rebooting an iPhone 7 or iPhone 7 Plus requires pressing and holding both the Sleep/Wake and Volume Down buttons for at least 10 seconds until the Apple logo appears, restarting an iPhone 8 or iPhone 8 Plus is a three step process that involves the Volume Up button, the Volume Down button, and the Side button on the device.
How to Force Restart or Hard Reset the iPhone 8 and iPhone 8 Plus
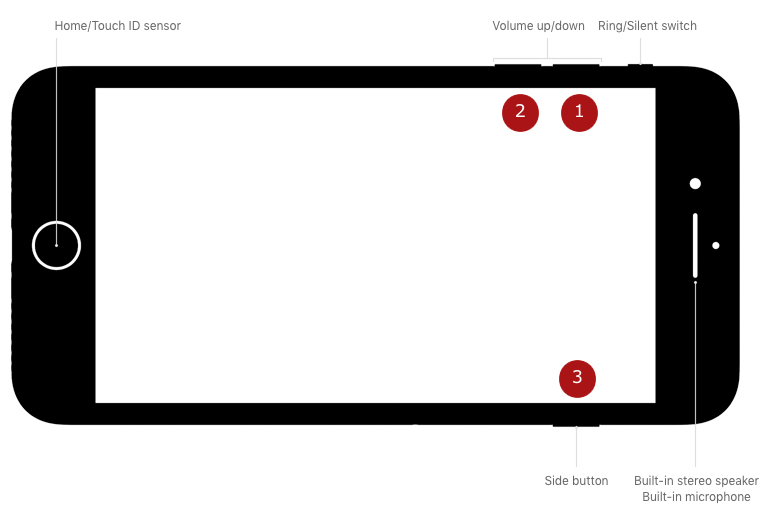 Press and quickly release the Volume Up button.
Press and quickly release the Volume Down button.
Press and hold the Side button (aka power) until you see the Apple logo.Powering off regularly still requires holding down the Side button for a few seconds until the “slide to power off” prompt appears. In iOS 11 and iOS 12, there’s also a “Shut Down” option in the Settings app at the bottom of the General menu.
Apple made this change because on iPhone 8 and iPhone 8 Plus, pressing and holding the Side aka Sleep/Wake button and one of the Volume buttons now activates the Emergency SOS feature.
Force restarting an iPhone is different than recovery using DFU mode, for which the steps remain the same as the iPhone 7 and iPhone 7 Plus.
Discuss this article in our forums
Here’s how scientists read a charred 16th-century scroll without unraveling it
What do you do when you’re an historian trying to recover information from a severely damaged 16th century scroll that’s darn near unreadable? You turn to cutting-edge technology, of course. At least, that is what several international researchers have been lending their expert assistance to — and they’ve been able to help reveal the hidden text inside the severely burned rolled-up document as a result.
“For historical documents that are delicate — often due to fire or water damage — it is problematic to open or unroll them, as this would cause further damage,” Paul Rosin, a professor in the U.K.’s Cardiff University’s School of Computer Science and Informatics, told Digital Trends. “Not only is this a problem, but if the document disintegrates then the results may not be readable.”
The team involved in the project started by carrying out a non-destructive 3D X-ray scan of the document at the U.K.’s Queen Mary University. This technique creates thousands of thin cross sections of the document, on which the ink was visible as bright blobs. The 3D data was then passed to computer scientists at Cardiff University and a collaborator at China’s Beihang University, who used computer vision algorithms to create a flat representation of the scroll. This allowed the team to extract the writing on its surface.
“Our work was a good proof of concept to show that it is possible to extract information even from very challenging data,” Rosin continued.
He noted that, in this case, the documents were not of essential historical importance: Being legal documents referring to a few land transactions, records about disturbances of the peace, payment of fines, names of jurors, and other local information. However, there is no reason why the same technique could not be used for other, more crucial documents in the future.
“For something as important as the Dead Sea Scrolls probably even extracting a few phrases would be considered worthwhile,” he said.
Research like this isn’t the first time that the worlds of historical research and high-tech have crossed paths to avoid damaging potentially significant finds. Previously, researchers exploring the Great Pyramid of Giza used a not-dissimilar technique called “muon tomography” to map a newly discovered hidden chamber in the enormous structure. In another instance, Lidar — a laser-based tool most commonly used in self-driving cars — was utilized to create a detailed map of a long-lost city hidden beneath the jungle in Cambodia.
Editors’ Recommendations
- Want a peek into the future? Watch these robots 3D print concrete structures
- How to unlock a phone on each and every carrier
- How to root Android phones or tablets (and unroot them)
- Home printer buying guide: How to choose a printer that best fits your needs
- How to unpair an Apple Watch
Like a Bat-Signal for cyclists, this laser light makes bikes visible to drivers
Having lights on your bicycle isn’t just an optional extra — it’s a legal requirement in most places, provided that you wish to cycle after it’s dark. Well, you’ve probably never seen seen a bike light quite like the one created by U.K. startup Beryl, though. Called the Laserlight Core, it’s a smart projection system that’s designed for safer cycling. It works by projecting an image of a cyclist 20 feet in front of you as you ride. Think of it as your own attention-grabbing, cycling-themed Bat-Signal, and you won’t be too far wrong.
“We have combined a high-spec white front light with the patented Beryl laser projection, allowing cyclists to both see and be seen, beaming out blind spots as they ride through the city,” Beryl CEO Emily Brooke told Digital Trends. “The light can function either as a standard front light or, with [the] laser enabled, with a push of a button.”
Beryl grew out of Brooke’s Product Design degree at Brighton University in the U.K. While she was there, she read about the high number of bike accidents that happen as the result of bikes being in a car’s blind spot. Brooke went on to create the first Beryl light prototype, which quickly caught the attention of transport officials in London. They incorporated it into the London bike share scheme in 2015, and it has since been been piloted in New York, Montreal, and — very soon — Glasgow, Scotland.
The Laserlight Core is the company’s second-generation light, incorporating improvements in laser technology to produce Beryl’s clearest, most defined laser projection to date. It also boasts other improvements over its predecessor, the Laserlight Blaze. These include a “day flash mode,” lighter casing, and a tool-free bracket with silicone band mount.
“The Laserlight is a patented technology, and so Beryl is the only company that uses the forward image projection,” Brooke said. “We believe that the Laserlight is unique in the space, as it is focusing on strategic visibility: Visibility where it really matters.”
As ever, we offer our usual warnings about the potential risks inherent in Kickstarter campaigns — even when the company has successfully shipped products previously. If you’re keen to go ahead and get involved, however, head over to the project’s crowdfunding page, where you can pledge your dough. Prices start at $75, and shipping is set to take place in December.
With any luck, that should mean it’s poised to be a great holiday gift for the cycling enthusiast in your life.
Editors’ Recommendations
- Awesome Tech You Can’t Buy Yet: Screen-blocking specs, cybershoes, and more
- Don’t get burned! How to back crowdfunding projects the smart way
- How laser projection is taking IMAX even further over the top
- Apple AR glasses: News and rumors about ‘Project Mirrorshades’
- These Raspberry Pi 3 bundles will cover everyone, from coders to gamers
Google to shut down Google+ after exposure of 500,000 users’ data
Google announced that it will shut down Google+ for consumers after revealing that the social networking site suffered from a security vulnerability that affects as many as 500,000 of its users. It’s believed that the personal data of hundreds of thousands of Google+ users may have been exposed on the site between 2015 and March 2018, though Google claims that it does not believe that data from its users were misused as part of the glitch.
The security flaw could have revealed personal details that about its users to potential hackers, such as a user’s name, gender, email address, and occupation. In its report, Google claims that the bug was discovered when it launched Project Strobe to review third-party developer access to Google account and Android device data.
“We made Google+ with privacy in mind and therefore keep this API’s log data for only two weeks,” Google revealed in a blog post after the Wall Street Journal reported the flaw. “That means we cannot confirm which users were impacted by this bug. However, we ran a detailed analysis over the two weeks prior to patching the bug, and from that analysis, the Profiles of up to 500,000 Google+ accounts were potentially affected. Our analysis showed that up to 438 applications may have used this API.”
Google claimed that after the bug was discovered, it was quickly patched and that it was not aware of any abuse. However, it did not reveal the flaw initially as a way to preserve its reputation and not invite regulatory scrutiny, according to a report on the Wall Street Journal. In addition to shutting down consumer accounts, Google also plans to announce changes to its privacy policy in response to the potential data breach, the Journal reported, including new changes to its APIs to limit developers access to user’s data on Gmail and Android devices.
Rival Facebook is still reeling from a public relations fiasco after it revealed earlier this year that data from its users was misused as part of the Cambridge Analytica scandal. More recently, Facebook also discovered a bug that allowed hackers access to its users’ private data. The Facebook security flaw affected 50 million users, and Facebook made a decision to forcibly log off 90 million of its users as a result of the issue. Affected users could log back into their Facebook account to regain access to the social network. Facebook also forced to implement sweeping changes to how it handles data in an effort to rebuild trust as a result of its recent breaches.
Google made the decision to shutter Google+ over the next 10 months, citing a lack of user engagement. “The consumer version of Google+ currently has low usage and engagement: 90 percent of Google+ user sessions are less than five seconds,” Google said.
Editors’ Recommendations
- Facebook’s latest data breach could earn Europeans thousands in compensation
- Is Google launching an A.I. fitness coach for smartwatches?
- Google’s Titan Key ensures your phone and apps are virtually unhackable
- Riddled with problems, Chrome 69 isn’t the celebration Google hoped for
- Google will warn businesses if state-sponsored hackers target G Suite users
