


How to buy Bitcoin with PayPal
JackGuez/GettyImages
Buying Bitcoin is much easier today than it was in the past, but what if you want to purchase it using money you’ve already dumped into a PayPal account? It turns out if you want to do that, it’s a bit more tricky — and much more expensive.
One of the main reasons why it’s difficult is the potential for chargebacks. Major exchanges won’t allow PayPal transactions because it would be too easy for people to buy the Bitcoins, then use PayPal’s support system to chargeback their purchase and receive their original purchase fee back. That would be an unscrupulous and fraudulent way to buy Bitcoin — even when using the services below — so is not encouraged in any manner.
However, it is possible. Before you can receive any Bitcoin, regardless of payment method, you need to have a Bitcoin wallet set up, as well as a PayPal account. Once you do that, you’ll be ready to move ahead and start buying Bitcoin with PayPal.
Method 1: Direct trade
Due to the fact that cryptocurrency exchanges don’t allow you to buy Bitcoin with PayPal, the best way to do so is with a direct trade. Websites that facilitate these kinds of peer-to-peer transactions help put you in touch with someone who is looking to sell Bitcoins who accept PayPal as a payment method.
The two main websites for conducting these kinds of transactions are LocalBitcoins and Paxful. Both offer a multitude of payment methods for Bitcoin, from gift cards to cash, but PayPal is a popular choice. To buy Bitcoin with PayPal on either service, follow the steps below:
Step 1: Head to the homepage of LocalBitcoins or Paxful and sign up for an account.
Step 2: Use the respective site’s search tools to select the amount of Bitcoin you want to buy (or USD you want to spend), with PayPal as your preferred payment option.
Step 3: Choose an offer based on the relative Bitcoin price, user rating, or customer reviews. Click the “Buy” button on the right-hand side.
Step 4: Make sure to read the specific terms of the deal with your chosen seller. Some request ID, others a contact number.
Step 5: If you are happy with their stipulations, confirm the amount of Bitcoin you want to buy and click the large “Buy” button to continue the transaction.
Step 6: You will then be put into direct contact with the seller. The specifics of the transactions will be up to you to discuss and confirm with them, but once the process is complete and you have sent your payment using PayPal, your newly acquired Bitcoin will be sent to your specified wallet.
Method 2: Bitcoin “loans”
Although no exchanges will accept PayPal transactions, there is one website which offers a more automated system than the pure direct trade sites outlined above. XCoins operates what it describes as a Bitcoin secured loan system, whereby it allows Bitcoin owners to “lend” their cryptocurrency to potential PayPal buyers, who can then do with it what they will. They loan it, in exchange for payment and one of those payment options is PayPal.
XCoins touts itself for offering low fees for Bitcoin purchases, though for the convenience of using its service you pay a lenders fee, which at its lowest is 15 percent. You also pay a “loan origination fee,” at 7.5 percent of your investment and a PayPal processing fee of several percent plus a flat rate of a few cents on top of that. As with buying through direct trade websites, PayPal transactions on Xcoins are not cheap.
Step 1: Head to the XCoins homepage and click “Get Bitcoin” in the top menu.
Step 2: Sign up for an account and verify it with the link emailed to you.
Step 3: Set up two-factor authentication through your mobile device.
Step 4: Input the amount of Bitcoin you want to buy in Bitcoin or your chosen currency. Xcoins will then search for a suitable lender for your transaction.
Step 5: When a lender has been found, you’ll be shown the details of the transaction, including processing and lender fees. If you are happy to go ahead with the purchase based on those figures, read the linked loan agreement and tick the corresponding box to show you have done so. Then click “Continue to Payment.”
Step 6: You will then be redirected to your PayPal account, where you will need to login and validate the transaction as usual.
Step 7: Once you have returned to Xcoins, your Bitcoin will be sent straight to your Xcoins wallet, at which point you can send it to a more secure wallet of your choice.
Editors’ Recommendations
- How to buy Bitcoin
- How to buy Ethereum
- How to trade bitcoin for other cryptocurrencies
- You’ll need to sell your Bitcoin if you want to buy games with it on Steam
- How to buy Litecoin
Kids hijacking your Netflix account? Here’s how to delete items
My Make OU/123RF
We’ve all been there. One day, you arrive home from work, slouch satisfyingly in your favorite chair, and power up Netflix to pass the time. Suddenly, you notice a row titled “Because you watched Spy Kids 3D.” What?!
Then, it hits you: Little [insert child’s name here] somehow got onto your profile and started watching kids programming, and now all your recommendations are cartoons! Fret not, though — you don’t need to delete the profile and start over. You can simply delete individual items from your viewing history, and we’re here to show you how.
A note: Technically, you’ll be “hiding” items from your viewing history, not “deleting” them, as Netflix still keeps statistics on your habits. For all intents and purposes, though, it’s the same thing.
Sign in with your trusty computer
First things first: You can only delete viewing history from a desktop web browser. The Netflix mobile app and apps on various smart TVs or streaming devices don’t offer you the option (though you can typically delete entire profiles from any device).
Head to Netflix and sign in. Select the profile you want to edit — most likely, this will be whichever profile you use personally — and, once you’re at the browsing screen, click the profile icon in the upper right corner.
Manage your viewing history
You’ll want to select Account from the drop-down menu. Next, scroll down to the My Profile section of the account management page. Click Viewing Activity (located on the right side, above Ratings), and you’ll see the following screen.
Scroll through to find anything you don’t like, and click the black “X” to remove it from your viewing history. As you can see, television episodes are listed individually, and they can individually impact your recommendations. Deleting a TV episode will also prompt Netflix to ask if you want to remove the entire series from your history — a nice feature, we think.
That’s it! You don’t need to click a “Save” button or anything. Just head back to the browsing page and start watching stuff to get those suggestions back up to speed. For more help, we’ve got a handy collection of Netflix tips and tricks at the ready.
Editors’ Recommendations
- Parting ways? Here’s how to delete a Netflix profile from your account
- 20 Netflix tips and tricks to make your streaming experience even better
- How to use Windows Timeline
- How to clear cookies in your browser
- Catch every touchdown, ad, and trailer: How to watch the 2018 Super Bowl
Blu Vivo X review: Can you get a flagship experience for under $250?

Miami-based Blu today launches its latest smartphone, the Vivo X. With a price tag of around $250, it’s actually on the higher end of things for the phone maker. In other words, this is what you might consider a flagship model for the unlocked device manufacturer.
On paper, and in practice, the Blu Vivo X stands toe-to-toe with a number of much more expensive phones. Blu lines it up next to the Moto X (4th Gen.) as a close competitor but that’s not quite a fair fight. The Motorola phone is considerably older by today’s standards, even if it’s still in its first year. While it certainly bests that particular model, it doesn’t stack up evenly to other “flagship” products from the likes of Samsung, LG, or Google.
We’ve spent the last few weeks using the Blu Vivo X as a secondary device to our daily driver. We tried to use it as often as possible, but never quite loaded up all of our day-to-day apps and games. If you’re looking for a TL;DR version of the review here it goes: We liked it a lot and even loved some of it. But, that doesn’t mean it was without problems.

Key Specifications
- 2.6GHz octa-core processor (MediaTek P25)
- 64GB internal storage (with microSD slot up to 64GB)
- 4GB RAM
- Android 7.0 Nougat
- 6.0-inch display with 18:9 aspect ratio (720 x 1440 pixels)
- Dual rear cameras (13-megapixel, 5-megapixel) with flash
- Dual front cameras (20-megapixel, 8-megapixel) with flash
- Fingerprint sensor
- 4,010mAh battery
- 4G LTE: 1/2/3/4/5/7/8/12/17/28
General Impressions
Opening up the box we see that Blu gives us a little more than what we get out of them in its lower-priced efforts. Namely, the package includes earbuds and a reverse charge cable. Inside the box are the phone, a charger, a pair of earbuds, a silicone protective case, a screen protector, a sticker, and the paperwork.
Sadly, it’s not everyday that you get the headphones with a smartphone at this price. Moreover, Blu is the only brand we know of that routinely throws in a protective case and screen protector. Interestingly enough, this time the case has a distinct black and white pattern on it which mimics the design on the box. It’s eye catching, to be sure, and gives the phone a touch of personality.
Picking up the Vivo X, it calls to mind the Pixel XL or Samsung Galaxy S8+. It’s big, dense, and feels like a quality device. There’s a nice curved edge to it just about everywhere you look; the front screen has a curved display and the back has its own share of tapered edge.
Generally speaking, the Vivo X is comfortable to hold. It’s just a little bit bigger than what we normally use on a daily basis, but we came to appreciate the screen size that comes with it. There’s not much bezel to the sides of the screen so it comes across like a “long” phone. This is common, though, when dealing with the 18:9 aspect ratio in larger displays. More on that in a moment.

Hardware
On paper, the Blu Vivo X lines up nicely with bigger name phones that fetch $400-$500, or higher. In other words, the phone brings more to the table than you’ll need this year and likely next. There’s nothing wrong with buying specifications you’re not tapping into anytime soon. All that means is your phone could last longer than expected.
Whereas many of Blu’s phones cater to first time smartphone buyers or those with light demands, the Vivo X is cut from a different cloth. It’s the beefiest handset from Blu yet and delivers some incredible hardware. With that said, it’s an excellent choice for customers who might be upgrading from an older phone.
Unlocked for the win
If you’re on T-Mobile, AT&T, or one of their respective prepaid networks and don’t need to buy based on a brand name, this is an excellent start. As an unlocked phone, the Vivo X is compatible with GSM networks [4G LTE, (1/2/3/4/5/78/12/17/38), 3G (850/900/1700/1900/2100), and HSPA+ 42Mbps]. Like other Blu models, this one comes with support for two SIM cards so feel free to mix and match, especially if you travel.
Strength comes from a MediaTak (Helio P25) 64-bit 2.6GHz octa-core processor with a Mali-T880 GPU and 4GB RAM. Storage comes in at 64GB internally, with a microSD card slot good for another 64GB.
It’s not the same as what we’d get from Qualcomm Snapdragon 835 and there are phones with 6GB and 8GB RAM on the market. The flip side of that coin is the cost. Will you see the difference in performance? Assuming you even could, is it worth the money? We can’t answer those questions for you.

Physical design
The right side of the phone is where you find the power button and volume rocker. The power button has a nice textured feel to it so you can distinguish it from the others. Across the display, on the left is where you’ll access the SIM cards and microSD expansion card slot. Down below are the microUSB port, microphone, and 3.5mm headphone jack.
Yes, you read that correctly. The flagship experience for 2018 comes with a microUSB port. We’ve been somewhat lenient over the last year, giving Blu the benefit of the doubt for its seemingly arbitrary choices as to whether to go with the old standard and which use the new. We’re not as forgiving now. There’s zero reason to go with microUSB for something as big and powerful as this.
Above the display is where you’ll locate the front facing cameras, which are set to the left of the speaker. The back side of the phone has a fingerprint reader in the upper middle.
Display
At 6-inches, the display is both comfortable and gigantic. Its 720 x 1440 pixel resolution (282 ppi) screen is protected by Corning Gorilla Glass 3 so it can withstand scuffs and scratches. The curved edge not only looks great, but responds to touch well. Would Gorilla Glass 4 or 5 be better? Sure. That’s part of keeping cost low, though.
One area where lower priced smartphones tend to cut corners is the resolution; often they’ll dial down to 720p to keep price down. While Blu went with a full HD+ image, it’s not the same as what you’d get in a pricier competitor. Noticeable? When you set it next to a phone that runs twice the price, sure. On a daily basis? Not so much. Suffice it to say, your eyes never strain and the picture is more than respectable.

According to Blu, this is a conscious decision. The phone maker tells us that it’s “balanced perfectly with customer preference for longer battery life.” So, while you could get a better picture or higher resolution, it’s going to come with a trade-off.
The Vivo X gave us an accurate picture in pretty much all lighting situations. Pictures and video leap off the screen and look great with 6-inches of real estate. Text is crisp and easy to read in the default settings. If you want or need larger text or different light settings, there’s plenty of customization under the hood.
Camera
When it comes to cameras, the Blu Vivo X offers up one of the company’s best experiences ever. And, when you factor in the $250 price tag, it’s an even better value.
Both the front and back configurations are dual cameras with flash. Combined with a fairly robust camera app, it gives users a lot of flexibility in shooting. We were impressed with the handling of photos before taking them as well as in real time.

The depth of field was spectacular, and when using the bokeh effect in the app, it produced shots that you’d expect from a much more expensive phone. We enjoyed a number of the effects; however some are more novelty than practical. With that said, there are a few general modes to choose from including panorama, night, and professional.
Other modes included in the camera software include time-lapse, text recognition, smart scanner, mood photo, and translation. Text recognition lets one snap a photo of text in a magazine or book which can be converted to something to copy or share. Play around with them and you’ll find each is a little different and rounds out the experience.
As for the actual photos and videos, we had no major issues. There were occasional pauses when focusing and not all results were as nice as we’d like. But, it’s much better than you’d expect from a $250 phone and is really no worse than we’ve seen in other, pricier models. Oh, and that wide-angle front-facing group shot? Excellent stuff.
Software
As is the case with all other Blu smartphones, there’s little here that’s added to the Android experience. Nearly the default stuff you’d get from Google, we only found a few pre-installed apps and only hints of custom settings.
Among the apps that Blu installs on the Vivo X are Amazon Prime Video, Amazon Shopping, its own clients for music, sound recorder, notes, and file explorer. You’ll be prompted to update to the latest releases for each but it’s largely like starting off with a Nexus or Pixel in terms of software.
We didn’t find as many options for customization or added flair in the area of aesthetics as we’ve seen in other models. In the past we’d sometimes have a Theme Park or UI settings, but that’s not the case here. This brings us to another point.
Stock Android grab bag
As much as Blu tends to leave its devices largely alone, they each have varying degrees of change or customization. In other words, it’s always something different. Strangely, they’re always the same, yet they’re always different. Sometimes it’s not having a traditional app drawer, or a swipe up for notifications. Others it’s stuff like long pressing for triggering shortcuts on icons.
What’s the oddball feature for the Vivo X? It’s one we found the very moment we turned the phone on and went about configuration. Alas, there’s no access to settings. Zero. Zilch. Want to toggle on/off Wi-Fi, Bluetooth, or a flashlight? Head to to the app drawer and look for settings.
At first we thought this was only going to be a minor nuisance. But, after maybe two or three days we found it maddening. We’ve taken it for granted just how much we hop in and out of settings like brightness, auto-rotate, airplane mode, and mobile hotspot.
A positive sign
In our time with the review unit we were prompted to install a software update. Hoping there was something in there to reconfigure these options, we were somewhat pleased to, instead, see an update for Google’s January 2018 security patch. This leads us to a final point about the software on the Vivo X.
We’re fast approaching the unofficial anniversary of Android 8.0’s debut. Google began offering a first look at the build last March and then formally released it with the Pixel 2 later in the year. Either way you look at it, enough time has passed for it to be the default build in a “flagship” phone.
To its credit, Blu has already pushed out a security update, addressing a concern of ours. As we see it, if you can’t keep up with the latest overall software release, at least stay pretty current on patches and security.
We’ve not heard whether the Vivo X will receive Android 8.0 but we’d certainly like to see it pushed in a timely manner. Sure, Android 7.0 Nougat is great and has plenty of awesome features, but it’s about to be two steps behind before we know it.
Performance
As a daily driver for a casual user or someone who will occasionally push their Android around, the Vivo X will do a great job. We’re always reluctant to install a bunch of apps and games until we’ve gotten a sense for the out of box stuff; as we mentioned earlier, that’s exactly what happened here.
A few weeks with the device saw us only installing the most pressing apps and a few recent games to review. In fact, we didn’t even add all of our email accounts. If we were to estimate the percentage, we’d say we were around 65% installed as compared to our daily driver. Given that, we did not run into any slow downs or performance issues. All of the games we played, even those more graphic intense, were handled with ease.

Battery
Battery life was great, which we fully expected when you’re talking about a 4,010mAh power source. Combined with one of the most efficient software builds available it delivers more than two average days of usage. While we admittedly didn’t load this review unit up with every daily app, it’s still running our heavy lifting apps.
We tend to throw our phones on a charger sometime in the afternoon, just out of habit. Our nightly routines vary so we like to preemptively top off the battery just in case we’re out for extended periods. Suffice it to say, it doesn’t take but a few minutes to add a sizable amount of battery life to the Vivo X. With that said, we never even came close to getting into the dangerous space of 10% or less.
We’re going to use this opportunity to revisit the topic of microUSB versus USB Type C. To us, if you come with your biggest device yet, you bring along any other tech you’ve used before, too. This means sticking with the Type C charging port that’s been used in other models.
The fingerprint reader was quick and very accurate. It’s in the right spot having moved around from the home button in other Blu phones. Launching into the phone, logging into apps, and using it for verification of purchases was just as good as we’ve found in handsets like the Pixel 2.
Similarly, the Face Unlock is a nice way to secure your phone, giving you one more way to lock things down. In our time with the review unit we dabbled with a number of ways to lock the device, dancing mainly between this and the fingerprint reader. We were impressed with both of these options and recommend using one to secure your handset.
Conclusion
As we were preparing our final thoughts for the Vivo X we learned that the pricing for the phone was going to come in considerably lower than initially expected. At first we were told the handset would carry a standard retail price of $299.99. A limited-time promotion would drop the cost to $259.99 for a short while, making it even more appealing.

At that price we were pretty content with the package and could see ourselves recommending it to the right person. There’s obviously going to be some reservation because of the questionable decisions along the way, but it’s a great bang-for-buck proposition.
On the night before this review was completed we learned that Blu will offer it for $199.99 at launch, raising it up to $249.99 later. That’s a full hundred dollars off if you’re an early adopter. And, even the standard retail comes in lower in the end, too.
At these prices we are much more forgiving of the shortfalls and corner cutting. Now we see the device not so much as a flagship killer or in a head-to-head comparison. At this price we’ve changed our perspective to “this is an insane amount of phone for only $200”.
There may be more exotic or sexier models out there, but you’ll pay a premium price for the experience. And, while there are phones with 6GB RAM or beefier specs, they’ll run extra for it. After nearly a month with the Vivo X we’ve come to appreciate it for what it is and what it does.
We thought that we’d need more than 3GB or 4GB of RAM for more than a year now. Instead, we’re more than content with that for our daily needs. And, based off of the apps and games we’re using, we don’t see ourselves scrambling for more anytime soon.
We often recommend that anyone considering their first Android phone might want to look into Blu. If for no other reasons, you get more for your money and an unlocked phone that lets you switch carriers without having to buy a new unit.
Let’s assume Blu set out to hit a home run with the Vivo X. Did it? We’ll give them credit for a triple. Let’s also say that it worked the count full and fouled off a couple of balls in the process.
You’re going to have a difficult time beating this phone’s specs at this price. And, if you do, you’ll probably be looking at something from a brand you’ve never heard of before. If you’re looking for a phone for T-Mobile or AT&T in the US, start here and work your way out. Likewise for those overseas considering something new for Orange Vodafone, O2, or other GSM carriers.
Pixel 3 wish list: What we want to see from Google’s 2018 flagship
The Pixel 2 is already the best Android phone you can buy, but it can always be better. Here are the things I would like to see in the Pixel 3.
I’ve had my Pixel 2 XL since a week after release, and while a small number of early units had some issues, most owners have reported being happy with their device. I didn’t encounter any of the hardware issues that other early owners experienced, and I’ve been enjoying the phone quite a bit since receiving in the mail.

Having said that, there are some things I would change about the phone. Nothing major, but a few little things that would add up to a better device (in my eyes). I know the Pixel 3 will feature the newest processor, an even better camera, and whatever software features come in Android P. But some pieces aren’t certain, and I hope these all make it into the Pixel 3.
Broader retail availability

This one doesn’t matter much for me, since I’ve been buying my phones unlocked for years. But I’m not most people. Most consumers — at least in North America — still go to their cellular carrier’s stores to play with a device in hand before buying it. Which mostly means those consumers are buying iPhones and Galaxies. That’s not to say those are bad choices, but if Google wants to improve the Pixel line’s sales numbers, the phone will need to be sold by all carriers. I’m not sure how long Verizon has a retail exclusive for the Pixel phones, but hopefully 2018 is the year they will be available in more stores.
Wireless charging

Way back when dinosaurs roamed the earth, Google’s Nexus line featured Qi charging fairly consistently. That changed when the Nexus 6P debuted with a metal body, and the Pixel line has continued the exclusion of any wireless charging. With the latest iPhones popularizing wireless charging more than ever and the wireless charging standards settling, I’d really like the next Pixels to bring back Qi charging. This will necessitate moving away from the metal back to using glass, but I think the tradeoff would be well worth it. There are some Qi charging adapters that would work with the current Pixels, but that would mean I couldn’t use the USB port to connect to my Android Auto head unit.
Faster wired charging

Wireless charging is for when my phone would sit overnight, but when I need to charge in a hurry, nothing works better than just plugging in a cable. While the Pixels currently charge fairly quickly with the right charger, there have a few instances — entirely of my own making — where I’ve needed the phone to top up sooner. The Essential Phone can recharge at a blistering 27 watts, while the Pixels don’t charge any faster than 18 watts. That’s still plenty fast for most situations, but not all.
iPhone X-style gesture navigation

I haven’t had a chance to use an iPhone X, but it seems like everyone who has used one has loved the gesture navigation. OnePlus has started experimenting with similar gestures, which serve as a proof of concept for how gestures could work with Android’s back and multitask system. This is something that would probably come to older phones with the Android P update, so if this is something Google is working on, we’ll probably see it at this year’s Google I/O.
Some sort of secure face unlock

This isn’t something I’m likely to use if a fingerprint sensor is also present, but it’d be a good option nonetheless. A secure face unlock system would be great when using gloves during the winter months, especially if it can tie into Google Pay. I still want a fingerprint sensor present, either remaining on the back or built into the screen. Giving users a choice on which biometric system to use would be perfect for me. Android has had insecure Face Unlock for years, but a native solution that plugs into the same APIs that are used for fingerprint sensors would be the best thing for the platform going forward.
Honorable mention: A 3.5mm headphone jack

Pretty please?
How about you?
What would you like to see in the Pixel 3? Let us know down below!
Google Pixel 2 and Pixel 2 XL
- Pixel 2 FAQ: Everything you need to know!
- Google Pixel 2 and 2 XL review: The new standard
- Google Pixel 2 specs
- Google Pixel 2 vs. Pixel 2 XL: What’s the difference?
- Join our Pixel 2 forums
Best Buy
Verizon
Google Store
Project Fi
Qualcomm teases what its Snapdragon 845 can do for VR
The 845 is virtual reality’s new best friend.
Samsung’s Galaxy S9 will be one of the first smartphones powered by Qualcomm’s Snapdragon 845, and it’ll have a lot of key advantages over the 835. According to a new reference device that was just announced, we’ll be seeing a similar story when it comes to virtual reality.

The reference device in question is the headset you see above, and it’s based on the latest version of the Snapdragon Mobile VR platform that’s powered by the Snapdragon 845. The headset offers “more than twice as much display throughput” when compared to Qualcomm’s VR platform based on the 835, offers 30% faster performance, and uses 30% less power.
In other words, the 845 is a big deal for standalone VR headsets.
Additionally, the 845 will enable standalone VR headsets (like the Mirage Solo and Vive Focus) to ship with higher-res dual displays that each has a 2K resolution.
The reference headset also has a new feature called “Adreno Foveation.” By taking information from the four cameras on the reference headset, the Adreno GPU will be able to produce sharper graphics depending on where the headset detects you’re looking. Along with this, “Roomscale” tracking will be able to map your body movements and the area around you so you can easily avoid any obstacles in the real-world for a more enjoyable VR experience.
Qualcomm will be showing off this latest reference headset at MWC, and while it won’t be available for consumers to purchase, it should give us a clear picture of what to expect from VR as we make our way through 2018.
Qualcomm announces new AI Engine ahead of MWC 2018
What to do when you see green dots on your PlayStation screen

Are there green dots all over your screen when you turn on your PS4? Here’s what to do first.
Every now and then in the life of an electronic device, things can go sideways. It is an undoubtedly horrifying experience when you find that your very expensive piece of technology is doing something entirely wrong. One issue that is seen on a PlayStation 4 on occasion is green dots smattered across your display. Imagine that the universe of stars that you see in the night sky was superimposed on your display but every star was a green point of light. If you’re experiencing this issue with your PS4, here are some things you can do.
The first thing you need to do is take a deep breath. I understand how you’re feeling. I have been there.
HDMI issues
This is not a problem that is only seen on PlayStation consoles. Any device that uses HDMI for video output can be subject to this issue. Fortunately, the solution is often quite simple.
The first thing to do is ensure that the HDMI cable is firmly seated both into the PS4 and your TV. Sometimes it’s as simple as your HDMI cable not getting a proper connection to your devices. Unplug the cable and plug it back in firmly.
If that doesn’t solve your issues, try using an HDMI cable that is known to be functioning properly. If the known functional HDMI alleviates the issue then you know it’s as simple as replacing your cable.
There is a slight possibility that your HDMI ports have accumulated some debris that is causing a poor connection. Blasting the HDMI ports with compressed air just may be enough to solve your problem.
Call the pros
The PlayStation comes with a one year warranty. If your system falls within that window then, by all means, send that baby back and get it taken care of by the mothership. If your system is no longer under warranty then you can still create a service request with Sony to have your system repaired. In all likelihood, it won’t be free but it will be cheaper than a brand new system. You can create a service request for your system here and you can always call the Sony support line at 1-800-345-7669.
Hopefully, your green dot issue is a simple problem to resolve. We are all thinking good thoughts for you in your time of need. If all goes well you will back playing games in no time.
Why are we talking about PlayStation 4 stuff on Android Central? Let us explain.
PlayStation 4

- PS4 vs. PS4 Slim vs. PS4 Pro: Which should you buy?
- PlayStation VR Review
- Playing PS4 games through your phone is awesome
Amazon
These are three of the cities where AT&T’s 5G network will launch in 2018
Everything’s faster in Texas.
In early January, AT&T announced plans for launching a legit 5G network in twelve different markets by the end of 2018. The carrier remained tight-lipped at the time about which markets would be graced with this early access, but now we have the names of three of those twelve.

According to a post on AT&T’s newsroom, “parts of” Dallas, Atlanta, and Waco, Texas will be among the first cities to be serviced with true 5G speeds. Other supported cities will be announced over the next few months, and following these early tests, AT&T will expand its lineup of 5G-capable smartphones in 2019.
Commenting on this announcement, AT&T’s Senior Vice President of Wireless Network Architecture and Design, Igal Elbaz, said:
After significantly contributing to the first phase of 5G standards, conducting multi-city trials, and literally transforming our network for the future, we’re planning to be the first carrier to deliver standards-based mobile 5G – and do it much sooner than most people thought possible.
AT&T will initially offer 5G using the 3GPP standards and mmWave spectrum, but as it’s expanded, 5G will be integrated into other spectrum types as well. AT&T expects its 5G network to offer multiple gigabits per second of speed with low latency, and to help ensure everything stays on track, the carrier is opening a 5G lab in Austin where it’ll be able to run stress tests of the network and really put it through its paces.
AT&T will release true 5G service by late 2018
Carriers

- Which unlimited plan should you buy?
- Verizon’s Unlimited plans: Everything you need to know
- Everything you need to know about the T-Mobile ONE unlimited plan
- Everything you need to know about the AT&T Unlimited plan
- Everything you need to know about Sprint’s Unlimited Freedom plan
- Join the Discussion

Best Cases for the Huawei Mate 10 Pro
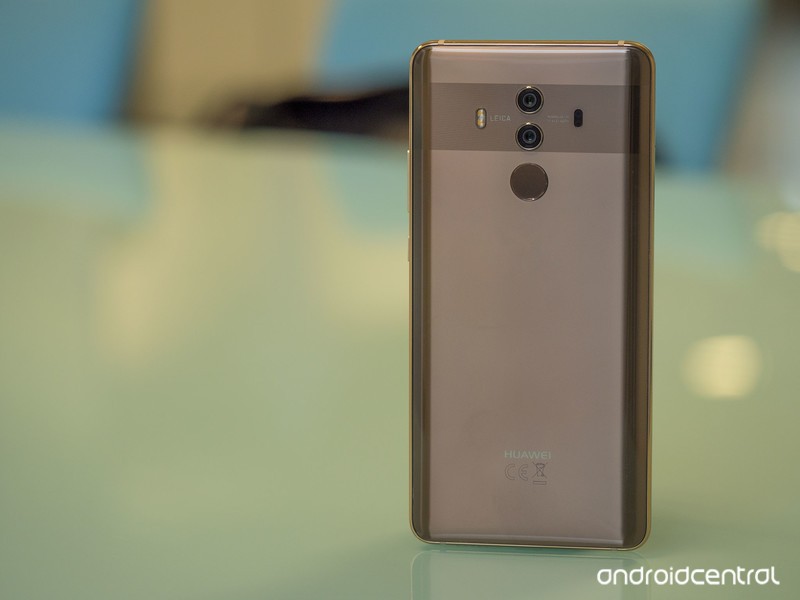
Need a case for your new Mate 10 Pro? These should be on your shortlist.
The Mate 10 Pro is a powerful flagship and a battery champ, and it’s finally launching in the U.S. in just a few days! If you’re planning on picking one up, you’ll probably also want to get a case to keep it safe.
While there aren’t too many cases for the phone just yet, we’ve compiled a short list of some of our favorites you might want to check out.
- Ringke Fusion
- Incipio NGP Pure
- Vinve Slim
- Spigen Rugged Armor
- UAG Plasma Series
- Nillkin Super Frosted Shield
Ringke Fusion

If you like the thin clear case that comes with the Mate 10 Pro but want a bit more protection, the Ringke Fusion could be the answer. It’s a two-part case, with a hard polycarbonate panel protecting the back and TPU around the sides for an easy grip.
Despite a relatively slim profile, the Fusion is MIL-STD 810G certified, meaning your Mate 10 Pro should be safe and sound. It even has a removable cover for the USB port to protect it from the elements.
The Ringke Fusion is one of the cheaper cases on our list at around $12, and you can choose from a few color options for the TPU bumper.
See at Amazon
Incipio NGP Pure

Inicio has always been a popular brand when it comes to phone cases, and for good reason. The NGP Pure is a simple case meant to add a bit of drop protection without all the bulk.
It’s made out of Incipio’s Flex2O polymer material, which is designed to hold up against stretching and tearing, meaning this case is built to last along with your phone.
You can pick up the NGP Pure from Incipio’s site for fairly cheap at just $20.
See at Incipio
Vinve Slim

If you really like the camera strip on the back of the Mate 10 Pro, you’ll likely appreciate the Slim case from Vinve. Like the Ringke Fusion, this case features a dual-layer design with TPU and polycarbonate, and mimics the camera strip with an extension of the bumper.
Because of its dual layer construction, the Vinve Slim is as protective as it is stylish, and the grippy TPU bumper should keep you from dropping it in the first place.
Should you decide to pick up the Vinve Slim, it’s available for about $9 on Amazon.
See at Amazon
Spigen Rugged Armor

Thin, clear cases are great for showing off your phone, but sometimes you need something a bit more protective. That’s where Spigen’s Rugged Armor case comes in.
The Rugged Armor adds a small bit of thickness to the Mate 10 Pro (but don’t worry — it’s no Otterbox), but in exchange you get shock absorption through Spigen’s Air Cushion technology. The volume and power buttons and easy to press, and you trade the phone’s aesthetic strip around the cameras for carbon fiber styling.
Spigen sells the Rugged Armor for $19.99, but you can get it for only $13 or so from Amazon.
See at Amazon
UAG Plasma Series

Another great option for the particularly clumsy is the Plasma Series case from Urban Armor Gear. This case takes special care to protect the Mate 10 Pro from fall damage with special lining inside and added thickness on the corners.
The rubberized grip keeps the phone from slipping out of your hand, and the cutouts still allow for easy access to the fingerprint sensor around back.
The Plasma Series is a bit pricy at about $40, but it could be well worth it to protect your $800 phone.
See at Amazon
Nillkin Super Frosted Shield

Some people just want a shell-style case that protects the back of the phone from scratches without adding bulk. For them, Nillkin’s Super Frosted Shield case is worth a look.
It’s made of a hard polycarbonate with a grippy texture, and the top and bottom are left open, meaning you won’t have to worry about your USB cables fitting into a tight port cutout.
The best thing about the Super Frosted Shield? It’s only about $9 on Amazon — and it even includes a screen protector in the box!
See at Amazon
Which one are you going to buy?
Are you planning on buying one of the cases we mentioned, or are you waiting on something different to come out? Let us know in the comments!
Huawei Mate 10
- Huawei Mate 10 Pro review
- Huawei Mate 10 series specs
- Huawei Mate 10 Pro U.S. review: Close to greatness
- Join the discussion in the forums
- More on 2016’s Mate 9
Get a free Amazon Fire TV 4K when you prepay for a month of DirecTV Now
Don’t pass this up.
DirecTV Now is offering a free Amazon Fire TV 4K when you sign up for its service and prepay for just one month of service, even if you pick the $35 a month plan. The company previously required you to prepay for two months of service to get the free Fire TV (which Amazon charges $70 for), but now has slashed that down to just one. For $35 you now get access to a full month of the streaming service and some new hardware to watch it on.

You will need to be a new customer to take advantage of this offer and the Fire TV 4K will be shipped to you via FedEx within 2 to 3 weeks from the time you sign up. The offer is a little hidden, as usual, so to take advantage of it you’ll need to begin the account creation process. Once you input your email and create a password you’ll select a channel package and any add-ons that you may want, and then it will offer you the free Fire TV 4K promotion.
DirecTV Now does automatically bill each month, so if you only want to do one month for this promotion be sure to cancel the renewal once you complete the checkout process. If you’d prefer an Apple TV 4K, you can get one for free when you prepay for three months of service.
See at DirecTV Now
Google’s Reply app is here and works surprisingly well
Earlier this month, Google’s Area 120 experimental division announced its latest creation – an Android app called “Reply.” Reply essentially brings Allo’s Smart Reply feature to all of your communication apps, and it’s now available for anyone to download.

Reply is still in beta, and if you want to download it, you’ll need to sideload the APK file as it isn’t available on the Play Store. Assuming you’re comfortable doing this and have a phone running Android 7.0 or later, getting Reply is just a few taps away.
Once you open the app, sign in with your Google account, and enable notification access, you’ll get a quick rundown of all the features Reply has to offer. In addition to automated responses based on the context of a conversation you’re having, Reply can also generate responses using your location data, send a heap of automatic replies based on your work calendar and certain keywords, and more.


I tested out Reply for a few minutes on my Pixel 2, and whether I was using Android Messages, Hangouts, or Facebook Messenger, it worked just as it’s advertised. The suggested replies are certainly what users will interact with the most, but if you take some time to set up all the automation features Reply has to offer, you could turn it into a really powerful tool.


There are still some bugs here and there (I personally wasn’t able to set my home or work address), but even so, it’s remarkable how well Reply works in such an early form. If you want to give it a try, you can download it here.
Reply wants to add Smart Replies to all your messaging apps
