


‘Blade Runner 2049’ VFX reel shows CG tricks behind bleak landscapes
There’s no question that Blade Runner 2049 revolves around computer-generated effects, whether it’s the retro-futuristic technology or its holographic AI personas. However, the CG is more pervasive than you might think. Rodeo FX has released a visual effects reel for Denis Villeneuve’s bleak sci-fi movie, and it’s evident that even the seemingly mundane shots were draped in digital artwork. Caution: there are mild spoilers ahead.
It’s not shocking that some scenes are entirely CG (such as flights over the future Los Angeles), or have to use it to fill in landscapes that don’t exist. However, it’s the extent to which it’s used. When K exits his vehicle in Las Vegas, for example, very little of the scene is real — he’s walking toward a green screen held up by a crane. Even moments that don’t look like they need CG, such as visiting a collection of genetic records or a sweatshop, use it to add depth and atmosphere.
The clip highlights not just Rodeo’s CG skills (that’s clearly the main purpose), but also how far effects have come since the original Blade Runner… and really, in the movie industry in general. Where the first movie was dictated by the limitations of filmmaking that was still almost exclusively analog, 2049 could go as far as its creators’ imaginations would allow.
Via: The Verge
Source: Rodeo FX (Vimeo)
Amazon and Microsoft employees caught up in sex trafficking sting
The tech industry has a clear history of sexism and misogyny, but a recent Newsweek report highlights another problem. The publication got its hands on a slew of emails sent to brothels and pimps between 2014 and 2016 that document the industry’s patronage of brothels and purchasing of services from trafficked sex workers. Among the emails, which were obtained through a public records request to the King County Prosecutor’s Office, were 67 sent from Microsoft employee email accounts, 63 from Amazon accounts and dozens more from companies like Boeing, T-Mobile, Oracle and local Seattle tech firms.
Some of the emails were collected during a 2015 sting operation that targeted sex worker review boards and resulted in the arrest of 18 individuals, including high-level Amazon and Microsoft directors. Two opted for a trial, which is currently set to begin in March.
Seattle’s sex industry has grown right alongside its tech industry and the city’s authorities have said that some men spend up to $50,000 per year on sex workers. Brothels are even known to advertise how close they are to tech offices. Alex Trouteaud, director of policy and research at the anti-trafficking organization Demand Abolition, told Newsweek that the tech industry is a “culture that has readily embraced trafficking.”
In a statement sent to Newsweek, Microsoft said, “Microsoft has a long history of cooperating with law enforcement and other agencies on combating sex trafficking and related topics, and we have employees who volunteer their time and money specifically to combat this issue as well. The personal conduct of a tiny fraction of our 125,000 employees does not in any way represent our culture. No organization is immune to the unfortunate situation when employees act unethically or illegally. When that happens, we look into the conduct and take appropriate action. Microsoft makes it clear to our employees they have a responsibility to act with integrity and conduct themselves in a legal and ethical manner at all times. If they don’t, they risk losing their jobs.”
Amazon told Newsweek it’s investigating the matter and said, “Amazon’s Owner’s Manual clearly states that, ‘It is against Amazon’s policy for any employee or Contingent Worker to engage in any sex buying activities of any kind in Amazon’s workplace or in any work-related setting outside of the workplace, such as during business trips, business meetings or business-related social events.’ When Amazon suspects that an employee has used company funds or resources to engage in criminal conduct, the company will immediately investigate and take appropriate action up to and including termination. The company may also refer the matter to law enforcement.”
Via: Newsweek
New Jersey town will close streets to fight navigation app traffic
It’s no secret that some communities hate traffic-savvy navigation apps like Waze with a bitter passion. A congested highway can send legions of commuters down streets that clearly weren’t meant for more than more than a handful of cars at any given time. And one town has apparently had enough. The New York Times has learned that Leonia, New Jersey will close 60 streets to everyone but residents and workers at peak driving periods (6AM to 10AM and 4PM to 9PM) from January 22nd onward. If you’re using a nav app, the town may effectively cease to exist at rush hour.
It’s extreme, but Leonia is in an unusual position. When slow traffic steers people through the town, it can prove a nightmare for residents who might not even have a chance to leave home until the traffic clears. Police chief Tom Rowe told the Times that Leonia had tried limited closures and warning navigation app providers, but that just foisted problems on to other streets — and that’s assuming drivers heeded the redirections in the first place.
A Waze spokeswoman said it would honor any changes that legally declare a road to be private. The Google-owned service wants to “work holistically” with cities, drivers and map editors to improve driving “for all.”
The question is whether or not Leonia’s strategy will hold up under scrutiny. These are supposed to be public roads, after all. It might also wind up passing the buck to other communities. And of course, there’s the reality that people might have genuinely good reasons to pass through Leonia at peak periods besides living or working there. What if you’re visiting someone or have an urgent situation? Short of widening roads, there’s no straightforward answer here. Navigation apps may create headaches for small towns not equipped to cope with morning rush hour, but a drastic attempt to thwart them may create its own share of problems.
Source: New York Times
The best Surface Pro alternatives
The Surface Pro has always been an ambitious device, but in the past couple iterations, it’s really come into its own. It has beautiful design, powerful internals, and a great detachable keyboard. It’s not perfect, though. First off, it’s expensive. The Core m3 version starts at $800 — and that’s without the keyboard or stylus. Secondly, it has apretty old-school port selection, choosing not to opt for USB-C.
As is true with any groundbreaking product, there will always be a host of lookalikes that are worse in some ways and better in others. We’re not even just talking about 2-in-1s here — these are all laptops that explicitly have the same detachable keyboard design of the Surface Pro.
So if the Surface Pro is too expensive, or if you don’t like its port selection, here are four Surface Pro alternatives that might work.
The Best
Eve V – $800+
You may have never heard of the Eve V — after all, it’s not made by any of the usual suspects. Instead, the Eve V is a crowdsourced machine, backed by an Indiegogo campaign that raised over $1.4 million dollars.
The idea was simple. See what people actually wanted out of a 2-in-1 computer, and build it. The result is the best alternative to the Surface Pro, held back only by the stylus, which doesn’t have anywhere near the sensitivity levels of Microsoft’s Surface Pen. In addition, our tests showed that performance wasn’t quite as strong, either.
Other than that, the Eve V does two important things right — the price, and the port selection. The Eve V starts at $800, but that includes both the keyboard and pen. Compared to the same value with the Surface Pro, you’re saving $160. Secondly, the Eve V offers a great port selection, including a USB-C 3.1 port, and a USB-C with Thunderbolt 3 port.
See it
The Rest
HP Spectre x2 – $1,049+
There’s no doubt the HP Spectre x2 resembles the Surface Pro, but there are some significant differences. The first is the sleek, gold kickstand, and refined style of the all-black aluminum body. The Surface Pro looks great as well, but the Spectre x2 offers a decidedly different aesthetic that some people will no doubt favor.
The Spectre x2 also has a slightly higher resolution display, two USB-C ports, and a slightly lower price. Although HP doesn’t offer a Core m3 version like Microsoft and Eve, a similarly-configured Surface Pro is a good $300 more expensive.
See it
Lenovo Miix 720 – $1,249+
The Miix 720 starts at $1,249 for its Core i7 version — and only goes up from there. However, when you do the price comparison, you’re looking at major savings up against the Surface Pro. On these high-end models, a similarly-configured Surface Pro will cost you over $600 more than Lenovo’s alternative.
What you receive is a wonderfully-made device, using the Yoga-style watchband hinge on the kickstand and finished in the business-class aesthetic Lenovo is known for. The Miix 720 does without adding a bunch of extra weight or thickness, competing with the Surface Pro’s already compact size.
See it
Dell Latitude 5285 2-in-1 – $900+
Dell’s Surface Pro competitor has everything you’d expect to see: a simple, thin design, stuffed with a Core i3 CPU, 128GB of SSD storage, and 4GB of RAM. It doesn’t have the distinguished style of the Surface Pro, or some of the other options on this list, and it’s a bit heavier. Yet it does have the rest of the bases covered. In particular, if you’re looking for something that will blend in with your office surroundings, the Latitude 5285 2-in-1 is a good choice.
In addition, the Latitude 5285 doesn’t have the best resolution at 1,920 x 1,280. Dell does, however, claim that the device manage up to 12 hours of battery life with its 32 watt-hour battery, which isn’t bad. Again, Dell’s offering is quite a bit cheaper than the Surface Pro, mostly because it includes the necessary keyboard and stylus bundled in.
See it
Editors’ Recommendations
- Microsoft Surface Pro (2017) review
- Windows 10 Fall Creators Update is enjoying a smoother ride to the top
- Microsoft takes on Apple’s prestige: Surface Book 2 15-inch vs. MacBook Pro 15
- Battle of the 15-inch 2-in-1s: HP Spectre x360 vs. Microsoft Surface Book 2
- Is Google’s Pixelbook a worthy competitor to the Surface Pro?
Make your Huawei Mate 10 Pro’s battery last up to a week with our amazing tips
The Huawei Mate 10 Pro is so good that once you’ve got one, you’ll want to keep using it as much as possible. Read our Huawei Mate 10 Pro review for evidence. To make sure the phone is ready when you want it most, it’s important to make the most out of the battery. It’s already a large, 4,000mAh cell that we’ve found lasts for two days with normal use, but heavier use will see that number drop.
Luckily, there’s quite a lot you can do to maximize the Huawei Mate 10 Pro’s battery life, and we’ve got all the answers on how to do it right here. If you opt for the most extreme battery saving tip, your phone could last a week in standby. If battery life isn’t your concern, check out our other Mate 10 Pro tips here, or if you want a case for the phone, we’ve got recommendations here.
Use Phone Manager
Phone Manager is Huawei’s own system optimization app, and it comes pre-installed on the Mate 10 Pro. It’s a system app, so you can’t accidentally uninstall it. If you can’t spot it immediately, search for it by slowly sliding a finger down the screen to open the recently used app drawer, and enter Phone Manager into the search bar at the top.
Unless the Phone Manager meter shows 100, then the first thing to do is tap the Optimize button. This performs various tasks, one of them being to make sure nothing is unduly draining the battery. For example, it may turn Bluetooth off if it’s on and inactive.
Next, let’s look at the Battery option. It’s in here where you can make the most difference to your phone’s standby time. Tap the icon in the bottom left which also shows the current battery percentage remaining. At the top of the new screen the system informs you approximately how long, based on current use patterns, the battery will last until it’s flat. Tap this to get a more in-depth breakdown of what’s using the most power. It’s usually your mobile signal, GPS, Wi-Fi, and screen that require most energy.
Now let’s start extending the life of your battery. Huawei has two power-saving modes of its own. Both are activated inside the Battery option in the Phone Manager app, or using an option in the pull-down Android notification shade. The least intrusive is Power Saving Mode, which typically adds four or more hours to the standby time by shutting down background apps, stopping email syncing, and reducing visual effects and audio in the operating system.
If that’s not quite enough, then you’ll want to flick the switch on the Ultra Power Saving Mode. This is for the serious battery-saving maniac, and should be considered an extreme option. It limits use of all apps aside from the most important, it shuts down GPS, lowers the screen brightness, and strips away your wallpaper. You can select the apps you still want to use, but anything too power intensive defeats the object. With this mode active, your phone’s battery could last up to a working week in standby. When you’re finished with Ultra Power Saving Mode, look for the door-like icon in the top right of the screen to exit.
Outside of using these options, you can train your Mate 10 Pro to make the best of its battery. Tap Launch under the Battery menu to find a list of apps the Mate 10 Pro is managing and observing power consumption for. Make sure the Manage Automatically switch is active, as this helps the Mate 10 Pro keep an eye on apps that frequently wake the system, or draw more power than others. Tap Battery Usage for more in-depth information on which apps are taking the most power. If one of the power-hogs is an app you don’t use often, consider deleting it.
Finally, tap the Optimise option under the Battery menu. The Mate 10 Pro will go through the same series of actions it did when you opened the Phone Manager app to keep your phone running smoothly, plus it provides a few tips on making the most out of the battery. These include turning off GPS, adjusting alert style, and even disabling screen auto-rotate. Another battery saver under the Battery menu is switching on the Mate 10 Pro’s dark theme, which changes the background in menus to black and the text to white. It looks cool, and helps the screen work more efficiently.
Finally, if the Battery menu in Phone Manager is one you use often, consider putting a shortcut on your home screen. On the main Phone Manager screen, tap the Gear icon in the top right, then Shortcuts, and flip the switch next to Battery.
Be sensible
Huawei’s Phone manager is a very comprehensive and effective way to manage the Mate 10 Pro’s battery. However, there are still things you can do outside of it to manage power. Some of it is common sense. Don’t play games, don’t stream audio over Bluetooth, don’t stream video, and keep open, active apps to a minimum. Close them down using the Android menu key and tapping the little trash can icon at the bottom of the screen. We love the Huawei Mate 10 Pro’s desktop mode, but it won’t do your battery life much good.
If possible, put your phone in Flight mode if you don’t need to be connected, to save more power. Just remember you won’t receive any notifications, emails, messages, or calls in this state. If Flight Mode isn’t an option, and you leave your phone on most of the time, consider setting up a Do Not Disturb time. This silences the phone at specific times, apart from alarms or apps you set as priority. It won’t save masses of battery power, but it does help the phone operate more efficiently, and little savings add up.
This is usually an automatic suggestion at the top of the screen when you tap Settings. If it’s not, find Sound under the Settings menu, then tap Do Not Disturb, and flip the Enable Now switch. Under this you’ll be able to manually adjust the times when the phone enters and leaves Do Not Disturb mode.
Fast charging
If the worst happens and the Mate 10 Pro’s battery percentage remaining is down to single figures, grab the charger that came with the phone. The Mate 10 Pro uses Huawei’s Supercharge fast-charging system, and 50 percent capacity can be reached in just 30 minutes, giving enough juice for a working day. It’s important to remember that Supercharge needs the Huawei charger to operate, and won’t operate with the charger you borrowed from a friend who owns a phone made by a different manufacturer.
Let EMUI help
This is an easy battery life tip, because it doesn’t involve you doing anything at all. Huawei’s EMUI 8.0 user interface, placed over Android 8.0 Oreo on the Mate 10 Pro, intelligently manages many aspects of the operating system all the time. Mostly this is to do with how apps consume system resources and management of RAM and power, and this will have an effect on battery life over time.
When EMUI finds an app that’s pulling more power than expected from the phone, it will send a notification with several options on how to deal with it. It’s good to know you can relax a little while the software takes care of things behind the scenes, even when you’re not actively saving battery power.
Even if you just decide to activate Ultra Power Saving Mode at times when you aren’t using your phone, following just this one tip will extend the time your Huawei Mate 10 Pro’s battery will last by several hours. Follow the rest, and you’ll stretch out its life even further. We’re still enjoying the Mate 10 Pro, and if we find any other battery saving tips we’ll share them with you here.
Editors’ Recommendations
- Huawei Mate 10 Pro tips and tricks to turn you into a professional
- ZTE Axon M review
- Huawei Mate 9 review
- Windows 10 Timeline hands-on
- Samsung Galaxy Note 8 vs. Huawei Mate 10 Pro: Which phablet reigns supreme?
These smart lights work with Amazon Alexa

Control your home’s lighting using Alexa and these smart bulbs.
Amazon offers an affordable way to start building out a voice-activated home automation system for your house or apartment with their Amazon Echo and Echo Dot powered by their A.I. assistant, Alexa. On its own, you can use Alexa to play music and find news, sports and other information. But things get really interesting when you start to connect Alexa up to smart devices, including connected LED bulbs and smart switches, around your house.
There are a number of light options compatible with Alexa. We’ve broken things down based on the different brands and ecosystems that each have their own compatibility with smart lights and smart switches that you’ll ultimately be able to control via Alexa on your Amazon Echo.
- Philips Hue
- Samsung SmartThings
- Insteon Hub
- WeMo switches and outlets
- Lutron dimmers and switches
- LIFX smart bulbs
- GE Link LED Smart Bulb
- TP-Link
Philips Hue

Philips Hue is the leader in smart bulbs, and are downright cool. You can connect up to 50 Philips Hue bulbs, lamps and lighting strips via the Philips Hue Bridge, so chances are you could convert all your home’s lighting over to the Philips Hue system. Whether you’re looking for 60W equivalent white LED bulbs, bulbs that feature 16 million colors, or LED light strips for futuristic accents, there’s a reason why so many people have gone with Philips Hue.
Alexa syncs right up to the Philips Hue Bridge, which means you’ll be able to set up different lighting groups for your rooms and IFTTT recipes on your phone, then also control everything with the sound of your voice via your Amazon Echo. There’s a lot of fun to be had here, as Philips Hue lights can be synced up to your music for epic dance parties, and otherwise customized in countless different ways to suit your lifestyle.
If you’re interested in getting started with Philips Hue, you’re best off getting a starter kit. There are a couple different options to consider:
- Philips Hue Starter Kit w/ two bulbs and one Bridge — $69.99 on Amazon
- Philips Hue Starter Kit w/ two bulbs, one bridge and an Amazon Echo Dot — $99.99 on Amazon
- Philips Hue Starter Kit w/ two A19 bulbs, one Bridge and one Dimmer switch — $125.47 on Amazon
- Philips Hue Starter Kit w/ three White and Color Ambiance bulbs and one Bridge — $142.77 on Amazon
No matter which starter kit you choose, the beautiful part of going with Philips Hue is that it’s super easy to add extra bulbs or other elements to your ecosystem later.
Samsung SmartThings

SmartThings provides a full suite of options for home automation, which includes a few options for smart lights. You’ll need a [SmartThings Hub] to get started, but from there you can connect plug-in smart switches for appliances, lamps and outdoors, and in-wall dimmers which support dimmable LED and CFL technologies along with legacy support for incandescent, halogen, Mark 10, and magnetic lighting loads.
You can also connect smart bulbs from Philips Hue or Osram to your SmartThings Hub, along with a host of other super handy home automation products that all work within the SmartThings ecosystem.
If you’re mainly interested in smart lights, you can get a SmartThings Hub and an Osram bulb bundle. If complete home automation is your ultimate goal, you might be more interested in the SmartThings Home Monitoring Kit, then build your own lighting arsenal from the available SmartThings-compatible lighting options.
Insteon Hub

Insteon’s offerings for smart home lighting mostly include in-wall dimmers and switches and plug-in dimmers. They do offer their own programmable, dimmable LED bulbs, available in two styles: 8W LED bulbs and 12-watt recessed bulbs. You can use the Insteon app to set bulbs into groups for scheduling and creating scenes, then take control via Alexa.
To start building out your Insteon smart lighting ecosystem, you should get the Insteon Starter Kit, which comes with the necessary Hub, and two Dimmer Plugs, perfect for setting up a voice controlled bedside lamp. From there, you’ll need to buy compatible bulbs as you need them.
Insteon’s system is a decent option for those looking for home automation, but overall their lighting options are somewhat lacking.
WeMo switches and outlets
WeMo offers Wi-Fi enabled smart switches and outlets that you can control via Alexa. The WeMo Light Switch can be used to replace any light switch in your home, letting you schedule and control your lights and appliances without the need of a central hub.
This one is better for the DIYers out there who are interested in manually creating their own home automation network with in-wall switches and plug-in adapters to control lamps and other small appliances. Those looking for hassle-free installation and smart bulb options are best looking elsewhere.
Lutron dimmers and switches
Lutron Caseta Wireless products offer a selection of smart dimmers and switches that connect via the Caseta Wireless Smart Bridge. Connect your Smart Bridge to Alexa allows you to control all the dimmers and switches with your voice.
Check out the Lutron Caseta Wireless Smart Lighting In-Wall Dimmer Kit or the Plug-in Dimmer Kit to see what this system is all about. This is another route that’s going to require DIY effort with initial setup and is also lacking branded LED bulb options, but the Hub is compatible with a bunch of other smart devices from leading brands including Ecobee, Nest, Honeywell, Logitech, and Sonos.
LIFX smart bulbs

LIFX offers a range of smart bulb selections for indoor and outdoor usage that are compatible with Alexa. Not only can you turn your LIFX bulbs on and off using only your voice, Alexa can also control and tweak your bulb color or light temperature so you always have complete control over your bulbs.
You can buy them individually or save money by bundling them into multipacks so you can upgrade bulbs around your home and link them all together via Alexa. They also sell bulbs with built-in infrared to enhance your security cam’s vision, as well as LED strips to add some futuristic and colorful accents to your home. Check ’em out!
See at LIFX
GE Link Smart LED Bulb

General Electric has a few smart bulb options available that work with Alexa but require a hub (compatible with SmartThings or Wink Hub 2.
You can get a standard A19 bulb for $29 (great if you already have a compatible smart home hub), or you can opt for the GE starter kit which includes two A19 bulbs and a compact GE Link Hub for just $75.
Other bulb sizes are also available.
See at Amazon
TP-Link
TP-Link offers smart bulbs that connect to your home network via Wi-Fi and do not require a standalone hub. There are four bulb options, from a standard white dimmable bulb to a fully-customizable multi-color bulb.
All of TP-Link’s bulbs are pairable with the Alexa app which allows you to control your lighting with your voice. TP-Link sells other smart home devices such as smart plugs which are also controllable via Alexa, as well as cloud-based cameras which are not.
See at TP-Link
Which should you get?

Thanks to Alexa’s compatibility with a variety of smart light systems, you’ve got several great options for automating and customizing your home. Which system you go with will greatly depending on your current living situation.
If you’re living in an apartment and are just looking to control some funky lighting options via Alexa voice controls, Philips Hue is your best bet. Buying a starter kit is a great investment that you can take with you as you move — and with the lifespan of LED lighting well exceeding a decade, you’ll enjoy the freedom to rearrange, expand and easily move your Philips system wherever you go.
If you’re a homeowner looking to integrate IoT devices throughout your home, you’ll want to buy an Alexa-compatible hub that shares a wide range of compatibility with other brands and products, such as SmartThings or even a Wink Hub 2, then build out your smart bulb and other devices to the exact specifications of your home.
And if you’re in the process of planning a home renovation, it might be worth looking at WeMo, Insteon, and Lutron’s in-wall switches or dimmers to convert your existing home wiring into a smart lighting system that you can then control with your voice. Don’t just update the look of your home — upgrade its functionality, then let Alexa control it all with the power of your own voice.
Updated December 25: Added the GE Link smart bulbs to our list!
Wireless mic Mikme brings high-end sound to mobile videos
There are plenty of portable audio recorders and microphones on the market, but MikMe goes a step beyond all of them. It’s a compact wireless microphone that synchronizes with an iPhone app, allowing you to make quick mobile videos with high-quality sound. The only problem: It costs $500. That puts it out of reach for normal consumers, but it might be worth it for vloggers and people who need to make professional-sounding videos on the fly. And if you really care about audio quality, you’re probably used to paying a premium for specialized gear.
MikMe certainly feels premium, with its sturdy metal case and light weight. Inside its mesh housing, you can see its heart and soul: a 1-inch, gold-plated condenser capsule. That’s in the same territory as expensive large diaphragm microphones, which are typically well suited to recording vocals and instruments. MikMe’s capsule is also contained in spider suspension, which minimizes extra noise while you hold and walk around with it.
Naturally, it also works as a standalone recorder. It can capture up to 24-bit 96Khz audio on its own, but that quality gets bumped down to 44.1Khz when you’re sending it to your phone. That’s still CD quality, though, which makes it ideal for web video. Inside, it houses 16GB of storage and a battery that lets you record for three and a half hours.
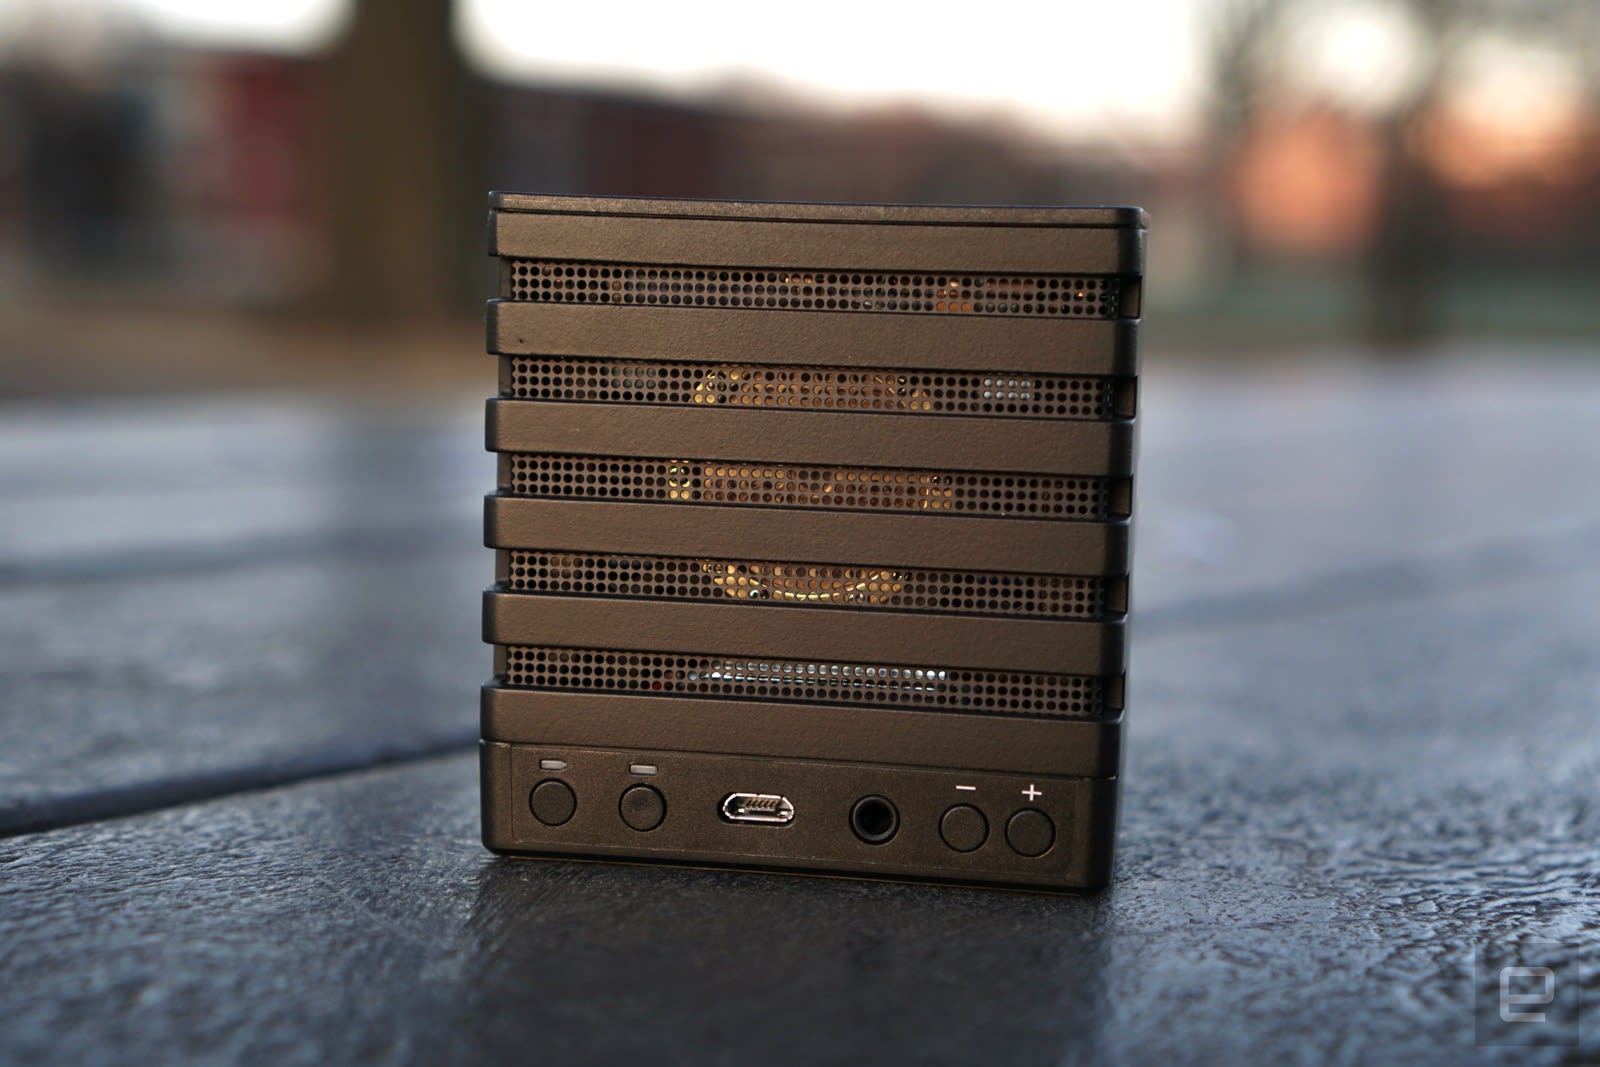
MikMe’s interface is relatively simple: Along the back, it has buttons for power and Bluetooth, a micro-USB charging port, a headphone jack for monitoring your recordings, and two buttons to control headphone volume and the microphone’s gain. The big button on the top lets you start and stop recordings, as you’ve probably guessed.
To use MikMe with your iPhone, you first have to connect it as a Bluetooth device. After that, the company’s app will automatically recognize it. From there, you can trigger remote audio recordings on your MikMe or synchronize recordings that’ll go to both your phone and the device. Then there’s the most important feature: You can shoot a video using the MikMe as your source microphone. That’s pretty straightforward. Just hit record and your phone will start capturing a video as usual, and the MikMe will also start recording.
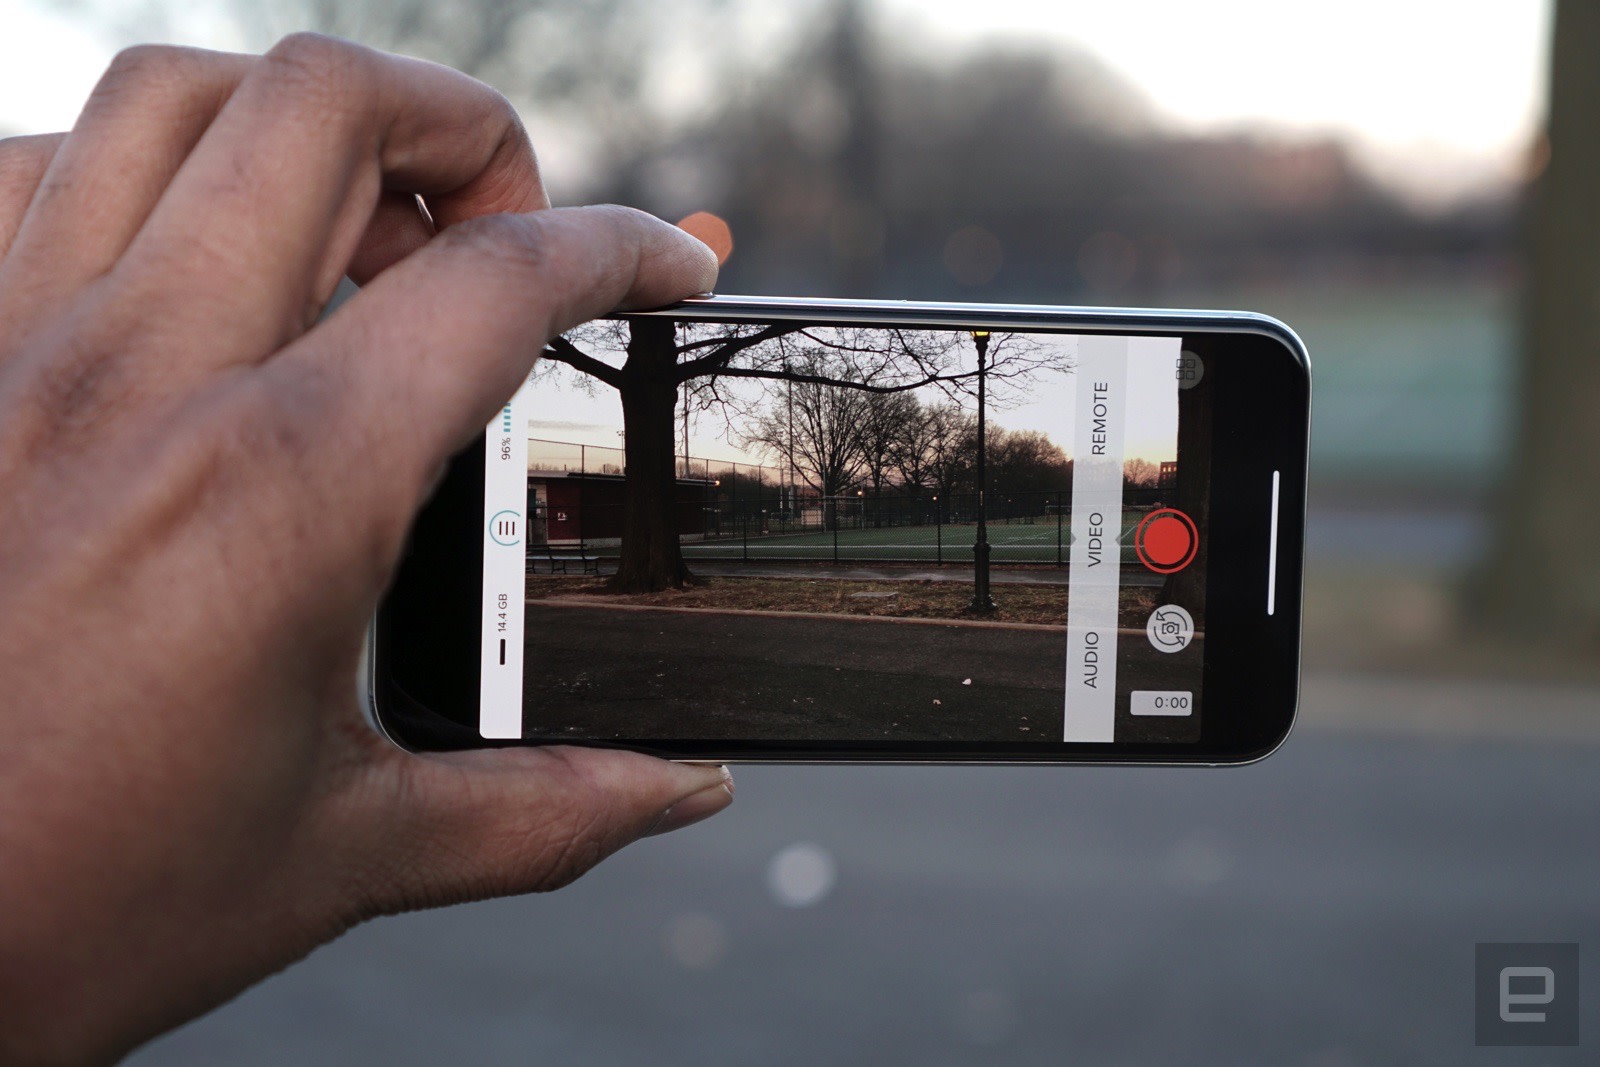
At that point, you’re free to walk around with the microphone, and away from your phone. As long as you’re in Bluetooth range, everything will stay in sync. Once you’re done recording, the app also takes another pass to make sure the video and audio are paired together properly. From there, you can export it to your phone and upload it to your social media platform of choice. In our noisy office kitchen, the MikMe managed to record incredibly clear audio as I walked about, something that my iPhone X could barely manage when I was standing right in front of it.
That, in a nutshell, is MikMe’s main selling point. It allows for more freedom when shooting mobile videos, and sound quality unlike anything you’ll ever get with your phone. Is it really worth $500, though? For a certain type of user, one who spends a lot of time shooting mobile videos, it’s a more convenient option than carrying around an external recorder. Using that method you have to wait until you edit the video on a computer before you upload it. With MikMe, you can get the superior audio track applied instantly.
If you’re more concerned with creating a truly professional video, and you don’t mind waiting a bit, then a more traditional audio recording setup might make more sense. Realistically, though, MikMe was never meant to replace something like that. It’s more focused on giving you quick results without much work. To give us a sense of what’s possible, the company also produced several music videos recorded entirely with MikMe. Most viewers would have a hard time telling that the sound came from a tiny wireless microphone.
While MikMe is certainly expensive, its usefulness could be priceless to some. And if it ever comes down in price, it could be essential for aspiring YouTube stars.
Best accessories to buy for your new Amazon Fire tablet
Accessories are what make the Amazon Fire HD tablet a full experience and not just an inexpensive way to watch stuff.
So you’ve got a shiny new Amazon Fire HD tablet. Maybe it’s the 7-incher. Or the 8-incher. Or even the 10-inch Fire HD. Either way, congratulations! Someone you know is pretty smart, because while these aren’t the most powerful Android-based tablets you can find, they’re easily the best value for your money.
Yes, really. A couple reasons for that. One is that Amazon has a really robust ecosystem these days. It’s maybe not quite as streamlined as Google’s, but once you’re set up you’ve got access to movies, TV shows, apps, music, books — and of course all the online shopping Amazon can throw at you.
And if you’ve got kids, these are still the only tablets I’d had one.
But you’re not done yet. It’s time to accessorize. Here are the first accessories I’d look at for your brand-new Fire HD tablet.
See at Amazon
Buy a case
 Do yourself a favor: Just buy a case. Even if you don’t think you’ll drop your tablet. You will. And cases are more than just protection these days. They’re also a handy way to prop up your Fire HD for watching movies or playing games.
(And, yes, they also protect your tablet.)
There are a ton of options out there, whether it’s the first-party plastic case from Amazon, or something leather(Esqueda) from a third party seller.
See at Amazon
Buy a microSD card
 The thing about the Fire HD tablets is that there’s not a lot of built-in storage space for apps and pictures and movies and games and stuff.
The thing about the Fire HD tablets is that it’s also super easy to just pop in an inexpensive microSD card and increase that storage space exponentially. Which one should you get? It really depends on your budget.
Me? I always try to get more than I think I’ll need. Because nobody has ever said “Ya know, I just have too much storage space.”
See at Amazon
Buy a screen protector
 This one’s especially true if you’ve got kids — a screen protector can mean never having to say you’re sorry.
For one, they’ll help keep your display free of scratches. But they’ll also help keep that display clean of Kid Goo™ — that unexplainable stuff that kids secrete to no end.
Just trust me on this.
See at Amazon
Buy an extra charger
 The only thing worse than a dead tablet is … not knowing where the charger is.
Fire HD tablets all use the older Micro-USB standard. (Seriously, Amazon, it’ll be time to switch to USB-C at some point.) The good news is that if you don’t have any extra Micro-USB chargers laying around, they’re really just a couple bucks. It’s worth picking up an extra charger or two.
And maybe snag one for the car while you’re at it.
See at Amazon
Amazon Fire tablets
- Amazon Fire 7
- Amazon Fire HD 8
- Amazon Fire 7 Kids Edition
- Amazon Fire 8 Kids Edition
- Amazon Fire HD 10
See more at Amazon
How to restore your apps and settings to a new Android phone

Got a new phone? Awesome! Here’s how you can restore your apps and settings from your previous device.
Google has always synced calendar events, contacts, Drive documents, Gmail settings and other account-related information across devices, and since Android 5.0 Lollipop the company started offering the ability to restore apps to a new device. With Marshmallow, the feature was expanded to include app data as well as system settings, with all the information stored in the cloud. Android 7.0 and 8.0 doesn’t bring changes to the backup service itself, but Google has placed more focus on privacy and how sensitive information is sent or stored.
If you’re using the Google Now or Pixel Launcher, your home screen background, icon and widget layout, as well as the folder structure, is now saved to the cloud, allowing you to restore your settings to a new handset and retain your home screen layout.
Where does all this data get stored? Google is backing up the app data to Drive, allocating 25MB for each app. Data used by the backup system doesn’t count toward your storage quota. Meanwhile, developers can choose to select what app data gets stored in the cloud and you can opt-out of the service at any time through your device settings.
Here’s how you can restore your apps and settings when moving to a new Android phone.
How to enable the Android backup service
First, make sure you have the backup service running on your current phone.
Open Settings from the home screen or app drawer.
Navigate to Backup & reset.
Select Back up my data.

Toggle Back up my data to On.
Select Back to go back to Backup & reset.
Check that the correct Google account is associated in Backup account.
Toggle Automatic restore to On to restore settings and data when installing an app.

Now that you’ve enabled the Android backup service, your system settings and app data will be automatically saved to Drive. When you’re switching to a new phone, you can rely on the service to restore your settings, apps, and associated data.
Note: The menu layout may not look exactly as above on your phone, but any phone running Lollipop and above should have an equivalent of Backup & reset.
How to restore apps and services on a new Android phone
Restoring apps is straightforward if you’re using a handset running Lollipop and above. This setting is available to phones as they’re booting up for the first time, or after they’ve been factory reset.
Select the arrow at the welcome screen to start setting up your handset.
Select the System language.
Log in to your home Wi-Fi network.

Select Accept and continue.
You can easily copy your Google accounts, apps, and data from another device, but for now, we’ll not use this option.
Log in to your Google account (you have two-factor authentication enabled, don’t you?).

Tap Accept to sign in to your Google account.
In the Google services page, you can select whether you want to enable the backup service for your account.
Choose your preferences, and select Next.
If you want to add another email account, you can do so in the Add another email section. Otherwise, just select Not now and hit Next.

We now come to the Which device? section, which lets you select the device you want to restore from.
You’ll see a list of all your previous devices, and when you’ve last used them.
Select a device to see all the apps available for restore.
If you want to restore all apps and settings, hit Restore.

Don’t want everything restored? Hit the arrow next to Restore all.
Selectively choose which apps you want to restore.
Hit Restore to retrieve apps and settings from the cloud.

You can now set up fingerprint security and enable Google Now.

That’s it! Once the initial setup is completed, apps and settings will be restored in the background.
Your privacy
Gathering data and sending it off to a remote server means it’s outside the app sandbox and depends on Google and the people who made your phone to be doing the right things. That may not always be the case, as phone manufacturers have a lot of leeway when they make an Android-powered phone. Google’s thoughts on the issue:
Caution: Because the backup transport can differ from device to device, Android cannot guarantee the security of your data while using backup. Be cautious about using backup to store sensitive data, such as usernames and passwords.
Google provides plenty of documentation on how to use the Backup service, so developers have the means to be cautious and do the right thing with sensitive data. Don’t let this scare you away from using the service, but you do need to be aware.
How to see the amount of data synced to the cloud
Although you can’t see what data is being backed up to the cloud, you can take a look at the amount of app data that’s being stored. Here’s how you can find out:
Open Google Drive from the home screen or app drawer.
In My Drive, select the hamburger menu from the top left corner.
Navigate to Settings.

Tap Manage backup.
You’ll see a list of all the apps that are using the backup service.

The backup system works well for restoring apps and system settings, but app data remains an issue. When I did a clean Marshmallow install on the Moto G4 Plus and used the restore feature, apps like Fenix were already logged in, and my preferred settings for the Twitter client were intact from a previous phone. However, not all apps take advantage of the backup service, and with the feature limited to apps built on API level 23 (apps built for Marshmallow) and above, there are several older apps that aren’t eligible. The biggest issue is that even though the service is free and requires no special cloud services, developers just aren;t using it.
The ability to restore apps and settings is available on all current phones running Android 6.0 and above, although there are a few outliers. Recent Xiaomi phones, for instance, do not offer the restore service at all. I had to manually install apps individually on the Play Store like it’s 2013. The issue is more common in countries like India, where there is an influx of Chinese phones with heavily tweaked user interfaces.
In Western markets, this should not be an issue. If you’re buying a phone from the likes of Samsung, LG, HTC, Sony, Motorola, or any other handset manufacturer that has a foothold in the U.S. market, you’ll be able to use the restore functionality to retrieve your apps and settings data with ease.
How has your experience been with Android’s restore feature? Let us know in the comments.
Android Oreo
- Android Oreo review!
- Everything new in Android Oreo
- How to get Android Oreo on your Pixel or Nexus
- Oreo will make you love notifications again
- Will my phone get Android Oreo?
- Join the Discussion
Switching from iPhone to Android: Everything you need to know

So you’ve seen the light and are switching from iPhone to Android. Welcome! Here’s what you need to know!
Switching from iPhone to Android can be a bit daunting. If you’re unpacking a brand new Pixel 2 or Galaxy S8, or something else equally exciting, let us help you get set up quickly and easily!
If you’ve never used an Android phone before, there are a few things you should know before taking the leap (even though it’s the leap home).
There’s a learning curve
Switching from iPhone to Android isn’t the same as upgrading the from the iPhone 7 to the iPhone X. It’s more akin to switching from Mac to Windows (though not as drastic). General functions are still similar, but major Android phone manufacturers will often have proprietary user interfaces, distinguishing them from other makers.
Therein lies the rub. There is no single version of Android in the way that there’s only one iOS. Companies take the Android operating system and interpret it and mold it according to their vision, meaning you’ll get a different experience using a Samsung phone than you would using an HTC phone or an LG phone.
Though all Android operate similarly on a fundamental level, it’s the little, finicky difference that set them all apart, so it may take some getting used to.
If you’re just about to turn off your iPhone and put your SIM card into a brand new Pixel, Galaxy or something else shiny, here’s what you need to know!
Turn off iMessage!
When you message other iPhones from your iPhone, they’ll communicate via iMessage when you’re connected to the internet. This is different from regular SMS texting, and if you leave iMessage turned on on your iPhone, many of your texts will still be routed through that service.
If you’re on your new Android phone, you won’t receive any of those messages. You need to disable iMessage before making the switch! (And while you’re at it, turn off FaceTime.)
- How to disable and deactivate iMessage on iPhone
You might have to buy your apps again
If you have pay-upfront apps on your iPhone that you paid for, you’ll likely have to buy them again from the Google Play Store if you want them on your Android phone.
The Google Play Store and the App Store are completely different entities, and the apps they house are made for different platforms. Some of the apps you had on your iPhone may not even be available for your Android phone and vice versa. That said, if you’re subscribing to a service like Spotify or Evernote, you just need to download the app and log in on your new Android phone to get going.
You may need to re-sync your life
If you have all of your contacts, calendar events, photos, documents, and more synced with iCloud, and everything’s on your iPhone, you’ll likely have to re-sync everything on your Android phone.
Android’s version of the cloud is housed in your Google apps, like Docs, Gmail, Contacts, Drive, and more. When setting up your Android phone, you’ll set up a Google account and from there, you can actually sync some of your iCloud content with your Google account, so that you don’t have to re-enter all of your dates, contacts, etc.
What you’ll need to bring with you
You don’t have to leave your life behind on your iPhone. You can bring your information with you so that you’re not taking hours to populate your Android phone with all of your stuff.
Contacts
Yes, Google and Apple are direct competitors and the two biggest competitors in the mobile game, but neither makes it too difficult to switch teams. Rather than manually enter all of your contacts into your new Android phone, you can export your iPhone contacts in a few different ways.
- How to transfer contacts from iPhone to Android
Calendars
If your calendar is flush with events, it’d be a major pain in the behind to have to add them all in again once you’ve made the switch to Android. Luckily, all of your calendar info resides in files called ICS, which are widely used and easy to transfer.
- How to sync your iPhone calendar to your Android phone
Photos
Like most of us, your phone is probably your primary camera. You’ll want to take those precious memories with you when you leave the land of Apple, especially if you’re planning on erasing and selling your iPhone after. We recommend using Google Photos. Most Android phones have Google Photos pre-installed (and if not, it can be downloaded from the Play Store) and it’s a super quick and easy process.
- How to transfer iPhone photos to Android
Documents
If you use iCloud Drive, then you probably have a few documents socked away and you might want to get rid of iCloud Drive in favor of Google Drive when you switch to Android. Transferring those files is easy if you use the iCloud Drive and Google Drive desktop apps!
- How to transfer your iCloud Drive files to Google Drive
Manufacturer tools
Some manufacturers have their own tools to help you migrate your information from a computer. So if you have all your iPhone data on a computer, you can add it to your Android phone using the maker’s tool.
You won’t be able to add an iPhone backup to your Android phone, but you’ll be able to drag and drop contacts, music, and more from your computer.
Samsung Smart Switch
You’ll need to use the desktop client to be able to move your iPhone data to your new Samsung phone. It’s essentially the same as moving files around on your computer, but by connecting your Android phone to your computer, you’ll be able to transfer everything right to your phone.
- Download now
- How to use Samsung Smart Switch to back up your Galaxy phone
LG Bridge
LG Bridge lets you interact with your LG phone on your computer, where you can easily transfer all of the stuff you want to bring over when you migrate from iPhone to Android.
- How to use LG Bridge with your LG phone
Pixel Switch
Each Google Pixel comes with a USB-OTG adapter that allows you to quickly and easily transfer files, contacts, calendar entries and even iMessages from an iPhone to your new Android phone.
- How to transfer data from iPhone to Google Pixel
- Learn more about Pixel Switch at Google
Just remember
At the end of the day, switching to Android from iPhone is nowhere near as difficult as switching your writing hand, or even using that hand to write a test! An Android phone still performs the same basic functions you’re used to: making calls, messaging, surfing the web, playing games, etc.
It may take some getting used to, but you might find yourself feeling freed with all the customizable options that Android has to offer (I took three days to decide my home screen layout when I got my first Android phone after switching from iPhone).
Have fun with it and really do your research before buying your first Android phone so that you make sure you’re buying what’s best for you.
If you need some help with choosing, check out our Smartphone Buyer’s Guide, where we show you the particulars on just about every Android phone around, so that you can make an informed decision when it comes to switching over.
Questions?
Got a question about using and Android phone? Little nervous about making the switch? Let us know in the comments below!
Android Oreo
- Android Oreo review!
- Everything new in Android Oreo
- How to get Android Oreo on your Pixel or Nexus
- Oreo will make you love notifications again
- Will my phone get Android Oreo?
- Join the Discussion
