


The ION360 U is a mobile 360 camera that doesn’t drain your phone’s battery
Why it matters to you
The ION360 U makes 360 photos accessible as a smartphone accessory, but without the smartphone battery drain.
Shooting 360 photos and videos with a mobile accessory makes the format easily accessible — and now that 360 camera can also recharge your smartphone. Today, October 12, startup ION360 launched the ION360 U, a 360 camera and case that snaps onto iPhone and Galaxy smartphones — and charges them, too.
The ION360U has two 7.4-megapixel cameras built into a camera case. The two cameras sit at the top of the smartphone, with a 200-degree lens on each side to capture the immersive perspective. The battery inside the case powers the camera while shooting, which means the camera doesn’t drain the smartphone battery. ION360 says the feature is unique to the U camera. When the camera isn’t in use, the battery can be used to recharge the camera as well.
The case design allows the camera to connect directly to the smartphone, which means no Wi-Fi linking in order to get the camera and the app to communicate, preventing slowdowns and offering quick access to shooting. Launching the app automatically launches the camera, the company says.
The ION360 U is capable of shooting 4K quality video for up to around 100 minutes on a fully charged battery. The company says the camera is also live-stream capable for both Facebook and YouTube and is ready to go live in a matter of seconds, thanks to quick-stitching software. Facebook has already granted the Live 360 Ready designation to the new camera.
The case and camera weighs only about 4.3 ounces, with models available for the iPhone 7 and 7 Plus, and the Samsung Galaxy S8 and S8+. The ION360 U app is available from both the App Store and Google Play. The camera is launching with exclusive availability through Sprint stores and the ION360 website.
“Through our Sprint partnership, the ION360 U is very well positioned to give customers an opportunity to see for themselves how easy to use and integrated the camera, case, and app are,” said Giovanni Tomaselli, founder and president of ION360. “Instead of taking a still image from a static viewpoint — which traditional standalone or smartphone cameras provide — the ION360 U allows you to bring your family and friends into your experiences, from all perspectives, instantaneously, without changing the smartphone experience. Just snap it onto its case, and go.”
The ION360 U retails for $300.
Foolproof ways to remove the background from an image
Looking to remove the background from an image, but not quite sure how to go about doing it? You’ve come to the right place! Don’t worry, changing a background is probably easier than you may think — especially with the right software! Below, we’ll cover web apps like Background Burner, as well as offline tools like Photoshop. Read on for all the details.
We also have guides on how to create a watermark and how to make an animated GIF, if you’re looking for additional tutorials related to photography.
Web-based apps
Background Burner
Removing simple backgrounds
So let’s say you want to Photoshop a mustache onto your coworker’s face or tweak an image you found online, but you don’t have access to Photoshop and all of the mustaches you find feature an annoying background. In order to strip out the background and get a PNG file, which will allow you to isolate your image and save it without any background content, follow these steps:
Step 1: Download and save the image in question to your computer.
Step 2: Head over to the official Background Burner website.
Step 3: Click the blue Choose File button in the bottom-right corner, or simply drag and drop your image into the dotted box at the bottom.
Step 4: Now, watch as the tiny dragon eradicates the background of your image. The tool does a pretty precise job with basic backgrounds, but if you want to make additional changes, click the Touch up button below the resulting image. Then, use the Mark Foreground and Mark Background tools to define the parts of the image you’d like to remove.
Step 5: Once the image preview on the right-hand side of the page looks correct, click the green Log in to download button. You’ll need to create a free account in order to download the resulting image, but doing so is easy, especially if you allow the site access to your Facebook or Google credentials.
Removing complex backgrounds
Looking to remove the background from an actual photograph, not just some clip art with a white background? Don’t worry — Background Burner can handle this, too. To get the job done, simply follow the steps as outlined above, but be a little bit more precise when marking up your image. For example, the picture below is pretty good, but the background doesn’t quite fit. We want to replace it with something a bit more impactful.
To begin removing the background, follow steps 1 through 3 above, and allow the dragon to do its job. As you can see below, the tool’s edge-finding algorithm did a decent job of finding the model, and provided us with four options to choose from.
We chose the one that left most of his body intact, but nixed the grill and various party goers. If you’re happy with the initial results, simply click the green Select button. If not, click Touch up and fine-tune your image. Using the first image as our outline, we started painting green lines on the parts of the image we wanted to be restored.
So, to make it more accurate, we needed to zoom in and get more precise with our markings. You can change the size of your brush in the top menu, but we’ve found that’s it’s far easier to zoom in. Once you’re close enough to see where the algorithm missed the edges, drop a few green marks to encapsulate the part of the image you’d like to keep. Once done, zoom out to see if the finished product looks OK. Ours isn’t perfect, but it’ll do. Now, do the same with the red brush (aka, the Mark Background tool).
When you’re happy with your product, click Use This in the bottom-right corner. Again, you’ll need to create a free account in order to download the resulting image, but doing so is easy if you allow the site access to your Facebook or Google credentials.
Now we can add a newer, more appropriate background…
Perfect! Keep in mind that there is also a professional version of Background Burner — one that’s specifically focused on ecommerce — if you plan to remove image backgrounds on a regular basis or need access to more advanced tools. Oh, and if you’re interested in augmenting a sweet profile image like this, we’ve rounded up a collection of the best selfie apps.
Alternative: Clipping Magic
If you want to explore a more detail-oriented option, check out this alternative to Background Burner: Clipping Magic. Like the aforementioned tool, it uses automated software to detect edges — all you have to do is mark the “foreground” and “background” with red and green strokes.
Clipping Magic also provides a useful live preview, which lets you tweak the results on the fly. The web app provides basic options for shadow and color adjustment, too, along with a couple other tools that allow you to better adjust the resulting image. This makes the software more suitable for detailed projects, ones in which you want more control over how your image looks.
How to convert a PDF to EPUB on Windows, MacOS, and Linux
The PDF is a versatile file type which can handle images and text well and look good on a variety of devices. Not every one displays them as well as others, though, and in the case of Ebook readers, there are often better options. With that in mind, in this guide, we’ll teach you how to convert a PDF to EPUB document in several different ways.
As easy as it is to convert PDFs to EPUBs, it’s also a cinch to convert a PDF to a Word document. If you want to edit that PDF before converting it any format, make sure to check out our guide to the best PDF editors.
Calibre (Windows, MacOS, Linux)
The open-source Calibre is a great piece of ebook software for Windows, MacOS, and Linux, and includes a file conversion feature among its suite of tools. Here’s how to make that PDF-to-EPUB conversion.
Step 1: Drag and drop the PDF you want to convert into Calibre, or click the “Add books” icon in the top left-hand corner and select “Add books from a single directory.” Then, choose the PDF you want to convert.
Step 2: Highlight your book from the main-window list and then click the “Convert Books” button.
Step 3: Choose the “Epub” output format using the drop-down menu on the right-hand side and make any necessary adjustments to the title, and other details.
Step 4: Once the conversion is complete, you can click the “Jobs” icon in the bottom right-hand corner to find out more. Clicking “Show job details,” will show you where it was output. You can now use your newly converted Epub document as you wish!
Online-Convert.com (web-based)
Online Convert is one of the more reliable web-based options out there, and you can use it to convert a wide variety of file types. Aside from converting PDFs to EPUBs, you can also convert DOCX files to DOC, for example.
Step 1: Navigate to the main Online Convert homepage.
Step 2: Find the PDF file you want to convert by clicking “Choose File,” “Choose from Dropbox,” or “Choose from Google Drive.” Alternatively, enter the URL leading to the PDF. Here, you can also enter additional information regarding the book, such as the title or author.
Step 3: Click “Convert file” and wait for the conversion to complete. Afterward, you’ll be able to access the file from its designated folder.
EPUBator (Android)
The EPUBator app for Android allows you to convert PDFs directly on your smartphone or tablet. It’s easy to use, too, rendering it a go-to solution for those looking to convert PDF files on the go.
Step 1: Download and launch the app. Then press “Convert PDF.”
Step 2: Locate the folder on your smartphone or tablet that contains the PDF you want to convert. Once found, select it.
Step 3: The conversion process should begin automatically. Once finished, tap “Verify ePUB” to confirm the conversion worked as intended. The new EPUB file should be in the same folder as the original PDF. You can also halt the conversion for whatever reason by tapping “Stop” during the conversion process.
Now that you’ve made your new EPUB document, if you need a new ebook reader to view it on, these are our favorites.
Updated 10/02/2017 by Jon Martindale – updated images and confirmed methods.
The trickiest iPhone 8 problems, with advice on how to fix them
Smartphones are complex devices designed to make our lives easier, but sometimes they end up causing frustration instead. We’re impressed by the iPhone 8 and the iPhone 8 Plus, but they’re not perfect. While Apple’s devices are generally well made and smooth-running, things can — and do — go wrong from time to time. We’ve gathered together some notable issues with the latest iPhone 8 Plus and common iPhone 8 problems here, along with advice on how you might deal with them.
Issue: Swelling battery
You may have seen some reports about iPhone 8 Plus batteries swelling up and causing the screen to detach from the body of the device. The first report, picked up by TNW seems to have centered on an iPhone 8 Plus in Taiwan, but MacRumors has since reported a few more similar incidents in Japan, Canada, and Greece. It’s not clear how widespread the issue is, but it appears to be a relatively rare occurrence.
Solution:
- Apple is investigating this, but if you encounter a similar problem there’s really only one course of action: Contact Apple and get a replacement handset.
Problem: Crackling earpiece
Several iPhone 8 and 8 Plus owners have been complaining about a crackling earpiece during calls. A repetitive, intermittent static sound or distortion makes it difficult to hear properly during normal calls and FaceTime calls. The problem has popped up on the Apple support forum, on Reddit, and elsewhere.
Potential solutions:
- Wait for a software update. Apple has acknowledged this issue and told The Verge, “We are aware of the issue which is affecting customers in a small number of cases. Our team is at work on a fix, which will be included in an upcoming software release.”
- Reportedly it is fixed in the iOS 11.1 developer beta. If you have a developer account, you can try it out via the Download New Betas tab after signing in at developer.apple.com.
- It’s possible there’s a separate, but similar hardware problem to do with touching the earpiece, according to this Reddit post. If that’s your issue, then you may need to contact Apple about a replacement handset.
Glitch: App Store keeps refreshing
If you load up the App Store and find that it just repeatedly refreshes every few seconds, then you are not alone. We encountered this problem on our iPhone 8 review unit, but it has been reported elsewhere and it doesn’t seem to be confined to Apple’s latest devices.
Potential solutions:
- A simple restart was enough to get our iPhone 8 back on track. Hold down the Sleep/Wake button and slide to power off. Then press the Sleep/Wake button to turn your iPhone back on. We haven’t seen this issue return.
- Some people had success by signing out of their account and back in again. Go to Settings and tap on your name at the top, then iTunes & App Store > Apple ID and choose Sign out. Tap Sign In and enter your details to sign back in and then try the App Store again.
Issue: Screen unresponsive or frozen
There have been a few reports on the Apple forums about the iPhone 8 or iPhone 8 Plus becoming unresponsive and freezing on the lock screen or the home screen. Unusually, in a few of these cases, some of the hardware buttons and certain gestures still work, but everything else is frozen.
Potential solutions:
Hold down the Sleep/Wake button and then slide to power off, assuming it works. Press the Sleep/Wake button to turn it back on again.
The force restart method has changed for the iPhone 8 and iPhone 8 Plus. You must press and quickly release the Volume Up button, then press and quickly release the Volume Down button, then press and hold the Sleep/Wake button until you see the Apple logo.
If the problem returns after a restart, then backup anything precious and try wiping your iPhone, then restoring your backup. Check out how to factory reset an iPhone for full instructions.
If you’ve tried a factory reset and then restored your backup and the problem returns, then it could be something in your backup that’s causing it. Try factory resetting your iPhone 8 and set it up as a new device, then test to see if the problem is gone.
Still no joy? It’s time to contact Apple or head into an Apple Store and ask about a repair or replacement.
Problem: Overheating
If you find that your iPhone 8 or iPhone 8 Plus is getting very warm, or even hot, to the touch, then there’s generally no reason to panic. We found that our iPhone 8 got very hot when playing AR games, but it can also get warm when you’re first setting it up, restoring a backup, or using GPS and a game simultaneously, like with Pokémon Go. If it gets too hot, the iPhone 8 is designed to disable certain features, like the flash, display a temperature warning on screen, and shut itself off.
Potential solutions:
- The obvious thing to do is take a break from using it until it cools down.
- If you can go to a cooler environment, then do so. Leaving your iPhone 8 on the dash in your car on a hot day, for example, could cause a problem.
- If you have an iPhone 8 case or cover, then consider removing it to allow the heat to dissipate faster.
- Try turning off any functions you aren’t using. For example, go to Settings > Privacy and toggle Location Services off.
- If you’re in an area with poor signal, then it may be worth swiping up to open the Control Center and tapping the Cellular Data icon to turn it off. Just remember to turn it on again later.
- Hold down the Sleep/Wake button and then slide to power off. Press the Sleep/Wake button to turn it back on again.
- The most likely culprit for overheating is a specific app or game, so pay attention to what is running when it happens and consider uninstalling anything problematic.
Shutterstock now lets users search for photos with specific compositions
Why it matters to you
The new search tool makes it easy to find a specific layout for graphics projects.
Computer vision is empowering keyword searches and auto-tagging, but a new Shutterstock feature is allowing designers to search for not only what objects they want in the photo, but where they want them. Shutterstock Labs is now publicly testing a composition search tool that allows browsers to mix keywords with the layout of the photo.
In graphic design, stock photos are often paired with text or more graphics. The new Shutterstock compositional search tool allows designers who are looking for a specific layout to find the right image without sifting through all the options that don’t have the right layout.
Inside the tool, designers can search for one or more keywords. Those keywords then pop up inside a layout square. Dragging the keyword icons within that space will put the matching images in the search results first. Multi-keyword capability means that you can search specifically for a photo with, for example, a cat on the right and a dog on the left.
In addition to adding keywords, designers can also add a “copy space” icon to the compositional tool. This tells the search engine to look for images that have empty space suitable for adding text in that portion of the image.
Shutterstock built the new tool using a combination of machine vision and natural language processing, along with advanced information retrieval or search techniques.
“Shutterstock is on the front lines of improving the future of visual search technology using pixel data, deep learning, and artificial intelligence. What’s remarkable about this breakthrough is that we only trained our model to learn what things are, but our deep network learned how to represent where things are, ” Jon Oringer, founder and CEO of Shutterstock, said in a press release. “For marketers, searching for an image with copy space using this tool will save a significant amount of time. We continue to innovate on this valuable search technology and invest in machine learning to improve the customer experience and provide more time for productivity and creativity.”
The compositional search tool has some similar functionality to the platform’s reverse image search tool that finds similar images, but doesn’t require a photo as a starting point. The tool also joins Shutterstock’s AI-powered auto keyword tool.
How to add rounded screen corners to your Android phone
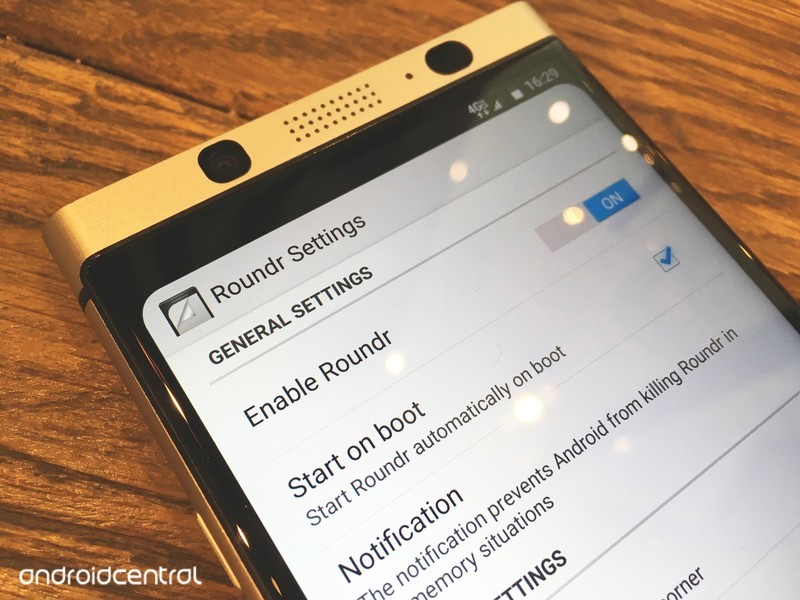
If you’ve seen the iPhone X and thought “I want those rounded corners”, then you’re in luck. There is an app that brings rounded corners to your Android device, without root!
If you ever felt like square corners on a screen look too rough, you can round them bu using a simple app. The best part is that no root is required. Of course, this won’t physically round your corners, but if you have an AMOLED screen, or if you don’t mind having the curve be a little smaller, then it will look great nonetheless.
Read more at ModMy!
Why I pre-ordered the Pixelbook
Chromebooks are great for low price devices, but this is why I’m choosing a Pixelbook as my next laptop.
In early October, Google had an event to showcase all its latest hardware. While most attention was (rightly) focused on the new Pixel phones, I wasn’t too interested in those. They look nice for sure, but my OnePlus 3T is working just fine for now. I was much more interested in the Pixelbook: the new, ridiculously expensive Chromebook.

But why? Chrome is great on a low-cost device because the simpler operating system will let that device perform much better than an equivalent laptop running Windows. And there are already pseudo-flagships in the way of the Asus Chromebook Flip C302 and Samsung Chromebook Plus and Pro, which hover around half the price of the entry model Pixelbook. To be clear, I did order the entry level Pixelbook with 128GB of storage, an Intel Core i5, and 8GB of RAM.
When I buy a gadget, I try my best to find something that will serve multiple roles. A smartphone is an obvious example in that it’s also a camera, a music player, and the most convenient way to see pictures of adorable dogs. A traditional tablet would fill most of these roles as well and would be even better for certain tasks like reading a novel. However, I prefer owning a convertible laptop instead of a tablet for reading, since I also need a laptop in my life. This year, there have been plenty of convertible Chromebooks at different price points, including at the entry level. While a more powerful Chromebook might be a little smoother, a lower-end Chromebook wouldn’t be objectively bad.
 A Windows or macOS laptop can run the Chrome browser, as well as “real programs.”
Why not other operating systems?
But why bother with a Chromebook that starts at $1,000? Why buy that over a MacBook Air or Surface Laptop and just install the Chrome browser? Those laptops would be able to run the Chrome browser and also run “real programs.” I haven’t used macOS at any point in my life, and while it’s always nice to expand my horizons, there isn’t anything I would want to do on a MacBook that I couldn’t do on a comparable Windows laptop. I’m not tied into the Apple ecosystem at all, but I still used a Windows laptop back when I owned an iPhone.
On a related note, I also considered buying a 12.9-inch iPad Pro earlier this year, but the lack of mouse support and Apple’s use of Lightning instead of USB-C for charging put me off. The Pixelbook starts at $50 more than the iPad Pro 12.9, and for that price, it includes a real keyboard (the iPad Pro keyboard is an additional $169 over the base price), mouse support, a desktop browser with full extension support, and USB-C for charging. Tablet apps are going to be miles better on the iPad compared to Android apps on Chrome, but I only use three apps and the other factors more than makeup for that.
 The iPad Pro is also a nice lightweight computer, but it misses the mark for me.
In my day job, I manage Windows desktops and laptops, as well as Chrome devices for a healthcare-focused non-profit. If I had to guess, I’d say 75% of our devices are Chromebooks or Chromeboxes, but a vast majority of my time is spent handling the Windows computers. It sounds cliché, but the Chrome devices just work. Updates are nice and seamless and don’t harass our users the same way Windows updates do. And the Chromebook or Chromebox is rebooted within seconds due to the way updates work on Chrome.
I literally never worry about a Chrome device being infected with malware or a virus, because by and large they can’t. There absolutely are exploits for Chrome devices, but they are much, much less likely to occur than an exploit for Windows.
That experience played out when I used a Windows laptop in my personal life. There was always something less than great about the experience. This ranged from Bluetooth problems on one laptop to inconsistent battery life on another to sleep/wake issues on another. None of these are insurmountable, but they’re also issues I never faced on any of the Chromebooks I used. When I open a Chromebook, the screens come on. When I go to pair a Bluetooth mouse, it pairs. When I’m sick in bed and watching Netflix, the battery lasts just as long as other times I binge watch my favorite shows.
I love this consistency that comes with using a Chromebook, and I never found the same consistency on any of the Windows laptops I used over the course of 10 years before I switched to a Chromebook. For what I want to do on a laptop, Chrome has more than enough power, while remaining consistent and enjoyable to use.
Android applications are another key point for me. I can read from my Comixology or Play Books collection inside a web browser, but that experience is…less than smooth. Similarly, I could emulate Android applications on any Windows device, but even on high-end Windows laptops that’s just clunky. I only use three Android applications on my Chromebook: Play Books, Comixology and Polarr, but they’re services I love using every day.
 This Acer Chromebook will do nearly everything the Pixelbook can for a fraction of the price.
What about other Chromebooks?
But again, lower-end Chromebooks also run Android apps. So why spend $1,000 on a Chromebook? That answer is likely to differ for every buyer, but for me it comes down to the fact that other Chromebooks don’t have all the features I want. I spent most of this year with the Asus Chromebook Flip C302, and it was great. With the exception of the odd assignment that required a piece of Windows software, the second half of my Bachelor of Science in Information Technology was completed on a Chromebook. My courses were completed online, which certainly helped.
At the same time, Google Docs, Sheets and Slides have gotten much better over the years, and I think most users would be perfectly comfortable using those in place of Word, Excel or Powerpoint. I still did most of my academic writing inside of Microsoft Office for formatting reasons (and my school gave everyone an Office 365 license), but I would have been just at home inside Google’s apps.
Other Chromebooks didn’t have the combination of features I desired. The Pixelbook does.
The Asus C302 is a fantastic laptop, but a pretty awful tablet. The 16:9 ratio and heavier weight make the device cumbersome to hold as a tablet, even with two hands. A 3:2 ratio screen feels much more like a tablet, while not sacrificing usability when the device is being used as a laptop. I tried a Samsung Chromebook Plus — which has a 3:2 display — when it was released earlier this year, but the lack of a backlit keyboard killed it for me. I recently sold my Asus C302 and picked up another Samsung Chromebook Plus because I’ve been doing more reading. It works well, and it is indeed comfortable to use a tablet. But the lack of a backlit keyboard still hampers the device in my mind.
If that were the only flaw of that model (and its brother, the Chromebook Pro) I’d deal with it. But the keyboard is a bit cramped, the trackpad isn’t great, and it maxes out at 32GB of internal storage. I haven’t seen or used the Pixelbook in person like some of my colleagues, so the first two issues may well be present on that device. While Chromebooks haven’t historically needed lots of storage, with Android apps that equation changes. I wouldn’t mind if the Chromebook Plus had 64GB of storage, but 32GB is just too small if I want to download a bunch of movies from Netflix or Plex, or if I install any games. An SD card or USB drive can’t integrate with Android apps on Chrome yet, and even if they did I’m not sure if the slower read speeds on the card would still allow for a smooth user experience.

At the time of writing, a brand new Chromebook Plus goes for $437 on Amazon. A little more than twice the cost nets me four times as much internal storage, more RAM (which I honestly don’t need) and a glorious backlit keyboard.
There are other aspects of the Pixelbook that I’m sure will be nice but didn’t factor into my purchasing decision. The design looks fantastic, but the Asus and Samsung Chromebooks look fantastic as well. I’m sure the pen works really well, but I’m not a pen user. I don’t currently plan on buying the pen, and I’m glad it wasn’t included so it wouldn’t drive up the price of the laptop itself. With my phone close to me at all times, I’m not too concerned with Assistant being on any other device. It also won’t be long before Assistant comes to every Chromebook because Google wants Assistant on as many devices as possible.
I also don’t intend to boot into a different flavor of Linux, but I’m sure it’ll work wonderfully for those that want to do that. While there have been rumors of Chrome being able to run virtual machines inside the browser, I’m not buying this based on what it may or may not do someday. If that capability does come out, I’ll most likely give it a try before never using it again.
I’m not going to try and convince anyone to run out and buy a Pixelbook. Any lower priced Chromebook will perform just as nicely and will get features like Assistant later on. There are certain pieces of software that others legitimately need that aren’t fully featured on Chrome, or just aren’t available in the first place. I still have a Windows desktop at home that is my gaming, media conversion, and Plex server machine, and it isn’t going anywhere anytime soon. I personally love using Chrome on a convertible laptop, and I’m sure the Pixelbook will be the Chromebook I love the most.
See at Google
Google Hardware

- Google Wifi review
- Google Home review
- Everything you need to know about the Chromecast Ultra
- Chromecast vs Chromecast Ultra: Which should you buy?
Google Wifi:
Google
Amazon
Google Home:
Google
Best Buy
Chromecast Ultra:
Google
Best Buy
An upgraded version of Bixby might be announced on October 18
Bixby 2.0 will reportedly offer deeper third-party integration and move the assistant beyond smartphones.
Back in February, Samsung used its Galaxy S8 and S8+ to introduce Bixby to the world. Bixby has had a rocky life so far, but despite a delayed release in the United States and a lacking feature set from day one, the AI has actually progressed into something that’s not complete garbage.

Samsung will be holding a developer conference in San Francisco on Wednesday, October 18, and according to a new report from The Korea Herald, this is where the company will be announcing Bixby 2.0. Bixby 2.0 is expected to be an upgraded version of the assistant that we already have, and although not too much is known about the update just yet, there are a couple key features that we can supposedly look forward to.
The first of these is further integration with third-party services. You can already use Bixby Voice to call an Uber, start playing a song on Google Play Music, and plenty more, so we’re excited to see what other apps the AI will be expanding to. Along with this, it’s also suggested that Bixby 2.0 will have a big focus on its use in devices other than smartphones.
Moving Bixby to smartwatches seems like the most natural next step.
We’ve already seen Bixby make its way to Samsung’s incoming Gear IconX wireless earbuds, but we’ve yet to see the assistant appear on any of Samsung’s smartwatches. Moving Bixby to the likes of the Gear S3 and Gear Sport only makes sense, and along with this, there’s also the chance of a Samsung smart speaker that we’ve been hearing rumors about for months now.
Leading up to Bixby 2.0’s announcement, Samsung has also appointed Chung Eui-suk as the head of service intelligence for future development of Bixby. Chung Eui-suk is Vice Chief of Samsung Research America, and the move was made as a result of Bixby’s poor market response.
Bixby might not ever become as popular or powerful as Google Assistant or Amazon’s Alexa, but with a new exec leading the charge and a big 2.0 release less than a week away, it certainly seems like Samsung is going to try it’s best to do so.
Samsung Galaxy S8 and S8+
- Galaxy S8 and S8+ review!
- Galaxy S8 and S8+ specs
- Everything you need to know about the Galaxy S8’s cameras
- Get to know Samsung Bixby
- Join our Galaxy S8 forums
Verizon
AT&T
T-Mobile
Sprint
Unlocked
‘Life is Strange’ prequel’s second episode arrives next week
Life Is Strange was one of our favorite games of 2015 and its prequel of sorts turned out to be pretty great, even though it was made by a different studio. Titled Before the Storm, the game’s first episode came out in August of this year. On October 19th, you’ll be able to jump back into Chloe and Rachel’s story with the second episode, titled “Brave New World.” A new trailer sets the scene for the upcoming episode, which will be available on Xbox One, PS4 and PC (via Steam).
The trailer teases some new characters and places, while returning to familiar ones from the first game. Chloe isn’t too happy with the “dillhole” that her mom is moving in with them, and she gets mixed up in a shady errand for Frank Bowers at Blackwell Academy. Chloe and Rachel’s relationship seems to deepen as well. Fans of the series will likely thrilled about the new installment — if you want to get caught up by starting at the beginning, the first episode of the original BAFTA award-winning Life is Strange is free on all platforms.
Source: Square Enix
