


Apple acquires wireless charging company PowerbyProxi
Since Apple made wireless chargers to go with its latest iPhones, it’s safe to say that it already has a team working on the technology. It sounds like the tech titan wants to expand its presence in the space, though, because it has just purchased New Zealand company PowerbyProxi. The Auckland firm is best known for creating the Proxi-Module platform, a modular wireless power and data system that can be adapted and incorporated into various types of devices to give them wireless capabilities. A few years ago, Samsung also invested $4 million into the firm but clearly didn’t snap it up completely.
Apple senior vice president of hardware engineering Dan Riccio has confirmed the acquisition to Stuff New Zealand, saying that the company wants “to bring truly effortless charging to more places and more customers around the world.” He didn’t say how much money changed hands, but according on the investor info Stuff gathered, it could be in the upper tens of millions of dollars. PowerbyProxi chief Fady Mishriki revealed, however, that his team is joining Apple but will continue working from their native country.
Cupertino added Qi compatibility to the iPhone 8, the iPhone 8 Plus and the iPhone X, so future phones will definitely inherit the feature. It’s unclear what Apple is planning to do with PowerbyProxi’s team and technology, but we’ll likely see the results in future hardware reveals.
Via: MacRumors, 9to5mac
Source: Stuff
Xbox One consoles could support premium wireless speakers
Xbox is jumping aboard the WISA train. Microsoft’s console is the first gaming brand to become a member of the trade group known as the Wireless Speaker and Audio Association. That makes it the odd one out among audio and electronics manufacturers like Bang & Olufsen, Gibson, Harman/Kardon, and LG. By signing up, Xbox will be able to partner with its WISA cohorts to provide support for more high-end wireless hardware.
In case you’ve never bought a premium wireless speaker system, WISA offers a 7.1 channel audio standard that operates in the “relatively unused” 5.2-5.8 GHz radio frequency spectrum. Plus, you get the advantage of a one-touch setup of what is essentially an audio WiFi network, only with better sound quality than, say, Bluetooth. But, WISA-certified products don’t come cheap.
With the release of the top-of-the-range Xbox One X on the horizon, the move couldn’t come at a better time. What could make the 4K gaming experience even more immersive? How about a set of wireless, surround sound speakers?
Source: WISA Association (pdf)
Microsoft ceases production of the Kinect
Microsoft has been slowly chipping away at the Kinect’s usefulness and features across its platforms, yet today’s news still comes as something of a shock. The company announced today to Co.Design that manufacturing for the motion sensor input device has been shut down.
That’s not to say that the Kinect was a failure in and of itself. The technology was revolutionary; the standalone product, however, didn’t take off the way Microsoft had hoped. According to Co.Design, Microsoft has sold around 35 million Kinects since 2010. The device got a boost when it was coupled with the Xbox One at launch, but Microsoft was forced to to introduce a version of the console without the camera because of price considerations and lagging sales.
The Kinect’s technology will live on in various forms, including, surprisingly, in the iPhone X. Apple acquired PrimeSense, the Israeli company that created the 3D tech in the original version of the Kinect, back in 2013. The iPhone X will use PrimeSense’s algorithms in the depth-sensing camera’s Face ID system. Additionally, Microsoft is also working on the Hololens, which was developed by Kinect creator Alex Kipman. It’s an AR headset that uses a Kinect sensor.
Via: The Verge
Source: Co.Design
Amazon Debuts New ‘Cloud Cam’ Security Camera and ‘Amazon Key’ In-Home Delivery Service
Amazon today announced its latest device, called the Amazon Cloud Cam, which keeps track of your home using an intelligent security camera that syncs up with the company’s new iOS and Android apps. Amazon said that the $119.99 Cloud Cam was built to help you check on pets while at work, monitor the front door when you’re on vacation, or look into your kids’ room from another room in the house.
Cloud Cam features 1080p full HD resolution video, night vision, two-way audio, a wide viewing angle, and activity clips from the last day synced with the Amazon Cloud Cam app. Of course, the new security camera will work with Alexa devices like the Echo, Echo Show, Echo Spot, Amazon Fire TV, and Fire tablets. You can say, “Alexa, show me the [camera name]” and the assistant will bring up the requested feed from anywhere in your house.
When on the go, the iOS and Android apps let you stay in touch with the Cloud Cam, as well as receive customizable notifications for alerts detected by the device’s motion detection and computer vision technology. When it detects motion, Cloud Cam sends out a push notification and stores a clip securely for you to review. Amazon said that the camera will get smarter over time with more advanced detection, alerts, and other new features — like advanced audio alerts and pet detection — will launch down the line.
“Cloud Cam has all the features you need to monitor your home, including a 1080p Full HD camera, night vision, two-way audio, and free storage for clips—and with the secure AWS cloud powering Cloud Cam’s advanced computer algorithms and intelligent alerts, the service is always getting smarter,” said Charlie Tritschler, Vice President, Amazon Devices. “All of this is just $119.99—Cloud Cam is a premium product at a non-premium price.”
Without a subscription, three Cloud Cams are supported in one home, and with a subscription you can have up to ten cameras in one home. Subscriptions also enable additional storage for video (beyond just 24 hours), unlimited downloads and shares of video clips, Person Detection to flag specific human activity instead of general motion, and Zones to ignore certain areas of motion (like a ceiling fan). Amazon’s Cloud Cam subscription tiers are listed below:
- Basic ($6.99/mo, $69/yr) offers access to the last 7 days of motion detection clips for up to 3 cameras
- Extended ($9.99/mo, $99/yr) offers access to the last 14 days of motion detection clips for up to 5 cameras
- Pro ($19.99/mo, $199/yr) offers access to the last 30 days of motion detection clips for up to 10 cameras
Additionally, Amazon today announced a new “Amazon Key” service that works in conjunction with the Cloud Cam. Exclusive to Prime members, Amazon Key allows you to have your order securely delivered inside your home when you’re out of the house. Amazon Key will be a new checkout option for Prime members in 37 cities across the U.S. beginning November 8, and will be available for “tens of millions of items” on the site.
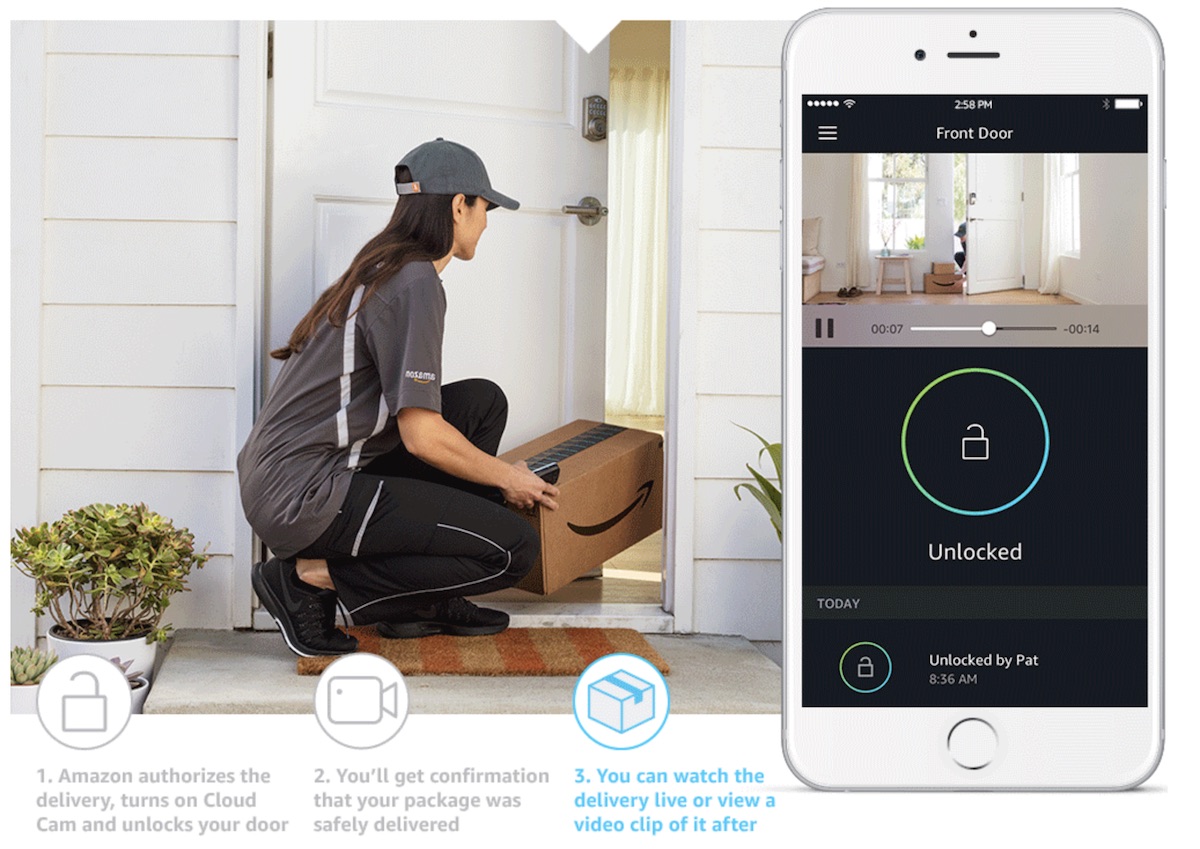
Amazon Key combines Cloud Cam with one of several compatible smart locks by companies like Yale and Kwikset. The process begins with Amazon verifying that the correct delivery driver is at the right address at the right time, using an encrypted authentication process. Then, Amazon Cloud Cam begins recording once that process is complete and the door is unlocked for the driver, without giving them any access code or key, and they place the package in your home and then leave.
“Amazon Key gives customers peace of mind knowing their orders have been safely delivered to their homes and are waiting for them when they walk through their doors,” said Peter Larsen, Vice President of Delivery Technology, Amazon. “Now, Prime members can select in-home delivery and conveniently see their packages being delivered right from their mobile phones.”
You can pre-order the Cloud Cam today by itself for $119.99, a two-pack for $199.99, or a three-pack for $289.99, and the device will ship November 8. The company is also offering an Amazon Key In-Home Kit with a Cloud Cam and a compatible smart lock for $249.99.
Tag: Amazon
Discuss this article in our forums
How to convert a PDF to JPG for easy viewing on any device
There are plenty of worthwhile reasons to convert a Portable Document Format (PDF) to a JPG image (it’s different from a GIF, you know). Although PDF files are a fantastic way to package a slew of text and image documents together, they often require an external application or plug-in and are unnecessary if you want just a single page or image. But to make that transition, you need to know how to convert a PDF to JPG.
Fortunately, there are a number of ways you can do it and in this guide, we’ll walk you through our favorites, step by step, no matter which platform you’re on.
If you need to edit your PDF before converting it, we have a guide to the best PDF editors, too.
Adobe Photoshop CC — Premium Windows app
Although Photoshop is a premium tool, it’s one of the easiest methods for converting pages of a PDF document into a JPG image file. There’s also a free trial that lasts for seven days, so if you only have a few files you want to convert, it’s a great way to do it.
Step 1: Make an Adobe account and download the Photoshop CC free trial. Install it as you would any other piece of software.
Step 2: Open Photoshop and sign in to your account if necessary.
Step 3: Click “File” and then “Open” in the top menu bar.
Step 4: Select the PDF you want to convert into a JPG and click “Open”.
Step 5: In the resulting pop-up window, choose the page of the PDF you want to convert into an image and click “OK”.
Step 5: Click “File” and then “Save As.”
Step 6: Using the drop-down menu, select the “JPEG” format. Choose where you want to save the image to, using the navigation window, and then click the “Save” button.
PDF to JPEG — Free Windows app
PDF to JPEG is a free Windows app that, does exactly what its name suggests. It’s minimalist but allows for a welcome amount of control over converting specific pages, selecting where images will be saved, and more. If you only have access to Windows 10, this is probably your best solution for frequent conversions.
Note: unlike Photoshop, this app will convert every page of the PDF to JPG files, so consider another option if you only need one page converted.
Step 1: Download the PDF to JPEG converter app from the Windows store and install it.
Step 2: Open the app and click the “Select File” button.
Step 3: Choose the PDF File you want to convert and click the “Open” button.
Step 4: Click the “Select Folder” icon.
Step 5: Choose a destination folder for your converted image(s) and then click the “Select Folder” button.
Step 6: Click the “Convert” button. Depending on the size of the PDF file, it may take a little while to complete, but once done, every page of the PDF document will be converted into an image and saved in your destination folder.
PDF Preview — Free MacOS tool
Out of all the platforms, MacOS probably offers the easiest and most direct option for converting PDFs innately — in other words, you don’t have to download any extra tools to get the job done. Here’s what to do.
Step 1: Open a PDF in “Preview”. In most cases, PDFs should automatically open in Preview unless you’ve chosen another program for the job. You may have to find your PDF file and right click to open in Preview if necessary.
Step 2: In the “File” tab, choose “…”.
Step 3: Change the name, add tags, choose the export location and, most importantly, set the “Format” to “JPEG.” Select “Save” to finish up. That’s it!
If you only want to save part of the PDF, then head over to “View” and make sure “Thumbnails” is turned on. This allows you to select particular pages via the Thumbnail sidebar.
This process works great for simple conversions. However, you can’t really tweak the PDF in any meaningful way, which could be annoying for more complex projects. If yours falls into that category, we suggest you take a look at our online suggestions for tools that offer more customization and ways to fix problematic PDFs further down this page.
PDF to JPG app — Free Chrome OS app
We haven’t forgotten about you, Chromebook users! Your options may be a little more constrained than other operating systems, but you still have conversion solutions to use if necessary. The PDF to JPG app, can be downloaded from the Chrome Web Store and much like the Windows 10 app of the same nature, this little tool is simple, doesn’t take up much space, and is great if you frequently need to change file types.
Step 1: Select your PDF file and choose whether you want to convert the whole thing, or specific pages.
Step 2: Choose where you want to save it, and then hit the “Convert to JPG” button.
Step 3: Wait for the process to complete. When it’s done, click the “Download JPG images” button. Since it’s all handled in the cloud, you have up to 24 hours to download your files before they’re deleted.
Zamzar — Free web tool
Online tools can typically be used from any computer or mobile device. Since they don’t take up any room on your computer and tend to be speedy little converters, you may prefer them to other options. Their only downside is that they tend to be a little limited in the amount of data you can convert at one time, which makes them difficult to use for larger PDF files.
Still, they can be a useful tool and one of our favorites, is Zamzar. It’s incredibly straightforward. Navigate to Zamzar’s PDF to JPG conversion tool in your web browser and follow the on-screen instructions.
Step 1: Select your PDF by clicking the “Choose Files” button.
Step 2: Use the drop-down list to choose the “JPG” format.
Step 3: Enter your email address where you want the file sent.
Step 4: Click “Convert” to begin the conversion process. When it’s finished, a link will be emailed to you where you download your files from.
Zamzar can do pretty much anything to PDFs, so if you want to convert your PDFs to HTML5, BMP files, DOCX, or anything else that your project might require, you can do. If you want a specific tool for converting a PDF to a Word document or an EPUB file, we have great guides for those too.
PDF to JPG — Free web tool
A similarly easy-to-use tool, PDFtoJPG isn’t necessarily a better tool than Zamzar, but it is different and may appeal more to your purposes and tastes. It’s a little like printing to PDF, but the reverse process.
Step 1: Navigate to the PDFtoJPG homepage in your web browser.
Step 2: Click the “Upload a file” button and select your PDF from the resulting window.
Step 3: Choose the specific page or page range that you want to convert.
Step 4: Decide the page width and its background color in the respective sections.
Step 5: Click the “Convert now” button. When it’s finished, click the individual “Page” links at the bottom of the page to download your new images!
Update: Overhauled structure and updated steps. This article was originally published March 4, 2013.
Editor’s Recommendations
- Need to convert a PDF into an Excel document? Try these methods
- How to convert a PDF to EPUB on Windows, MacOS, and Linux
- How to convert FLAC to MP3
- How to convert your videos from MKV to MP4 in a few quick steps
- Play any video on any device with the best free video converters
How to transfer music from an iPod to a computer: A step-by-step guide
Do you still have an old iPod, iPod Touch, or other iOS device lying around with songs that you really want on your desktop computer? Transferring those songs isn’t always easy, especially if you want to mix and match tracks from the old days with your current collection. We’ll show you how to how to transfer music from an iPod to a computer, no matter if you have a PC or a Mac.
Preparation: Check your devices and connect your Apple device
Take a minute to check all your software and get your songs ready. Whether you are using a PC or Mac, you will need to install iTunes and make sure that the latest updates have been installed (if nothing else, this adds some quality of life changes that will make the other steps easier). Likewise, if possible make sure that your mobile device is also updated. For older iPod models and iPod Touch devices, updates may have stopped some time ago, in which case you don’t have to worry about it.
Also, iTunes is a little unpredictable in the way it handles duplicate songs, such as copying them twice or giving them different information. Many people choose to fully wipe iTunes before beginning this process, since all the songs they want to transfer are already on an iPod or similar device. However, some people have gone through so many devices (iPod and other) that they end up mix and matching more carefully. Whichever way you choose, get rid of duplicate songs and any other data you don’t want to transfer over.
When you are ready, connect your Apple device to your computer. A typical USB port should work fine for this purpose. There are have some reports of certain USB 3.0 ports not working well with older iPods, so if you run into trouble with a USB 3.0 port, you may want to try plugging into a USB 2.0 port instead.
Again, plugging your Apple device in is likely to bring up some prompts for syncing and enabling certain features. Say no to all of these. Essentially, you don’t want iTunes to make any decisions on its own, especially when it comes to wiping out your song libraries.
Option 1: Activate iCloud Music Library
iCloud keeps getting more capabilities, and one useful feature Apple was careful to include is the ability to manage your music via the cloud. The big advantage of this method is that it’s easy: You probably already have all the downloads you need, and moving songs can be a largely automatic process. The downside is that this method only applies to newer Apple devices with Apple Music. If you have an old iPod (especially a model before the iPod Touch) then iCloud probably won’t be able to help you. In this case, move down to our second option. If you have a newer model, follow these steps. Note that your device doesn’t have to be plugged in for this process, so it still works even if you can’t plug your device into the chosen desktop.
Step 1: Turn on Apple Music with your iCloud Music Library, which you can find in the settings sections of your devices or in iTune’s Preferences section on desktop. Note again that this only works with newer Apple devices that can connect to the internet, so particularly old iPods are out of luck here (option 2 can help you out). The iCloud Music Library needs to be switched on for all devices involved, and the same user needs to be signed in. If you haven’t turned on the Music Library before, Apple will ask if you want to keep the music that’s on your device or overwrite it with iCloud’s music. You should always choose to keep the music so you don’t lose songs.
Step 2: On your desktop iTunes app, select Account and then select Purchased from the drop-down menu. This will open up a window of all the iTunes songs you have every purchased on your account.
Step 3: In the new window, in the upper portion, you will see an option to select songs that are Not in My Library. Choose this option to see all the songs that aren’t currently in iTunes.
Step 4: Download all available albums by selecting the cloud-shaped icon in the upper-right corner of the album. Note that this will take up some bandwidth, so a good wireless connection is suggested. After the downloads are complete, those songs will now be in your iTunes library.
Note: As you probably noticed, this method only works on songs that you have purchased with your current iTunes account. If the songs were purchased from another account, you may have to do some account shuffling to get your songs on iTunes. It’s less usual for an Apple device to have songs that weren’t downloaded from an iTunes account at all, but it can happen. In this case, you should try option 2 instead. You can also get refunds on iTunes purchases if necessary.
Option 2: Use iMazing
There are a number of different apps available to help manage music between Apple devices and iTunes: Our favorite is iMazing a freed, up-to-date download that manages all sorts of iTunes media, including songs. It’s compatible with both Mac and PC, and you can even use it instead of the iTunes library for organization. Here’s what to do.
Step 1: Navigate to this page and download the free version of iMazing Music. The pay version is $40, and includes an upgrade to iMazing 2 along with extra features, but if you aren’t planning on using iMazing as your music library (something to consider), it probably isn’t necessary.
Step 2: Open up iMazing Music — the interface will look a lot like iTunes. iMazing should automatically identify your iPod or other Apple device connected to your computer, and bring up its name in the left-hand sidebar menu, similar to iTunes. If it doesn’t, unplug and reconnect your iPod to get things going.
Step 3: Select your device from the sidebar. This should identify the content on the device in a drop-down menu. Select Music from that menu.
Step 4: At the bottom of the iMazing window you will see several icons for iTunes-related actions you can take. You want to select the option that says “Export to iTunes.”
Step 5: A new window should now open that allows you to fill in some of the details. You can choose to export your entire library, or only export music (selecting the music-only option is a good idea if you have other content on the device). You can also choose to export to a separate folder, or directly to iTunes. Choose iTunes if it is the only music library you use, and select Next. You will also have options to choose what song data you want export — unless you are really short on space, you can leave all song data checked. If you want to save some space and increase transfer speed, you don’t really need Skips or Last Played data.
Step 6: Keep selecting Next to move onto the Transfer section, and confirm you are ready to begin. iMazing will then do the rest of the work.
Note: This method should work with older iPods. However, you may need to choose to Export to Folder or a similar alternative to extract those songs. Once exported, you can then import them into your music library using iTunes. We can also help you convert audio files to MP3 files as necessary.
Update: Replaced past options with iCloud Music Library and iMazing.
Editor’s Recommendations
- How to make ringtones for an iPhone (any generation)
- Tight on space? Here’s how to transfer photos from your iPhone to a computer
- Wondering how to backup an iPhone without iTunes? Try these six alternatives
- An emoji is all you need to find a playlist with new Apple Music Messenger bot
- How to download podcasts and listen to them on Android or iOS
HMD Global kicks off Oreo beta program, starting with the Nokia 8
Oreo beta is now available for the Nokia 8, other Nokia devices to follow soon.
Back in September, HMD Global’s Chief Product Officer Juho Sarvikas teased Oreo running on a Nokia 8, with the executive stating that the company will roll out the update once it’s “perfect.” Sarvikas also said at the time that the company would be willing to open up a beta program for those interested in testing out beta builds, and it is doing just that now. In a recent tweet, Sarvikas has announced that Oreo beta builds are now available for the Nokia 8, with other devices in its portfolio — the Nokia 3, Nokia 5, and Nokia 6 — added to the program shortly.
Announcing Nokia phones beta labs! Be the first to test #AndroidOreo on #Nokia8 (physical Oreos not included!) https://t.co/91uhqstnnm pic.twitter.com/GNiNrK31B0
— Juho Sarvikas (@sarvikas) October 25, 2017
If you have a Nokia 8 and are interested in testing out the Oreo beta update, you’ll have to hit up this link, register for an account and validate your device’s IMEI number and your carrier. Once you’re enrolled, you’ll receive the latest build as an OTA update. If you decide to not receive beta updates, you can deregister your device from the program, which will kick your device back to the public release channel.
You’ll be able to share your feedback with HMD Global with the Feedback app, which comes pre-loaded on all Nokia phones. The program is limited to the Nokia 8 right now, but we’ll let you know once HMD Global starts taking registrations for the other devices in its portfolio.
Sign up for Oreo beta for the Nokia 8
LG Display sees 80% surge in profits even as overall revenue remains flat
LG Display sees an uptick in profits, but it may be a few quarters before its OLED unit turns a profit.
LG Display has released its third-quarter earnings, posting a healthy increase in profits. Operating profit saw a massive 81% hike from the same period a year ago to $519 million (586 billion won). Net income at $422 million (477 billion won) was 152% more than what the company managed in Q3 2016. That said, overall revenue increased by just 4% from Q3 2016 to $6.1 billion (6.9 trillion won).

Most of the revenue is from LCD sales, but LG’s OLED panels are gaining momentum. The company noted increased demand for its OLED TVs (which are excellent), coupled with an uptick in mobile OLED displays. TV panels made up 40% of the company’s revenues, with mobile devices accounting for 27%, tablets and notebooks PCs at 17%, and monitors at 16%.
OLED panels on the whole account for just 10% of the company’s overall revenues, and that’s set to see an increase to 20% next year. From CFO Don Kim:
LG Display plans to focus on investing in OLED products as part of its long-term preparation for the future. We will continue to maximize profitability in our differentiated LCD products, and will improve the profitability of the OLED business through expansion, under the conservative assumption that the challenging market situation will continue.
LG’s OLED panels have been under scrutiny of late because of the irregularities with the Pixel 2 XL’s display, which won’t help matters for the company as it tries to take the fight to Samsung. Over the last week, we’ve found that the Pixel 2 XL has issues ranging from screen burn-in to a blue tint across the panel and muted colors.
Google Pixel 2 and Pixel 2 XL
- Pixel 2 FAQ: Everything you need to know!
- Google Pixel 2 and 2 XL review: The new standard
- Google Pixel 2 specs
- Google Pixel 2 vs. Pixel 2 XL: What’s the difference?
- Join our Pixel 2 forums
Google Store
Project Fi
Verizon
Best Buy
The Morning After: Wednesday, October 25th 2017
Hey, good morning! You look fabulous.
We put two of the latest 4K streaming sticks to the test, explain why scientists are redefining the kilogram and discover a ramen fork that cancels out slurping.
Tom Nook is going after your real money.‘Animal Crossing: Pocket Camp’ arrives on smartphones in November

In Animal Crossing: Pocket Camp, you build your own camp from scratch instead of developing a town. Despite the change in setting, the elements the beloved franchise is known for are still there: Isabelle will still guide you in your journey, along with the animals that move into your camp.
You’ll able to visit other camps and make friends with other players, as well as build new facilities. To build a new pool or a playground, you’ll have to find crafting items and wait until they’re finished. But now you can purchase those items and speed up the facilities’ construction with Tom Nook’s help by paying with Leaf Tickets. And that’s how Nintendo intends to make money from the game.
A 4K streaming stick face-off.Amazon vs. Roku

They’re both about $70; they both bring 4K streaming with all the video apps you’d like to use. Devindra Hardawar spent some time going back and forth between the latest Fire TV stick and Roku Streaming Stick+, so you don’t have to.
It could be time for an upgrade.Which 4K OLED sets are worth buying?

With so many new televisions boasting fantastic image quality, which is the best for your particular needs? We’ve scoured the web, reading reviews from trusted critics to determine which OLED TVs you should be considering right now.
$3,199.Sony’s A7R III packs big improvements into a familiar package

Sony officially revealed its new A7R III at an event in China very early this morning, and it packs a handful of notable improvements and under-the-hood changes into a very familiar looking body.
Google is testing its buyers’ patience.Some Pixel 2 phones are making strange noises

If Pixel 2 screens with supposedly “burned in” images weren’t enough, there are now reports of some phones emitting clicking noises and high-frequency whines. Not a good start for phones branded as Google-made hardware.
But lead is heavier than feathers.Why scientists are redefining the kilogram

For the first time since the international system of units (SI) launched in 1960, the International Bureau of Weights and Measures (BIPM) is redefining four basic units of measurement, not by any human metric but by the immutable forces of the universe.
Shame on you, noodle harasser.This ramen fork will play noises to cover up your gross slurping

The non-issue of noodle harassment has met its match. Nissin, makers of the Cup Noodle, has invented the Otohiko, which is a tech-enhanced fork that will detect slurping noises and camouflage them with other sounds.
But wait, there’s more…
- Misfit’s Vapor Android Wear watch goes on sale October 31st
- ‘Bad Rabbit’ ransomware is causing major issues across Europe and Russia
- Lenovo and Intel take the first step toward eliminating passwords
- Twitter will identify political ads and disclose who paid for them
- Apple lists the cars that can wirelessly charge your iPhone
- Nintendo’s Switch now supports your old GameCube controllers (with the right adapter)
The Morning After is a new daily newsletter from Engadget designed to help you fight off FOMO. Who knows what you’ll miss if you don’t subscribe.
Nissan’s EVs will swap engine noises for ‘song’
The US Department of Transport (DoT) recently decreed that all hybrid and electric vehicles must make a noise to protect pedestrians, especially folks who are blind or have limited vision. Rather than just saying, “okay, we’re adding a noise to our EVs, you guys,” Nissan made a big production about releasing its “song,” even giving it a name. “‘Canto’ has been developed to help with pedestrian safety, as well as to provide … a sound that is energizing and confident,” the company said in a press release.
The sound changes tone and pitch when the vehicle speeds up and slows down, and is activated at speeds of around 12 to 19 mph. In the US, the standard is 30 km/h (19 mph), a rule the DoT said “will help prevent about 2,400 pedestrian injuries each year once all hybrids [sold in the US] are properly equipped.” Nissan says its own sound is also made to “enrich the aural environment of a typical city street” and be clearly audible, but not disturbing to city residents or vehicle occupants.
It adds that “Canto” comes from Latin and means “I sing,” adding that it’s still subject to change. To me, the harmonic tone (below) sounds like a cross between an orchestra warming up and THX’s “the audience is listening” theater sound trailer. If you’re crossing the street when one of its future vehicles shows up (the EV above is the Leaf Nismo concept), it’s certain to make your activities feel more dramatic, anyway.
Source: Nissan
