


Amazon Music iOS App Now Supports CarPlay
Amazon today updated its Amazon Music app for iOS devices to version 6.4.0, adding a small but important new feature: support for CarPlay.
With the latest version of the Amazon Music app, Amazon Music subscribers who own a vehicle equipped with CarPlay can access their music directly through the CarPlay interface when an iPhone is connected to the car.
Amazon Music is available to Amazon Prime subscribers, with two million songs, playlists, and stations included in a membership.
Separate Amazon Music Unlimited subscriptions are also available for on-demand listening to “tens of millions” of songs, with pricing starting at $7.99 for Prime members ($9.99 without a Prime subscription). A lower-cost Echo-only plan is also available for $3.99 per month.
Amazon Music can be downloaded from the App Store for free. [Direct Link]
Related Roundup: CarPlay
Tags: Amazon, Amazon Music Unlimited
Discuss this article in our forums
Microsoft Universal Foldable Keyboard review

Research Center:
Microsoft Universal Foldable Keyboard
There’s no shortage of mobile keyboards in the world. Some, such as EC Technology’s Bluetooth Ultra-Slim Keyboard and the Jorno Keyboard, fold in thirds. Others, including VisionTek’s Waterproof Bluetooth Mini Keyboard and today’s review unit, Microsoft’s Universal Foldable Keyboard, fold in half. Nearly all are water resistant to some degree, and most of them support all three of the standard tablet and smartphone operating systems: Android, iOS, and Windows.
Akin to its Surface 3 and Surface 3 Pro Type Cover keyboard sibling, Microsoft’s mobile keyboard is light, compact, and easy to use. And like most Microsoft keyboards (and other peripherals), it’s well-designed and well-built, if somewhat expensive. If you shop around, you can find it for around $70. You can pick up the VisionTek model for as little as $20, though, and the iClever BK03 Ultra Slim Mini Bluetooth Keyboard, yet another competitor, sells for about $36. At nearly two-thirds of a C-note, do you get what you pay for?
Slim, sleek, and sturdy
At 4.9 inches from top to bottom by 4.9 inches across when folded (11.6 inches unfolded), and just under half an inch thick, the Universal Foldable Keyboard is about the size of a CD jewel case. Unfolded, it has a quarter-inch profile. It’s a bit larger than its close competitor (price- and quality-wise), the $100 Jorno Keyboard (3.5 by 9.9 inches). At just over six ounces, both devices weigh about the same, but the Jorno model comes with a carrying case that doubles as a stand for holding your mobile device upright while you type.

Bill Roberson/Digital Trends
Microsoft’s keyboard is encased in a plush, soft gray pleather that looks and feels elegant and appears to be fingerprint and scratch resistant. As mentioned, like most of its competitors, its water resistant, so a splash shouldn’t harm it. A magnet holds the two halves closed, so that they don’t flop open and closed in transit, and you charge it via the included microUSB cable. The jack on the keyboard is the standard size used to charge most Android phones and several other microUSB devices. Overall, the Universal Foldable Keyboard is nice to look at, and despite its petite size and light weight, it feels durable, too.
Open and go
Like several other mobile keyboards, opening the Universal Folding Keyboard turns it on, as indicated by a small LED in the upper-left corner. On the opposite corner are three other status LEDs that indicate the current operating system (OS) configuration, and you can easily switch between each OS by pressing a function key directly below the LEDs.
Microsoft’s keyboard is encased in a plush, soft gray pleather that looks and feels elegant.
Depending on the selected OS, the keyboard function keys (and several other keys) assume the appropriate roles. When switching from Windows to iOS, for instance, the Alt key becomes the Option key. The Windows key assumes the Home key role in Android, and so on.
The Universal Folding Keyboard holds configuration info for two separate Bluetooth devices. You pair it with your mobile devices and switch back and forth between them with the first two function keys. Pairing itself is straightforward in that you hold one of the Bluetooth keys until the mobile device finds it, and displays a code. Typing that code on the keyboard completes the process. Pairing worked flawlessly the first time.
Ready, set, type
If you’re used to a comfortable, full-size ergonomic keyboard with wrist support, with this and other mobile keyboards, they’ll be some adjustment time while you get use to this small, flat input device. The space in the center where it folds is particularly distracting, as are the two spacebars (one on each side of the fold) and the oversized T, N, G, H, and 7 keys. If you’re a speed typist (or even if you’re not), count on the Universal Foldable Keyboard slowing you down.

Bill Roberson/Digital Trends
That said, despite its size and other limitations, the chicklet styled keys travel comfortably with enough plunge, given the keyboard’s low profile. It’s much like typing on a Surface or another small keyboard attached to a combination laptop/tablet PC — too small if you were weaned on a full-size keyboard, but much easier than thumb typing, especially for writing lengthy emails.
Charge and forget about it
As mentioned, you can charge the Universal Foldable Keyboard with just about any microUSB cable. Not that you’ll be charging it often; Microsoft says that a full charge will last three months. We used it extensively (right out of the box without charging) for more than a week, including to type this review, without plugging it in. It doesn’t come with an AC power adaptor, but you can safely charge it from a USB port on a PC or Mac, or from your tablet or smartphone adaptor.
Warranty information
The Microsoft Universal Foldable Mouse comes with a three-year limited warranty against failure under normal use.
Our Take
The Microsoft Universal Foldable Keyboard is an excellent choice for folks that do (or want to do) a lot of composing on their smartphone or tablet. We think it would be slicker if Microsoft also provided a carrying case that seconded as a stand for holding your mobile device upright. Overall, though, we found the Universal Foldable Keyboard a highly useful, well-designed product.
Is there a better alternative?
The Microsoft Universal Foldable Mouse is light, compact, easy to use, well-built, and it has an elegant look and feel. We were especially impressed with how well the magnet holding the two halves together has just the right strength to make it easy to open and close, as well as keep it from flopping open. And it’s easy to connect to and to switch back and forth between your mobile devices.
More: Use your tablet like a laptop with $14 Anker Bluetooth Ultra-Slim Keyboard
During our review we found several mobile Bluetooth keyboards ranging from the cheap and not-very-well-built, to those comparable to Microsoft’s somewhat costly solution. One of the closer in price and features is the Jorno Keyboard that, as mentioned, comes with a carrying case that seconds as a stand for holding your smartphone or tablet upright.
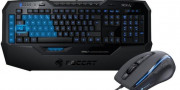
Microsoft Universal Foldable Keyboard Compared To

Logitech G213 Prodigy

Steelseries Apex M500

Razer Turret

Razer Blackwidow X Chroma

Cougar Attack X3 gaming keyboard

Razer Deathstalker Chroma

Logitech Harmony Smart Keyboard…

Microsoft Sculpt Ergonomic Desktop

Logitech K400

Roccat Isku and Kone+

Microsoft Wireless Desktop 5000

Cooler Master Storm QuickFire

Logitech iPad 2 Keyboard Case by…

Cherry JK-0300

Logitech K750 Wireless Solar…
How long will it last?
By offering it with a three-year warranty, Microsoft obviously has faith in this keyboard, and it certainly feels rugged enough to last for quite some time. It doesn’t require software, so there’s nothing to update in the future. As long as you take good care of it, the Universal Folding Keyboard should last over the long hall. And hey, if it stops working in the first three years, Microsoft will replace it.
Should you buy it?
Not everybody needs a keyboard for their mobile device. If all you type is short text messages, thumbing it may be preferable to getting out the keyboard each time you need to type a few words. If, however, you compose longer emails or Word documents frequently, the Microsoft Universal Folding Keyboard, once you get used to it, should save you some time and aggravation—especially if thumb typing isn’t your strong suit.
Microsoft Universal Foldable Keyboard review

Research Center:
Microsoft Universal Foldable Keyboard
There’s no shortage of mobile keyboards in the world. Some, such as EC Technology’s Bluetooth Ultra-Slim Keyboard and the Jorno Keyboard, fold in thirds. Others, including VisionTek’s Waterproof Bluetooth Mini Keyboard and today’s review unit, Microsoft’s Universal Foldable Keyboard, fold in half. Nearly all are water resistant to some degree, and most of them support all three of the standard tablet and smartphone operating systems: Android, iOS, and Windows.
Akin to its Surface 3 and Surface 3 Pro Type Cover keyboard sibling, Microsoft’s mobile keyboard is light, compact, and easy to use. And like most Microsoft keyboards (and other peripherals), it’s well-designed and well-built, if somewhat expensive. If you shop around, you can find it for around $70. You can pick up the VisionTek model for as little as $20, though, and the iClever BK03 Ultra Slim Mini Bluetooth Keyboard, yet another competitor, sells for about $36. At nearly two-thirds of a C-note, do you get what you pay for?
Slim, sleek, and sturdy
At 4.9 inches from top to bottom by 4.9 inches across when folded (11.6 inches unfolded), and just under half an inch thick, the Universal Foldable Keyboard is about the size of a CD jewel case. Unfolded, it has a quarter-inch profile. It’s a bit larger than its close competitor (price- and quality-wise), the $100 Jorno Keyboard (3.5 by 9.9 inches). At just over six ounces, both devices weigh about the same, but the Jorno model comes with a carrying case that doubles as a stand for holding your mobile device upright while you type.

Bill Roberson/Digital Trends
Microsoft’s keyboard is encased in a plush, soft gray pleather that looks and feels elegant and appears to be fingerprint and scratch resistant. As mentioned, like most of its competitors, its water resistant, so a splash shouldn’t harm it. A magnet holds the two halves closed, so that they don’t flop open and closed in transit, and you charge it via the included microUSB cable. The jack on the keyboard is the standard size used to charge most Android phones and several other microUSB devices. Overall, the Universal Foldable Keyboard is nice to look at, and despite its petite size and light weight, it feels durable, too.
Open and go
Like several other mobile keyboards, opening the Universal Folding Keyboard turns it on, as indicated by a small LED in the upper-left corner. On the opposite corner are three other status LEDs that indicate the current operating system (OS) configuration, and you can easily switch between each OS by pressing a function key directly below the LEDs.
Microsoft’s keyboard is encased in a plush, soft gray pleather that looks and feels elegant.
Depending on the selected OS, the keyboard function keys (and several other keys) assume the appropriate roles. When switching from Windows to iOS, for instance, the Alt key becomes the Option key. The Windows key assumes the Home key role in Android, and so on.
The Universal Folding Keyboard holds configuration info for two separate Bluetooth devices. You pair it with your mobile devices and switch back and forth between them with the first two function keys. Pairing itself is straightforward in that you hold one of the Bluetooth keys until the mobile device finds it, and displays a code. Typing that code on the keyboard completes the process. Pairing worked flawlessly the first time.
Ready, set, type
If you’re used to a comfortable, full-size ergonomic keyboard with wrist support, with this and other mobile keyboards, they’ll be some adjustment time while you get use to this small, flat input device. The space in the center where it folds is particularly distracting, as are the two spacebars (one on each side of the fold) and the oversized T, N, G, H, and 7 keys. If you’re a speed typist (or even if you’re not), count on the Universal Foldable Keyboard slowing you down.

Bill Roberson/Digital Trends
That said, despite its size and other limitations, the chicklet styled keys travel comfortably with enough plunge, given the keyboard’s low profile. It’s much like typing on a Surface or another small keyboard attached to a combination laptop/tablet PC — too small if you were weaned on a full-size keyboard, but much easier than thumb typing, especially for writing lengthy emails.
Charge and forget about it
As mentioned, you can charge the Universal Foldable Keyboard with just about any microUSB cable. Not that you’ll be charging it often; Microsoft says that a full charge will last three months. We used it extensively (right out of the box without charging) for more than a week, including to type this review, without plugging it in. It doesn’t come with an AC power adaptor, but you can safely charge it from a USB port on a PC or Mac, or from your tablet or smartphone adaptor.
Warranty information
The Microsoft Universal Foldable Mouse comes with a three-year limited warranty against failure under normal use.
Our Take
The Microsoft Universal Foldable Keyboard is an excellent choice for folks that do (or want to do) a lot of composing on their smartphone or tablet. We think it would be slicker if Microsoft also provided a carrying case that seconded as a stand for holding your mobile device upright. Overall, though, we found the Universal Foldable Keyboard a highly useful, well-designed product.
Is there a better alternative?
The Microsoft Universal Foldable Mouse is light, compact, easy to use, well-built, and it has an elegant look and feel. We were especially impressed with how well the magnet holding the two halves together has just the right strength to make it easy to open and close, as well as keep it from flopping open. And it’s easy to connect to and to switch back and forth between your mobile devices.
More: Use your tablet like a laptop with $14 Anker Bluetooth Ultra-Slim Keyboard
During our review we found several mobile Bluetooth keyboards ranging from the cheap and not-very-well-built, to those comparable to Microsoft’s somewhat costly solution. One of the closer in price and features is the Jorno Keyboard that, as mentioned, comes with a carrying case that seconds as a stand for holding your smartphone or tablet upright.
Microsoft Universal Foldable Keyboard Compared To

Logitech G213 Prodigy

Steelseries Apex M500

Razer Turret

Razer Blackwidow X Chroma

Cougar Attack X3 gaming keyboard

Razer Deathstalker Chroma

Logitech Harmony Smart Keyboard…

Microsoft Sculpt Ergonomic Desktop

Logitech K400
Roccat Isku and Kone+

Microsoft Wireless Desktop 5000

Cooler Master Storm QuickFire

Logitech iPad 2 Keyboard Case by…

Cherry JK-0300

Logitech K750 Wireless Solar…
How long will it last?
By offering it with a three-year warranty, Microsoft obviously has faith in this keyboard, and it certainly feels rugged enough to last for quite some time. It doesn’t require software, so there’s nothing to update in the future. As long as you take good care of it, the Universal Folding Keyboard should last over the long hall. And hey, if it stops working in the first three years, Microsoft will replace it.
Should you buy it?
Not everybody needs a keyboard for their mobile device. If all you type is short text messages, thumbing it may be preferable to getting out the keyboard each time you need to type a few words. If, however, you compose longer emails or Word documents frequently, the Microsoft Universal Folding Keyboard, once you get used to it, should save you some time and aggravation—especially if thumb typing isn’t your strong suit.
Huawei Watch 2 Sport vs. Huawei Watch 2 Classic: Which one is right for you?
Huawei has finally taken the wraps off of the Huawei Watch 2. Unlike the first time around, however, there are actually two devices with the Huawei Watch 2 name: The Huawei Watch 2 Sport and the Huawei Watch 2 Classic. While you might assume the only differences are aesthetic, the truth is that there are also a few changes under the hood.
So which one is right for you? Turns out, the devices have some very specific use cases, which is why we’ve put together this guide.
More: Huawei Watch 2 Classic and Watch 2 Sport: Our first take
Specs
Huawei Watch 2 Sport

Huawei Watch 2 Classic

Size
48.9 x 45 x 12.6 mm (1.93 x 1.77 x 0.50-inches)
48.9 x 45 x 12.6 mm (1.93 x 1.77 x 0.50-inches)
Weight
57g (2.01oz)
60.5g (2.15oz)
Screen
1.2-inch AMOLED
1.2-inch AMOLED
Resolution
390 x 390 pixels
390 x 390 pixels
Operating System
Android Wear 2.0
Android Wear 2.0
Storage
4GB
4GB
Processor
Qualcomm Snapdragon Wear 2100
Qualcomm Snapdragon Wear 2100
RAM
768MB
768MB
LTE Support
Yes (optional)
No
Connectivity
GSM/HSPA/LTE/Wi-Fi b/g/n
Wi-Fi b/g/n
Bluetooth
Yes, version 4.1
Yes, version 4.1
GPS
Yes
Yes
Battery
420mAh
420mAh
Water Resistance
IP68
IP68
Sensors
Accelerometer, gyroscope, heart rate, barometer, compass
Accelerometer, gyroscope, heart rate, barometer, compass
Colors
Orange, Black, Grey
Titanium
DT Review
Hands-On
Hands-On
When it comes to specs, the two watches are almost identical. Both devices come with a Qualcomm Snapdragon Wear 2100 processor, which is built specifically for wearables. On top of that, they both feature 4GB of storage and 768MB of RAM, so they should be able to handle most wearable-related things you can throw at them.
The amount of storage, RAM, and the processor in these Android Wear watches are among the best you can get at the moment. Because the two watches have the same specs, this one is a tie.
Winner: Tie
Pink Trombone is a disembodied mouth that shows you how sounds are formed
Why it matters to you
Want to see how mouths are manipulated to form the various sounds that they make? This unique web app gives you a hands-on lesson.
Let’s be honest, if it weren’t for the faint whiff of NSFW material about its name, we would all click a link entitled “Pink Trombone” the moment we saw it.
A new web app created by Neil Thapen, a researcher at the Institute of Mathematics of the Academy of Sciences of the Czech Republic, it’s a pretty awesome creation: A disembodied mouth that you can manipulate to see how sounds are formed.
You probably won’t be using it to form any sounds other than guttural “Oh-ah-oo-ee-aa!” type noises but it’s an intriguing look at how the mouth’s soft and hard palate, tongue, lips, and oral and nasal cavity are manipulated to produce vowels and consonants, as well as varying pitch.
More: Startup that gives a voice to the speechless wants you as a donor
“Pink Trombone is an interactive articulatory speech synthesizer,” Thapen told Digital Trends. “That is, it creates speech by modeling — in a simplified way — the physical form and movements of the human vocal tract. Programs like this have been around for a long time, but the examples I’ve seen from academia tend to have unfriendly interfaces. I have tried to make one that is fun to use. You can move the tongue or lips around in real time with your fingers, and see what sound comes out.”

Thapen said the web app has no real connection with his day job, which is research in logic. Instead, it ties in with his hobby of game development and making “interesting things that are fun to interact with.”
“I started working on it when my daughter began to speak,” he continued. “I was reading about the physical processes involved in speech production and thought it would be interesting to implement them on the computer at the same time as she was doing it in real life. Of course, she ended up learning much faster than I did.”
If you want to try it out, you can do so by clicking the link here. As far as gaining a basic understanding of speech and phonetics, and specifically how speech organs actually work, this is the best “hands-on” education you’re likely to get.
Microsoft is currently experiencing issues with letting users log into its services
Why it matters to you
If you’re currently having issues logging into a Microsoft service, stop trying to fix your PC. Microsoft is having some system problems that are holding you back.
While the cloud and integrated cloud services can be great things in terms of linking systems and data, they do have one major weakness — they represent a single point of failure. That’s particularly true for services that use a single login to access multiple services.
As a case in point, if you’re having issues logging into a Microsoft service right now, then there may not be anything wrong with your PC, nor anything you can do to regain access to your Microsoft accounts. Rather, it’s looking like Microsoft itself is what’s holding you back, as The Verge reports.
More: 12 of the biggest problems with Windows 10, and how to fix them
Apparently, Microsoft’s infrastructure is experiencing its second major interruption so far this month, with a number of properties disallowing users from logging in. The issues seem to be either very slow access to services or the inability to log back into services that need to be recovered. Affected services include Xbox Live, Skype, OneDrive, Outlook.com, and the Windows Store.
One example of the problem occurs when trying to add a OneDrive account to Windows 10 to enable syncing. Attempt to do so return an error that the account cannot be accessed. Microsoft Xbox Live support has this to say:
“Our engineers and developers are actively continuing to work to resolve the issue causing some members to have problems finding previously purchased content or purchasing new content. Stay tuned, and thanks for your patience.”
While this notice specifically applies to Xbox Live, the symptoms are occurring on some of Microsoft’s other services as well. As you can see from the screenshot below, trying to update apps in the Windows Store on a system that was already fully authorized returns an error about a missing Internet connection. If you want to be notified when the services are available, then go to the Xbox Live support page and click on the green “Notify me” button.
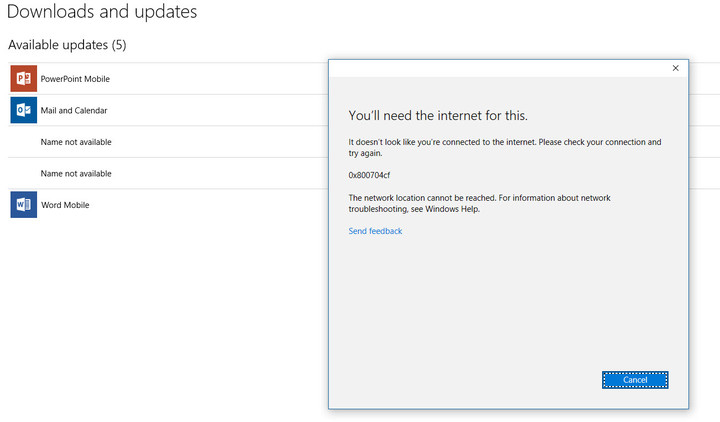
Mark Coppock/Digital Trends
If you’re feeling like you’re watching an episode of “The Outer Limits,” then don’t bother adjusting your PC. You’ll just have to wait for Microsoft to resolve these issues before gaining full access to your Microsoft services. In the meantime, you can spend a few minutes complaining about the vulnerabilities involved with putting all of our computing services in single baskets.
Reddit users will soon be able to add profile pics and bios to their profiles
Why it matters to you
In a bid to make Reddit more accessible to new users, the social network’s adding new custom profile pages.
Reddit, self-coined “front page of the internet,” will look a little different going forward. On Tuesday, the social network began rolling out a new profile page design that takes a cue from Facebook and Twitter: Users can make posts directly to pages, and users who log in can follow profiles for new posts.
The changes haven’t gone live for the larger Reddit community just yet. In a public post explaining the new profile features, Reddit’s development team said they will be limited to “a very small number [of] high-profile users” to ensure they don’t “directly impact [users’] day-to-day activities,” Reddit said.
More: Reddit CEO in whole heap of trouble with users of popular Trump subreddit
Once the revamped profiles get a thumbs-up from the initial crop of testers and profile pages roll out broadly, users will get the choice of switching to a “more prominent” avatar and adding a short biography about themselves. All logged-in users, meanwhile, will see new posts from users they choose to follow and will be able to comment — but not create new posts — on profile posts.
It’s part of a bid to make the website more “accessible” to new users, co-founder Alexis Ohanian told Reuters. “If you yourself are someone who wants to share something, it’s pretty daunting,” he said. “We’re in a position where we can start doing product improvements that are admittedly overdue but represent a real level up for Reddit.”
Reddit made headlines over the past several years, and often for the wrong reasons. Former CEO Ellen Pao, who oversaw the shutdown of subreddits accused of “hateful” behavior, was forced to resign after a petition calling for her removal received more than 200,000 signatures.
More: Google wanted to buy Reddit in 2005, but its co-founders declined offer
One particular community, r/The_Donald, featured conspiracy theories, fake news, and racist and misogynistic posts about President Donald Trump’s political opponents. Another, Pizzagate, inflamed a conspiracy theory that linked former Secretary of State Hillary Clinton to a fictional pedophile ring at a Washington, D.C., pizza parlor.
Current chief executive Steve Huffman admitted in an interview with Reuters that the site’s policy against harassment had not been adequately enforced.
“We’re making this change because content creators tell use that they have a hard time finding the right place to post their content,” Reddit noted. “We also want to support them in being able to grow their own followers (similar to how communities can build subscribers). We’ve been working very closely with mods in a few communities to make sure the product will not negatively impact our existing communities.”
Innovative prosthetic leg propels wearers through water as if it were their real limb
Why it matters to you
Just because someone is missing a limb doesn’t mean they are handicapped. With this new prosthetic leg, they are every bit as capable.
With modern advancements in prosthetic design, more people are able to continue walking despite missing one or two legs. These new limbs allow people to carry on, making it less of a disability and more of a unique quality. While designs mastered walking on land, moving through water remained a challenge. However, a new breakthrough from Northwell Health changed that, allowing a former Marine to not just simply wade in water but to efficiently swim in it, as well.
Northwell’s new project is essentially the first fully functional prosthetic swim leg. While this isn’t to say other legs won’t operate in water, it’s that they typically don’t add much of a benefit to the wearer — in other words, they tend to act more like an anchor. Instead, Northwell’s prosthetic actually propels users through water as if it were their original limb.
The new leg features a jet-black foot and a nonslip tread on its sole. Designer Todd Goldstein even crafted some components of the prosthetic using a 3D printer — for instance, one part of it is an upside down triangle of nylon and plastic located where the calf would be. This is what provides extra propulsion through the water, while cone-shaped holes allow some water to pass through so it doesn’t overpower the natural limb.
As mentioned above, Northwell tabbed former Marine Dan Lasko to put the limb through its paces.
“It feels good,” Lasko told the The New York Times after his first lap. “I can definitely feel the difference but I just have to get used to the bit of extra weight.”
Already, Goldstein has a few tweaks to make. During testing, the foot filled with water, creating an unfavorable amount of drag — Goldstein’s thinking is to add a series of holes to help release it. Additionally, the 3D-printed triangle fell off during testing, showing its need for a stronger adhesive in future models. Still, Lasko emerged from the tests pleased with the limb.
“I haven’t done that in years,” he said. “I felt good and free.”
More: Here are 7 prosthetic limbs that are so amazing that they’re almost better than the real thing
Swimming is a beneficial exercise for many amputees. Higher impact exercises such as running or jumping lead to blisters or deeper tissue wounds but laps in a pool are gentle on the skin. According to Eric Feinstein, a manager at Northwell Ventures, the final prosthetic plans to become available in the next six months. The cost intends to range between $2,000 and $5,000, depending on specific client customization.
How to flash Android O factory image on Nexus, Pixel devices
Like last year, Google has released a developer preview for Android O two months before the company’s developer conference. There’s no public over-the-air update this time around, though, so you’ll have to manually flash the system images to your phone.
More: Android O is getting picture-in-picture mode, app icon badges, and more
Google has posted factory images for the Nexus 5X, 6P, Nexus Player, Pixel C, Pixel, and Pixel XL. We should caution, however, that the first developer preview is often the buggiest. There could be bugs that brick your device, so make sure you back up your data before you do anything. Google also mentions that a public beta will be available at a later date, and this first preview is largely for developers. Still, if you want to take a crack at seeing Android O now, we put together this comprehensive guide detailing each and every step of the way.
How to flash the factory image
Flashing the factory image differs from installing the over-the-air (OTA) update in that the factory image contains the full system files for your device, whereas the OTA update contains only the upgrade information. In other words, flashing a factory image is more like completely deleting all the software on your device and replacing it. The OTA will only replace what is being changed since your last update.
Some people prefer to install the OTA update since you don’t have to do a factory reset, while others like the factory image method because it’s like starting from scratch with a fresh install of the entire system. It’s more of a pain to factory reset your device, but you are less prone to some of those annoying bugs that seem to crop up after an OTA update.
Remember to make sure all your data is backed up, because you will lose all your data on the device when you unlock the bootloader, which is required for flashing. There is no way to unlock a bootloader without a factory reset. However, if you happen to already have an unlocked bootloader, then you can forgo the factory reset if you wish. We will show you how later on, but we still recommend that you back up your data in case something goes wrong.
Installing ADB and Fastboot
In order to flash the factory image to your Nexus or Pixel device, you must have ADB and Fastboot installed on your desktop computer. ADB stands for Android Debug Bridge, and it allows you to send commands to your Android device over USB through a terminal/command-line interface such as Windows Command Prompt. Fastboot allows you to unlock the bootloader on your Android device.
There are two methods to getting ADB and Fastboot on your computer. The first is to download and install the Android SDK tools from the Android developer site. This method will work on Windows, Mac, and Linux machines. If you’re a Windows user, you can download and install Minimal ADB and Fastboot instead, which is actually the easiest method. However, we recommend installing the Android SDK tools because the download will also give you the Google USB drivers at the same time, which you will need in order for your computer to recognize your device. If you do decide to install Minimal ADB and Fastboot, you can still download the Google USB drivers separately. We will show you how to do that later.
Follow the instructions below for either installing the Android SDK tools or Minimal ADB and Fastboot.
Download and install the Android SDK tools
Click here to download and install the Android SDK Tools from Google’s developer site. There are choices for Windows, Mac, and Linux. These instructions are for Windows machines.
When asked what directory to install the software to, we recommend that you set it to C:android-sdk. If you choose a different location, just make sure you remember it.
Once the Android SDK Tools are installed, launch the download from the Start Menu.
The SDK Manager will open. Just uncheck everything except Android SDK Platform-tools and Google USB Driver. Android SDK Platform-tools is at the top and Google USB Driver is toward the bottom.
Click on Install 2 packages at the bottom right.
Check Accept license and click Install.
ADB and Fastboot will now reside in the C:android-sdkplatform-tools folder if you followed step 2 as outlined. If you chose a different directory, than ADB and Fastboot will reside in the platform-tools folder under whatever location you chose to install the Android SDK Tools to in step 2.
Download and install Minimal ADB and Fastboot
Click here to download minimal_adb_fastboot_v1.3.1_setup.exe from the XDA forums. Note: the version number could be different if a newer version is released after this post has been published.
Launch the minimal_adb_fastboot_v1.3.1_setup.exe file.
When asked which directory to install the software to, we recommend that you set it to C:android-sdkplatform-tools, since we will be using that location for the rest of this guide. If you choose a different location, just make sure you remember it.
Downloading the Android O Developer Preview factory system image
Now it’s time to grab the most recent version of the Android Nougat or Android O Developer Preview factory image. Please click on one of the following links to download the appropriate file for your device.
- Google’s Developer Preview site – Android O updates
Just make sure to select the version that matches your device. This is very important, because you must flash the Nexus 5 image on a Nexus 5. A Pixel XL image won’t work on a Nexus 5.
You will notice that each device has a bunch of links under it. Google makes it easy to revert back to an older update if you wish. The most recent update is generally at the bottom of the list. The Android O developer preview is available for the Pixel, Pixel XL, Pixel C, Nexus Player, Nexus 6P, and Nexus 5X.
Note: Google will post factory images for each and every update moving forward. This means that you can follow this guide again and continue to get the latest preview of Android O right away without the need to wait until your device receives the OTA update automatically.
Extracting the contents of the system image
The downloaded file should have .tgz as its extension, and you need to extract the contents before going further. The best thing to do is download and install 7 Zip. There is an unofficial version for Macs as well. Once 7 Zip is installed on your machine, follow these steps:
Open the 7 Zip File Manager and navigate to the folder that you saved the .tgz file in.
Double click on the .tgz file.
You will now see a file with a .tar extension.
Double click on this file to show the contents (this will take about a minute or more).
After it has opened, you should have a folder with the codename of your device as part of the title (ex. marlin for Pixel XL), Double click on it.
You should now see a collection of files. Select all of them, and click on Extract to extract all the contents. Type in the destination C:program files (x86)androidandroid-sdkplatform-tools (if you installed the full SDK) or whatever directory ADB and Fastboot are installed in.
Enabling USB debugging and connecting your Nexus or Pixel device via USB to your desktop

Now you need to make sure USB debugging is enabled on your Nexus or Pixel device. Open Settings on your Nexus or Pixel device. If you do not see Developer Options toward the bottom of the Settings screen on your device, follow these steps to activate them.
Tap on About Phone and find the Build Number.
Tap on the Build Number seven times and the Developer Options will appear on the main page of the Settings.
Tap on the Back key to see the Developer Options.
Tap on Developer Options.
Check to enable USB Debugging.
Before you connect your device to the USB port on your computer, you want to make sure you have the appropriate drivers installed. You should be all set if you opted to install the Android SDK Tools. If you instead chose to install Minimal ADB and Fastboot, you can grab them here. Since you’re working with a Nexus or Pixel device, you specifically want the Google USB Drivers. The download will be a zip file, so extract the contents where you wish, and remember the location.
Now connect your device via a USB cable, and you are ready to flash the zip file that you extracted earlier. If you’re connecting your Nexus or Pixel device to your computer for the first time, you will get a popup box on your Nexus or Pixel device stating what the computer’s RSA Key is. Just check Always Allow From This Computer and tap on OK.

If your Nexus or Pixel device doesn’t show the RSA key popup, then open the notification panel, select USB For Charging Only, and change the mode to Transfer Photos (PTP).

If your Nexus or Pixel device still doesn’t show the RSA key popup, then follow these instructions:
On your Windows desktop, go to your Control Panel then Device Manager.
You should see your Nexus or Pixel device under Other Devices with a Yellow ! mark on it.
Right-click on it and select update driver.
Choose Browse my computer for driver software, and choose the directory where the Google USB Drivers are located. If you chose to install the Android SDK tools and followed our instructions, they should be in the C:android-sdkextrasgoogleusb driver folder. If you chose to manually download the Google USB drivers, just navigate to the folder that you archived the contents of the Zip file in.
If your device still doesn’t show the RSA key approval popup, then open the command prompt on your desktop and navigate to the folder where ADB and Fastboot reside. If you followed our instructions from the Installing ADB and Fastboot section, it will be in the C:android-sdkplatform-tools folder. Just type cdandroid-sdkplatform-tools at the command prompt in Windows. If ADB and Fastboot are somewhere else, just navigate to that location instead.
Type “ADB devices” and you should get the following result:

The RSA key approval popup should now be visible on your Pixel device. Just check Always Allow From This Computer and tap OK.
Type “ADB devices” again, and you should get the following result with a different device key:

You are now ready to flash the factory image.
Flashing the Android O Developer Preview factory image
If your device doesn’t have an unlocked bootloader, follow the instructions below.
This process will require a factory reset, so make sure you have your important data backed up.
Open the Command Prompt in Windows or Terminal on a Mac and navigate to the folder that ADB and Fastboot are installed in. Again, if you followed our instructions from the Installing ADB and Fastboot section, it will be in the C:android-sdkplatform-tools folder. Just type “cdandroid-sdkplatform-tools” at the prompt in Windows. If ADB and Fastboot are somewhere else, just navigate to that location instead. To make things easier, so you don’t have to type out long directories, you can also paste it by pressing ALT and the spacebar, then choose Edit before selecting Paste.
If you’re using a Mac, you need to add the platform tools directory to your $PATH. In terminal, type “sudo nano/etc/paths”. Now enter your password, go to the bottom of the file, and enter the full path of the “platform tools” directory. Hit control-x to quit and enter Y to save.
The following ADB commands are for Windows machines. If you’re using a Mac, just add “./” before each command, for example: “./adb reboot bootloader”.
Assuming you device is already connected to your computer via USB and USB Debugging is enabled, you need to re-start it in fastboot mode. Follow one of the two methods below. Option A may be preferable because it’s another confirmation that your computer recognizes your Nexus or Pixel device.
A) Type “adb reboot bootloader”
B) Turn your device off, then turn it back on while holding down the relevant key combinations for your device. For many devices it’s Volume Up + Volume Down + Power. You can see what your device’s key combinations are here.
Type fastboot oem unlock to unlock you device. As a final warning, this step will erase everything on your device.
Type flash-all to install the bootloader, baseband firmware(s), and operating system. If you get a missing system.img error, then scroll down to bottom of this page for further instructions.
This process could take several minutes, so it’s important not to power off or disconnect the device. Once it’s finished, your device will reboot and the latest version of Android O will be installed.
You can opt to re-lock the bootloader if you wish, but assuming you will do this again with a future update, you might want to leave it unlocked, so you don’t have to perform a factory reset again. If you do want to re-lock, just follow Step 2 above and change Step 3 to fastboot oem lock. That’s it.
If your device already has an unlocked bootloader and you don’t want to do a factory reset and lose your data, follow the instructions below.
Open the Command Prompt in Windows or Terminal on a Mac and navigate to the folder that ADB and Fastboot are installed in. Again, if you followed our instructions from the Installing ADB and Fastboot section, it will be in the C:android-sdkplatform-tools folder. Just type “cdandroid-sdkplatform-tools” at the prompt in Windows. If ADB and Fastboot are somewhere else, just navigate to that location instead. To make things easier, so you don’t have to type out long directories, you can also paste it by pressing ALT and the spacebar, then choose Edit before selecting Paste.
If you’re using a Mac, you need to add the platform tools directory to your $PATH. In terminal, type “sudo nano/etc/paths”. Now enter your password, go to the bottom of the file, and enter the full path of the “platform tools” directory. Hit control-x to quit and enter Y to save.
The following ADB commands are for Windows machines. If you’re using a Mac, just add “./” before each command, for example: “./adb reboot bootloader”.
Assuming you device is already connected to your computer via USB and USB Debugging is enabled, you need to re-start it in fastboot mode. Follow one of the two methods below. Option A may be preferable because it’s another confirmation that your computer recognizes your Nexus or Pixel device.
A) Type “adb reboot bootloader”
B) Turn your device off, then turn it back on while holding down the relevant key combinations for your device. For many devices it’s Volume Up + Volume Down + Power. You can see what your device’s key combinations are here.
You will need to edit the flash-all.bat file that you extracted from the factory image, which should be in the same directory as ADB and Fastboot. Just open it with any simple text editor such as WordPad. You will see a line that starts with “fastboot -w update……..” Just remove the -w from this line. The -w flag wipes your data, so removing it will obviously stop that from happening.
Type flash-all to install the bootloader, baseband firmware(s), and operating system. If you get a missing system.img error, then scroll down to bottom of this page for further instructions.
This process could take several minutes, so it’s important not to power off or disconnect the device. Once it’s finished, your device will reboot and the latest version of Android O will be installed.
If you get a missing system.img error in Step 4 of either method, then follow these instructions
Extract all the files from the .zip file, which happens to be one of the files extracted from the original .tgz you downloaded from Google. The Zip file name probably begins with “image.” There should be various .img files within this Zip file. On top of this, you already have bootloader and radio .img files in the same directory. Just make sure all the .img files (from Zip file) and the ones that were already extracted are in the same directory as ADB and fastboot. Now you are going to flash each .img file separately.
If you don’t have either one of the bootloader or radio .img files, don’t worry, not all devices need them. It’s also important to follow this exact order. At the CMD prompt and in the C:program files (x86)androidandroid-sdkplatform-tools directory (if you installed the full SDK) or wherever ADB and fastboot reside. Remember, add ./ before each command if you’re using a Mac.
type fastboot flash bootloader [name of your file].img
type fastboot flash radio [name of your file].img
type fastboot reboot-bootloader
type fastboot flash recovery recovery.img
type fastboot flash boot boot.img
type fastboot flash system system.img
Lastly, if you want, you can wipe the cache with this command – fastboot flash cache cache.img
Now it’s time to enjoy your Android O update. Remember, you can follow this guide again when Google issues its next Android update, so be sure to bookmark this page for later reference. If we missed anything, or if you have any other tips, please don’t hesitate to let us know in the comments.
This article was originally published on July 7, and updated on March 21 by Christian de Looper to reflect availability.
Want seared scallops? The Hestan Cue smart cooking system is pricey but precise
Why it matters to you
Hestan Cue thinks novices can quickly learn to cook without making mistakes with its smart cooking system.
There is probably a reason Hestan Cue had an enclosed booth at the 2017 International Home and Housewares Show — they had people on hand making scallops, after all. Food scents wafted all around the showroom floor as chefs at various booths flipped pancakes or made pasta sauce. But at the Hestan Cue booth, the induction burner and pan were doing most of the work.
Hestan acquired Meld Smart Knob more than a year ago. The Meld was supposed to retrofit your existing stove into a smart one. That was one of Hestan’s early steps in developing the Cue, Lorin Peters, culinary media manager at the company, told Digital Trends. Instead of working with your current range, though, the Cue is an independent induction burner and pan that communicate via Bluetooth with one another to keep a consistent temperature so you never burn a pancake or dry out your chicken.
More: Bear Bowl cook pot weighs less than cell phone and folds down to the size of your wallet
The pan itself has sensors and a “smart handle” — in that it is full of tech you don’t want to throw in the dishwasher. Handwashing aside, the system is meant to make cooking foolproof. The accompanying app walks you through recipes and the burner can heat the pan to a precise temperature. That means instead of turning your burner to high heat, the app will tell the Cue to set itself to 350-degrees Fahrenheit (176.67-degrees Celsius). The app will set a timer, as well, so you know exactly when to flip them.
If you would rather fly solo, the system can be used like a regular induction burner. It has physical controls but they don’t let you dial in specific degrees; instead, you will slide your finger across the temperature control to set it to something between one and 10.
The Hestan Cue has been available for pre-order through Williams-Sonoma for a few months now. The price is $400 for the burner and $250 for the pan. Once it starts shipping in early April, the price will increase to $650 for the burner. That is pricier than the Cinder, a precise countertop grill that doesn’t require a pan. The Cinder has a much bigger footprint, though. At 12.5 inches in diameter and less than five pounds, the Cue more portable and storable than the Cinder.
Despite its hefty price, the Hestan Cue signals that we might be seeing more precision coming to cooktops. General Electric’s FirstBuild also had its Paragon Mat on display at the show, which similarly lets you set an induction burner’s temperature in degrees. Perhaps you’re noticing a theme here. Both the Hestan Cue and Paragon use induction. It may be less familiar to U.S. home cooks, but it does hold temperature better than gas or radiant.
