Powerstick Hawkeye review: An alarm system for your USB devices

The Hawkeye by PowerStick.com is a personal alarm system and reminder tool that connects to your USB-enabled device, allowing the user to monitor his USB cable, and whichever device is connected to it.
Design and Setup
The Hawkeye is incredibly easy to set up. It looks like any other USB dongle, but there is a button on the reverse side. The button activates the alarm. Since the Hawkeye works with any USB device, there is no setup, and it is device-agnostic. Once the device is out of the box, it is working immediately.
Features
 We mentioned that the Hawkeye is both an alarm system and a reminder; they function in essentially the same way. Once out of the box, plug your USB cable into the Hawkeye, and then the Hawkeye into either a wall charger or a USB port and press the only button on the dongle. This now activates the alarm. Any time the device is removed from the cable that is connected to the dongle, the alarm sounds.
Designed for travelers, the alarm is ideal when in an airport or a coffee shop to ensure the security of your device if you need to step away. The reminder or notification use-case would be ideal when in a hotel.

Personally, I have walked out of a hotel room on more than one occasion and forgot to grab my charger, and the Hawkeye seeks to stop that from happening again. When you unplug your phone, but not from the wall, the alarm will sound, reminding you to grab your cable as well.
Conclusion
For the price ($14), the Hawkeye does exactly what it says. The alarm is slightly less-quiet than a standard mobile phone on the loudest setting, so don’t expect to hear it from several rooms away or a crowded airport, but inside a hotel room, or a moderately-quiet coffee shop, it can absolutely be heard.
The simple usage of the dongle with only one button is both a blessing and a curse–it turns on and off with just one press of a button, making it incredibly easy to disarm it. Also, if it becomes unplugged from the wall, no alarm will sound. Because of this, I think it is a great tool as a reminder in a hotel to not forget to grab your charger, but not exactly ideal in an airport to prevent someone from running off with your device.
Raspberry Pi Zero W review
Buy now from Amazon
The Raspberry Pi Foundation recently launched the Raspberry Pi Zero W, an improved version of the original Raspberry Pi Zero that adds built-in Wi-Fi and Bluetooth. These have been two features many Raspberry Pi fans have been requesting for a long time, and now, thankfully, they’re finally built into the wonderful Raspberry Pi Zero.
- Raspberry Pi Zero review
- Raspberry Pi 3 review
Since the Raspberry Pi Zero W is simply a variant of the Raspberry Pi Zero, this isn’t going to be a full, in-depth review. Instead this review will focus on all the new features the Zero W brings to the table. If you’re looking for detailed performance metrics on this board, I’d suggest heading over to my original Raspberry Pi Zero review. It’s also worth reading my review of the Raspberry Pi 3 as it was the first Raspberry Pi to feature built-in Wi-Fi and Bluetooth.
When I reviewed the Raspberry Pi 3, I wrote, “I can only hope that Wi-Fi and Bluetooth become a standard for all future Raspberry Pi boards. Anyone want a Raspberry Pi Zero+ with Wi-Fi and Bluetooth, even if it costs $15? Yes please!” The Raspberry Pi Foundation not only beat my expectations on price, it seems they also ignored my naming suggestion!
Without any further delay, here is my Raspberry Pi Zero W review.
Specifications
| CPU | 1 GHz ARM11 Broadcom CPU | 1 GHz ARM11 Broadcom CPU | 1.2 GHz quad-core ARM Cortex-A53 CPU from Broadcom | 700 MHz ARM11 Broadcom CPU |
| GPU | Videocore IV | Videocore IV | Videocore IV | Videocore IV |
| Memory | 512 MB | 512 MB | 1 GB | 512 MB |
| Storage | microSD card slot | microSD card slot | microSD card slot | SD card slot |
| Connectivity | 1 x microUSB, mini-HDMI, 802.11n wireless LAN, Bluetooth 4.0 |
1 x microUSB, mini-HDMI | 4 x USB, HDMI, Ethernet, 3.5mm audio jack, Wi-Fi, Bluetooth | 4 x USB, HDMI, Ethernet, 3.5mm audio jack |
| OS | Linux | Linux | Linux, Windows 10 IoT core, Android Things | Linux |
| Connectors | Unpopulated 40-pin GPIO header, SPI, I2C, Camera interface (CSI), | Unpopulated 40-pin GPIO header, SPI, I2C, Camera interface (CSI), | Camera interface (CSI), GPIO, SPI, I2C, JTAG | Camera interface (CSI), GPIO, SPI, I2C, JTAG |
| Price | $10/£9 | $5/£4 | $35/£30 | $25/£20 |
Design
If you were expecting anything other than a small circuit board then you have come to the wrong place. For $9, you don’t get any kind of case or anything resembling a consumer-level product. However, that’s sort of the point of Raspberry Pi products. The Zero W is meant to be bare bones, cheap, and versatile, so hobbyists and professionals alike can make anything they’d like.
Like the original Pi Zero, the System-on-a-Chip (SoC) is near the middle of the board, while the various ports are found towards the bottom. There is a mini-HDMI port for the display (mini now rather than full sized HDMI) as well as two micro-USB ports – one for power and the other for data (i.e. it is a normal USB port). To use the micro-USB port to connect peripherals like a keyboard or mouse you will need a micro-USB B male to USB A female adapter.
To the left of the board is the microSD slot. There is no built-in flash memory on the Pi Zero (just like the other Pi boards) so you need to get hold of a microSD card for the OS and for data storage. Without a microSD card the Pi Zero W won’t boot.
There is no Ethernet port, just like the first Pi Zero. However, now that the Zero W has built-in Wi-Fi capabilities, you can connect to the board without using a USB Wi-Fi dongle or a USB Ethernet port.
To get the Raspberry Pi Zero W up and running you need a mini-HDMI to HDMI adapter, an HDMI cable, a micro-USB power supply (like a phone charger) and a microSD card (at least 4 GB). You will also need a monitor/TV, a small USB hub, a mouse and a keyboard. All of these latter items can be removed once you have the board setup and running “headless.” You can also use a Bluetooth mouse and a Bluetooth keyboard.
Hardware

Just to recap on what you get with the Raspberry Pi Zero W. It is a fully working 32-bit computer with a 1 GHz ARMv6 single core microprocessor (ARM1176) , a VideoCore 4 GPU, and 512 MB of memory. The GPU is capable of driving a full HD display at 60 fps. You also get access to the 40 General Purpose Input and Output (GPIO) ports, however the header is unpopulated, meaning there are no pins.
Because of its size and use of an energy-efficient ARM-based processor, the Raspberry Pi Zero can be powered from an external battery pack, like the ones you use to charge your mobile phone on the go. This is a great solution for “headless” setups for use on robots or other embedded projects.
To earn the “W” moniker, the Zero W uses the Cypress CYW43438 wireless chip as Raspberry Pi 3 Model B meaning it has 802.11n wireless LAN and Bluetooth 4.0 connectivity.
Software

The operating system of choice for all Raspberry Pi boards is Linux, specifically the Debian based Raspbian. Installing Raspbian is a breeze. You need to download the New Out Of the Box Software (NOOBS) zip archive and extract it onto a blank microSD card. Boot the Pi Zero W from the card and follow the on screen instructions. Once complete the Zero will reboot into the Raspbian desktop environment.
When the desktop appears you will probably want to configure the networking. Click on the network icon (near the clock at the top-right of the screen) and you will see a list of all available wireless networks. Select the one you want and enter the password. If you right-click the network icon and choose the Wireless & Wired Network Settings option from the pop-up menu, you can manually enter a static IP address.
If you are using your Pi Zero for an embedded project then you might not want the desktop to start by default. You can configure this using the “Raspberry Pi Configuration” program. Click Menu (top-left of the screen), then Preferences, then Raspberry Pi Configuration.
In the middle of the System tab you will see the option to boot to Desktop or to CLI. If you do opt to keep the desktop then you should consider enabling VNC (on the Interfaces tab) so that you can access the desktop remotely.
While you are in Raspberry Pi Configuration, you can also set the hostname of your Pi Zero W and also configure the auto login options. Under the Interfaces tab you should also enable SSH login which will allow you to connect to your Pi Zero W over SSH.
With the Wi-Fi network configured and SSH enabled, you are now ready to disconnect the keyboard, mouse and monitor, and reboot to access your Zero W remotely.
Final thoughts

Having built-in Wi-Fi and Bluetooth makes the Raspberry Pi Zero W versatile and flexible, and at $10 you can’t fault the price. The possible uses and projects for the Zero W are endless and it lends itself well to Internet-of-Things projects. Sensor data gathering (via the GPIO ports), plus a 1 GHz 32-bit processor, plus wireless connectivity equals a winning formula.
As with the original Raspberry Pi Zero, the desktop performance of the Zero W is poor, plus there are the hidden costs in terms of adapters. If you want more performance and a full set of ports, including wired Ethernet, then you should opt for the Raspberry Pi 3. However for any IoT project that requires a cheap processor board with built-in wireless connectivity, I suggest you buy a bucket load of Pi Zero W boards.
Buy now from Amazon
Elon Musk’s Neuralink will plug AI into your brain
Somewhere between rolling out new Teslas, launching re-usable rockets and digging a tunnel under Los Angeles, Elon Musk managed to start yet another new company. According to a Wall Street Journal report, Musk’s latest project is called Neuralink and its goal is to explore technology that can make direct connections between a human brain and a computer.
As the Journal reports, Musk has an “active role” in the California-based neuroscience startup, which aims to create cranial computers for treating diseases and, eventually, for building human-computer hybrids. During a conference last summer, Musk floated the idea that humans will need a boost of computer-assisted artificial intelligence if we hope to remain competitive as our machines get smarter.
Neuralink is registered in California as a medical research company and has reportedly already hired several high profile academics in the field of neuroscience: flexible electrodes and nano technology expert Dr. Venessa Tolosa; UCSF professor Philip Sabes, who also participated in the Musk-sponsored Beneficial AI conference; and Boston University professor Timothy Gardner, who studies neural pathways and in the brains of songbirds.
Like Tesla or SpaceX, the company plans to present a working prototype to prove the technology is safe and viable before moving on to the more ambitious goal of increasing the performance of the human race. In this case, the prototype will likely be brain implants that can treat diseases like epilepsy, Parkinson’s or depression. Musk himself told Vanity Fair that he believes the technology for “a meaningful partial-brain interface” is only “roughly four or five years away.” But even if that proves successful, there’s still a long way to go before we’re plugging an AI directly into our brains.
Source: Wall Street Journal
Formula 0.0001: Nanoscale grand prix features the world’s smallest cars
Why it matters to you
Some very interesting things are happening at nanoscale. This upcoming car race features four vehicles 500,000 times thinner then a line drawn by a ball point pen.
What could be more exciting than watching the souped-up vehicles of Formula One or NASCAR racing around a track? How about another car race, only one in which the vehicles are around 100 times smaller than a DNA molecule, 30,000 times thinner than the width of a human hair, and 1 million times smaller than a millimeter?
Welcome to an upcoming contest physically taking place in Toulouse, France, but streaming live over the internet courtesy of the magic of YouTube. Called the Nanocar Race, the event will pit four single-molecule, human-controlled “vehicles” up against one another in a race to the death … or at least the end of a 0.0001 millimeter length of track.
More: World’s tightest knot could lead to materials breakthroughs
“We started out by thinking about designing a molecule with wheels, and eventually we started realizing that it would be possible to drive it,” CNRS senior researcher Christian Joachim, one of the brains behind the project, told Digital Trends. “That’s when we thought about creating a competition.”
Four teams from around the world will compete in the final race, since that is the number that can be tracked at the same time using the lab’s adapted scanning microscope. Propulsion for each of the cars is provided courtesy of tiny electrical pulses from microscope tips, while human operators will also be needed to handle the two turns the mini-speedsters need to make.
“It’s a real experiment in real time,” Joachim continued. “It’s like launching a rocket. We considered both streaming it live or recording it and then showing it after. We asked all of the team, as well as our sponsors, and everyone thought we should take the risk of doing this in real time.”
If you’re interested, you can tune in and watch the whole thing live on YouTube on the Nanocar Race channel on April 28. It’s a truly unique concept, and while some may scoff at the idea of turning serious nanoscale research into a sporting competition, there’s no doubt that the idea has already captured people’s imaginations.
“The nanocar is just one part of the work we’re doing with single molecules,” Joachim said. “There are two or three trends at the nanoscale right now: the other two being getting molecules to calculate and to transmit information. Nobody cares. But if you say that you can make a molecule into a car? Suddenly people get excited. It seems that mechanics are a more accessible entry point than electronics.”
We think you’d have to be pretty small-minded not to get excited.
A new report from Nokia warns infected smartphones are more common than thought
Why it matters to you
Smartphone security is not as bulletproof as previously thought so be sure to install an anti-virus app on your phone.
Smartphone viruses may not be a security threat you hear about every day, but they are far more common than you might think. According to Nokia on Wednesday, it found that there was an 83 percent rise in monthly smartphone infections in the second half of 2016.
In a survey of 100 million devices across Europe, North America, Asia-Pacific, and the Middle East, the rate of infections in mobile networks peaked at 1.35 percent in October and averaged about 1.08 percent in the second half of 2016. That was up from 0.66 percent in the first half of the year or 63 percent.
More: New Android malware disguises itself as a Chrome update
About 81 percent of infections were on Android devices, 15 percent on Windows devices, and four percent on iPhones and other mobile devices.
The monthly rate of infections on smartphones was 0.9 percent in the second half, up 83 percent from 0.49 percent of devices in the first half. Over the entire year, infections rose a whopping 400 percent.
About 81 percent of infections were on Android devices, 15 percent on Windows devices, and four percent on iPhones and other mobile devices.
More: At urging of aides, President Trump gives up his personal smartphone
The Nokia report joins a growing body of evidence that mobile malware is on the rise.
Google’s Android Security 2016 Year in Review found that Android device infections reached 0.64 percent in the first quarter of 2016 and 0.77 percent in the second quarter — a growth of 0.77 percent. From there, the infection rate moved to 0.67 percent in the third quarter and 0.71 percent in the fourth quarter.
Google said that since 2014, infections on Android have been less than one percent, and it noted that users were 10 times more likely to download malware from outside Google Play than inside its store in 2016.
According to Kaspersky Labs, the number of malicious installations nearly tripled compared to 2015. About 40 million attacks were attempted by mobile malware, and mobile advertising Trojans — viruses capable of aggressively displaying ads on infected devices and secretly installing other applications — were largely responsible, accounting for 16 of the top 20 malicious apps.
Mobile ransomware trojans — apps that disable device with demand messages — were among the most aggressive. More than 153,000 unique users were targeted last year, an increase of 1.6 times compared to 2015. And Kaspersky Labs detected over 260,000 unique varieties over the course of its investigation.
The takeaway? Exercise common sense when installing an unfamiliar app and consider one of the many third-party security suites available across mobile devices.
Samsung patent hints at Gear smartwatch with display around the bezel
Why it matters to you
We’re seeing flexible displays pop up everywhere, but they could actually be quite useful to smartwatches and other wearables with unique form factors.
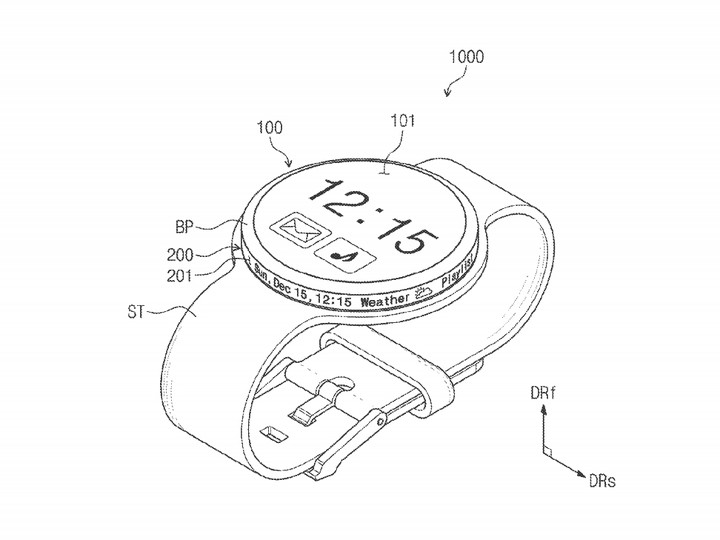
Flexible displays have been popping up in Samsung’s phones for a few years now, and even some of the company’s smartwatches. But we haven’t seen one quite like this before. A patent application filed by Samsung that surfaced last week, retrieved by Patently Mobile, shows a watch with a secondary display running along the side of the body.
The screen occupies space along the bezel that is typically used as a rotating dial on Gear smartwatches for quickly changing apps and other functions. In the application, the strip relays basic information, like date, time, and weather. It runs most of the way around the watch, with a space in the middle omitted to house the driver circuit board.
More: Samsung Gear S3 review
U.S. Patent and Trademark Office
The patent notes that, in this particular application, the display can only be rotated 90 degrees. It is also split into two sections — upper and lower — for an undisclosed purpose, though the diagrams often show them acting together as one panel.
As space comes at a premium when designing a device so compact and complex, it is understandable that Samsung would look to smartwatches as the next class of devices that could benefit from the recent advances made in flexible display technology.
The application itself was filed in September 2015 and published last week. While patents are no guarantee of the future, it wouldn’t be surprising to see Samsung bring this idea to term in the next Gear iteration. It could help the device stand out in a crowded market.
Patently Mobile goes on to note that the secondary display could also serve as a test bed for another, future idea Samsung is considering — a bracelet with a screen that almost fully wraps around the user’s wrist. Once proven, the tech employed here might function at a much larger scale in the unique form factor of a bracelet. Apple has also shown interest in such a design, which indicates a possible direction forward for the smartwatch industry. The question is, how long until that vision can be realized?
10 Moto G5 Plus tips to help you master your new phone
The latest installment in everyone’s favorite Android budget line will be an irresistible bargain for many. Sporting a shiny new look, the Moto G5 Plus offers a range of improvements over its predecessor, including a new processor and support for NFC.
More: Keep your Moto G5 Plus safe from harm with one of these cases
Lenovo has made the smart decision to go with almost stock Android 7.0 Nougat, mercifully free of bloat. If you’re looking to get to grips with your new phone, we’ve got a range of Moto G5 Plus tips to help you. These tips will also work for the standard Moto G5.
How to use the fingerprint scanner to navigate


The fingerprint scanner is below the screen on the front of the G5 Plus, but it can be used for more than scanning fingerprints. You can also swipe left on the fingerprint scanner to go back, swipe right to open recent apps, or tap to go to the home screen. Turn this on in the Moto app under Actions > One button nav. It will remove the usual on-screen navigation buttons.
How to turn on the flashlight

This is handy for turning on the flashlight on your Moto G5 Plus one-handed. Open the Moto app and tap Actions > Chop Twice for Flashlight. Now, if you do a double chop gesture the flashlight will switch on. Double chop again to turn it off.
How to use split screen

This feature is baked into Android 7.0 Nougat and it allows you to have two apps on screen at once. To try it simply open an app and then press and hold the recent apps or multitasking button. The open app will shrink to take up half of that 5.2-inch screen and you can select another app from your recent apps list to occupy the other half. To exit, simply drag the resize bar all the way up or down, or tap and hold the recent apps button again.
How to shrink the screen

You can swipe from the navigation bar at the bottom of the screen to shrink the screen for easier one-handed use. The option is in the Moto app in Actions > Swipe to shrink screen. Tap anywhere on the unused part of the screen and it will go full screen again.
How to use System UI Tuner

Pull down the notification shade and tap and hold on the settings gear icon for a few seconds until you see the message “Congrats! System UI Tuner has been added to Settings.” If you go to Settings and scroll down, you’ll see System UI Tuner has appeared below Developer options. It allows you to customize the status bar, so you can toggle off icons that you don’t want to appear there. There are a few other bits and pieces you can tweak, including a split screen gesture and do not disturb customization.
How to use Moto Display

This feature allows you to see things like the time, date, and remaining battery without fully waking up your display. This is a familiar feature on some flagships, so it’s nice to see it as an option on the Moto G5 Plus. To turn it on, open the Moto app and choose Display, then pick the settings you want.
How to take a screenshot

It’s easy to capture a screenshot on the Moto G5 Plus. All you have to do is hold down the Power and Volume down buttons together. You should see a short animation and hear a capture sound. You’ll find screenshots in their own folder in your gallery app.
How to quickly launch the camera

Open the Moto app and tap Actions > Twist for Quick Capture. With this on, you can twist your wrist twice to automatically launch the camera.
How to take photos by tapping anywhere

It’s horribly annoying when you line up the perfect group selfie shot and realize that you can’t quite reach the onscreen shutter button. Thankfully, you can set the Moto G5 Plus camera app to snap a shot whenever you tap anywhere on screen. Open the camera app and swipe left to right to reveal the settings panel. Under Photo you should see Shutter type and you can choose Tap anywhere.
How to lock focus on a subject

The Moto G5 Plus has a 12-megapixel camera that by default has auto-focus enabled, which seems to work quickly and accurately. However, there will be times when you want to choose a subject to focus on. To do so, open the camera app and simply tap and hold on the subject until you see a small padlock icon appear on the reticle in the middle of the screen. It will now try to stay focused on that subject, even if it moves. You can turn the lock off by tapping on the screen.
This $36,000 safe is what Bruce Wayne would use for his watch collection
Having spent some time at the Baselworld 2017 watch show this year, it’s very easy to see how people spend so much money on fancy watches. Models worth hundreds of thousands are shockingly commonplace. If you’ve already invested in several, how will you keep them safe, sound, and in perfect working order? Just putting them in an ordinary safe obviously isn’t good enough.
What you want is a Bluetooth-connected, leather-covered safe from German company Chronovision. It winds your (non-smart) watches for you, and comes in a size large enough that the floor in your house may not be able to support it. It’s the safe Batman would choose to store his watch collection.
More: Our first take review of the Guess Connect Touch
The compartments that store the watches aren’t just for show, they serve a purpose. It’s essential for many watches to be properly maintained, which means not letting them run out of power. Self-winding watches require movement to wind themselves up, which is usually from your arm when it’s being worn; but that’s not always an option if the watch is worth the same as a normal house, or you have a sizeable collection. That’s why you need a watch winder. Each spins round in the right direction, at the right speed, and for the right amount of time to wind your watch, without it ever leaving the safe.
Bluetooth-connected
Chronovision’s ChronoSync app contains a massive database of watches, complete with the correct winding profile for each one, and each winder module can be programmed individually. If your watch isn’t listed, all the attributes can be manually entered. For the ultimate visual experience, all the winders can be set to work at the same time, resulting in a spinning paradise of watches inside. Because it’s Bluetooth-connected, you can do all this while relaxing on the couch with a glass of (presumably expensive) wine.

Andy Boxall/Digital Trends
The app also controls the lighting inside the safe, and the tech continues on the outside, with a super secure fingerprint reader to unlock the door, and a hidden key lock behind the scanner in case of a power failure. All the internal parts of the safe are customizable too, including the finish, color, and materials used in the build.
The cost of all this luxury? A mere $36,000 for the version you see here, which was made specially for the show. A lot of money for a safe, but when the collection it contains could potentially be worth 10, 50, or 100 times that — it’s a worthy investment. If you have just one watch that needs regular winding up, Chronovision also sells the Chronovision One, a single, modular watch winder for about $540.
How to change your wallpaper and login screen in Windows 10
Windows 10 ditched the live tiles oft-associated with Windows 8 — well, sort of — and brought back the iconic Start menu last found in Windows 7. With something old and something new, Windows 10 is well-positioned to become the go-to operating system for most users, even if Windows 7 stills holds the lion’s share of the market. Regardless, what if you want to add a little of your own flavor to Microsoft’s latest operating system?
Perhaps one of the biggest differences between Windows 10 and earlier OS iterations is that you can personalize your computer’s login page and desktop. Unlike with other versions of Windows, however, the method for accomplishing these tasks isn’t as straightforward as you might think. To help with personalization, we’ve created this walkthrough for changing the image on your desktop and login screen.
Step 1: Navigating to the Windows 10 Personalization settings window
First, navigate to the Settings menu by clicking the Action Center icon in the lower-right corner of the screen. Then, click All Settings and select the Personalization icon to bring up the desktop’s visual options.
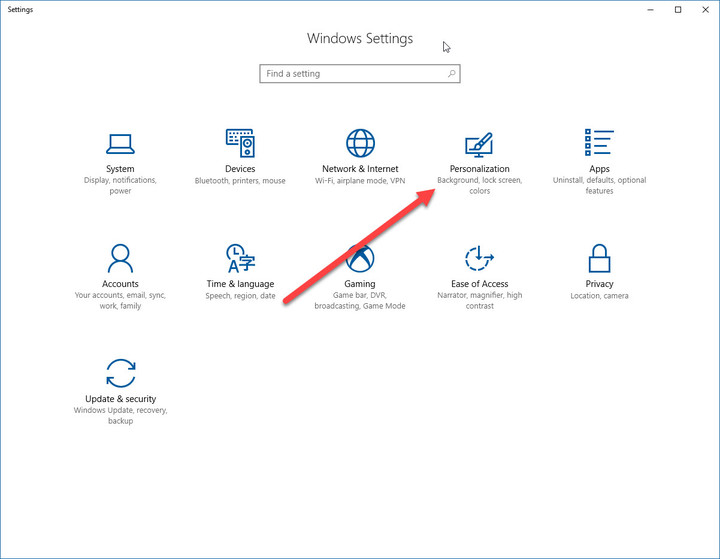
Windows 10 users also have the ability to right-click on the desktop to quickly reach the Personalization menu. Simply right-click anywhere on your desktop and click Personalize, and the intended section should open in the Windows Settings app. Once the window appears, follow Steps 2a and 2b below to successfully change your background and login screen.
More: Microsoft celebrates Windows 10 Anniversary update with new ninja cat backgrounds
Step 2a: Changing the background image
The first tab in the Personalization window is the Background tab, which allows you to change your desktop image to a saved picture, a solid color, or a slide show of various images. Atfer selecting the Picture option, you can choose your desktop picture by clicking Browse and selecting a picture from your computer’s hard drive or from a small selection of themed images.
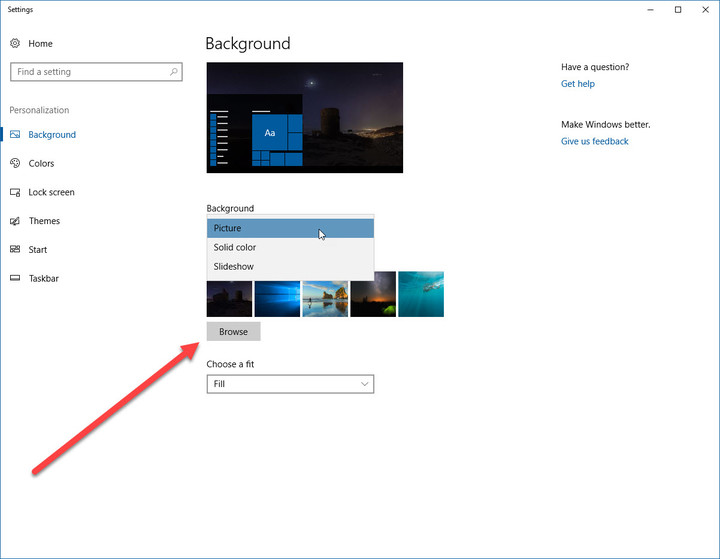
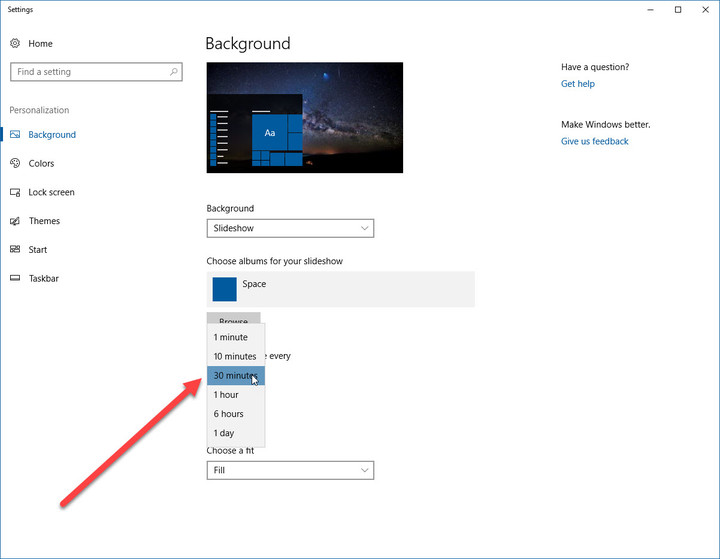
If you’re selecting a folder for the Slide Show option, then you can click Browse and select a folder with pictures you would like your machine to cycle through. Once you’ve selected a folder, then you can choose how long you want each picture to be on your screen before cycling to the next picture.
Keep in mind that if you a have monitors, then a different picture will be selected for each monitor and each one will also cycle through your images. For both a picture or a slideshow, you can choose to fit the image to the screen, stretch it, or select from one of several other options that ensure your pictures will appear the way you’d like them to on your particular display(s).
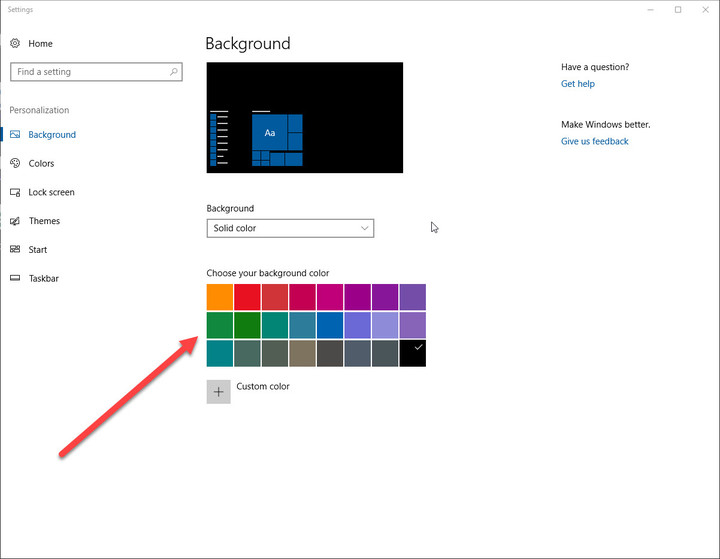
Finally, you can also select a solid color as your background, either from a palette or by creating your own custom color.