


ITC finds that Samsung and Qualcomm didn’t violate NVIDIA patents

NVIDIA’s first patent lawsuit campaign isn’t exactly going according to plan. The US International Trade Commission has ruled that Samsung and Qualcomm aren’t infringing on NVIDIA’s graphics patents. The judge rejected two of the patent claims outright and deemed a third patent invalid. There’s still a chance that the ITC will rethink its decision following a review in February, but this steals a lot of the thunder out of NVIDIA’s legal war — Samsung and Qualcomm aren’t facing a looming government sales ban that could force them to settle the civil dispute. NVIDIA says it’s still “confident” that it’ll emerge triumphant, but that may be putting on a brave face despite … especially when Samsung’s counterattack is still underway.
Via: Reuters
Source: NVIDIA
AT&T and T-Mobile are looking to swap PC and AWS-1 spectrum licenses
![]()
Rival carriers AT&T and T-Mobile in a new deal have agreed to swap PCS and AWS-1 spectrum licenses throughout the United States, according to a couple of new FCC filings. These licenses will be swapped in identical amounts, so the total spectrum both carriers are holding will remain unchanged.
AT&T and T-Mobile said the license swaps “are intended to enable more efficient operations by creating larger blocks of contiguous spectrum and aligning spectrum blocks across markets.” It’s worth nothing that the deal hasn’t gone through yet, as it’s pending FCC approval. However, at this point, there’s no reason as to why the FCC would block the deal.
Both carriers will be swapping spectrum from many markets, but some of the major ones include Boston; Minneapolis; Phoenix; Sacramento, Calif.; and Austin and San Antonio, Texas. This deal won’t benefit customers immediately, but will guarantee some long-term happiness, as it will allow both carriers to build 15×15 and 20×20 Wideband LTE in some areas. These wider channels will allow for higher capacity traffic and increased speeds, meaning customers will see overall better stability from both carriers in the future.
These deal benefits T-Mobile in particular, as the company has a goal of reaching over 250 markets with Wideband LTE by the end of the year, which we are rapidly approaching. This license swap will help T-Mobile be well on its way to reaching that goal.
Again, it’s still pending FCC approval, so nothing has actually happened yet.
source: FCC (1), FCC (2)
via: TmoNews
Come comment on this article: AT&T and T-Mobile are looking to swap PC and AWS-1 spectrum licenses
HTC One A9 photos showed off in new leak
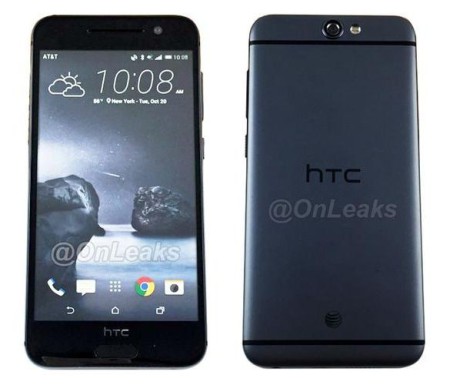
HTC is a little over a week out before the company is expected to unveil its next flagship, the One A9, at a virtual press conference. As we approach the official announcement, leaks become much more frequent. That said, this latest leak comes from OnLeaks, showing off what is allegedly a dummy version of the One A9.
Excitement is heightening for the device, as HTC recently confirmed that the phone they plan to announce on October 20 will be running Android 6.0 Marshmallow right out of the box, which is a rarity with the new Android version just having been released.
Obviously nothing is official until there’s an official announcement, but what’re your thoughts on the One A9 so far?


source: OnLeaks (Twitter)
Come comment on this article: HTC One A9 photos showed off in new leak
Google CEO Sundar Pichai dishes out new promotions, Hiroshi Lockheimer now SVP of Android

Former Google CEO Larry Page and Sergey Brin left the search giant to form parent holding company Alphabet, leaving Sundar Pichai as the new CEO at Google. And now, Pichai has just made his first big move at Google, promoting Hiroshi Lockheimer from VP of Android to SVP of Android, Chrome OS, and Chromecast.
Pichai had some other promotions to give out, making Neal Mohan the SVP of display and video advertising, where he was formerly just a VP. Phillip Schindler was also given a new promotion, and will now be the new SVP of Global Sales and Operations for Google.
You may have heard about Hiroshi Lockheimer from various presentations. He’s actually been at Google since 2006, and recently had a big part to play in the launch of the Nexus 5X and Nexus 6P, which was his biggest appearance as of late.
Either way, there’s been quite a reorganization at Google, as Pichai also handed out a bunch of promotions for its new VPs as well. These promotions were announced via a company-wide email on Friday.
source: Re/Code
Come comment on this article: Google CEO Sundar Pichai dishes out new promotions, Hiroshi Lockheimer now SVP of Android
Paranoid Android is pretty much over

Paranoid Android has long been considered one of the most popular custom ROMs available on Android. Unfortunately, it looks like the development team might be throwing in the towel sometime soon.
It’s no secret that the team has been slowing down as of late. After OnePlus hired a handful of key members from the Paranoid Android team to work on its new OxygenOS ROM back in February 2015, users running Paranoid on their devices quickly found out that future updates would be few and far between. The dev team did manage to push out Android 5.1 Lollipop to Nexus devices in July, though the team said the delay was largely due to the fact that they were missing the manpower they once had on their core team.
So what’s to come of the custom ROM? Following a brief post from Paranoid Android’s Andre Saddler on Google+ claiming that the ROM is, in fact, dead, we reached out to one of PA’s project leads, Matt Flaming, for comment. Although he didn’t have any official statement to share from the team, Flaming relayed to us that the remaining members at PA have become too busy with their lives to continue working on the project. You see, the dev team has always been extremely small, so when everyone seems to have more important things to work on it can be difficult to get work done. Some of the members are focusing on finishing up college and have other important things going on.
Flaming continues:
I cannot say officially that we are indeed dead, as I would love to see where 2016 brings us. I would love to wind down 2015 not worrying about it, and hopefully ‘get the band back together’ early next year. Maybe after everyone has had some time off they will realize how much they miss it. I, for one, will hold out hope on revitalizing the project at some point.
Flaming says he has no plans to put the kibosh on the distribution network, blog, website or anything else PA related in the near future.
It’s certainly sad to see Paranoid Android come to an end, if that ends up being the case in the future. The development team has become one of the most respected, detail oriented and talented teams in the custom ROM community, and we’re sure many folks out there won’t be extremely happy to hear this news.
Have you used Paranoid Android in the past, or do you still use it? We’d love to hear your thoughts on the custom ROM in the comment section below.
How to install the Marshmallow factory image on your Nexus device

The much anticipated Android 6.0 Marshmallow update is here, and Google just recently posted the factory images for its supported Nexus devices. The company did announce that the OTA is rolling out, but that can take weeks, if not longer, to get to everybody. This is largely because companies roll out these updates in stages. That way if there’s something wrong, it only affects a small group of people instead of everybody with that device.
If you’re not into waiting around, we’ve got a handy guide on flashing the factory image on your Nexus device after the break!
Setting things up
One thing to keep in mind is that you will lose all of your data. Flashing Marshmallow on your device requires your bootloader to be unlocked, and in the process of unlocking the bootloader, your device will be wiped of all of its data. That said, the first and most important step to flashing Marshmallow is to ensure all of your data is backed up. If your bootloader is unlocked already, you won’t need to worry about losing any data, and we’ll detail how that’s done in this guide. Still, it’s best to backup than to have not at all. Go back up that data!
Next, you’ll need to install ADB and Fastboot to your computer in order to flash the Marshmallow factory images. If you’re on Windows, you can install the much quicker Minimal ADB and Fastboot; however, the Android SDK tools also include the Google USB drivers, which are very handy. That said, we’ll show you how to go through both.
Installing Minimal ADB and Fastboot:
- Download Minimal ADB and Fastboot from the XDA Developer Forums
- Open the downloaded file
- When prompted, install to C:android-sdkplatform-tools
Installing the Android SDK:
As mentioned earlier, the Android SDK is the more surefire way to get ADB and Fastboot, considering that you can also get the Google USB drivers at the same time. It’s a more lengthy process, but just as easy:
- You’ll need to download the Android SDK Tools from Google. The Android Developers website primarily advertises the Android Studio package, but you can just get the Android SDK Tools at the bottom of the page for your desired operating system.
- Follow the wizard and install to C:android-sdk
- Launch the SDK Manager
- Unselect all packages except for Android SDK Platform-tools and Google USB driver
- Install your packages.
That’s it! Now we just need the factory images.
Getting factory images
You can download the latest Marshmallow factory image from the Google Developers website. Generally, the latest version of Android will be found at the bottom of the list under each device. Just be very careful to make sure you’re downloading the correct version for your device. For example, you don’t want to attempt to install a Nexus 7 (2013) factory image on a Nexus 5. You must install the Nexus 5 factory image on a Nexus 5.
The most recent version of Android will always be at the bottom of the list, so you can go through the same process with this guide when there’s an Android 6.1 version or something of the sort.
Extracting factory images
You’ll need to download 7 Zip or use any similar program, such as WinRAR, to extract the contents of the .tgz file you just downloaded (the factory image). Once you’ve gone through the setup wizard of installing that, you can follow the following steps to extract the contents of the .tgz file:
- Launch 7-Zip and navigate to the directory the your factory image is in.
- Double click the .tgz file to reveal another file with a .tar file extension.
- Open the .tar file, and you should find the folder with your devices codename (e.g. hammerhead, shamu, and so on). Open the file.
- Select all the files that appear, and extract them. Use the destination C:program files(x86)androidandroid-sdkplatform-tools (if you installed the full SDK) or the directory Minimal ADB and Fastboot are installed in.
Preparing to flash
The first step is to go into your device’s Settings menu and enable USB debugging in Developer Options near the bottom of the menu. If you don’t see Developer Options anywhere in your Settings, Google has some documentation on how to make them visible:
To access these settings, open the Developer options in the system Settings. On Android 4.2 and higher, the Developer options screen is hidden by default. To make it visible, go to Settings > About phone and tap Build number seven times. Return to the previous screen to find Developer options at the bottom.
If you went the route of installing Minimal ADB and Fastboot, you’ll need to follow this process:
- Download the official Google USB Driver from Google Developers
- Install the USB Drivers
- Remember the location of the drivers after extracting the .zip file.
Now, we’re ready to plug the device in. Connect it via USB cable, and if this is the first time you’ve connected it to your computer, you might get an RSA prompt on your Nexus device. Just check the “Always allow for this computer” box, select OK, and we’re good to go.
Flashing Marshmallow on your Nexus device
Preliminary instructions for Mac users:
These instructions are intended for Windows users, however, getting them to work on a Mac is very similar. The only real differences is that you’ll need to open Terminal on Mac (as opposed to Command Prompt) and add a “./” in front of the commands you type in Terminal. Additionally, you’ll need to add the platform tools to your $PATH directory on Mac.
The process is simple:
- Open Terminal
- Type sudo nano/etc/paths
- Enter your password
- Type in the path of your platform tools directory
- Hit control-x on your keyboard to quit and Y to save changes
You should now be able to follow the flashing instructions below without any issues on Mac. Just be sure to remember to add that “./” in front of your Terminal commands.
Flashing instructions:
- With your computer connected to your Nexus device via USB and USB debugging enabled, you’ll need to restart in fastboot mode. You can type adb reboot bootloader (just add a ./ in front of your command on Mac) in Command Prompt to do this. Alternatively, you can use your device’s button commands.
- Enter fastboot oem unlock to unlock your device.
- Enter flash-all
- Your device will reboot with the latest version of Android Marshmallow.
Congrats, you have Android Marshmallow before most of the world!
If you have unlocked the bootloader already, follow these instructions below:
- With your computer connected to your Nexus device via USB and USB debugging enabled, you’ll need to restart in fastboot mode. You can type adb reboot bootloader in Command Prompt to do this. Alternatively, you can use your device’s button commands.
- You need to edit the flash-all.bat file you extracted from the factory image. Locate the file (should be in the same spot as ADB and Fastboot). Open it in any text editor and remove the -w in the line where you see fastboot -w update
- Enter flash-all in Command Prompt
Congratulations! The update should begin to install, and once it’s done, all you need to reboot.
What to do if you encounter a missing system.img error:
You will need to extract all the files in the .zip file, extracted from the factory image we downloaded from Google earlier.. The file name should begin with “image.” In this file will be many of the .img files you need, which we are going to flash individually to hopefully avoid that system.img error.
It’s pertinent you flash the following steps in an outlined order, obviously replacing “nameofyourfile” with the actual file name. Also, keep in mind the Mac instructions outlined earlier if commands aren’t working. Just enter the commands below in Command Prompt, and then you should be good to go!
- fastboot flash bootloader nameofyourfile.img
- fastboot flash radio nameofyourfile.img
- fastboot reboot-bootloader
- fastboot flash recovery recovery.img
- fastboot flash boot boot.img
- fastboot flash system system.img
If you’re flashing Marshmallow on a Nexus 9, you’ll also need to add the fastboot flash vendorvendor.img command after step 6.
Closing
After successfully following these steps, you should now be able to enjoy all that Marshmallow brings to your device. If Google ever releases an update, you can follow this same process with the updated factory image.
In the meantime, let us know what you think of Marshmallow in the comments below!
Come comment on this article: How to install the Marshmallow factory image on your Nexus device
Our ongoing missions to Mars are over 50 years in the making

A deep space mission to Mars will require more than a few bottles of Poland Spring and water reclamation is a complicated business. Luckily, recent research is showing that liquid water may be more prevalent on the red planet than previously thought. Gathering the data that led to this discovery (amongst many others) didn’t just happen overnight. It’s the result of over 50 years’ worth of missions from Earth with sights set on Mars, not all of which were successful. We’ve collected some highlights from humankind’s long history of hurling spacecraft toward the fourth planet from the sun, and the good news is: We’re getting better at it.
Slideshow-326570
Booq Boa Saddle Bag Review: Is the functionality worth the price?
In today’s day and age, having all of your technological devices with you is becoming easier and easier. Partially due to the fact that our devices are becoming slimmer and lighter, but also because of the bags and cases that we can carry everything we need with us.
There are a lot of different options out there that help you take your tech life with you at all times, from backpacks, to messenger bags, and even a backpack that has a portable battery built in. We’ll be taking a look at one of the more professional, yet convenient options available.

The Boa Saddle bag from booq, is a great option that has that professional look, and awesome function at the same time. Made from Nylon and leather, the Boa the durability to hold up against most issues, and the function to hold everything you’ll need.
Specifications
- Fits: 15″ Mac & PC
- Exterior: 16.5″ x 12.2″ x 5.9″
- Interior: 14.6″ x 10.2″ x 1.1″
- Weight: 2.36lbs
On the outside, you’ll find the “Ballistic Nylon” everywhere with the exception of two places; the leather handles, and the strap that allows you to attach to your luggage handle. Having the ability to easily put the Boa on top of your luggage while walking around the airport, will make your travels much less painful. You won’t have to worry about slinging the Boa over your shoulder and worry about it falling off when you have to bend over to pick something up.
As for inside the Boa, booq claims that it is “Deceptively spacious”, and they definitely got that right. When I first received the Boa, I was a bit concerned about being able to get everything I need with me, into the bag, but I was wrong about that. The Boa has a total of 12 different pockets. There are three main pockets, one for your laptop, one for your miscellaneous items or tablet(s), and an outer pocket that can be used for anything else.


The main pocket that is the home for your laptop is lined in fleece to keep your laptop clean, and helps provide some protection while you’re walking about. The next pocket is the one that holds everything else you need for your travels. Within this section, there are eight pockets, complete with smaller pockets to house some pens, and a few larger pockets that can hold a 7″ tablet with ease.


The third section that can be found on the Boa Saddle, has a smaller pocket within, but also is a tight fit, so if you have a tablet larger than 7″, this would be the place to house it. The smaller pocket within, is just large enough to hold your smartphone. Someone who carries more than one smartphone around, doesn’t want to hog up those precious pants pockets with a bunch of phones or anything else. So booq thought of that, and built-in a pocket so that you can throw your extra phone in there and still have it protected.
The final pocket that can be found on the booq Boa Saddle is just a miscellaneous one, that can house anything extra you may have. There’s also a key ring on the inside with a detachable fob so that you can put your keys in there and have everything in one place.
If you’re still wondering about how much you can put into the Boa Saddle, here’s everything I carry with me on a daily basis, just to help you get an idea.
- 15″ Samsung laptop and charger
- 7″ off-brand tablet
- OnePlus 2
- 128GB USB 3.0 Thumb Drive
- OnePlus 2 Charger
- (2) MicroUSB cable
- (1) Lightning Cable
- Charger for Huawei Watch
- (2) Pens
- (1) Stylus
- (1) External battery pack
- The Martian (book)
- Sony Headphones
- House keys
That’s the most I’ve ever been able to carry with me at one time, and I really have everything I’ll ever need all in one place. So what happens if you ever forget where you left your Boa Saddle Bag, or if it gets stolen? Well booq took that into account and included a Terrlinq name plate, on the outside of the Boa Saddle. Once you get the Boa, you’ll want to head over to Terralinq’s site and get your bag registered so that you’ll be able to find it your Boa is ever stolen.

One more thing that may be causing you some concern after seeing the amount of items that I keep in my bag. Weight. I’ve been using the Boa for about a month, and have tweaked my Everyday Carry a few times, but you really don’t notice the weight. Obviously, if you carry something like the IntoCircuit Power Castle, then you’re bag will feel a bit too heavy, and you may want to rethink that. Regardless, with the leather handles, and the convenient shoulder strap, you’ll never really notice how heavy the Boa is, even with a bunch of items in it.
The Boa is something that I would recommend to anyone looking for a professional shoulder bag, that can carry everything you need. Add in the built-in Terralinq tracking, and you’ve got the end-all shoulder bag. Now, with a professional bag, there’s a cost associated with it, and for the premium look, feel, and function, the Boa’s going to cost you. If you’re interested in the Boa Saddle Bag from booq, it’ll set you back about $195 with free shipping directly from booq. Or you can save 5 cents by getting the Boa from Amazon with Prime Shipping.
While the price is a bit steep, the booq Boa Saddle is a great option out there for anyone who wants a professional and functional shoulder bag. Let us know what you think about the Boa Saddle in the comment section below.
The post Booq Boa Saddle Bag Review: Is the functionality worth the price? appeared first on AndroidGuys.
Booq Boa Saddle Bag Review: Is the functionality worth the price?
In today’s day and age, having all of your technological devices with you is becoming easier and easier. Partially due to the fact that our devices are becoming slimmer and lighter, but also because of the bags and cases that we can carry everything we need with us.
There are a lot of different options out there that help you take your tech life with you at all times, from backpacks, to messenger bags, and even a backpack that has a portable battery built in. We’ll be taking a look at one of the more professional, yet convenient options available.
The Boa Saddle bag from booq, is a great option that has that professional look, and awesome function at the same time. Made from Nylon and leather, the Boa the durability to hold up against most issues, and the function to hold everything you’ll need.
Specifications
- Fits: 15″ Mac & PC
- Exterior: 16.5″ x 12.2″ x 5.9″
- Interior: 14.6″ x 10.2″ x 1.1″
- Weight: 2.36lbs
On the outside, you’ll find the “Ballistic Nylon” everywhere with the exception of two places; the leather handles, and the strap that allows you to attach to your luggage handle. Having the ability to easily put the Boa on top of your luggage while walking around the airport, will make your travels much less painful. You won’t have to worry about slinging the Boa over your shoulder and worry about it falling off when you have to bend over to pick something up.
As for inside the Boa, booq claims that it is “Deceptively spacious”, and they definitely got that right. When I first received the Boa, I was a bit concerned about being able to get everything I need with me, into the bag, but I was wrong about that. The Boa has a total of 12 different pockets. There are three main pockets, one for your laptop, one for your miscellaneous items or tablet(s), and an outer pocket that can be used for anything else.
The main pocket that is the home for your laptop is lined in fleece to keep your laptop clean, and helps provide some protection while you’re walking about. The next pocket is the one that holds everything else you need for your travels. Within this section, there are eight pockets, complete with smaller pockets to house some pens, and a few larger pockets that can hold a 7″ tablet with ease.
The third section that can be found on the Boa Saddle, has a smaller pocket within, but also is a tight fit, so if you have a tablet larger than 7″, this would be the place to house it. The smaller pocket within, is just large enough to hold your smartphone. Someone who carries more than one smartphone around, doesn’t want to hog up those precious pants pockets with a bunch of phones or anything else. So booq thought of that, and built-in a pocket so that you can throw your extra phone in there and still have it protected.
The final pocket that can be found on the booq Boa Saddle is just a miscellaneous one, that can house anything extra you may have. There’s also a key ring on the inside with a detachable fob so that you can put your keys in there and have everything in one place.
If you’re still wondering about how much you can put into the Boa Saddle, here’s everything I carry with me on a daily basis, just to help you get an idea.
- 15″ Samsung laptop and charger
- 7″ off-brand tablet
- OnePlus 2
- 128GB USB 3.0 Thumb Drive
- OnePlus 2 Charger
- (2) MicroUSB cable
- (1) Lightning Cable
- Charger for Huawei Watch
- (2) Pens
- (1) Stylus
- (1) External battery pack
- The Martian (book)
- Sony Headphones
- House keys
That’s the most I’ve ever been able to carry with me at one time, and I really have everything I’ll ever need all in one place. So what happens if you ever forget where you left your Boa Saddle Bag, or if it gets stolen? Well booq took that into account and included a Terrlinq name plate, on the outside of the Boa Saddle. Once you get the Boa, you’ll want to head over to Terralinq’s site and get your bag registered so that you’ll be able to find it your Boa is ever stolen.
One more thing that may be causing you some concern after seeing the amount of items that I keep in my bag. Weight. I’ve been using the Boa for about a month, and have tweaked my Everyday Carry a few times, but you really don’t notice the weight. Obviously, if you carry something like the IntoCircuit Power Castle, then you’re bag will feel a bit too heavy, and you may want to rethink that. Regardless, with the leather handles, and the convenient shoulder strap, you’ll never really notice how heavy the Boa is, even with a bunch of items in it.
The Boa is something that I would recommend to anyone looking for a professional shoulder bag, that can carry everything you need. Add in the built-in Terralinq tracking, and you’ve got the end-all shoulder bag. Now, with a professional bag, there’s a cost associated with it, and for the premium look, feel, and function, the Boa’s going to cost you. If you’re interested in the Boa Saddle Bag from booq, it’ll set you back about $195 with free shipping directly from booq. Or you can save 5 cents by getting the Boa from Amazon with Prime Shipping.
While the price is a bit steep, the booq Boa Saddle is a great option out there for anyone who wants a professional and functional shoulder bag. Let us know what you think about the Boa Saddle in the comment section below.
The post Booq Boa Saddle Bag Review: Is the functionality worth the price? appeared first on AndroidGuys.
The weird and the wonderful from Japan’s biggest tech show

CEATEC 2015 is trade show that tries to thinly spread a trend across a whole range of exhibitors: traditional electronics giants like Honda, Sharp and Panasonic mix with university research projects, startups, and just outright weird things. This year, however, there wasn’t a standout one. The Internet of Things, energy efficient transport and increasingly precise robots were three vague themes, but with flashes of occasional crazy brilliance. You’ll find the best discoveries from half a week in Chiba, Japan, right here. And as a sort-of-sayonara to the show, here’s a gallery of the freakier sights. Slideshow-327661
