


Review: Philips’ Latest Sonicare FlexCare Platinum Brush Connects to Your iPhone via Bluetooth
Philips recently announced its first Bluetooth-connected Sonicare toothbrush aimed at adults, which interfaces with an iPhone to monitor brushing habits, offer brushing tips, and make sure you’re brushing right.
Priced at $199, the Sonicare FlexCare Platinum Connected takes the well-known and popular FlexCare brush and introduces iPhone connectivity through a Sonicare app that tracks everything from how long you brush to where you brush to how hard you brush.
Design and Features
I’ve used Sonicare brushes for upwards of 10 years so I’m familiar with most of the brushes and brush heads, and the FlexCare is one step down from the top of the line brush, the DiamondClean (my day to day brush). To be honest, I’m disappointed that Philips added Bluetooth connectivity to the FlexCare instead of the DiamondClean because it doesn’t have quite as many features (3 modes instead of 5) and the non-unibody design isn’t as nice.
 The FlexCare Platinum Connected next to a Diamondclean brush
The FlexCare looks like your standard electric toothbrush, with a removable brush head that needs to be replaced every three months or so, a power button, and buttons for adjusting settings like intensity. Since brush heads are removable, you can share your FlexCare Connected base among several family members if you want to.

There are three cleaning modes: clean, a standard two-minute daily cleaning mode; white, a shorter mode designed to remove surface stains; and deep clean, a longer three-minute mode for a deeper clean. The main round button on the FlexCare turns it on and off, while the longer button is the one used to switch through the modes.
A third button at the bottom of the brush lets users select an intensity from one of three options: low, medium, and high. Users with sensitive gums and teeth will want to choose the low option, while the higher option will result in a better, quicker clean with up to 62,000 brush strokes a minute.

Unique to the FlexCare Platinum Connected is a set of sensors that are designed to work specifically with the app. There’s a location sensor that relays where the brush is in your mouth, a pressure sensor that makes sure you’re not applying too much pressure when you brush (which can damage your gums) and a scrubbing sensor to make sure you’re not moving the brush too much (with a Sonicare, the brush does the work – you basically just hold it up to your teeth).
Sonicare ships the FlexCare Platinum Connected with two of its newest brush heads, the InterCare and the AdaptiveClean. Both of these brush heads are on the larger side compared to other Sonicare brush heads so they cover a lot of surface area. The InterCare brush is designed to reach more deeply between the teeth while the AdaptiveClean has flexible sides that are supposed to cover more of the tooth for a better clean.
Sonicare brush heads are supposed to be replaced every three months and cost somewhere around $10 to $15 per brush head, so that’s an expense to be aware of when purchasing a toothbrush like the FlexCare Platinum Connected. Integrity of the brush head is important for better plaque removal than a manual toothbrush (Philips promises that its brushes remove as much as 10x more plaque).

Sound wise, the FlexCare Platinum Connected is louder than the DiamondClean but it isn’t obnoxiously loud. It sounds like your average electric toothbrush.
The FlexCare Connected can be purchased with or without a UV sanitizer (the model with one is $20 more expensive) that can be used to sanitize brush heads. I’ve previously owned a UV sanitizer and while it works fine, I don’t think it’s an essential piece of equipment. You just stick your brush head in the container, shut the door, and turn on the light to kill germs.

It’s simple enough, but there are bacteria in your mouth anyway that you can’t UV sanitize and toothpaste is probably taking care of a lot of the lingering bacteria on the brush.
App
Sonicare’s app isn’t for tracking brushing habits over time, but for making sure you’re brushing the right way in the moment, something I found to be a lot more useful than the over-time tracking feature in the Oral-B app designed for the Oral-B Bluetooth toothbrush.

The Sonicare brush connected seamlessly and quickly to my iPhone through the Sonicare app. Using the app is done by launching it before you turn on the brush for a daily brushing session. As soon as the brush turns on, the app displays a 3D model of a mouth and guides you through brushing each quadrant of your mouth. As you brush, the teeth in the 3D model go from yellow to white to denote progress, which is quite motivating.

Using the sensors in the brush, the app can vaguely tell where the brush is located in your mouth, so it’s able to detect how long you spend brushing each area. With the “Clean” setting, it walks you through two minutes of brushing and then directs you to turn the brush on again for a touchup of all the areas where you didn’t spend enough time, making sure everything is thoroughly clean. It’s also able to detect too much brush movement and too much pressure, sending alerts through the app each time.

The FlexCare Platinum Connected’s movement sensors are decent, but not infallible. The app can detect which side of your teeth you’re brushing in each quadrant based on the way the brush is held, but if the app is directing you to brush the upper left quadrant and you do lower right, it can’t tell the difference. You have to follow along with the app for it to be effective.
I also felt like it was giving me more touch up areas than necessary, but in general, I got a more thorough clean than I do brushing on my own. As for the pressure and movement sensors, these are sensitive and effective and always accurately prevented me from pressing too hard or moving the brush back and forth too vigorously in my mouth.
I’m a dedicated brusher, but the app was still useful because it made sure I was brushing for the right amount of time and in the right way each and every time I brushed. The app also gamifies brushing, allowing users to earn points for completing tasks like brushing properly, flossing, and rinsing with mouthwash.
For people who need more motivation to brush, it definitely works. There are also goals to work towards to achieve fresher breath, healthier gums, and whiter teeth. Most of these goals can be achieved by doing things like brushing twice a day for two minutes and flossing.

What the app doesn’t do well is track brushing habits over time because of a somewhat confusing layout. You can see your weekly progress towards goals you’ve set and export data for your dentist, it’s hard to get just a quick overview of statistics like how many times you’ve brushed, for how long, when you’ve flossed, and more.
There are some quirks with the app, which I hope Philips will address in future updates. It doesn’t send out brushing reminders, it doesn’t always ask for specific data on whether or not I’ve flossed or rinsed (and thus does not catalog this data), and the design is overcomplicated with content overlap in the “Progress” and “Goals” sections that makes long-term data collection difficult, but for bare bones brushing tracking and motivating, it works.
Other app features include reminders on when to replace brush heads, battery readings, product recommendations, the ability to set focus areas based on dentist feedback, appointment tracking, and coaching for better brushing habits.
Bottom Line
At $199, the Sonicare FlexCare Platinum Connected isn’t cheap by any means, but the price point is in line with other top-of-the-line Sonicare toothbrushes from Philips, including other FlexCare and DiamondClean models. It’s also a price comparable to some higher-end electric toothbrushes from companies like Oral-B.
There are a lot of people out there who use (and are satisfied with) manual toothbrushes that cost a handful of dollars, which can make a $200 toothbrush (and the replacement brush heads) sound absolutely outrageous, but as a long time devotee of the electric toothbrush and the Sonicare line in general, I believe it’s worth the price point if you’re looking for something that is unquestionably going to improve your dental hygiene and potentially cut down on dentist bills.
My teeth feel much cleaner when I use a Sonicare brush compared to a normal brush, and I was a big fan of the two brushes that came with the FlexCare Platinum Connected. They easily reached all of my teeth with little effort and left my mouth feeling clean for hours.
If you already own a Sonicare and are in need of an upgrade, the FlexCare Platinum Connected is worth looking at, but if you already own an electric brush, the features the app adds probably aren’t worth investing in something new. They’re nice to have, especially for people who need a little extra motivation to get their daily brushing in or those who want to make sure they’re brushing thoroughly, but ultimately, it’s the brush and the brush head that are doing all the work cleaning your teeth, not the app.

That said, features like pressure sensing are invaluable for someone like me — I brush much too hard when left to my own devices and that’s caused some problems for me in the past — and it was also nice to know when I didn’t spend enough time in one area. If you’re looking for a better brushing experience and don’t mind investing the money, the Sonicare FlexCare Platinum Connected is a solid choice.
Pros:
- Thoroughly cleans teeth
- Gentle on gums
- App encourages better brushing habits
- Sensor alerts for pressure/movement
- Two week battery life
Cons:
- Expensive
- App interface is confusing
- Brush heads must be replaced
- FlexCare brush handle needs to be dried after each use to prevent mold growth
How to Buy
The Sonicare FlexCare Platinum Connected can be purchased for $199 from the Philips website or from Amazon.com. A version with a UV brush head sanitizer is also available for $219.99.
Note: Philips provided the Sonicare FlexCare Platinum Connected to MacRumors free of charge for the purposes of this review. No other compensation was received.
Tags: Philips, Sonicare
Discuss this article in our forums
Review: The Easy-Install SnapPower Charger Adds a USB Port to Your Outlet
The SnapPower Charger, designed to make it easy to add USB ports to a wall outlet with no complicated wiring, originated on Kickstarter in 2015. It’s basically an outlet replacement that features two standard sockets and an additional USB port, and it’s meant to be simple enough to install in just a couple of minutes.
SnapPower is available in three colors (white, light almond, and ivory) to match different home decor. Design wise, it looks identical to a standard outlet cover, but it features a hump at the bottom that houses a USB port for charging iOS devices. There are two versions of the SnapPower, designed to fit square or round outlets, which make up most of the types of modern outlet plates in the United States.
The SnapPower works by connecting the two metal tabs at the sides of the outlet cover to the screws of the outlet, allowing for a small amount of power to be drawn into the USB port of the device.

My apartment, which is fairly modern, is equipped with square-style outlets and the square SnapPower fit well. Some older houses and apartments might have outlets that are not compatible with the SnapPower, so that’s something to be aware of when considering a purchase.

I have zero electrical experience and I was able to install the SnapPower without running into problems. I turned off the power to my office through the circuit breaker, unscrewed my existing outlet cover, pulled it off the wall, snapped the SnapPower into place over the bare sockets, and then put the screws back in and turned the power back on. It took all of five minutes to do and was very straightforward.

One caveat — I had an outlet that had been installed by an electrician upside down. The SnapPower still worked, but I had to install it upside down as well to get the contacts to line up properly to power the USB port.

The SnapPower is bit thicker overall than a standard outlet cover and much thicker at the bottom to accommodate a USB port, so it makes outlets stand out visually more than a normal outlet would, but it wasn’t enough of an aesthetic difference to be super noticeable.
Any USB device can be charged with the SnapPower, but it’s limited to one amp, which is best suited to iPhone charging. Charging speeds are comparable to charging with an Apple iPhone charger, so it’s not great for charging iPads.

I was able to charge an iPhone 6s Plus in about the same amount of time that it takes to charge with a standard iPhone charger and Lightning cable, but my 9.7-inch iPad Pro took much longer, and I didn’t even attempt to charge my 12.9-inch iPad Pro with such a low-power charger.
When I charge my iPhone, I don’t typically use Apple’s included charger because it’s too slow, so I thought the SnapPower, while convenient, just wasn’t worth it for me. It’s not something that I’d use on a regular basis because I generally want faster charging for my iPhone and my other iOS devices.
If you’re charging an iPhone overnight (or an Apple Watch) the speed of the charging doesn’t matter quite as much, which makes the SnapPower more useful. I could see installing this next to a bedside table for a simple way to charge a device overnight without taking up a full socket.
Bottom Line
At a price ranging from $16 to $20 based on the number of SnapPower Chargers purchased, the device seems expensive for what you get – a single USB port. Comparatively, a little Anker PowerPort that can plug into a socket and offer 4 USB ports with faster charging speeds costs $25 from Amazon, which seems like a better deal to me. I’d rather spend my money on a multi-port charger that can go anywhere.

That said, if you’re looking for a sleek solution that doesn’t add visible bulk to your sockets and is easier to install than a solution that requires wiring expertise, the SnapPower is a good option. It was quick and easy for me to put in place and since I didn’t need to do any wiring, I could install it in my apartment on my own.
If I had a house, I might seek out something more permanent and robust, able to charge devices at a faster rate. The SnapPower is limited to 1 amp, which is a major drawback if you have a lot of larger devices like iPads that require more power to charge at a reasonable rate.
Pros:
- Easy installation
- Clean, simple look
- Leaves both sockets open
Cons:
- Only adds 1 USB port
- 1 amp
How to Buy
The SnapPower Charger can be purchased from the SnapPower website. It costs $20 for a single charger, $38 for two, $85 for five, and $160 for 10.
Tag: SnapPower
Discuss this article in our forums
Sonos Review: The Play:5 is the Perfect Centerpiece for a Whole House Audio System
Sonos is a well-regarded brand known for creating some of the best multi-room home speaker setups, and in late 2015, the company debuted its latest product, a second-generation Play:5. The original Play:5 (once called the S5) came out in 2009, so the new Play:5 marks a long overdue update that brings a new design and better sound.
As someone new to the Sonos ecosystem, the Play:5 (paired with a set of Play:1 speakers) is the first Sonos speaker I’ve tested in my home. After a month breaking it in, I finally understand why Sonos is such a popular brand and is regarded as the best system for iPhone-compatible whole house audio.
Priced at $499, the new Play:5 isn’t cheap, but that price point includes a hassle-free user experience and impressive audio. As covered in the review below, there are some downsides to buying into the Sonos line, but its ease of use, sound, and multi-speaker pairing capabilities make it largely a win for those ready to shell out the cash for a quality sound system.
Design
The second-generation Sonos Play:5 has a more modern look than the original Play:5, bringing it in line with the Sonos Play:1 and the Sonos Play:3. It’s less boxy, wider, and has been designed in a way that lets it be positioned either horizontally or vertically. There’s no integrated stand.

It’s available with either a black or white outer shell, both of which come with a black mesh front panel that hides the interior components. Design wise, the Play:5 is unobtrusive enough to blend well into any room or decor style, but it might be more difficult decorating around the white version, which stands out more.

Visually, the Play:5 is most similar to the Play:3, only quite a bit larger. I have a decent-sized two bedroom apartment with a large living room and I felt like the Sonos Play:5 was too much speaker for the room, just based on its size alone. It measures in at just over 14 inches wide, eight inches tall and six inches wide and it weighs just about 14 pounds.
This is a hefty speaker that you’re going to want to station in one spot and not move around a lot. It’s not easy to carry and there’s no handle or anything for transporting it. There’s also no battery, so it always needs a power source.

At the top of the Play:5, there are capacitive LED-lit buttons that respond to different gestures to perform functions like upping the volume, pausing a song, and switching to the next song, so there’s no need to have access to a device for making quick music alterations.

The back of the Play:5 houses a port for the cable that powers it, a 3.5mm jack, an optional Ethernet port that can be used if you have a house without strong Wi-Fi, and a button for syncing the speaker to the Sonos app.
Sonos Setup and App
Sonos’ line of speakers connect to your devices through your home Wi-Fi network rather than via Bluetooth, and for that reason, you have to use the Sonos apps to listen to music rather than playing music directly from your device. There are apps for Mac, Windows, Android, and iOS.
Being restricted to the Sonos apps for music playback is something of a negative because you’re locked into the Sonos ecosystem and can’t use a music app of your choosing. It also makes it more difficult for guests to connect to your home music system because connecting over Bluetooth is not an option (but there is an audio line-in).
 Sonos for iOS
On the plus side, the Sonos apps and the Wi-Fi connection are convenient. Setup was beyond simple – about five minutes passed from the time I unboxed the Play:5 to the time I had it up and running — and I never had to reconnect or deal with connection issues.
The Play:5 is always ready to play music as long as it’s powered on and there’s decent Wi-Fi available, plus it can do things like play different songs from the same music service in different rooms (or the same song in multiple rooms) if you have more than one speaker. Ease of use was one of the things I loved most about the Play:5 — it just worked and did what I wanted it to do.
 Sonos for Mac
Since this is a Wi-Fi system, it’s also expandable. You can start with one speaker and then add on additional speakers in other rooms for a whole home audio system that’s all connected.
I tried the Sonos apps for Mac and iOS, but I primarily used my iPhone for music playback. All of the Sonos apps support playback from more than 40 streaming music services like Spotify and Apple Music or from music stored directly on a device. A wide range of file formats can be played.
The Sonos apps aren’t the most straightforward and there were some annoyances I ran into, like being unable to shuffle directly from my Apple Music playlists without adding them to a Sonos playlist and not being able to pause music for an incoming phone call, but for the most part, using the Sonos app to manage my music (from Apple Music) was fine.
If I could choose, I’d probably opt to use Apple Music, but the Sonos app wasn’t a deal breaker. It might even be a preferable control method if you subscribe to multiple music services.
Sound
Sound wise, the Sonos Play:5 is fantastic. I live in an apartment so I don’t have a lot of experience with professional audio equipment or speakers of this size (I mostly use headphones) and listening to music on the Play:5 was a revelation – with some songs, there was a level of detail and crispness I’ve never heard before. Vocals are always at the forefront and the bass is deep and rich.

The Play:5 is a speaker that costs $499, so I expect nothing less than amazing sound, and it lived up to my expectations. Behind the grille, there are six drivers (three tweeters and three mid-woofers) with dedicated amplifiers, and let me tell you, this speaker puts out some serious sound. It’s a speaker you can feel. It’s more than loud enough to fill a large room, and even at top volume levels playing songs with a lot of bass, there was never any distortion.
I never had issues with the connection, which I do sometimes run into with Bluetooth speakers, and there were never any points where the sound dropped out or was interrupted. The Play:5 and the Sonos app always offered smooth playback.
The Play:5 comes with a built-in Trueplay dynamic tuning system that’s designed to calibrate the speakers based on their position in the room to account for room shape and objects within the room. I expected this to be little more than a gimmick, but the adjustments that were made with Trueplay seemed to slightly improve the sound of the Play:5, which I had positioned on a desk.

In addition to dynamic tuning, there are settings for adjusting bass, treble, and balance to your taste, which you may need to do after tuning with Trueplay to reach the ideal sound.
Bottom Line
The Sonos Play:5 is too much speaker for my apartment, but if you have a house or a larger space and want to start making purchases towards a whole-home audio system, Sonos is the way to go and the Play:5 is the best sounding speaker the company offers.
At $499, the Play:5 is a serious investment (and you can even argue that it’s overpriced), but it’s incredibly easy to use, sounds amazing, and supports almost every audio service in existence. On the downside, you’re locked into the Sonos app and the Sonos ecosystem once you make a purchase, but the tradeoff seems worth it to those looking for the best multi-room audio experience.

After using the Sonos Play:5 and the Sonos system for a few weeks, I’m hooked. A WiFi audio system that doesn’t allow the flexibility of a Bluetooth connection isn’t going to be for everyone, but I was a fan of the simplicity and the sound quality. This is one review product that I am sorry to send back.
As a side note, I didn’t own the original Play:5 and so I can’t compare this new version to the original version. I highly recommend anyone who is considering a purchase read through multiple reviews to get a clear picture from both those who are new to the Sonos system and those who have used it for years.
Pros:
- Excellent sound
- Connects over WiFi
- Almost all music services available in Sonos app
- Can group multiple speakers together
- Can play different songs on different speakers via same device
- Easy to set up and control
- Expandable system for whole home audio
- Can use horizontally or vertically
Cons:
- Needs Wi-Fi
- Locked into Sonos ecosystem
- Have to use Sonos app
- No Bluetooth
- Expensive
How to Buy
The Sonos Play:5 can be purchased from the Sonos website for $499 with a 45-day return policy. It is also available from Amazon.com at the same price point.
Note: Sonos provided MacRumors with a Sonos Play:5 and a Sonos Play:1 for testing purposes, which were returned to Sonos at the conclusion of the review. No other compensation was received.
Tag: Sonos
Discuss this article in our forums
Moto G4 Review: No longer a game-changer (Video)
Before Lenovo bought Motorola from Google in 2014, the company created a few very interesting lines of phones under the Moto brand that sought to change the way we buy phones. One of these is the Moto G line, that was introduced a few years ago and offered an very reliable and speedy phone for less than $200 unlocked. The Moto G eventually became Motorola’s highest selling phone of all time.
Fast-forward to today, Lenovo hopes to carry on the legacy of the Moto G, and offer a quality, affordable successor in a world where most other smartphone companies are offering their new phones for lower prices. The Moto G4 is here, and literally bigger than ever.
Build
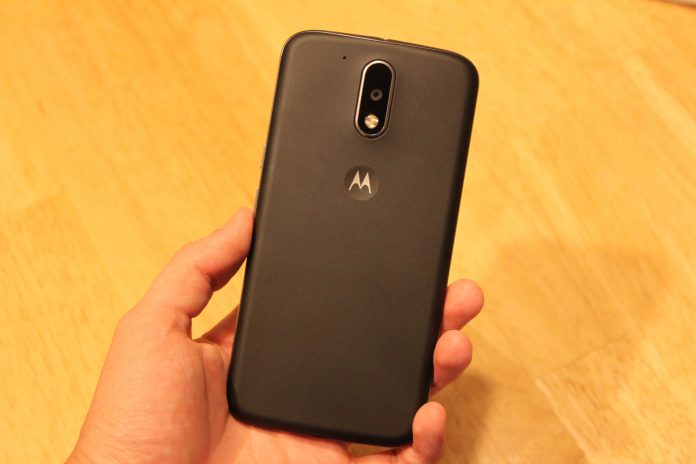
The Moto G4’s build quality hasn’t improved from the previous years iterations, but it feels solid for a $200 plastic phone. At 155 grams, it has the perfect amount of heft for me. I really like the plastic back of the phone which has a slightly textured feel to it and feels almost like rubber, although the oil from your hands will visibly show up on it after just a little usage. Wash your hands at all times.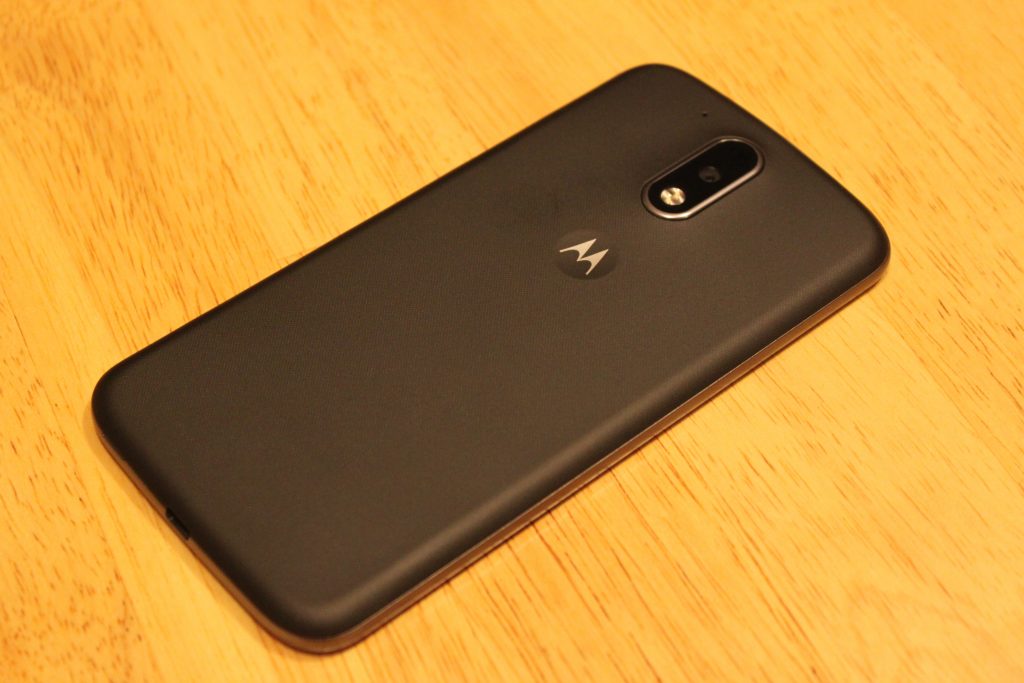
The front of the device brings the classic minimalistic style I’ve loved since the Nexus S came out a long time ago. In fact, the design of this phone reminds me so much of a bigger Galaxy Nexus – front and back. There’s nothing on the front except the secondary camera and a single front-facing speaker right above the screen. No Lenovo logo, no Moto logo. That’s a +1 right there. While I’m bummed they didn’t include dual speakers like last year’s Moto G, I can’t complain for the price. Plus, the single speaker does get very loud, and almost competes with speaker quality on flagship phones using single speakers on the bottom.
As for the power and volume buttons, someone at Lenovo should’ve spoke up about these. They feel cheap, and barely provide any feedback when pressing them. It takes more effort to press the volume buttons than any other phone I’ve used. The power button at least has a horizontal line texture on it to distinguish it from the volume.
Screen
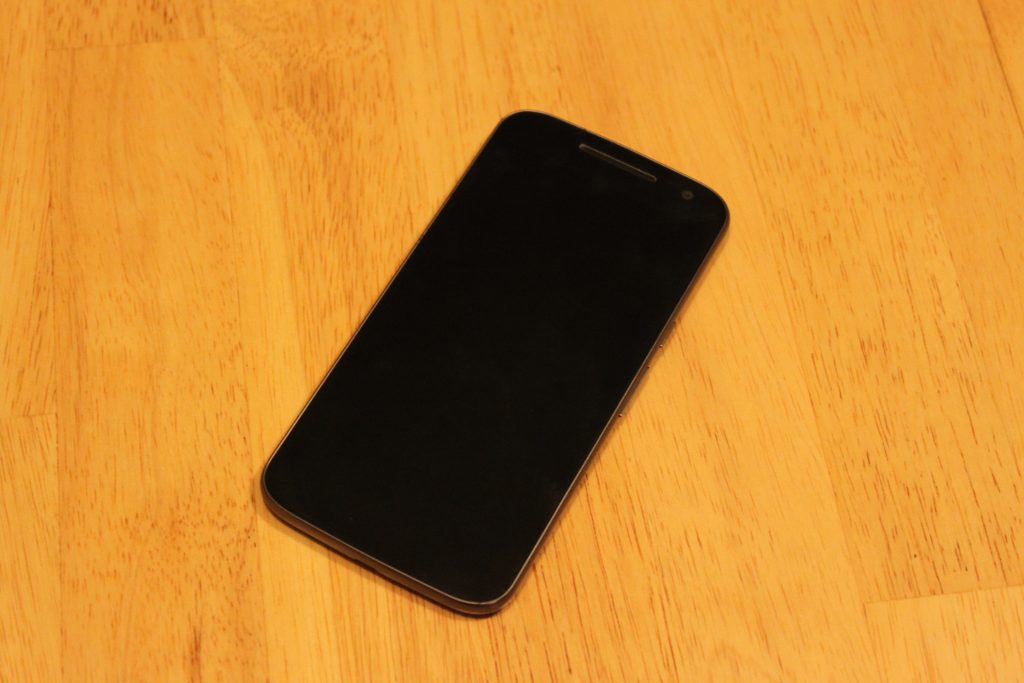
Easily the highlight of this phone. I’ve seen quite a few cheap LCD displays on phones before, even on more expensive phones, but the 1080p LCD display on the Moto G4 rocks.
I was disappointed with Lenovo’s decision to put a 5.5 display on the Moto G, but after using it for a week, it doesn’t feel like a big phone at all. 71% of the front of this device is covered with screen, so it doesn’t feel bulky to me.
Aside from the size, the quality of this screen seriously impresses me for what it’s worth. If any of you still own the OnePlus One or OnePlus 2, the display quality is right with those. I will say, the viewing angles are not great, as the brightness decreases and colors go yellow as soon as the device is slightly shifted away from your eyes. However this isn’t a problem for me, as my phone is directly facing me 98% of the time I use it.
Comparing the screen to other LCD displays like the Nexus 5X and Nexus 5, I immediately prefer the display on the Moto G4. The colors look very washed out on the LCD Nexus devices compared to the Moto G4, which is able to produce colors almost as vivid as an AMOLED display.
The 1080p resolution is perfect for this device. I started using this phone right after using the OnePlus 3, and believe it or not, I prefer this screen. These phones both have 5.5 inch 1080p displays, but the pentile AMOLED screen on the OnePlus 3 holds it back in comparison in terms of image sharpness. Images are sharper, more accurate, and the whites on the G4 look much better. I still much prefer the deep blacks on the OnePlus 3’s AMOLED screen though.
Performance
In 2016, it’s hard to find a phone running Android 6.0 that doesn’t perform well. The Moto G4 runs on a Snapdragon 617 processor which was unveiled by Qualcomm in September of 2015. I was expecting a sluggish experience, and to this day I’m waiting for the inevitable crashes or hair-pulling slowdowns to happen. But so far, this phone runs well! If I were to compare the everyday speed of the Moto G4 to something else, I would say it’s neck and neck with the Nexus 5 from 2013 – which still runs like a champ on Marshmallow with its Snapdragon 800 chip.
After using the phone for a couple hours on AT&T LTE while browsing on Chrome, the phone didn’t get as warm as other phones have, and quick-charging it with the Motorola Turbo-Charger doesn’t make the phone as hot as previous Motorola phones, specifically the hot-plate that is the Droid Turbo.
If you’re into mobile gaming, you might want to look the other way. The Adreno 405 GPU here does not handle most games very well, and loading times are pretty terrible. I primarily play Fallout Shelter, and while I had zero hiccups and quick loading times playing it on a phone with a Snapdragon 820 chip, the loading time to get into my game on average took a staggering 72 seconds on the Moto G4. This was if the game didn’t freeze or crash mid-load, which happened 20% of the time. I experienced similar results with other 3D games.
Camera
Don’t expect miracles here, people. But also don’t expect a bad camera. The Moto G4’s 13-megapixel with f/2.0 aperture provides pictures more than deserved for a $200 phone. Pictures in daylight look a little more dim than they should be.


Low-light pictures lose a lot of detail, but having HDR mode on really helps balance out the bright parts of the photos and the darks. Notice the overexposure of the Subway sign and interior in normal capture mode.

HDR off

HDR on

Daylight HDR on

Daylight HDR off
The camera app takes a couple seconds to open, which is annoying when trying to grab a quick shot. The app comes with some useful features such as professional mode that allows for manual tweaks, slow motion mode (although the 540p resolution for this is kind of a joke) and auto-HDR.
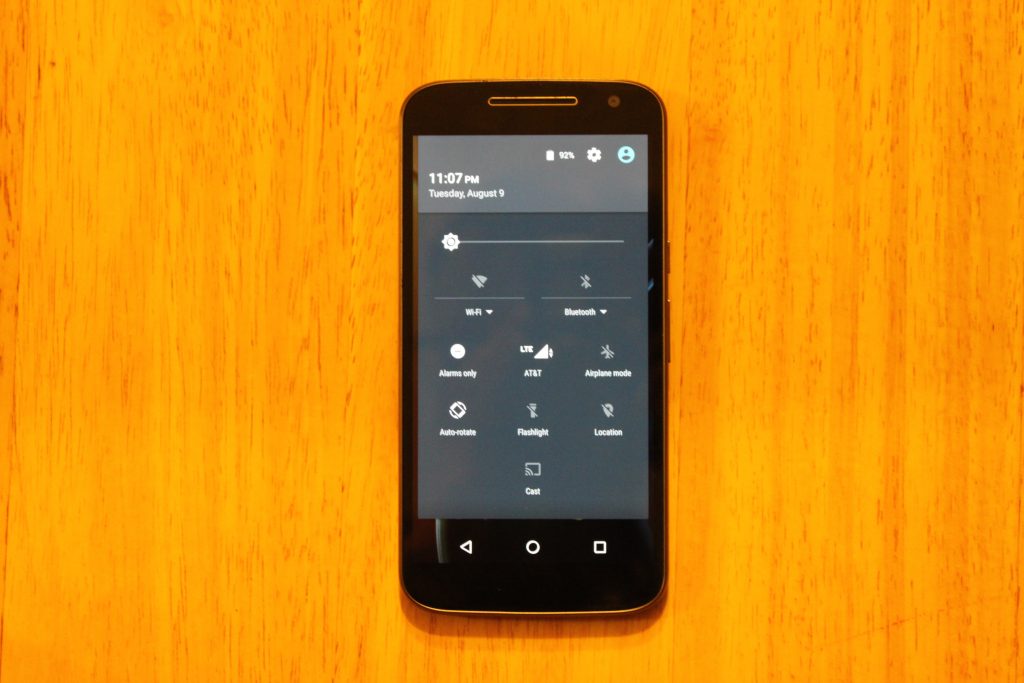
Software
I was a little nervous Lenovo would take Motorola’s near-stock Android skin and mess it up, but things have barely changed since previous Moto phones.
This is basically stock Android with the addition of a few useful features. First, we have Moto Gestures, which includes four ways of interacting with the phone. When it’s off, you can make a chopping motion with the phone to turn on the flashlight. Keeping the phone face down immediately mutes the phone and keeps it silent. When someone calls, picking the phone off the table cuts the noise of the ringer. Finally, whether the phone is on or off, twisting it will launch the camera.

On top of this, Moto Display is back, showing your notifications when the phone is sleeping, however it;s nowhere near as useful as it is on the Moto Z, or previous Moto X phones that have sensor on the front for hand waving gestures, or the AMOLED screens that actually save battery when using the Moto Display. On this phones LCD display, you can totally tell the entire screen is on, and it just doesn’t look great.
Battery
A 3000mAh battery is becoming common for a high-end phone, so the decision to put one in the $200 Moto G4 was a great move from Lenovo. This phone lasts until the very end of the day for me with 10-15% left. To be exact, I unplug the device at 6:45 AM, stream Play Music for 30 minutes to work, browse reddit and Chrome for about an hour a day, text my imaginary friends using Textra, send between 20-30 snaps with Snapchat, and use a lot of GroupMe until I’m tuckered out at 10:30 PM. That’s 16 hours of “moderate” usage.
I haven’t felt concerned with running out of battery in a day yet, but if I do, this phone comes with a Turbo-Charger that supports Qualcomm Quickcharge. I remember when I had to pay extra for a Turbo-Charger when I bought a Moto X 2014… so I’m very pleased with this.
Conclusion
I’m satisfied with the Moto G4. I’m not blown away by it, and I’m not disappointed with it. Lenovo didn’t take risks with this device, and they didn’t push any boundaries. The build quality lives on from previous Moto G generations, and the display quality is something I never expected to see on a $200 smartphone. But is a bigger, better display worth the removal of dual front-facing speakers and a waterproof exterior? If I were to give an answer, I would say the screen is more important to me than speakers I rarely use, or having the ability to pour champagne on my smartphone.
At $199 for the 16GB model, the Moto G4 is less impressive than it was in its earlier generations, and faces serious competition from smartphones in similar price ranges, such as the all-metal, fingerprint scanner included Honor 5X. For $199, I would recommend the Honor 5X over this phone, but you won’t be disappointed with a purchase of the Moto G4, especially with the experience of customizing it through the innovative Moto Maker website.
You can purchase the Moto G4 here
Beoplay H5 Review: B&O’s Bluetooth Earbuds Sound Great, but They’re Pricey
With the controversial removal of the headphone jack from Apple’s upcoming iPhone range a seeming inevitability, audio companies are already ramping up Bluetooth headset options ahead of the devices’ launch in the fall.
In June, premium audio heavyweight brand Bose debuted a wireless version of its flagship over-the-ear headphones with the QuietComfort 35’s. Not to be outdone, last month Danish audio big hitter B&O entered the fray with its Beoplay H5 Bluetooth buds, a pair of high-end magnetized earphones designed “for music lovers who live to move.”
Design and Features
As with most products bearing the Bang & Olufsen moniker, the Beoplay H5 buds aren’t exactly cheap at $249, but apart from the luxury brand cachet that comes with them, they promise premium performance in a compact package whatever your lifestyle, designed to segue seamlessly between a fitness routine and a daily commute, for example.

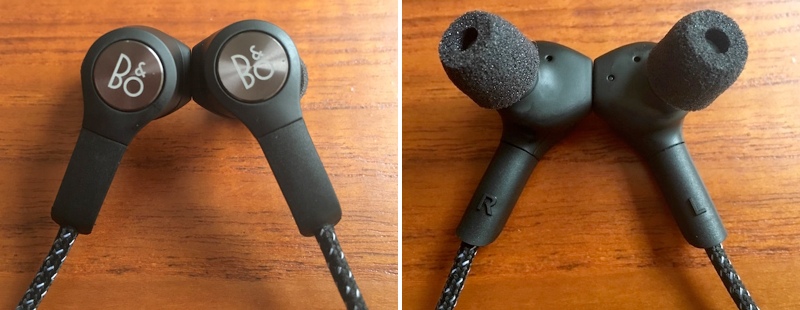
The dust and sweat-proof earpieces are made of a featherweight polymer-rubber compound with a branded aluminum disc on the rear, and each bud has a neck about an inch in length, with the power/pairing LED on one ear.
The buds are connected by a 52 cm (~20 in) cord sheathed in a soft braided textile that sits over the nape of your neck during wear, with an inline remote on the left-hand side and a hidden omnidirectional mic built in for taking calls.

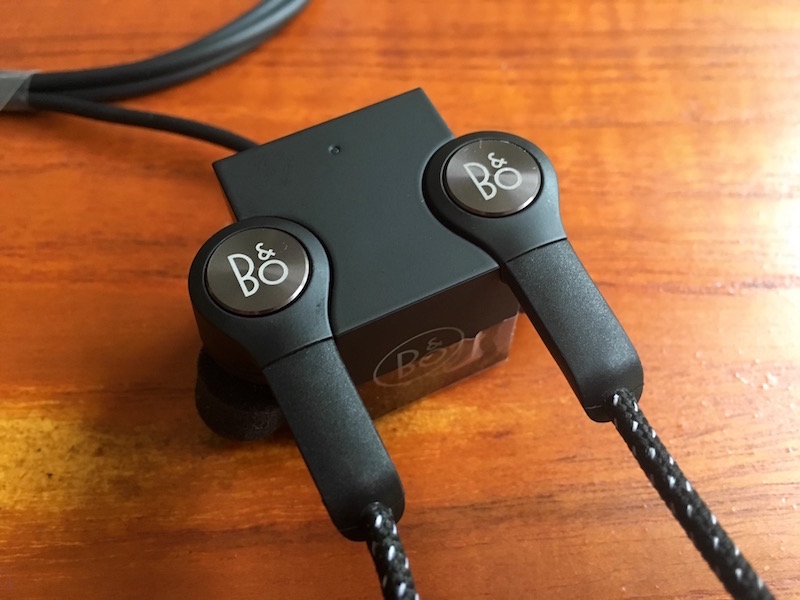
Each earpiece contains a magnet, so you can clasp them together securely for them to rest around your neck when they’re not in use. In another neat design feature, clicking the magnets together also auto-powers down the earphones to save battery.
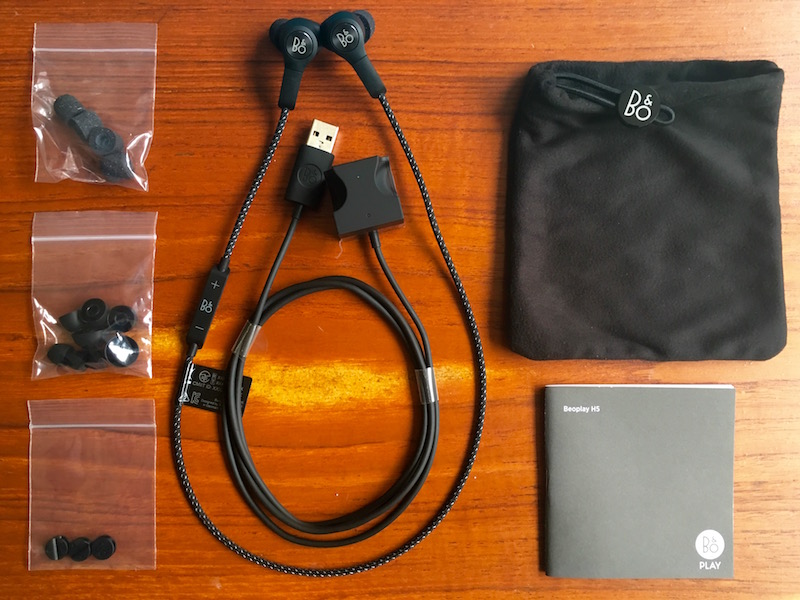
Seven pairs of eartips come supplied – three sizes of Comply Sport memory foam tips offering a malleable seal, and four sizes of standard silicone molded tips.

Also included in the box are cable clips, a carry pouch, a quickstart guide, and a unique magnetized “cubic charger” with two molded recesses that the earpieces snap into, with a cable running out the rear with a USB connector attached.
The earbuds connect to a source device using the latest version of Bluetooth (4.2) and support high-quality AAC and aptX codecs – only newer MacBooks, not iPhones, support the latter as of writing.

Audio output can be adjusted via the easy-to-use Beoplay iOS (or Apple Watch) app, which offers four presets for different activities (workout, commute, clear, podcast) and a ‘Tonetouch’ graphical equalizer to customize the sound further.
Once you’ve adjusted the output to your liking, you can save the audio profile directly to the earbuds, allowing you to set and forget. If you’re an Apple Watch wearer, you can choose between presets from your wrist, too.
Performance
Pairing the buds was a one-click affair of the power button on the inline remote, and the volume buttons proved to have the typical dual-functionality for moving between tracks, with the power/pair button also taking and ending calls.
Out of the box, the H5’s sound decent enough, offering a flat, natural reproduction and a close, friendly soundstage. Treble was a tad too crisp at times, but with a bit of adjustment via the accompanying app it was easily dealt with, and once I had a custom profile set, they really came into their own.
The controlled bass and clearly defined mid- and high-range detail of the H5’s serve rock, hip-hop, and instrumental genres extremely well, with jazz tracks reminding me of Vibe’s eminently balanced Brass Ba11 buds and their intimate, inclusive sound. As for the mic, it had no trouble picking my voice out over the din of a typical commute on public transport.
The earphones remained comfortable to wear, whether I was working out or casually listening to music, although the left earpiece had a habit of slowly loosening when I was on the move which broke the insulating seal and let sounds leak in from outside.

That got annoying after a while, so I switched to the Comply eartips and chose a larger left tip (I have odd-sized lugholes, apparently) which solved the problem.
I loaned the H5’s to a friend who complained that the left bud kept flying out of her ear during a high-intensity exercise routine due to the added weight of the inline remote, even after she swapped the tips for a bigger size. I couldn’t replicate the issue myself using the memory foam tips and the buds stayed securely in place whatever I was doing, but this should serve as a warning to potential buyers.
I was underwhelmed by the stated five-hour battery life of the H5’s (confirmed in my own tests) given that buds in Jaybird’s wireless range offer up to eight hours’ listening time, but in practice I only wore the H5’s two hours a day on average and it wasn’t a huge inconvenience to charge them for a couple of hours every other night – your mileage may vary.
Bottom Line
$250 earbuds will be a hard sell for many people. Personally I couldn’t justify it, but if you have the spare cash and are fond of luxury kit, then I suppose it’s not a deal breaker. Overall, the Beoplay H5 earphones are a lovingly designed, solid bit of kit. To be fair, it’s the least I’d expect at this hefty price, and happily they deliver.
The magnetized buds and auto-off feature are signature B&O design wins, as is the supplied charging cube – it’s just a shame the charge doesn’t last a few hours longer. I’d also advise to be careful not to lose the charger; it’s not like you’d be able to replace it with a standard micro-USB cable, as with some other wireless buds.
My only real design gripe was with the inline remote – its surface smoothness made it hard to find which was which volume control when out of my line of sight. After a while though, I became familiar with the layout and it became a non-issue.
Sonically the H5’s are rich, well-balanced, and pack a satisfying punch, and with some subtle audio profile manipulation you can easily adjust the output to your musical taste. Still, this is a significant investment, and for that reason I’d recommend you try the buds before you buy, even if that’s just to see if the tips play nice with your earholes. If they sound great and sit securely – and you can live with the middling battery life – then this luxury wireless headset could be an ideal match for your iPhone, headphone jack or no.
Pros
- Slick, comfy, considered design
- Plenty of supplied eartips to choose from
- Decent built-in mic and excellent audio output
- App presets that make a difference
Cons
- Battery life isn’t spectacular
- Inline remote mold unhelpfully smooth
- Achieving a secure eartip fit may be an issue for some
- Very expensive for earbuds

How to Buy
The Beoplay H5 earbuds cost $249, are available in black or dusty rose, and can be ordered on the B&O PLAY website.
Note: B&O PLAY provided the H5 earphones to MacRumors free of charge for the purposes of this review. No other compensation was received.
Tag: Bang & Olufsen
Discuss this article in our forums
Beoplay H5 Review: B&O’s Bluetooth Earbuds Sound Great, but They’re Pricey
With the controversial removal of the headphone jack from Apple’s upcoming iPhone range a seeming inevitability, audio companies are already ramping up Bluetooth headset options ahead of the devices’ launch in the fall.
In June, premium audio heavyweight brand Bose debuted a wireless version of its flagship over-the-ear headphones with the QuietComfort 35’s. Not to be outdone, last month Danish audio big hitter B&O entered the fray with its Beoplay H5 Bluetooth buds, a pair of high-end magnetized earphones designed “for music lovers who live to move.”
Design and Features
As with most products bearing the Bang & Olufsen moniker, the Beoplay H5 buds aren’t exactly cheap at $249, but apart from the luxury brand cachet that comes with them, they promise premium performance in a compact package whatever your lifestyle, designed to segue seamlessly between a fitness routine and a daily commute, for example.
The dust and sweat-proof earpieces are made of a featherweight polymer-rubber compound with a branded aluminum disc on the rear, and each bud has a neck about an inch in length, with the power/pairing LED on one ear.
The buds are connected by a 52 cm (~20 in) cord sheathed in a soft braided textile that sits over the nape of your neck during wear, with an inline remote on the left-hand side and a hidden omnidirectional mic built in for taking calls.
Each earpiece contains a magnet, so you can clasp them together securely for them to rest around your neck when they’re not in use. In another neat design feature, clicking the magnets together also auto-powers down the earphones to save battery.
Seven pairs of eartips come supplied – three sizes of Comply Sport memory foam tips offering a malleable seal, and four sizes of standard silicone molded tips.
Also included in the box are cable clips, a carry pouch, a quickstart guide, and a unique magnetized “cubic charger” with two molded recesses that the earpieces snap into, with a cable running out the rear with a USB connector attached.
The earbuds connect to a source device using the latest version of Bluetooth (4.2) and support high-quality AAC and aptX codecs – only newer MacBooks, not iPhones, support the latter as of writing.

Audio output can be adjusted via the easy-to-use Beoplay iOS (or Apple Watch) app, which offers four presets for different activities (workout, commute, clear, podcast) and a ‘Tonetouch’ graphical equalizer to customize the sound further.
Once you’ve adjusted the output to your liking, you can save the audio profile directly to the earbuds, allowing you to set and forget. If you’re an Apple Watch wearer, you can choose between presets from your wrist, too.
Performance
Pairing the buds was a one-click affair of the power button on the inline remote, and the volume buttons proved to have the typical dual-functionality for moving between tracks, with the power/pair button also taking and ending calls.
Out of the box, the H5’s sound decent enough, offering a flat, natural reproduction and a close, friendly soundstage. Treble was a tad too crisp at times, but with a bit of adjustment via the accompanying app it was easily dealt with, and once I had a custom profile set, they really came into their own.
The controlled bass and clearly defined mid- and high-range detail of the H5’s serve rock, hip-hop, and instrumental genres extremely well, with jazz tracks reminding me of Vibe’s eminently balanced Brass Ba11 buds and their intimate, inclusive sound. As for the mic, it had no trouble picking my voice out over the din of a typical commute on public transport.
The earphones remained comfortable to wear, whether I was working out or casually listening to music, although the left earpiece had a habit of slowly loosening when I was on the move which broke the insulating seal and let sounds leak in from outside.

That got annoying after a while, so I switched to the Comply eartips and chose a larger left tip (I have odd-sized lugholes, apparently) which solved the problem.
I loaned the H5’s to a friend who complained that the left bud kept flying out of her ear during a high-intensity exercise routine due to the added weight of the inline remote, even after she swapped the tips for a bigger size. I couldn’t replicate the issue myself using the memory foam tips and the buds stayed securely in place whatever I was doing, but this should serve as a warning to potential buyers.
I was underwhelmed by the stated five-hour battery life of the H5’s (confirmed in my own tests) given that buds in Jaybird’s wireless range offer up to eight hours’ listening time, but in practice I only wore the H5’s two hours a day on average and it wasn’t a huge inconvenience to charge them for a couple of hours every other night – your mileage may vary.
Bottom Line
$250 earbuds will be a hard sell for many people. Personally I couldn’t justify it, but if you have the spare cash and are fond of luxury kit, then I suppose it’s not a deal breaker. Overall, the Beoplay H5 earphones are a lovingly designed, solid bit of kit. To be fair, it’s the least I’d expect at this hefty price, and happily they deliver.
The magnetized buds and auto-off feature are signature B&O design wins, as is the supplied charging cube – it’s just a shame the charge doesn’t last a few hours longer. I’d also advise to be careful not to lose the charger; it’s not like you’d be able to replace it with a standard micro-USB cable, as with some other wireless buds.
My only real design gripe was with the inline remote – its surface smoothness made it hard to find which was which volume control when out of my line of sight. After a while though, I became familiar with the layout and it became a non-issue.
Sonically the H5’s are rich, well-balanced, and pack a satisfying punch, and with some subtle audio profile manipulation you can easily adjust the output to your musical taste. Still, this is a significant investment, and for that reason I’d recommend you try the buds before you buy, even if that’s just to see if the tips play nice with your earholes. If they sound great and sit securely – and you can live with the middling battery life – then this luxury wireless headset could be an ideal match for your iPhone, headphone jack or no.
Pros
- Slick, comfy, considered design
- Plenty of supplied eartips to choose from
- Decent built-in mic and excellent audio output
- App presets that make a difference
Cons
- Battery life isn’t spectacular
- Inline remote mold unhelpfully smooth
- Achieving a secure eartip fit may be an issue for some
- Very expensive for earbuds

How to Buy
The Beoplay H5 earbuds cost $249, are available in black or dusty rose, and can be ordered on the B&O PLAY website.
Note: B&O PLAY provided the H5 earphones to MacRumors free of charge for the purposes of this review. No other compensation was received.
Tag: Bang & Olufsen
Discuss this article in our forums
Apple Launches iBooks Instagram Page to Share Book Quotes, Reviews, and More
Earlier this weekend, Apple began promoting book-related content with a new Instagram account centered around its iBooks digital platform. The launch of the iBooks Instagram page coincided with the release of the script for Harry Potter and the Cursed Child, which the account posted about yesterday.
Apple also wished author J.K. Rowling a happy birthday through its new verified Instagram page, but otherwise the content appears to largely be focused on introducing followers to fresh and notable stories through quotes, author spotlights, and unique, short videos.
Some of the novels referenced so far on the new page include Blake Crouch’s Dark Matter, Emma Cline’s The Girls, and Wendy Walker’s All Is Not Forgotten. All of the mentioned books released between June and July, so it seems iBooks will keep its promotions aimed at recently launched novels while it gains more Instagram followers in its early stages.
Thank you for coming into this world and bringing so much magic into our lives. ✨ #HappyBirthdayJKRowling
A video posted by iBooks (@ibooks) on Jul 31, 2016 at 10:11am PDT
You can check out Apple’s new Instagram account for iBooks here.
Tags: iBooks, Instagram
Discuss this article in our forums
Review: Standzout’s Helix Dock for Apple Watch is Compact and Convenient
While I have long used the Twelve South Forté on my bedside table to dock my Apple Watch each night, I lacked a convenient alternative for on the go until last week. Enter the Standzout Helix Dock, a compact and convenient charging solution for the Apple Watch.
Helix is an Apple Watch dock made from injection molded polycarbonate plastic. It stores between a 0.3-meter and two-meter Apple Watch charging cable and Apple’s official USB wall charger in a compact and convenient housing, available in clear, black, white, and a phosphorescent glow-in-the-dark color options.
I was sent all four colors for the purposes of this review, and the white one was my personal favorite; however, the glow-in-the-dark version is a unique concept for night use. If you purchase the glow-in-the-dark version, remember that phosphorescent materials require some exposure to bright light before they can glow.

The housing consists of an outer piece that holds the Apple Watch charging puck on the top, and an inner piece that you tightly wrap the charging cord around. The wall charger then slides into the middle, with its prongs extending through cutouts in the plastic, and you plug the USB end of the Apple Watch charger into it.
The assembly process is simple and took me less than one minute, but the cord can get in the way unless it is wrapped very tightly around the inner piece — the compact design leaves very little excess room. The snug fit can make sliding on the outer piece a bit of a challenge, and I also found that the charging cable comes unravelled when I remove the outer piece regardless of how careful I am.

Helix comfortably fit into power outlets around my apartment, including those in tight spaces, and most importantly it worked properly. I have a stainless steel Apple Watch, but the dock works with any models. However, its usage is limited to the United States, Canada, Mexico, Japan, and elsewhere Type A plugs/sockets are used.
Helix Dock retails for $19.99, which is somewhat expensive for what is essentially two small pieces of plastic — nothing else is included in the box. But what you are truly paying for is an innovative idea for charging your Apple Watch at home, work, or on the go. The product is also designed and manufactured in the United States.

Several options exist for Apple Watch chargers and docks by now, and the Helix competes well in terms of price, size, and grab-and-go simplicity. It is particularly useful to throw into a backpack before heading out somewhere like the gym or airport, and having one less cable to untangle is always a plus.
How to Buy
Helix Dock retails for $19.99 on Amazon and the Standzout website in clear, black, white, and glow-in-the-dark. Free standard shipping within the U.S. is included, while international shipping to other countries is available.
Note: Standzout provided four Helix Docks to MacRumors free of charge for the purposes of this review. No other compensation was received.
Related Roundups: Apple Watch, watchOS 2, watchOS 3
Tags: Apple Watch accessories, Standzout
Buyer’s Guide: Apple Watch (Caution)
Discuss this article in our forums
Review: Jaybird’s Freedom Wireless Earbuds Are Tiny While Still Offering Great Sound
Logitech-owned Jaybird has been designing Bluetooth earbuds since 2007 and has established itself as a manufacturer known for creating quality headphones ideal for working out.
Jaybird’s latest product, Freedom, is the culmination of years of design refinements. The Freedom Wireless Buds are Jaybird’s smallest and most comfortable yet, with a sleek sweat-proof design, multipoint pairing, and up to eight hours of battery life. As with most products, there are some downsides, so make sure to read on to find out what to expect from Jaybird’s latest product.
Design and Fit
Jaybird’s Freedom Buds are tiny, a feat achieved by moving many of the audio components from the earbuds themselves to the remote control. Jaybird sells the Freedom in a range of colors from white and black to red and blue, with the earbuds themselves made from metal with plastic accents.
Visually, they’re smaller than any other earbuds on the market, but they look and feel like a quality product thanks to the metal design, a deviation from previous plastic earbud designs from Jaybird. These are wireless headphones, which means there’s no wire to plug into your phone because they connect via Bluetooth. I loved the look of the gold and white Freedom earbuds I tested — they’re small and sleek, the perfect companion to an iPhone.

There’s a cord that connects the two earpieces together, and on the right side of the cord, there’s a remote. Unlike the earbuds themselves, there’s nothing small about the remote. It houses all of the electronics normally located in the earbuds, and while it’s not heavy, it is bulky. It measures in at nearly two inches long and 1/4 inch thick.

When it comes to earbuds, comfort is my number one priority. I have small ears and with most headphones, Apple’s EarPods and UrBeats included, the insides of my ears start aching within a half an hour. The Freedom Buds are small enough that I barely feel them in my ears, even when using them for a couple of hours at a time.

With the wide range of tip options that come in the box, I suspect most users will be able to get a comfortable fit. There are silicone ear tips in small, medium, and large, plus Comply foam ear tips, also in small, medium, and large. I used the silicone tips while testing the Freedom Buds because the sound was better, but the foam tips were also comfortable.

The earbuds fit well in my ears, but getting them to stay in my ears was another issue. The bulk of the remote on the right earbud caused the earbuds to continually slip out of my ears and I was never really able to get a secure fit. Jaybird does include a set of ear fins with the earbuds, made of a soft, supple silicone, and that was the only way I could get them to stay put when moving around.
Jaybird says the Freedom Buds are sweat proof, and I didn’t have any issues. I didn’t run them under water or anything, but they definitely held up during regular activity.
Jaybird’s earbuds can be worn in two ways, depending on user preference. You can wear them like standard earbuds under the ears, or you can wear them over-ear with the cord wrapped behind your ears. Wrapping the cord around the ears alleviates some of the bulk of the remote, and two cord management clips can customize the cord length and further relieve the remote weight to make the earbuds more comfortable.
Shortening the cord of the Freedom Buds meant the remote hung down a bit less and was less in the way, but no matter what, it always pulled on the right earbud and was a consistent irritation. With heavy activity, the earbuds had a tendency to slip out of my ear a bit because of the remote’s weight, but clipping them to my shirt helped with the slippage, as did adding the fins.

Battery
The earbuds alone have a battery life of approximately four hours, but there’s an extra charging clip you can clip on to the remote to extend battery to eight hours. Theoretically, you can use this clip while the earbuds are in use, but it was just too bulky, heavy, and silly looking for me to use the charging clip this way.

Made of black plastic, the charging clip snaps right onto the back of the remote. It’s a battery in of itself, and it’s also what’s used to charge the Freedom Buds through a micro-USB port. The earbuds ship with a small micro-USB cable that can plug into any USB port or USB charger.
Frequent charging is one of the biggest downsides to wireless earbuds, and while I wasn’t a fan of using the clip while wearing the earbuds, it was a clever accessory for charging on the go. Snapping the clip onto the earbuds while they were in my purse was a quick and easy way to recharge them without needing to plug them in and it ensured I was never stuck with dead earbuds. 20 minutes of charging offers an hour of music playback.

My one qualm with the clip is its size. It’s small and easy to lose, and as far as I can tell, Jaybird isn’t selling replacements yet. It’s also worth noting that when you attach the clip to the remote while music is playing, it’ll cut off and need to be restarted.
Jaybird put a lot of thought into making charging as easy as possible, even down to the user interface. When the earbuds are turned on, the battery level is announced, and it’s also visible in the MySound app and in the Notification Center when connected to an iOS device.
An orange light is displayed when the earbuds are charging, and it changes to green once charging has completed. In my experience, it took just a couple of hours to charge the earbuds from dead to full.
Sound
I’m not an expert on sound, but as an average earbud user, the Jaybird Freedom sounds great — better than other wireless earbuds I’ve tried and better than many of the wired earbuds I own.
Noise insulation and blocking isn’t great, but because the earbuds are so small, it’s possible to get a good seal in the ear for the best possible sound. With a tight seal, all of the music I played was crisp and balanced, especially after I adjusted the equalizer to my tastes with the MySound app. The only negative I noticed was somewhat muddy bass on bass heavy songs.

Volume wise, the earbuds got loud enough to block out almost any ambient noise while still sounding clear and non-distorted.
Using the app, it’s possible to make minute adjustments and download sound profiles like “Bring the Bass,” “R&B” Jams, and “Warmth.” There are even sound profiles created by pro athletes like Sonya Looney and James Lawrence.
While sound is good, I wasn’t impressed with the range of the Freedom Buds. Jaybird says optimal range is about two feet, and that was about accurate to me. Direct line of sight also seemed to be required for clear sound – stepping into another room could cause it to cut out, and holding my phone in certain positions outdoors also sound to cut out once or twice. Jaybird recommends an armband that keeps the iPhone above the elbow when using the earbuds outdoors.
I had no trouble connecting the earbuds to any Bluetooth device, from my Mac to my iPhone to my Apple Watch. It was all seamless and simple.
Other Features
In addition to offering volume up, volume down, and power buttons, the remote also incorporates double presses for additional functionality. Holding down on the volume up button goes to the next song, while holding down on the volume down button goes back to the previous song. A short press on the middle button initiates a redial, a longer press ends a call or activates Siri, and an even longer press turns the earbuds off.
There’s a built-in microphone so the earbuds can be used for making phone calls, and the calls I made with it sounded loud and clear with no interference. When on a call, the buttons on the remote can be used to switch a call over to the Freedom, mute and un-mute, or place a call on hold and answer a second call.
A built-in “Multipoint” feature lets the earbuds pair with and connect to two different Bluetooth devices at once, allowing for quick switching. You can use the earbuds to listen to music on one device, like a Mac, and then switch over to answer a call, and there’s also a sharing feature for listening to the same music on two sets of Freedom earbuds from one device.
Bottom Line
$200 is a lot to spend on earbuds. It’s more than i normally spend because I’m prone to losing them, and I have mixed feelings on whether or not the Jaybird earbuds are worth the purchase price.
On one hand, I love the size, comfort, and long battery life, but that bulky remote was nearly a deal breaker for me, constantly getting in the way and pulling the earbuds out of my ears. It’s entirely possible that due to my small ear size and ear shape, I wasn’t able to get a good enough fit with the Freedoms to keep them in my ears, so others might have a different experience.

If you can get a good, secure fit with Jaybird’s latest earbuds, I think you’ll be happy with them. The sound is great for the average user and they’re undeniably comfortable, but you’ll definitely be paying a premium for these features. At $200, the Freedom earbuds are pricier than quality options from competitors.
We all have different ear shapes so not every set of earbuds is going to fit every ear. I’d recommend giving the Freedom a try if you’re looking for a set of premium wireless earbuds, but buy from Amazon so you have an easy way to return them if they don’t work out.
Pros:
- Tiny
- Comfortable fit, even in small ears
- Fins keep earbuds secure
- Fins are comfortable to wear for hours at a time
- On the go charging with battery dongle
- Can customize sound with accompanying app
Cons:
- Remote is bulky, weighs earbuds down
- Remote pulls earbuds out of ear
- Battery life is limited
- Extra battery dongle is heavy/bulky
- Battery dongle is easy to lose
How to Buy
Jaybird’s Freedom Wireless Buds can be purchased from the Jaybird website or Amazon.com for $199.95.
Note: Jaybird provided the Freedom Wireless Buds to MacRumors free of charge for the purposes of this review. No other compensation was received.
Tag: Jaybird
Discuss this article in our forums
Community Review: SCOTTeVEST Knowmatic Hoodie

A valiant attempt at solving a problem we didn’t even know we needed solved.
Editor’s Note: Welcome to our first ever Community Review! This is a full product review created by a member of the Android Central community, and it’s the start of a new program here. We’re going to be slowly opening this program up to community members and companies interested in participating. Please reach out to our Community Manager if you have any questions or would like to join the program!

SCOTTeVEST is a company the seeks to bring fashion and technology together in a unique way. Most company’s these days are trying to find new and different ways to integrate technology directly into the clothing, but SCOTTeVEST’s philosophy is simple: just bring the tech with you! Their vision is for a wide variety of fashion sensible jackets, vests, hoodies, and even lab coats, that will comfortably allow you to bring all, and yes I mean all of the things with you.
Smartphone? Check
Headphones? Check
Wallet and keys? Check.
Pop-tarts and Hot Pockets? Check.
iPad? (Yes, we know.) Check. You can bring both your mini, and your 9.7 inch tablet with you safely within the pockets of your SCOTTeVEST Knowmatic Hoodie.
SCOTTeVEST wants you to forget about computer bags and backpacks, but the question remains, can you really carry everything in it? Even the kitchen sink? Let’s find out.
Soft-wear

The Knowmatic Hoodie is firstly just that, a hoodie. So how does it stack up next to it’s other hoodie companions? Is it hoodie enough for all your hoodie needs? Well, as far as hoodies go (have I said “hoodie” enough yet?) it’s actually amazingly comfortable. It is made out of a micro-fleece material that is oh-so soft and keeps you warm as well. Although, being in Texas in the middle of summer, everything is hot. Like ridiculously hot. Aside from that, the Knowmatic Hoodie is very easy to wear and is certainly fashionable enough for even your most hipster-est of friends.
No matter how many pockets I use, I keep finding more!
As the name suggests, the Knowmatic Hoodie does have an adjustable hood — go figure. But they’ve added a fun little feature to it which, depending on your friends and family, some might find it more useful than others. Tucked away inside the hood is a flap that you can fold down to cover your eyes for all those little power naps throughout the day. Weather for flights, or train rides, or maybe just to politely tell your significant other that you are otherwise occupied at the moment. To ensure that those around you are getting the message that you don’t want to talk to them right now, a simple “DO NOT DISTURB” is printed on the flap. Thank you SCOTTeVEST for finally coming up with a way for me to tell the world to go away without me having to say anything. #Lifechanged
Oh and one more fun little tidbit on the outside of the hoodie — cuts into the cuffs of both sleeves is a hole for your thumbs so you can look like all the cool kids around town, and also, by the way, help keep your hands warm. We don’t have to tell them that cool can be functional too.
Hard-wear

This Hoodie claims to have 13 pockets. I say claims, because no matter how many I use, I keep finding more! They just keep appearing out of nowhere! It’s magical!
Let’s start with the ones on the outside. As you would expect on a hoodie, there are two pockets at the bottom where your hands would normally fit, pockets 1 & 2. But don’t for a second think that these are just regular pockets. For starters, both pockets can clasp shut with a small magnetic clasp. Also, on the inside of both pockets, there is an extra little tiny pocket for all your spare change, pockets 3 & 4. However, this is 2016 so I’ll just over pay for my coffee with my watch and be on my way, thank you. Aside from the change pocket, the inside of the right pocket (#2) hides two more surprises for you.
The more stuff you add to the vest, the heavier it will get.
The first is a strong elastic strap designed to hold your water bottle. However, it seemed to be a little more trouble than it was worth for me to get the bottle in and out quickly. I’d rather just set it in the pocket. The second hidden gem is a small key holder. This is a little more intricate gadget which involves a key ring on an extendable plastic band with a quick-release clasp on the end. This is all held in place by a snap button at the bottom of the pocket. Confused yet? It’s really not that bad and actually is a very convenient way to carry your keys without them falling out or getting pulled out by a less-than-savory thief.
Lastly, on the left sleeve is another pocket, #5 if you’re keeping track, which is perfect for a small wallet. It won’t fit anything massive but as long as it isn’t too big or stuffed with 20 different credit cards, it should fit ok.
Things really start to get interesting on the inside of the hoodie. Both sides of the hoodie are symmetrical so that makes it a bit easier. At the top, we have a pocket big enough for any smartphone with some extra room for sunglasses or whatever else you might need (pop-tarts on the go for instance). These pockets (6 & 7) clasp together magnetically as well so it’s easy to get in and out of quickly while making sure nothing falls out.

Beneath these pockets are even bigger pockets (8 & 9). These are designed for your larger gadgets like phablets, tablets, and kitchen sinks. This pocket is technically one large pocket that is divided down the middle with three small velcro patches that can transform this big pocket into two smaller ones. Turning these two pockets into four brings us to a grand total of 13 pockets (give it a second and it will make sense).
Now at this point you’re probably saying “holy crap that’s a lot of pockets”, and you’re right! But you’re also probably asking, “Doesn’t it get super heavy with all that stuff in there?” Great question, I’m glad you asked! The answer is, yes, because gravity. The more stuff you add to the vest, the heavier it will get. Luckily SCOTTeVEST had the same thought you did and came up with a mostly functional solution. They have built a Weight Management System into the material to help distribute weight more evenly throughout the hoodie. How it works is pretty simple; they design the shoulders and upper half of the clothes with extra material and place the seams in such a way as to help lighten the stress on your neck and back.
This, coupled with the strategic placement of the pockets, ensures that the hoodie won’t have any adverse side effects. Each new design is also inspected by a licensed chiropractor to ensure it’s safety. In my own use, since I don’t have another hoodie that can hold all of the things, I wasn’t really able to asses how good it is compared to other hoodies, but in short, the system works! Now it’s not gonna let you fly, but it doesn’t feel as heavy as it might without it. I say mostly functional because I’m honestly not sure how much lighter it will really feel. And keep in mind, the system cannot change the laws of physics so if you add 10 pounds of gear to the hoodie, you’ll still be carrying around an extra 10 pounds. After a while it will still feel heavy, but it makes traveling, or even those Sunday afternoon coffee shop sessions much more bearable.
Unfortunately, like all of Bond’s other stuff, this thing ain’t cheap.
But SCOTTeVEST wasn’t done there. Oh-ho no. Because now that we’ve gotten all the gadgets in there, what about my headphones? How am I going to jam out to the latest Bieber album while rocking out in my super fly hoodie? Don’t worry friend. You can still pretend to be cool with all the other kids. SCOTTeVEST’s solution for this is called the Personal Area Network or PAN (don’t ask me, I don’t know why they call it that either. It is patented though, so there’s that.). The PAN is a series of small holes and elastic bands all throughout the hoodie that will let you wire it up just like an undercover super spy. They start from the bottom-most pockets and weave their way up into the collar so your ear buds are never far from your ears. You can weave the plug end into pretty much any pocket you want, inside top, outside bottom, inside bottom, one of the invisible pockets, wherever you want. The end result is having your headphones within easy reach without having to wrap and unwrap them constantly or stuffing them down your shirt awkwardly. The earbuds live right by your ears and the rest of the wires are hidden out of the way so you don’t have to worry about them. It’s honestly probably the coolest part of the whole hoodie (aside from the pop-tart pocket of course).
All About the Benjamins

Unfortunately, like all of Bond’s other stuff, this thing ain’t cheap. One of SCOTTeVESTs biggest aims is to stay fashion sensible and as with most things fashion, that comes at a price. SCOTTeVEST is aimed at the business traveler crowd who maybe have a little extra money to spend in the name of convenience and looking professional. As such, their prices are a bit high. The absolute cheapest thing on their website is $25 but that’s a hat and a pair of boxers. If you are looking for a jacket, hoodie, shirt, or vest, things get a little pricier. On sale, you can find some for around $60 but they quickly go up from there.
The Knowmatic Hoodie that we’ve been talking about here is a cool $110. SCOTTeVEST also attempts to meld fashion with the ability to leave your computer bags behind, so depending how often you actually end up leaving your bag at home and how much your bag costs, things might balance out a little better. For example, the bag that I use the most cost me about $100 but now I have a cool hoodie that allows me to leave my backpack at home so for me it evened out. The other good news is that there are plenty of options for all kind of business professionals. Even body guards get some love with a jacket that will let you conceal your firearm right next to your iPad. So you can stop the bad guy with one hand, then immediately tweet about the whole thing!
All in all, it’s a good chunk of change to drop on a piece of clothing. It will really come down to how much you really need extra pockets, out side of the ones in your pants.
Final Thoughts

In my time with the Knowmatic Hoodie, I came away very impressed. For starters, the material is very soft and comfortable to wear. The size I ordered was correct and fit me perfectly well without being too baggy. It kept me warm, but was also breathable enough that I wasn’t sweating while wearing it.
Not only was I impressed with it as an article of clothing, but I was also impressed with how it loved up to it’s claim. When I go to work, I take with me my two phones, my iPad, wallet, keys, charging cable, and sunglasses. I used to take my backpack with me, but after using the hoodie for a while, I was able to fit everything I needed comfortably in the pockets without feeling overburdened. So I left the backpack at home. The harder part for me is not melting from sweat while wearing a hoodie in the 100 degree South Texas summer heat. Maybe I’ll start rotating the bag and the hoodie.
Should I Buy It?

Well, it depends on your needs.
SCOTTeVEST products are great for a wide variety of people. Almost everyone would be able to use the features of the hoodie. If you are a business traveler who wants to get away with an extra carry-on, or someone who needs to carry everything with you all the time, or if you have a bad relationship with your backpack and have been hurt, then SCOTTeVEST is perfect for you and it’s absolutely worth your money! It’s incredibly comfortable, allows you to carry everything you might ever possibly need right on your chest, and look great doing it. Also, if you’re a more safety conscious person, another great thing about the hoodie is that no one else can see what your packing. Everything is concealed well enough so that those unsavory types would have no idea what you’ve got on you.
If you don’t really carry that much tech with you, or you don’t travel a lot, or if you just prefer to carry a bag with you, then honestly it might be better to save your money and look elsewhere for fashionable outerwear. But if this is your sort of thing, you can find them for sale right from the SCOTTeVEST site.
See at SCOTTeVEST
