


How to Check Smart Thermostat Compatibility in your Home

You can do this.
So you want to get yourself a smart thermostat. Good for you. It’s a smart investment. But, yeah. There are wires involved. And just a little bit of electricity. Nothing too scary (and nothing too high-voltage), but that does mean there’s going to be a little bit of homework before you buy. Because (and I know this from experience) there’s nothing worse than coming home with a few hundred bucks worth of hardware and finding you can’t use it.
The good news is you don’t have to be like me. The good news is that it’s pretty easy to check to see if your home setup is compatible with a smart thermostat.
I’m not actually going to tell you if your home is compatible, though. But I will show you where to get started. Teach a man to fish, and all that.
Here’s how.
First things first: Open things up
Regardless of which brand of smart thermostat you’re going to go with, you’re going to have to open up your current one and take a look at the wiring.
Most likely you’ll see a rat’s nest of different colored wires, probably with letters at the terminals. That’s a good thing. Go ahead and take a picture of it with your phone. You’ll thank me later.
Then, it’s time to take a look at what you’re considering.
Will my home work with a Nest Thermostat?

Nest does a really good job of walking you through setup once you have one of its thermostats, but it also has one of the best pre-purchase experiences, too.
It’s the same basic process. Take a look at your existing wiring, and answer a few questions in an online widget compatibility thing. It’s simple enough.
But if you do need some extra help, Nest has additional options to figure things out. It’s got an online chat, toll-free phone number, and community forums. Or if you’re ready to throw in the towel and just get the thing done, they can hook you up with a “Nest Pro” for professional installation.
Click here to see if your home is compatible with a Nest Thermostat
Will my home work with an ecobee thermostat?

ecobee also has an decent online installation guide. Its compatibility checker maybe isn’t quite as sexy or comprehensive as what Nest has, but the premise is the same. Take a look at your existing wires and run through the guide, and you’ll quickly see if it’ll work.
ecobee has a couple extra steps — you might need the included power extender kit, or you might not, and it’s got external sensors to set up as well.
But ecobee also has an excellent series of videos walking you through things.
Click here to see if your home is compatible with ecobee
Will my home work with a Honeywell thermostat?

Honeywell has the most simple support pages of the three we’re looking at here. It’s definitely less interactive, but it’ll still get the job done.
Again, look at your existing wiring, then run through their little series of questions.
Click here to see if your home is compatible with Honeywell
Get the training needed to become an IT security professional for just $29!
If there’s one thing that isn’t going away anytime soon, it’s IT security. The internet plays a huge role (that’s only getting bigger) in the operation of companies and corporations, and the data being moved back and forth requires protection.
Professionals are in high demand when it comes to IT security, and having Certified Information Systems Security Professional (CISSP) on your resume will only help you get hired. The training required to pass the certification exam is usually expensive, but Android Central Digital Offers has a great deal. Instead of paying the regular price of $672, you’ll instead pay just $29. That’s 95 percent off!

This course includes eight comprehensive modules that you can access anytime. You’ll learn the principles of access control, the role of information governance in security standards, how to use cryptography to protect data in transit, and much more, all in preparation of the certification exam.
If you’re thinking about a career in IT security, don’t sleep on this course. CISSP certification looks great on your resume, and might mean the difference between landing a lucrative career and being passed over.
Nest Hello will work with Google Home to announce who’s actually at the door

You’ll just have to teach it a tad.
In hindsight, this one should have been obvious. And maybe Nest spelled it out explicitly and I just missed it. But in any event, let’s codify it here.
Nest Hello — the upcoming video doorbell from the company best known for its thermostats and cameras — will work with Google Home (and Google Home Mini — really, with Google Assistant) to announce who’s at your door. That is, it’ll recognize who’s there thanks to Nest Aware’s “Familiar Faces” feature, and then spit out that info over a Google Home. Nest is throwing in a free Google Home Mini if you pre-order Nest Hello by March 14.
Hmmmm. Not sure if I just missed this before, or if they updated for it, but it was obvious, no? pic.twitter.com/iT46qLtA5m
— Phil Nickinson (@mdrndad) March 5, 2018
Familiar Faces is a thing by which Nest recognizes that there’s a face (erm, or not) and then asks you to give it a name. From then on when it recognizes that person (or chair) it’ll say “Hey, there’s Phil. Phil’s here. Hi, Phil.” Or something like that. The point is that it doesn’t just pluck that person’s identity off of the internet — you have to personalize things.
But this will solve one of my major headaches regarding connected doorbells. It’s great being able to see who’s coming, or who’s there. But there’s still just enough lag time between the doorbell seeing someone and my being able to respond to a notification and open and app and then visually figure out who it is.
This should cut a couple steps out of the process.
For a couple other things on my Nest Hello wish list, check out “How Nest Hello could out-doorbell Ring.”
See at Nest
Amazon’s Kids Edition Fire Tablets are starting at $70 right now
Treat your kids to a new tablet.

Amazon’s Fire Tablets are super popular because of their affordable prices, so when you can save even more on them you shouldn’t miss out. The Fire 7 Kids Edition is currently down to just $69.99 from its regular price of $99.99 in your choice of blue, pink, or yellow. If you want something a little bigger, you can grab the Fire HD 8 Kids Edition for $89.99, which is $40 lower than it normally sells for.
Both options come with a year of Amazon’s FreeTime Unlimited, which is a $119 value. Amazon offers a two-year worry-free guarantee on the tablets, so if your kids happen to break the tablet Amazon will exchange it with no questions asked.
The tablets have access to tons of kid-friendly content and media. Unfortunately, they don’t have much internal storage, so you’ll want to add a microSD card to your purchase so that your kids don’t run out of space.
Best Cricket Wireless Phones as of March 2018
Here’s a look at the best Android phones offered by Cricket Wireless.
- Best overall
- Best for less
- Best for note-takers and doodlers
- Best if you already have a phone
The Galaxy S9 has just been announced and it will be released on March 16! We are still evaluating the phone and will add it to this list once it is available.
Best overall
Samsung Galaxy S8

See at Cricket Wireless
The Galaxy S9 will soon be available on Cricket, but until then, the Galaxy S8 is still the best Android phone the company sells. However, that shouldn’t come as much of a surprise.
As we all know at this point, the Galaxy S8 is a darn good phone. Its Super AMOLED Infinity Display is downright gorgeous, the 12MP rear camera continues to take impressive photos/videos, and things like a 3.5mm headphone jack and fast wireless charging are always welcome touches.
Better yet, if you don’t mind rocking last year’s tech, you can get the Galaxy S8 on Cricket for just $349.99 when you transfer an existing number and activate it with a new line of service.
Bottom line: At this very moment, the Galaxy S8 is still the best phone you can get on Cricket Wireless.
One more thing: If you have to have the latest and greatest, the Galaxy S9 will be here before you know it.
Why the Galaxy S8 is the best

What is there to say about the Galaxy S8 that hasn’t already been said? This remains as one of Samsung’s most powerful and best-looking phones ever made, and that holds true even with the S9 right around the corner.
The S9 will be on Cricket soon, but even when it arrives, the S8 will still offer an incredible user experience, beautiful display, and a heap of features for considerably less cash.
Best for less
Alcatel Idol 5

See at Cricket Wireless
There’s no denying that the S8 is a fantastic purchase, but if you’d like to spend a couple of hundred dollars less while still getting a great user experience, Alcatel’s Idol 5 is a great alternative.
For just $129.99 with a number transfer and activation, the Idol 5 comes equipped with a sturdy metal body, loud front-facing speakers, a surprisingly great 1080p LCD display, and even NFC for Google Pay. The camera isn’t the fastest and there’s a fair bit of pre-installed bloatware, but for a phone this cheap, the Idol 5 punches way above its asking price.
Bottom line: If you want a well-built smartphone that nails the basics, the Idol 5 is a top contender.
One more thing: Alcatel found itself in some hot water earlier this year, but the issue doesn’t appear to be totally widespread.
Best for note-takers and doodlers
LG Stylo 3

See at Cricket Wireless
Samsung’s Galaxy Note series is often praised for offering large screens and added functionality with the S Pen, and while all of this is fine and dandy, it can also set you back a pretty penny. If you’d like to get about 80% of the Note experience while saving a ton of cash, that’s where the LG Stylo 3 comes in.
The Stylo 3 has a big 5.7-inch screen with a resolution of 1280 x 720, and the included stylus that’s easily stored in the phone’s body makes it easy to sketch, sign documents, and much more. Add this together with a fingerprint sensor, 3,200 mAh battery, and a striking Rose Gold color, and it’s easy to see why this is such a steal at just $79.99.
Bottom line: The Stylo 3 offers a lot of the features that make Samsung’s Note devices so great at a fraction of the cost.
One more thing: LG opted for a cheaper plastic back and single mono speaker, but these aren’t uncommon at this price range.
Best if you already have a phone
Bring your own phone

See at Cricket Wireless
If you aren’t a fan of Cricket’s phone offerings, that’s not a problem. Because Cricket uses AT&T’s network, bringing your own phone is as easy as buying a SIM card and popping it in your device.
You can get a SIM kit from Cricket for just $9.99, and as long as your phone is unlocked and supports GSM networks, you shouldn’t have any issues whatsoever. In other words, you can sign up for one of Cricket’s awesome plans while using the Google Pixel 2, LG V30, HTC U11, and countless other handsets.
Bottom line: For $9.99, you can bring virtually any phone to Cricket’s network.
One more thing: Even if you don’t already have a phone, you can buy a wide variety of unlocked ones if the above options don’t tickle your fancy.
Updated March 2018: Added all of the best phones you can currently get on Cricket.
Android Auto was worth waiting three years to buy my car for

I waited three years to buy a CR-V with Android Auto, and it was worth every day.
I used to drive a 2003 Honda Odyssey. During my Disney College Program, she picked up the name Crimson. If anyone needed to move, if anyone needed to haul a crew around, or was taking a road trip, Crimson was our girl. Even at 226,000 miles, I was reluctant to give her up. During three years of car shopping to succeed her, I had only one requirement for Crimson’s replacement: it had to have Android Auto.
Now, I have it. And it’s glorious.
 A nerd and her first new car
This is my 2018 Honda CR-V, with the EX level trim, Obsidian Blue exterior, and most importantly, Android Auto. The native infotainment system on the EX and above supports both Android Auto and Apple CarPlay, with the USB port that links up with the head unit sitting at the bottom of the center console compartment. It’s a nice arrangement, allowing excess cabling to be coiled out of sight while the phone sits and charges on either the center console tray or in one of the cup holders.

If you hadn’t spied it in the photo above, there’s one big difference between this head unit and most aftermarket Android Auto head units: it has a good old-fashioned volume knob! I use the steering wheel controls more often, but it’s good to have a knob that people in the passenger seat can quickly quell the music when they get a call, or you want to blast that drum fill during “In The Air Tonight”. It’s old school, but there’s something undeniable about the appeal of a volume knob.


Speaking of steering wheel controls, the ones implemented on the CR-V’s wheel are equal parts cool and confusing. The volume slide is haptic, so if you just brush your thumb over it, it’ll turn the music up or down. This is cool if you’re a volume rider like I am, but it’s easy to trigger while making a turn. Likewise, the side-to-side arrow keys let you easily change tracks, but the center “Enter” button doesn’t pause the music. As volume gets its own rocker now, the up and down buttons will switch music sources, if you’re into that kind of thing. Me, I plug in my phone and let Android Auto do its thing.
There’s also call and voice command buttons on the steering wheel, and that voice command button pulls double duty. Click the button once, and you can give a voice command for the non-Android Auto part of the head unit. Press and hold the voice command button and Google Assistant will process your search instead.

The Android Auto experience is supposed to be the same across phones and head units, and the layout does indeed match other head units. There’re five buttons on the bottom nav bar: maps, phone, home, music, and Instrument Panel, which takes me back to the home screen on the CR-V’s launcher — the CR-V’s head unit runs Android. Navigating Android Auto is easier on the head unit’s 7-inch electrostatic screen than it fumbling with Android Auto on the phone itself, as I did with Crimson.

Between voice commands and the easy layout of most apps, it’s hard to run into the 5-tap limit when navigating, but every now and again that block me from reaching a playlist I wanted to switch to, but that’s why you’re supposed to get your music set up before you start driving. Using Android Auto for Google Maps instead of paying extra for a navigation service in the car is not only money-saving but sanity-saving, and the turn-by-turn directions are fed to the center screen of the CR-V’s instrument panel, so I don’t even have to look over at the main screen while I’m approaching a turn.

I’ve had the car for almost a month, and I can tell this is the beginning of a beautiful relationship. Without a doubt, I’m happy I waited for a model with Android Auto. Now, even though the CR-V has excellent Bluetooth and very easy pairing, I won’t have to worry about it, because Android Auto’s hardwired connection is easier and more stable. I know that wireless Android Auto was shown off at CES this year, and while that would be nice, I’d already waited three years for Android Auto. I wasn’t going to wait another three years for wireless Android Auto.
Future Essential Phone could have a pop-up selfie camera
This is how you make bezel-less smartphones.
We saw a lot of exciting tech at this year’s Mobile World Congress, but one phone that stole our hearts the most was Vivo’s Apex concept phone. The Apex is Vivo’s idea of what our phones could look like in the near future, and one of the most stunning parts of the Apex was its 90%+ screen-to-body ratio. Rather than adopting the infamous notch, Vivo achieved this by hiding the front-facing camera in the top of the phone’s body.

This is one of the more original smartphone designs we’ve seen in quite some time, and shortly after people started raving about it, Andy Rubin revealed on Twitter that Essential filed a patent for a very similar design in May of 2016.
Similar to the Vivo Apex, this patent shows a smartphone with a front-facing camera that can pop out from the top of the frame and then go back down into hiding when it’s not in use. In addition to looking cool, this also allows for virtually no bezels without sacrificing parts of your precious screen.

The Essential Phone was the first smartphone to be released with a notch in its screen, and while its take on this particular design trend is one of the least offensive ones we’ve seen, no notch is always preferable over any sort of notch — no matter how small it is.
It’s unclear when Essential will release a phone that takes advantage of this patent, but seeing as how Rubin publically touted it on Twitter, I’d say there’s some chance (even if not that great) we see this come to life with the Essential Phone 2.
Essential Phone 2 — How Essential can have a much more successful Year 2
Essential Phone
- Essential Phone review
- Essential Phone specs
- The latest Essential Phone news
- Join our Essential Phone forums!
Amazon
Best Buy
Sprint
Telus
Roland’s TR-8S mashes all your favorite 80s drum machines together
In the 80s, Roland drum machines were at the epicenter of hip hop, house, techno, acid house and other music genres. The 808, 909, 707, and 606 helped create the beats of some of your favorite songs. But if you wanted to pick up any of these vintage drum machines today, you’d probably end up dropping thousands of dollars. Fortunately, Roland just made getting all those vintage drum sounds a lot easier and cheaper with its new TR-8S, drum machine.
The successor to the Aira TR-8 introduced four years ago, takes what the company learned from that drum machine and fine-tuned it into a more capable and feature-rich drum machine that’s ready to mix and mash all those genres along with a few more with a just a few twists and button pushes. I got a chance to try out the new $699 TR-8S and during a hands-on and I came away impressed with what Roland has accomplished with the machine.
Right off the bat, my favorite new feature is the ability to import and play stereo or mono samples. Being able to add any sound (drum hit, voice or even a dog bark) to a sequence opens up a ton of opportunities for folks like myself that use drum machines during live performances. Plus, Roland’s implementation is dead simple. Just drop a WAV or AIFF onto an SD card and within a few seconds, it’s ready to be dropped into a sequence.
 Another update from the TR-8 is that instead of the two sequences per pattern, the TR-8S has eight sequences available per pattern. These can be played in order or selected on the fly. This also opens up opportunities for live performers. A musician could have the intro, verse, pre-chorus, chorus and bridge all in a single pattern.
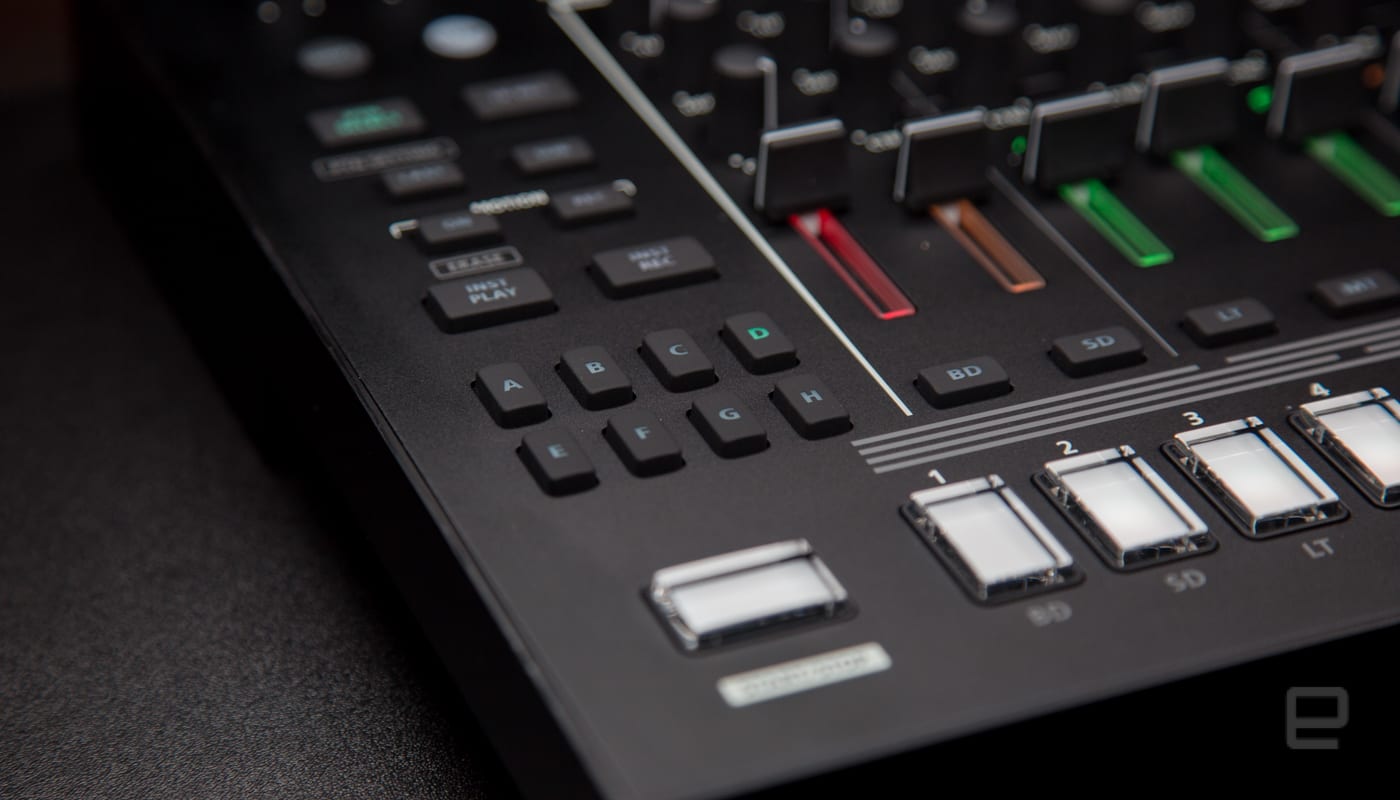
Plus now there’s a pressure sensitive pad that can be assigned to any instrument in a pattern. You can either tap to rec said instrument to a sequence or use it to play along and add a little flavor to a precomposed beat.
All the digital sounds on the TR-8S (and there are a ton of sounds, not just the drum machines) sounded outstanding. Rolands ACB (Analog Circuit Behavior) continues to impress me with its recreations of analog sounds.
Roland puts it all together in a package that’s easy to while also enabling more complex patterns. We’ll have a complete review of the TR-8S (which will be available this month) in the coming weeks.
Source: Roland
Pennsylvania sues Uber over 2016 data breach
Uber may be trying to clean up its image with new services like Uber Health, but its past mistakes keep coming back to haunt it. Back in 2016, Uber was the target of a cyberattack, which exposed the personal information of 57 million people. It took Uber over a year to actually report the attack; the company instead chose to pay the hackers a $100,000 extortion fee. Now, the state of Pennsylvania is suing Uber for failing it immediately disclose the breach.
“Uber violated Pennsylvania law by failing to put our residents on timely notice of this massive data breach,” Attorney General Josh Shapiro said in a statement. “Instead of notifying impacted consumers of the breach within a reasonable amount of time, Uber hid the incident for over a year — and actually paid the hackers to delete the data and stay quiet. That’s just outrageous corporate misconduct, and I’m suing to hold them accountable and recover for Pennsylvanians.”
The law Uber is charged with violating is the Pennsylvania Breach of Personal Information Notification Act. This requires companies to notify people who are impacted by any breach of data within a reasonable amount of time. It’s difficult to argue that thirteen months, which is the amount of time between the October 2016 leak and November 2017 disclosure, is “reasonable”. The law allows Shapiro to seek up to $13.5 million in penalties from Uber.
You can bet that Pennsylvania won’t be the last state to file suit against Uber; as many as 43 others are investigating Uber’s failure to disclose the hack. You can bet that this isn’t the last we’ll hear about this data breach.
Update: We’ve heard from Uber on the suit. They gave us the following statement: “While we make no excuses for the previous failure to disclose the data breach, Uber’s new leadership has taken a series of steps to be accountable and respond responsibly. We investigated the incident, disclosed the circumstances to state and federal regulators, and reached out to state Attorneys General, including Attorney General Shapiro, to express Uber’s desire to cooperate fully with any investigations. While we dispute the accuracy of some of the characterizations in the Pennsylvania Attorney General’s lawsuit, we will continue to cooperate with them and ask only that we be treated fairly.”
Source: Office of the Attorney General of Pennsylvania (1), Office of the Attorney General of Pennsylvania (2)
The settings you should change immediately after buying a new TV
It’s finally a good time to make the jump to a 4K TV. Prices have come down, HDR is up to snuff, and there are a bevy of great models to choose from. But once you bring your new TV home, you may want to take a trip through its settings and tweak a few in order to get the best possible picture.
If you peek into your TV’s settings, you’ll see a lot of features with catchy names — like “Ultra Black” or “Live Color.” Many of these features, however, are marketing gimmicks designed to sound impressive, one-up the competition’s spec sheets, and make the picture pop next to other TVs in brightly lit showrooms. In fact, many of them actually remove detail from the picture or cause distortions and artifacts that degrade picture quality. Here are the settings you’ll want to turn off for the best possible image.
The settings you should probably disable

Jump into your TV’s settings and head to the picture settings menu. Before you start tweaking, set the display’s mode to “Movie” (this is sometimes called “Cinema,” “Expert” or “Custom”). This will ensure that your basic brightness, contrast and color settings are as close to accurate as possible — at least, without going through a time-consuming calibration.
After that, you’ll want to head to the advanced picture menus to disable your TV’s post-processing features. In some cases, choosing that “Movie” picture mode may disable some of the below settings automatically — but it’s still a good idea to scour the settings menu yourself. Note that these recommendations apply to both standard and HDR TVs.
-
Dynamic Contrast: Sometimes called “Contrast Enhance,” this makes dark areas darker and bright areas brighter. That may make the picture “pop” a bit more, but in doing so, it’ll often crush blacks and whites, reducing the detail of the scene. It can also introduce color banding artifacts. Turn this off and you’ll ensure you’re getting the maximum amount of detail in the picture.
-
Black Tone: Similar to Dynamic Contrast, this attempts to make black areas look darker — but you can’t actually make your TV’s blacks blacker than they already are. Instead, this will make dark gray areas black, which will cause you to lose detail. It’s best to leave this off.
-
Black Detail: This is the opposite of Black Tone — it attempts to enhance details in dark areas by brightening them. You might think that’s a good thing, but in fact, it just causes the opposite problem: By lightening dark areas, you’re more likely to introduce artifacts.
-
Edge Enhancement: This feature attempts to make the image look a little sharper. That sounds good, but oversharpening can also create artifacts, like a “halo effect” around edges. In most cases, this should be left off.
-
Live Color, HDR+ Mode and Flesh Tone: All of these features introduce post-processing designed to enhance the color in some way. Live Color makes colors more saturated, HDR+ Mode attempts to make standard content look more like HDR, and Flesh Tone attempts to make skin pop. But if the movie you’re watching was properly mastered, the color should be fine; turn these off for the most natural-looking image. (Note that “Color Temperature” should not be lumped in with these features. You should leave that set to the Movie mode’s default, usually “warm.”)
-
Super Resolution, Reality Creation, Smooth Gradation and other Noise Reduction features: These attempt to make low-quality content look better, sharpening the picture and removing noise and other artifacts caused by digital compression or analog conversion. For high-quality content, like Blu-rays, these are best left off, since they can soften the picture. That said, you may want to turn them on for old DVDs (or even cable TV, if you find that it looks better).
-
Motion Interpolation: Every manufacturer has its own name for this. It goes by “Motionflow” on Sony TVs, “Motion Rate Supreme” or “Auto Motion Plus” on Samsung TVs, “TruMotion” on LG TVs and “Smooth Motion Effect” on Vizio TVs. Despite the different names, they all do essentially the same thing: generate more frames in between the already existing frames, for super-smooth motion. This is what causes that weird “soap opera effect” that so many people hate, and it can also introduce artifacts, so we recommend disabling it — unless you’re one of those people who actually enjoys it.
-
Auto Picture Mode: This is a feature on some Sony TVs that attempts to change your TV’s picture mode automatically based on what it sees on the screen. It’s generally a good idea to leave this off; the settings we recommend in this guide should work well no matter what you’re watching.
Note that not all TVs will have all these settings; cheaper panels, in particular, will have far fewer options. But this list should cover most of the image-processing settings you’ll see on popular TVs from big brands. At the end of the day, it’s all about what looks best to you. But if you want the most detail and the most accurate colors, as the filmmakers intended, we recommend disabling as many of these features as you can.

Will Lipman / Engadget
The settings you’ll need to try for yourself

Disabling all of the post-processing is the easy part. There are a few settings on your TV that can make the picture look much better (or worse), but which setting you should use depends a lot on your TV and what you’re watching. Here are a few settings you may need to experiment with:
-
Backlight: Most TVs have both a Backlight and a Brightness setting, and they do very different things. You should leave “Brightness” alone unless you’re calibrating your TV, as it affects the black levels. Backlight, however, you can set to whatever you want, as it just changes how bright your TV is. You’ll probably want it higher during the day, and lower if you’re watching in a dark room. (Your TV may also have an Energy Saving feature that attempts to adjust the backlight automatically.)
-
HDMI Range, Color Space, RGB Range or Black Level: This feature determines how the color signals sent to your TV are processed. If your TV lets you set this to Auto, leave it there. Otherwise, it should almost always be set to “Limited” (or “Low” in the case of some Samsung TVs). Make sure the devices plugged into your TV, like your game console or set-top box, are also set to “Limited.” “Full” is intended only for those who are using their TV as a PC monitor. (Note: On Sony TVs, Black Level is the same as Black Tone, and should be left off.)
-
24p Playback: Often called something like “Real Cinema” or “Pure Cinema,” this feature plays movies at 24 frames per second instead of using 3:2 pulldown. This is a rather complicated topic, but in short, it may remove some stutter when watching movies and TV shows. Some TVs do this automatically with no settings toggle needed, and some can’t do it at all. But if this setting exists, you’ll want to turn it on.
-
Local Dimming: This feature attempts to dim some of the LED lights in your TV to get darker blacks in certain parts of the picture. When implemented properly on full-array TVs, this feature can be great. On other TVs (especially edge-lit ones), it can lag behind the picture, darken certain areas too much, or cause flickering. Try this both on and off to see which you like better. This is called “Xtreme Black Engine Plus” on Vizio TVs. Sony TVs will have this, along with an “X-tended Dynamic Range” feature that does something similar with bright whites. Again, try it on and off to see what you like.
-
Game Mode: Intended for video games, this setting lowers the input lag of your TV to ensure that your button presses are registered onscreen as soon as possible. On some TVs, this comes at the expense of image quality. Try it on your TV — if it lowers the image quality of movies noticeably, you’ll want to turn it on only when you game.
-
Black Frame Insertion and PWM Dimming: Known as “Clear Action” on Vizio TVs, “Clearness” on Sony TVs, “LED Clear Motion” on Samsung TVs and “Motion Pro” on LG TVs — you’ll usually find this as a sub-setting under the Motion Interpolation setting described above. This feature inserts black frames in between the existing frames of the content you’re watching, which should reduce motion blur without introducing a strong soap opera effect. It will, however, cause the screen to dim considerably and flicker, which some people may not like, so try it on and off to see what you prefer.

There are hundreds of different TVs out there, and it’s impossible to cover every single setting you may come across, but this should give you a good idea of how to tweak your TV for close-to-optimal picture quality, without having to hire a calibrator or go through a time-consuming process yourself. If you find a setting that isn’t on the above lists, look it up online and see what people recommend — or sound off in the comments below.
Images: Vasquez / EyeEm via Getty Images (Color test); Will Lipman / Engadget (OLED starry sky); Vizio (TV settings menu); gorodenkoff via Getty Images (TV store)

