


Which Amazon Kindle should you buy: Paperwhite, Voyage, or Oasis?
Looking for a new e-reader? We’re here to help.

There’s no dearth of choice if you’re in the market for an e-reader, with Amazon alone offering four Kindles across various price points. Amazon has been making e-readers for well over a decade now, and in that time the retailer has come to dominate this segment thanks to a combination of hardware chops and an outstanding e-book store.
The current Kindle lineup starts off at $79, and goes all the way up to $269. Whether you’re looking to get started with e-readers or are interested in upgrading to a more feature-rich model, these are the best Kindles you can pick up today.
Kindle

The $79 Kindle has a lot going for it: you get 4GB of storage, ability to stream audiobooks over Bluetooth — the only other Kindle where that option is available is on the top-end Oasis.
The current-generation Kindle is also thinner and lighter than its predecessor, but there are a few drawbacks: there isn’t a backlight, and the pixel density at 167ppi isn’t ideal. The base variant is a decent choice if you’re unwilling to spend over a hundred dollars on an e-reader, but you get so much with the next variant in the series.
See at Amazon
Kindle Paperwhite

The Paperwhite is the default option for a lot of people. It costs $129 — $40 more than the base model — and comes with a backlight, 6-inch 300ppi display, and there’s a cellular option available if you want to download books on the go. The 300ppi display on the Paperwhite is just as crisp as the costlier Voyage or Oasis, and you have the option to adjust the intensity of the backlight.
The back has a soft touch plastic coating that makes it comfortable to hold the Kindle for hours on end, but its weight could turn out to be an issue for some. The Paperwhite is the heaviest Kindle you can buy today, coming in at 205g, and a lot of that has to do with its design. The screen is slightly recessed from the frame, and the large bezels mean the screen is protected in the case of a tumble.
If you’re looking for a Kindle that offers the best value, then the Paperwhite is the one to get. Amazon has mentioned that it will offer the e-reader for just $79 on Prime Day — making it a particularly great choice if you’re looking to get started with the Kindle ecosystem.
See at Amazon
Kindle Voyage

The Voyage is a premium take on the Paperwhite. While it has the same screen size and pixel density as its more affordable sibling, the Voyage is all about refinement. It has six LEDs under the screen that deliver a more uniform backlight — the Paperwhite has four — and there’s an ambient light sensor that automatically adjusts the intensity of the backlight based on your environment.
The LEDs produce a warmer hue, making it more conducive to read on the device for an extended duration of time. The Voyage also has page press buttons that let you turn the page by pressing down on either side of the bezel — and you get decent haptic feedback. The back has an angled pattern that nestles in your hand, and up front, the screen is flush with the body of the device.
At $199, the Voyage isn’t exactly what you’d call affordable, but the form factor and the ambient light sensor make it a compelling option if you’re looking to move up from the Paperwhite.
See at Amazon
Kindle Oasis

The Oasis is Amazon’s flagship Kindle. It is the only one in the lineup to offer water resistance, with the IPX8 certification allowing it to be submerged in up to two meters of fresh water for 60 minutes. That makes the Oasis a great option if you’re looking to read by the pool or in the tub.
The Oasis doesn’t look like any other Kindle, and that’s because of a unique design that sees the internal components located on one side. The design brief for the Oasis was to mimic a book folded in half, and it excels at doing that. Unlike the rest of the series, the Oasis has a brushed aluminum finish at the back. While it isn’t as comfortable as the soft touch plastic, you have the option to accessorize with a fabric case.
The screen resolution on the Oasis is the same at 300ppi, but the e-reader has a larger 7-inch panel. It also has 12 LEDs as well as an ambient light sensor, and an accelerometer that switches the orientation of the screen based on whatever hand you’re holding the Oasis.
If you’re looking for the best e-reader available today, the Oasis should be at the top of your list.
See at Amazon
Pair your e-reader with Kindle Unlimited

Buying a Kindle is just half the story; you’ll want to pick up some books to read on the device. Fortunately, Amazon’s Kindle Unlimited is one of the best e-book lending services available today. You get to choose from over 1 million titles, thousands of audiobooks, and popular magazines.
You’ll be able to save ten books on your device at any given time, and you’ll have to return a book if you want to add more. Kindle Unlimited costs $9.99 a month, but Amazon is currently offering a three-month subscription for just $0.99. That’s a great way to see what the service has to offer and decide if you want to continue subscribing after the trial runs out.
Sign up for Kindle Unlimited
Best Prime Day deals
Amazon Prime

- Benefits of Amazon Prime
- Get a free 30-day Amazon Prime trial
- Top microSD cards
- Top-selling battery packs
- Top charging cables
How to change the theme and accent colors in OxygenOS
Have a OnePlus phone? Here’s how to make it look just the way you want it 👌

The software that comes on OnePlus phones — OxygenOS — does a lot of cool things you won’t find anywhere else. If you’re a customization geek like me, one of the best features is the ability to change the theme and accent color of the user interface to make it look just the way you want.
The default theme that comes equipped on OnePlus phones out of the box doesn’t look bad by any stretch of the imagination, but if you’re ready to start tweaking things to make everything look exactly how you’d like, here’s what you need to know.
Note: This guide applies to the OnePlus 3 and newer.
How to change the theme
Open Settings.
Scroll down and tap Display.
Tap Theme.


If you’ve never changed the theme of your phone, it’ll be set to Default.


OnePlus gives you two options to choose from — Light and Dark — and both change the appearance of your settings page, quick settings drop-down, app drawer background, app shortcuts, and multiple OnePlus apps (such as Phone, Messages, Contacts, Calculator, and more.)
How to change the accent colors
After you’ve selected a theme you like, it’s time to pick an accent color. Although not as drastic as the theme you choose, your accent color choice is reflected in the text/icons in settings, your quick settings icons, volume indicator, app shortcuts text, and in the app drawer.
To change your accent color:
Open Settings.
Scroll down and tap Display.
Tap Accent color.


OnePlus currently gives you eight accent colors to choose from, but the company is testing something in the OxygenOS Open Beta that gives users more pre-made colors and even allows them to create their own custom hue.


If/when this makes its way to the stable build of OxygenOS, we’ll update this post accordingly.
Also, take note that you can only change the accent color with the Dark or Light theme — not the Default one.
Keep on theming! 🎨
Now that you know how to change up the look of your OnePlus phone, what color combos are you going to rock? Let me know what theme and accent color you choose in the comments below!
Everything that’s new in OxygenOS
OnePlus 6
- OnePlus 6 review
- OnePlus 6 vs. OnePlus 5T: How much changes in six months?
- OnePlus 6 vs. OnePlus 5: Should you upgrade?
- These are the official OnePlus 6 cases
- The OnePlus 6 doesn’t work on Verizon or Sprint
- Join the discussion in the forums
The $40 Roav Viva brings Alexa and a 2-port car charger on the road with you
Bring Amazon’s Alexa along for the ride.

Anker’s Roav Viva, an Alexa-enabled 2-port USB car charger, is down to $33.99 for Prime members today at Amazon. This is the lowest we’ve seen it drop, beating previous coupon deals by $5.
The Viva connects to your phone via Bluetooth, and then you connect your phone to your car’s stereo either via Bluetooth or an auxiliary jack. It will use your phone’s Internet to access Alexa’s services and relay them through your car’s speakers. You can access the full-range of Alexa’s skills, including playing your favorite music, getting directions, or hearing the news. You can make and receive phone calls without taking your hand off the wheel. It also has voice isolation via two integrated mics that can accurately identify your voice over other car noises.
The dual charging ports have PowerIQ technology to detect what’s plugged in and deliver the fastest charge. The top of the device has a mute button that makes it easy to turn off the mics if you don’t want Alexa listening to everything you say. Users give it 3.9 stars based on 445 reviews.
This price is exclusive to Amazon Prime members, so if you aren’t already a member, you’ll want to sign up for a free 30-day trial right now.
See at Amazon
Philips Hue: Everything you need to know

Make your lights smarter and your world brighter — or darker.
Smart lights are one of the most simple and visible ways to add some smart home flair to your home, and the smart light system from Philips Hue is one of the best on the market. Philips Hue lights allow us to seamlessly change the brightness and color of a room’s lighting as easily as a tap of a profile on our smartphone or a voice command thanks to integration with Google Assistant and Amazon Alexa.
Whether you’re just beginning to look into purchasing a Philips Hue hub for your home or you’re looking for more new mind-blowing tricks for your Philips Hue to do, we’ve got everything you need to know right here.
What do you need to get started with Philips Hue?

The Philips Hue system offers tons of different sizes and styles of bulbs, but no matter how big your house or small your apartment, there are two things you need in order to get started with a Philips Hue system:
- A Philips Hue Bridge, which acts as the hub that all of your Philips Hue lights will connect to and connect to the internet through for updates and away-from-home control via the Philips Hue app. The Philips Hue hub connects to the internet via ethernet port, so make sure there’s one of those free on your router.
- At least one Philips Hue bulb.
Since the bulbs and Bridges can be expensive on their own, Philips Hue sells a variety of starter packs, but your best value will likely be found in the 4 White Bulbs starter kit or the 2 Bulb Dimmer starter kit. The Dimmer isn’t necessary, but it’s nice to be able to control the lights in a room without using your phone or voice, especially in a room like the bathroom or in a child’s room.
Both of these starter kits feature white bulbs rather than the traditional color bulbs, but the color starter kit is $120 more expensive, and considering Philips Hue color bulbs go down to $40 during sales at least once a quarter, so put the A19 Color Bulb on your Amazon Wishlist and wait for a sale.
Set the scene

While you can control individual lights, the best part of configuring Philips Hue lights to my mind is setting up complex scenes that can control all the lights in one room — or all throughout your home — and being able to change them all by activating a scene. Philips Hue lights come with several pre-made scenes, but making your own is a cinch. Here’s how!
How to create a light scene with Philips Hue bulbs
OK Google, kill the lights

Philips Hue lights are great, but having to pull out the app every time you want to change them is a pain. Thankfully, Google Assistant can trigger Philips Hue scenes and change rooms or individual bulbs on and off with ease. There are just a few things you should know before you tie them together.
How to enable Philips Hue scenes and commands with Google Assistant

Nest makes smart thermostats and home security systems, and through the “Works with Nest” ecosystem, Nest and Hue can team up in a lot of helpful ways. Set your thermostat to Away, and Nest can tell Hue to turn off any lights you left on. Nest sensors pick up suspicious activity? Hue will turn on the outside flood lights so the cameras can better see if its a deer or an ax murderer.
How Philips Hue lights work with Nest

Want your lights to tie into your music or movies while you’re entertaining some guests or just want to get super into the latest episode of Westworld? Philips Hue can do that, but there’s an extra device you’ll need for this technological magic.
How to connect Philips Hue lights to your music, movies, or games

There’s a lot of cool things Philips Hue has been adding recently, but not all of those features are going to be compatible with the original round puck that came with older Hue starter kits. Fortunately, Philips includes a feature in the Hue app that makes transferring your lights and settings super easy.
How to upgrade to a new Philips Hue Bridge

Smart lights are part of a smart home, but which smart home assistant works better with Philips Hue, Google Home or Amazon Echo? Here’s how they compare.
Amazon Echo vs. Google Home: Which works best with Philips Hue

Do smart lights sound amazing but you just can’t justify the exorbitant prices Philips charges for its Hue lights? Well, that’s okay, there are plenty of other smart light solutions out there. Here’s what you should get if you just can’t get Philips Hue.
Best Philips Hue Alternatives in 2018
How to Use Finder Quick Actions in macOS Mojave
In macOS Mojave, Apple has introduced a range of new Finder Quick Actions that make it easier for you to perform quick edits to files without having to open the apps associated with them.
To view available Quick Actions, you need to enable the Preview panel in Finder. To do this, open a Finder window and select the menu bar option View -> Show Preview, or press the keys Shift-Command-P.
Quick Actions for Images, Video, and Audio
Quick Actions are located in the bottom right of the Finder window, just under the preview of the selected file. These actions will change depending on the file: For images, clicking Rotate Left turns the image counterclockwise, while clicking Markup invokes an enhanced Quick Look window containing a set of markup tools.
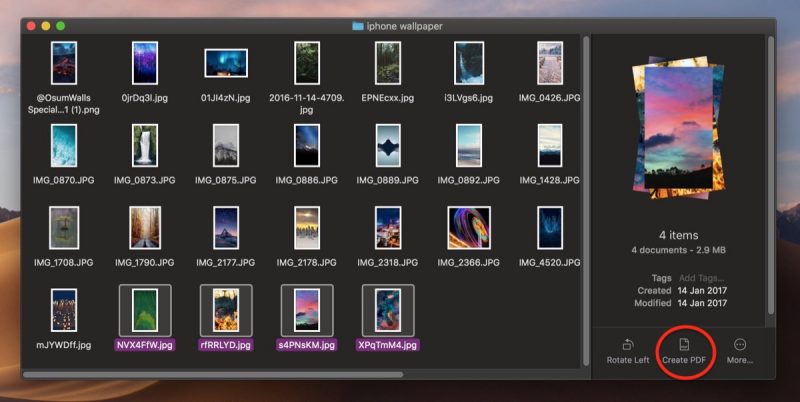
If two or more images are selected in Finder, the Markup button will change to Create PDF, allowing you to turn the images into a single portable document. If a QuickTime compatible video or audio file is selected, Markup will be replaced by Trim. Clicking this brings up a Quick Look window with an editing ribbon to trim the file.
How to Customize Quick Actions
You’ve probably noticed the More… button beside the default Quick Actions. Click this and then select Customize…, and you’ll be taken to the Extensions pane in System Preferences, where you’ll be able to select other actions to add to Finder’s Preview pane.
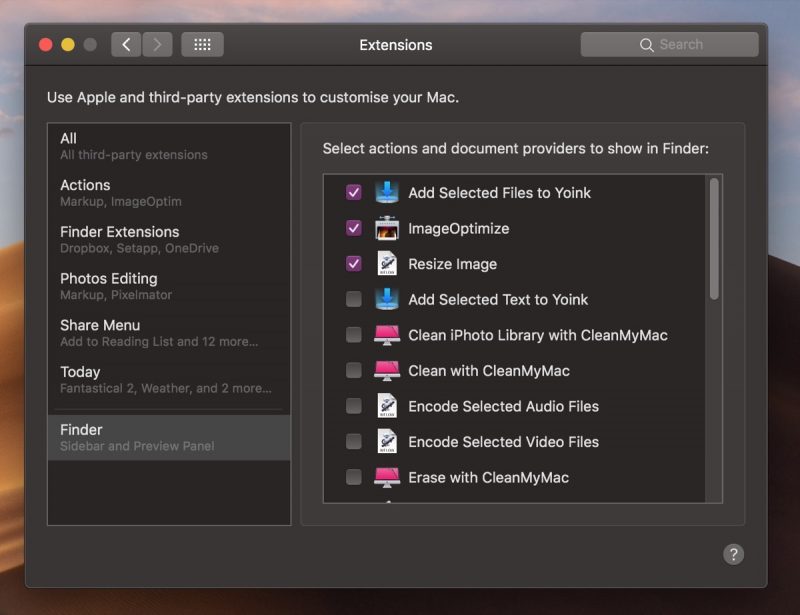
The actions available to you will depend on which applications you have installed and any pre-existing Apple scripts on your Mac. Apple is encouraging third-party developers to add support for more Quick Actions in their apps, but you can also create your own custom ones using the Automator app. For a useful example, check out our tutorial on how to quickly resize images using your very own Automator service.
Related Roundup: macOS Mojave
Discuss this article in our forums
Postmates delivers its on-demand service to 100 additional U.S. cities
If Postmates hasn’t arrived in your city yet, then check again. It may have just landed.
The on-demand delivery service has just announced its biggest U.S. expansion to date, launching in 100 additional cities across the country, from Albuquerque and Cincinnati to Salt Lake City and Tallahassee. It now serves a total of 385 locations in the U.S. and Mexico.
Having struck delivery partnerships with a slew of eateries and other businesses, Postmates has become the go-to service for a growing number of folks where the service operates.
Founded in 2011, San Francisco-based Postmates said the latest expansion brings its service to within reach of 135 million people and half of all U.S. households.
While Postmates faces tough competition from the likes of Grubhub, UberEats, DoorDash, and Amazon, this week’s expansion is its biggest effort yet to increase its market share.
Here’s a list of the new locations where Postmates will be operating:
If you’re new to Postmates, here’s how it works: You can start by browsing the app to see what the service delivers in your area. You’ll find a large range of possibilities in categories such as meals, drinks, groceries, and retail goods. Be sure to check the “New” section, too, to see what’s popular at any given time. You can also enter a search term if you know exactly what you want.
Once you’ve made a selection, place your order, sit back, and wait. Alternatively, you can track the progress of the delivery driver via the app’s map. An icon shows the driver heading to the restaurant, collecting the order, and heading toward your location. In case you’re not watching the map, you’ll receive a message to let you know when your delivery is near. Payment is handled by the app, so there’s no messing around with cash when your order is handed over.
Postmates endeavors to deliver your goodies as quickly as possible, usually within an hour. An estimated delivery time and the delivery fee are both shown on the page where you confirm your order. You can also rate and tip the driver via the app once the delivery has been completed.
To celebrate its push into 100 additional locations, Postmates is waiving delivery fees from Chipotle through Sunday, July 15, “because we know burritos are what you really want,” the delivery company said in a blog post. To take advantage of the deal, enter the code CHIPOTLE100 in the Postmates app when you place an order.
Editors’ Recommendations
- DoorDash is helping Walmart to take on Amazon and Whole Foods
- Walmart to end its grocery delivery partnerships with Uber and Lyft
- Amazon ramps up gig economy with Delivery Service Partners fleet program
- Amazon will now deliver packages straight into your car’s trunk
- Kroger supermarket chain to test driverless grocery deliveries
Japan Watchdog Says Apple May Have Violated Antitrust Rules With iPhone Deals
Japan’s antitrust watchdog on Wednesday said Apple may have breached antitrust regulations by forcing three major domestic network carriers to sell its iPhones cheaply and charge higher monthly fees (via Reuters).
The Fair Trade Commission (FTC) said that Apple had forced NTT Docomo, KDDI, and SoftBank to offer subsidies and sell iPhones at a discount.
In the eyes of the FTC, this made it hard for the mobile service providers to offer lower rate plans for long-term subscribers and effectively denied consumers a fair choice. FTC anti-monopoly law explicitly forbids such acts as “unfair restraint of trade” that disregards the operations of business partners.
Apple and its Japanese arm have told the FTC they will review their contracts in light of these criticisms, according to sources who spoke to Nikkei Asian Review.
Japan’s FTC started investigating Apple’s sales practices in 2016, but didn’t punish the company after it agreed to revise its contracts with the carriers, according to Reuters.
Tag: Japan
Discuss this article in our forums
Apple Fixed Bug in iOS 11 That Crashed Devices When Users Entered the Word ‘Taiwan’
Apple quietly fixed a bug in iOS 11 that caused devices set to the China region to crash when the word “Taiwan” was entered in a text field or the Taiwan emoji was used, according to a security researcher (via Axios).
Digita Security’s Patrick Wardle outlined in a blog post how the glitch in iOS 11.3 caused instant crashes on a variety of native and third-party iPhone and iPad apps, including iMessages, Facebook, and WhatsApp.
Wardle explained that although some aspects of the bug remained unclear, his investigations found that a “null” code would prompt the crash when a “removeEmoji” operation led the system to check the device’s language/region settings.
The glitch appears to be of Apple’s own making, given that iOS contains code that hides the Taiwanese flag emoji on devices set to the China region. Apparently the code worked for iOS devices set to China, but caused crashes on devices set to other regions.
While Apple fixed the glitch in iOS 11.4.1 after Wardle reported it, the bug’s occurrence highlights Apple’s willingness to placate China when it comes to sensitive political matters. China has long considered Taiwan to be under its sovereignty, despite Taiwan officially self-recognizing as an independent democracy wholly separate from mainland China.
Apple has made similar moves in the past to protect its important Chinese market. In July 2017, for example, Apple removed many VPN apps from the App Store in China, following regulations passed earlier in the year that require such apps to be authorized by the Chinese government.
In December 2016, the company was forced to remove both the English-language and Chinese-language versions of The New York Times app from the Chinese App Store, after being informed by the Chinese authorities that they were in violation of local regulations.
Another case of Apple censoring in China included the forced shutdown of iTunes Movies and the iBooks Store, following the release of controversial independent movie Ten Years, which won best picture prize at the Hong Kong Film Awards. The dystopian film imagines Hong Kong in 2025 with language police, mini Red Guards, radical protest and social alienation rife.
Note: Due to the political nature of the discussion regarding this topic, the discussion thread is located in our Politics, Religion, Social Issues forum. All forum members and site visitors are welcome to read and follow the thread, but posting is limited to forum members with at least 100 posts.
Tag: China
Discuss this article in our forums
Cornell’s popcorn-powered robots are far more practical than they sound
Popcorn is tasty, easy to prepare, goes well with your favorite Saturday night movie, and … it could help power future robots? At least, that is the unorthodox conclusion of work coming out of Cornell University, where researchers have demonstrated how it is possible to use nothing more than popping kernels to make a robot mechanism, such as a gripper, spring into action.
“Our lab is interested in multi-functional designs that permit simple robots to achieve complex tasks,” Steven Ceron, a Ph.D. researcher in Mechanical Engineering at Cornell, told Digital Trends. “Specifically, we are looking for ways that soft robot collectives can build amorphous structures out of their own bodies inspired by multicellular slime mold. To do this, we need an inexpensive fluid that can change rigidity and potentially expand upon deployment. Popcorn successfully demonstrates these features.”
The downside of this method of actuating robots in this way is that popping is irreversible, giving it a big disadvantage compared to regular rechargeable batteries. While popcorn can’t be un-popped, however, the exhausted kernels can be easily dissolved using water, after which new kernels can be reinserted to begin the process again.
On the positive side, popcorn kernels are also readily available at a very cheap price, and show some impressive physical attributes. For example, they pop with considerable strength, expand up to 15 times their original size, and change inter-granular friction by an order of magnitude. Kernels could additionally be used to make robots which are biodegradable since they wouldn’t leave behind a battery as they decompose.
In their demonstration, the Cornell researchers successfully showed off a variety of different ways to heat the popcorn. These included heating the air around the robot gripper to pop the corn, heating it via microwaves, or heating it using direct contact with a hot Nichrome wire. They showcased the mechanism working effectively with soft, compliant, and rigid-link robot grippers. In the future, they hope that demos such as this one will inspire other novel robotic mechanisms for a variety of applications.
A paper describing the work, titled “Popcorn-Driven Robotic Actuators,” was recently presented at the International Conference on Robotics and Automation (ICRA) 2018 event in Brisbane, Australia.
Editors’ Recommendations
- This robot eel glides through saltwater without making a sound
- 3D-printed mini-submarine can move in water without a motor
- Astonishing artificial muscle can lift 12,600 times its own body weight
- Awesome Tech You Can’t Buy Yet: Self-healing tents, jellyfish lamps, solar ovens
- Forget Roomba, your most important house robot could be the one that hugs you
How to make a to-do list with Google Home
While Google Home can do a lot of cool things, including understanding three different commands at once, it lacks the ability to create a full to-do list. Sure, you can schedule events for your calendar or create a basic shopping list, but it isn’t the same thing. And while Google has released the Google Tasks list management app, it currently has no integration for Google Home.
So, what’s a productive voice assistant user to do? Fortunately, you can create lists with basic Google Home commands – you just have to set up the right apps to do it. We’ll show you all the necessary steps in the process so you can make full lists with Home in no time.
Step 1: Sign up for IFTTT and connect to Google Assistant
IFTTT (If This Then That) is a basic, consumer-friendly system to create customized commands that work with a variety of services and smart devices. You can use IFTTT to create all sorts of rules, but here we’re going to recruit the service to create a to-do list through Google Assistant. Since Google Home’s main feature is Google Assistant in a speaker box, these rules will also work with Google Home or your Android phone.
Start by heading over to IFTTT and signing up for the service, which means creating a free account and password. Then go to the Google Assistant IFTTT page and make sure your IFTTT account is connected to Google Assistant by selecting Connect. This will confirm your Google account, so make sure it’s the account you use with Google Home.
Step 2: Download Todoist
The next step is to find a to-do list app that you like using. This will be the app where your voice command to-dos are added and organized, so it should be an app that you like to use and don’t mind having on your phone.
We suggest signing up for Todoist. It’s a free service that’s easy to use, offers great task management options, and works smoothly with both IFTTT and Google Assistant. Just add a login name, email, and password to start your Todoist account. Make sure you download and open the app on the mobile devices you use to keep track of your lists. You may want to play around a little bit to see how to Todoist works.
When you’re finished with that, head over to the Todoist page on IFTTT, and select the big Connect button here as well so that both services are connected to your IFTTT account.
If you really don’t want to use Todoist, then check the Google Assistant rules for other compatible services, like iPhone Reminders, DayOne, or Wunderlist.
Step 3: Find the right IFTTT template and activate it
You can absolutely create your own IFTTT rules (known on the platform as applets) for Google Assistant (which, again, will work via Google Home), but for newcomers it’s much easier to just find an applet that someone else has already created.
If you are on a browser, you can do this by heading to the page for Add a task to Todoist under the Google Assistant category. If you are searching another way or can’t follow the link right away, the applet ID for this rule is 478848.
With everything connected, you should see an option on this rule that says “Turn on.” Select it, and wait for the rule to activate. If you skipped any of the previous steps, IFTTT may prompt you to complete them at this time.
Step 4: Start creating your lists
Turn Google Home and your mobile device off and back on again, a little soft reboot to make sure everything has taken effect. Now you are ready to test out the list making.
The command phase for this rule is “OK/Hey Google, add a task” and then you fill in the rest with the activity that you want.
For example, you might say, “OK Google, add a task: Buy milk tomorrow,” or, “Hey Google, add a task: Update history thesis Thursday,” and IFTTT will automatically add the task to Todoist. Try this out a few times, then open up your Todoist app and see if a list has been created.
If the process doesn’t work, check to make sure that all your services are properly connected, and that you are using the right voice command phrase.
Editors’ Recommendations
- How to make a Discord bot
- How to save Instagram videos with these eight free apps and tools
- Google Tasks stand-alone app aims to help you to organize your life
- How to use iTunes to make ringtones for an iPhone (any generation)
- How to tell if someone is stealing your Wi-Fi

