


How to Use the Siri Raise to Speak Feature in watchOS 5
Apple’s watchOS 5 update includes a new Siri feature that eliminates the need to say “Hey Siri” or push the Digital Crown to activate the personal assistant.
Instead, you can raise your wrist and speak right to Siri, with the Apple Watch able to detect your movements and your desire to relay a Siri command. It’s simple to enable, and it works well once you know a few tricks.
Subscribe to the MacRumors YouTube channel for more videos.
Enabling Raise to Speak

Open the Settings app.
Choose “General.”
Scroll down to “Siri” and Tap it.
Make sure “Raise to Speak” is toggled on.
You can leave “Hey Siri” enabled right alongside “Raise to Speak,” and use whichever Siri activation method is most convenient.
Using Raise to Speak
Using Raise to Speak is as simple as raising up your wrist and speaking into your Apple Watch.
Lift your wrist as you would to view the time or do any other Apple Watch activity, and then speak a command. Most people will find that they need to bring the watch a little closer to their face than they would just to view it, so if you can’t get Raise to Speak to work, hold your wrist closer to your mouth.
Raise to Speak is a slightly different gesture than just raising your arm to look at the time, and the Apple Watch can tell the difference in intent.
Raise to Speak Tips
- Raise to Speak needs to be fairly close to your face to interpret a Siri voice command, which prevents it from automatically activating for the most part. If it’s not working, bring your wrist closer to the speaker of the Apple Watch before trying a command.
- Raise to Speak works both at the watch face and when an app is open. It does need to be activated with the wrist raising gesture, though.
- You need to speak at a normal speaking volume for the watch to detect a Raise to Speak command. Whispering will not work.
- Because Raise to Speak seems to rely on proximity to the Apple Watch’s speaker, Siri is not going to trigger when other people are speaking.
Other Siri Options
In the Siri section of the Settings app, accessible by following the steps above, you can also choose your Voice Feedback settings for whenever Siri is activated if you have an Apple Watch Series 3.

This isn’t a new setting, but it’s worth revisiting alongside Raise to Speak. You can choose to set Voice Feedback (aka vocal replies) to “Always On,” “Control With Silent Mode,” which will silence Siri if Silent Mode is turned on, or Headphones Only, which will cause Siri to provide vocal replies if you’re wearing AirPods or other Bluetooth enabled headphones.
You can also set Siri’s voice volume in the same section of the Settings app by tapping the volume icons or using the Digital Crown. This sets Siri’s overall response volume when the personal assistant responds to queries aloud.
Raise to Speak is a useful feature on Apple Watch for everyone, but especially for HomePod owners. If you want to activate Siri on your watch, you can now do so without accidentally triggering a HomePod that might be in the room with the “Hey Siri” command.
Related Roundups: Apple Watch, watchOS 5Buyer’s Guide: Apple Watch (Buy Now)
Discuss this article in our forums
Apple Music App for Android Gains Android Auto Support, Search by Lyrics and More
Following the release of iOS 12, which brought a few new Apple Music features, Apple has updated its Apple Music app for Android to introduce feature parity.
Today’s update brings support for searching by lyrics, an iOS 12 feature that’s designed to let you locate songs and artists using song lyrics rather than a song name.
To use the feature, all you need to do is type in a sentence from the lyrics of a particular song and Apple Music will try to find it. This doesn’t work with all songs, but it does work with those that offer lyrics in the Apple Music app.
Apple Music for Android is also gaining the new Artist Pages that were introduced in iOS 12, allowing an artist’s music to be played with a single tap, and there’s support for the Friends Mix.
Friends Mix is a playlist of songs gathered from the people that you’re following on Apple Music. Android users can also discover new music through the inclusion of a new Top 100 list that offers up the daily top 100 songs from countries around the world.
After installing the 2.6.0 update, Android users will also be able to use Apple Music with Android Auto for the first time thanks to new Android Auto support.
Android users can download the Apple Music app from the Google Play store.
Tags: Android, Apple Music
Discuss this article in our forums
How to Use iOS 12’s New Do Not Disturb Options
In iOS 12, Apple has given users the tools to cut down on disturbances to get more time away from their devices if desired, and one of these new tools is an expanded set of Do Not Disturb options.
Thanks to these changes, there are more convenient options for using Do Not Disturb in iOS 12, and it’s also a lot smarter.
How to Get to the New Do Not Disturb Options
Your Do Not Disturb options in the Settings app are largely the same, with the new Do Not Disturb features housed in Control Center.
Open Control Center, through a right-side swipe downwards on the screen of an iPhone X or iPad or by swiping upwards from the Home button on other devices.
3D Touch or long press on the Control Center icon that looks like a moon, which is the icon for Do Not Disturb.
A 3D Touch or a long press brings up all of the Do Not Disturb options, which can be selected with a tap.
Do Not Disturb is a default widget within the Control Center and it’s always available, so it’s not an option that needs to be enabled through the Control Center customization options.
All of the Ways You Can Use Do Not Disturb in iOS 12
There are multiple new limited-time settings for Do Not Disturb in the Control Center, which automatically turn off after the specified time elapses.
- For one hour
- Until this evening (or afternoon/morning depending on the time – it’s generally a few hours)
- Until I leave this location
- Until this event ends (if you have a timed event set in your calendar)
- A single tap on the icon without selecting an option turns on Do Not Disturb until you tap it again.
Not all of these options will be visible at all times. If you’re not in a set location or you don’t have any events scheduled, these two options won’t appear. The first two, allowing you to set Do Not Disturb for an hour or until the evening/afternoon/morning are always available.
Underneath these options, there’s a “Schedule” button (see screenshot at top) that will open up the Settings app so you can set a specific time period for when you want Do Not Disturb to turn on. This is also where you can turn on Do Not Disturb at Bedtime, a feature that prevents notifications from displaying on the iPhone’s display at night.
Check out our Do Not Disturb at Bedtime how to for more details on this feature.
Managing Do Not Disturb Settings
Your general Do Not Disturb settings are available in the Settings app, which can be accessed by going to Settings > Do Not Disturb or through the above mentioned “Schedule” section of the No Not Disturb Control Center widget.
Most of these settings aren’t new, but we thought it would be useful to offer a quick primer on Do Not Disturb’s other settings alongside what’s new in iOS 12.

In the Settings app, you can enable or disable Do Not Disturb, set a specific time for Do Not Disturb to turn on and off, or enable Bedtime Mode.
You can also choose whether Do Not Disturb should mute calls and notifications only while the iPhone is locked or at all times, and there are options to select whether calls from certain people should bypass your Do Not Disturb settings. This section is also where you’ll find your Do Not Disturb While Driving options.
Related Roundup: iOS 12
Discuss this article in our forums
How to send money on Facebook

Further reading
How to use Facebook
Best money-transfer apps
How to protect yourself without deleting your Facebook account
These days, sending money via apps is easier than ever, rendering cash and debit cards a thing of the past. The best thing about using Facebook to send money is that, unlike other popular services, it’s free whether you send or receive money. Other services — Venmo, in particular — also often act as middlemen, requiring the person receiving money to manually transfer it into his or her bank account. Thankfully, Facebook Messenger automatically does it on your behalf, regardless if you opt for the desktop or mobile iteration of the software. Here’s how to utilize the feature.
Note: You must be friends with the person you either want to pay or request money from. The service is also only available in the United States, France, and the United Kingdom.
Paying or requesting money in the Messenger app
Previous
Next
1 of 6


Step 1: Start a conversation with a friend that you want to pay.
Step 2: Tap the addition sign in the bottom-left corner.
Step 3: Locate and tap Payments on the left-hand side.
Step 4: Enter the amount you want to either pay or request.
Step 5: If you’re paying someone, choose either New Debit Card or Add PayPal.
Step 6: Enter your debit card information.
Paying or requesting money using a desktop computer
Previous
Next
1 of 4


Step 1: Start a conversation with the friend you want to pay.
Step 2: Locate the dollar sign in the bottom-right corner of the conversation.
Step 3: Enter the amount you either want to pay or request.
Step 4: If you are paying someone, you will be prompted to enter your debit card information.
Step 5: Click Pay in the bottom-right corner.
How to receive a payment
You will get a notification upon receiving a payment. If it’s your first time doing so, you will have to provide your debit card information. Once done, the funds will go directly to the checking account associated with your debit card.
Previous
Next
1 of 6


Setting a pin
Facebook may already encrypt your payments and user information to protect your transaction details, but we get that taking some precaution is a good idea. Fortunately, Facebook now lets you set a pin, which will require you to enter a four-digit code every time you make a payment. It’s currently only available within the mobile app, but it’s easy to set up.
Step 1: In the menu section of the Facebook app, scroll down to Settings and Privacy and tap Settings.
Step 2: Select Payments.
Step 3: Under the Security section, tap PIN.
Step 4: Enter a four-digit PIN that you will remember.
Step 5: Re-enter your PIN when prompted.
Currently, Facebook only allows payment with debit cards. It’s also important to know that it can take up to five days for your bank to approve the transaction, but, either way, it’s a great way to split a bill or pay your roommate back for groceries.
Editors’ Recommendations
- Samsung Pay: Everything you need to know
- What is Google Pay? Here’s what you need to know
- Don’t wait for a money transfer in Venmo — just use its Mastercard debit card
- How to use Apple’s Business Chat on your iPhone or iPad in iOS 11.3
- How to send a text message from a computer
AT&T’s new 5G network could adopt tiered billing, including a gaming plan
Riley Young/Digital Trends
As AT&T is building out its next-generation 5G mobile broadband network, the carrier’s executives are beginning to explore different strategies to monetize the service, including a tiered billing structure. AT&T still hasn’t disclosed what pricing customers can expect from its network.
“I think the business models are still evolving, said AT&T President of Mobility and Entertainment David Christopher at the Mobile World Congress Americas trade show last week in Los Angeles, California. “There will be different tiers of service.”
The next generation 5G networks will deliver many added benefits to consumers, and it looks like AT&T may charge differently for these types of benefits, Fierce Wireless reported. In addition to offering faster download speeds, 5G will also deliver lower latency. Christopher mulled creating a pricing tier for gaming to capitalize on the latter feature. In addition to gaming, 5G’s fast speeds may also be beneficial for delivering virtual and augmented reality content.
Gamers looking to buy a 5G gaming laptop may be locked into one network at the time of purchase. AT&T’s vice president of radio networks, Gordon Mansfield, explained to PCMag that since each carrier operates 5G on different bands and spectrum, there won’t be one modem that delivers cross-compatibility between carriers in the beginning. This means that if you buy a laptop through AT&T, you may not be able to insert a SIM card from a different carrier if you’re unhappy with the service.
In addition to a gaming-centric 5G plan, AT&T may also offer bundles with Internet of Things (IoT) devices. The company recently announced a SmartThings tracker with Samsung, which includes one year of service in that device’s $99 price tag. After the first year, customers wishing to maintain the 5G service can either pay monthly or get billed a discounted amount if they choose to pay annually.
Another option would be to add the service to a customer’s existing bill. With smaller consumer devices like the Apple Watch, AT&T could tack on a service charge to connect these devices to its network. Currently, AT&T charges customers a $10 monthly fee to add the LTE-equipped version of the Apple Watch to their monthly phone plans.
Rival Verizon will be the first carrier in the U.S. to launch its 5G network. Unlike AT&T, Verizon is targeting home broadband for its first application of 5G when the service becomes available next month. Verizon said that its 5G Home service will cost $50 a month, taxes included, for customers who have a cell phone plan. Although AT&T has not disclosed what speeds customers can expect for its 5G network, Verizon quotes 300Mbps average speeds, with peaks hitting 1Gbps, making 5G competitive against fixed home broadband offerings like cable and fiber internet.
The first 5G device to launch on AT&T’s 5G network later this year is described as resembling a puck, suggesting it could be a mobile hot spot. Phones will likely launch in 2019 when AT&T builds out its 5G network. AT&T promises that 5G devices will also be able to fall back on the LTE network — which has a larger coverage footprint.
Editors’ Recommendations
- Verizon 5G Home promises gigabit internet speeds for as low as $50
- AT&T names three more cities that will receive 5G networks this year
- Buckle up, Houston, you’ll soon be getting 5G service from Verizon
- Switching to the ‘Un-carrier?’ Here’s a breakdown of T-Mobile’s plans
- Moto Z3 review
Robots are going to steal 75 million jobs by 2025 — but there’s no need to panic
The robot job takeover may be arriving a bit sooner than you think. At least, that’s the takeaway from a (surprisingly positive) recent report by the World Economic Forum. In a paper published this week, the Swiss nonprofit — best known for its annual meeting in Davos — forecasts that half of all “work tasks” will be capable of being carried out by machines by 2025. Provided those figures are accurate, this will equate to the loss or displacement of a massive 75 million jobs. That’s the equivalent of every person in the United Kingdom, plus the state of New Jersey thrown in for good measure.
By comparison, around 71 percent of work tasks today are done by humans, with the remaining 29 percent being automated. Needless to say, it’s a big shift. It’s also a very rapid shift, especially compared with studies such as the frequently cited 2013 “Future of Employment” paper, which argued that 47 percent of U.S.-based jobs could be performed by machines over the next 20 years. While there’s a difference in the makeup of U.S. jobs versus total global jobs, the time frame difference between 20 years and less than a decade is stark — and reflects just how fast robotics and A.I. technologies are moving.
Don’t start panicking or planning your John Connor-style rise up against the job-pilfering Terminators just yet, though. While it may be human nature to gravitate toward the worst-case scenario, the World Economic Forum’s report is actually a positive one. It suggests that, even as robots take over a massive number of job, they will actually create nearlytwice as many. In total, the report suggests that 133 million human jobs will be created during that same period of time.
Although it is difficult to predict exactly what all of these will be (hey, who imagined that YouTube vlogger would be kids’ dream profession back in, say, 2002?), the report does give a few tips. Specifically, it suggests that jobs that involve programming or design, social intelligence, or critical thinking should be more resilient to the machine invasion.
As ever, the “creative destruction” process that forms a crucial part of capitalism continues. Only now, with way more robots thrown in for good measure!
Editors’ Recommendations
- Replaced by robots: 10 jobs that could be hit hard by the A.I. revolution
- BlackBerry Key2 LE hands-on review
- Tesla wants help, will hire customer experience specialists at 98 locations
- Trek now lets you build your bike, right down to the paint job
- The BrambleBee robot promises to help honeybees pollinate flowers
Google brings its high-accuracy emergency location tracking to the U.S.
In an emergency, every second can mean the difference between life and death, and Google’s latest tech could be a literal lifesafer.
In partnership with local carriers, Google has begun rolling out Emergency Location Services to Android devices — a service that will ultimately give first responders more accurate location information. The company first announced the new service two years ago, and since then it has rolled out to 99 percent of Android device with Android 4.0 or later, in a hefty 14 countries.
Now, in partnership with RapidSOS, ELS is finally coming to the United States. It will first be available on Android devices on T-Mobile, but will roll out to other carriers over time.
The move really brings calling 911 into the 21st century. In the past, emergency services were optimized for landlines, and the result was a large location radius. Now, 80 percent of emergency calls come from mobile phones — meaning those outdated systems really don’t compete in modern times.
The services have been really helpful in the countries that they’ve rolled out in. According to Google, the average uncertainty radius has shrunk from 522 feet to 121 feet — meaning that it’s far easier for emergency responders to find the emergency quickly.
“In Austria, a mountain biker in a remote, heavily forested area suffered a serious accident and called emergency services for help. The legacy emergency location systems provided a location with a radius of more than 900 meters (about half a mile), while ELS was able to provide a location within 12 meters (39 feet) to help first responders locate the biker,” said Google in a blog post announcing the U.S. launch.
Of course, the tech does raise some questions related to privacy, but Google is quick to point out that the location information is measured on the smartphone and passed straight to emergency services. In other words, it doesn’t pass through Google’s servers, which may be important for some.
So what do you need to do to ensure that ELS is enabled on your phone? Thankfully, nothing. As long as you have an Android phone with Android 4.0 or later, and your carrier supports the service, you’ll be able to make use of it. Hopefully, you’ll never need ELS, but if you do, it’ll most likely be there once more carriers support it.
Editors’ Recommendations
- Google tracks your location — even when you deny it permission
- How to find a lost phone
- Samsung brings 400 new jobs to South Carolina with a new customer care center
- How to track a phone
- What is Google Pay? Here’s what you need to know
How to Use Walkie-Talkie in watchOS 5
Apple’s watchOS 5 update, out now for all Apple Watch models with the exception of the original Apple Watch, introduces a fun new feature that mimics old school walkie talkies. With Walkie-Talkie, you can connect to your friends and family and have push-to-talk conversations right on your wrist.
The video below demonstrates Walkie-Talkie in action, while the post explains the steps to set it up and use it.
Subscribe to the MacRumors YouTube channel for more videos.
Turning on Walkie-Talkie and Adding Friends
Walkie-Talkie is an app on the Apple Watch with an icon that looks like a little walkie talkie on a field of yellow. Whenever you want to use Walkie-Talkie to communicate with someone, you’ll need to open up the Walkie-Talkie app. The first step, though, is adding a friend to chat with.
Open the Walkie-Talkie app.
Turn the Digital Crown to scroll through your contacts.
Choose a friend who has an Apple Watch and watchOS 5.
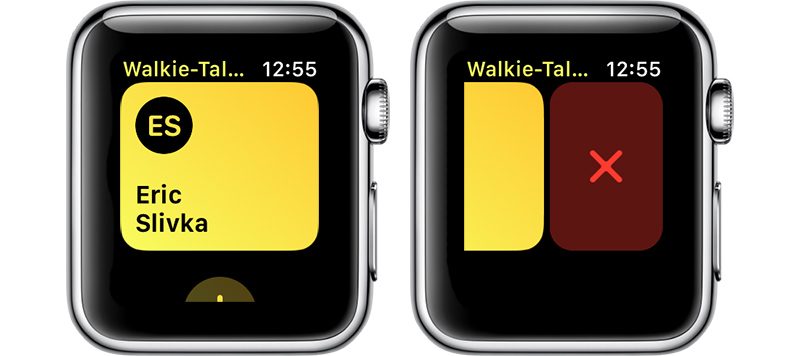
Tap on the person’s name in the contacts list. 
When a yellow card with their name appears on your Apple Watch in the Walkie-Talkie app, tap on the card.
Press on the “Talk” button to initiate a connection.
You’ll need to wait for your friend to receive your message and approve the Walkie-Talkie connection. It will say “Connecting to [Your Friend’s Name].
When a connection is established, it will go back to the Talk button and you will be able to have a Walkie-Talkie conversation with your friend.
If a connection cannot be established, you’ll see a popup that says “[Your Friend] is not available.” If this happens, it means the person on the other end did not answer the incoming Walkie-Talkie notification.
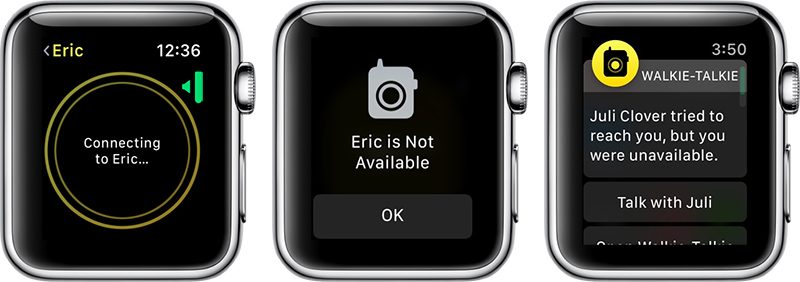
If the Walkie-Talkie connection screen hangs indefinitely on the connecting screen, it means the person does not have an Apple Watch or does not have watchOS 5 installed.
When a friend adds you to Walkie-Talkie, you’ll see an incoming notification that your friend wants to establish a connection with you. To chat, you will need to tap on “Always Allow.”

Talking With a Friend Using Walkie Talkie
Once a connection has been approved between you and your friend, you do not need to get approval for each and every message. You can just push to talk and whatever you say will be beamed to your friend’s Apple Watch.
Open up the Walkie-Talkie app.
Tap on the card for the friend you want to talk to.
Hold down the “Talk” button for the entire time that you’re speaking. You will see little concentric circles flashing, which means your message is being relayed to your friend. 
When you’re done speaking, stop pressing on the Talk button. This will allow your friend to press the Talk button on their end to send a response to you.
You can have multiple Walkie-Talkie connections with your friends, but you can only communicate with one friend at a time because Walkie-Talkie is a one-on-one feature. Group chats between multiple people are not supported.
Accessing Walkie-Talkie Quickly
Once you have a Walkie-Talkie connection established with at least one person, a little Walkie-Talkie icon will be displayed at the top of the Apple Watch’s main screen. If you tap it, it will take you right into the Walkie-Talkie app.
This icon also serves as an indicator that you’re available for Walkie-Talkie conversations and that any friends you’ve established a connection with can message you at any time.
Adjusting Walkie-Talkie Volume
Open the Walkie-Talkie app.
Choose a Walkie-Talkie contact card.
At the talk interface, turn the Digital Crown.
A downward turn lowers the Walkie-Talkie volume, while an upward turn makes it louder. Turning it all the way down effectively mutes the conversation.
Using Walkie-Talkie With AirPods or Bluetooth Headphones
If you have AirPods or other Bluetooth headphones connected to your Apple Watch, you will hear incoming Walkie-Talkie messages through the accessory rather than directly through the Apple Watch. You will also be able to speak into the microphone of the AirPods, keeping your conversations more private.
Turning Off Walkie-Talkie and Removing Contacts
If you want to shut off Walkie-Talkie conversations and refuse incoming messages, you can do so by setting yourself to unavailable.
Open up the Walkie-Talkie app.
Scroll all the way to the top to see the “Available” toggle. 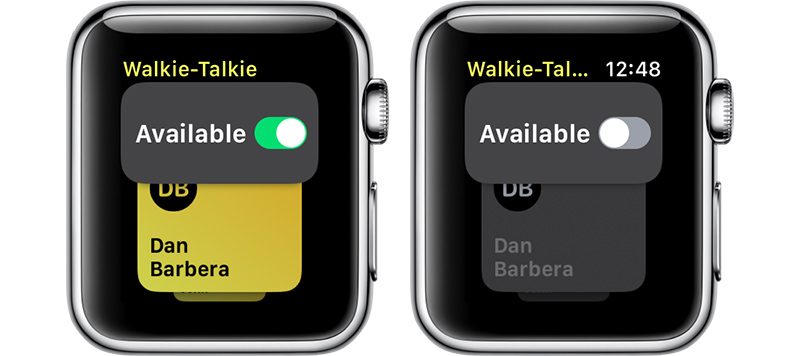
Toggle “Available” to off.
When your Walkie-Talkie availability is disabled in the Walkie-Talkie app, people who attempt to connect to you will see the message “[Your Name] is Not Available” and you will get a notification that someone attempted to reach you but you were unavailable with an option to go to the Walkie-Talkie app to resume the conversation.
To remove a contact from Walkie-Talkie, at the main contact card interface, swipe to the left on a name in the list to bring up a red “X” button. Press on the X to remove the contact.
Walkie-Talkie Warnings
Walkie-Talkie takes precedence over other settings on your Apple Watch. You will hear your friend speaking even if your Apple Watch is set to silent, but it does not ignore Do Not Disturb settings.
Related Roundups: Apple Watch, watchOS 5Buyer’s Guide: Apple Watch (Buy Now)
Discuss this article in our forums
iOS 12 Installed on 10% of Devices 48 Hours After Launch
Apple’s newest operating system, iOS 12, is installed on just over 10 percent of devices 48 hours after it launched according to data collected by analytics company Mixpanel. The data suggests customers are adopting iOS 12 at a slower rate than iOS 11 and iOS 10.
Last year, iOS 11 was installed on 10 percent of devices just 24 hours after launching, and in 2016, iOS 10 was installed on 14.45 percent of devices within 24 hours.
Customers may be reluctant to adopt a new operating system after all of the bugs and issues that were seen with iOS 11 software updates, but Apple made an effort to focus on the underlying code of iOS 12 and thus far, the update has been stable.
As should be no surprise, MacRumors readers are early iOS 12 adopters. Over 80 percent of readers queried so far have installed iOS 12 just two days after it launched. Follow us on Twitter and vote to let us know if you’ve upgraded to iOS 12.
Did you install iOS 12 yet?
— MacRumors.com (@MacRumors) September 19, 2018
iOS 12 is an update that brings significant speed and performance improvements to older devices, so most customers installing the software should see notable speed improvements over iOS 11 after updating.
On the iPhone 6 Plus, for example, apps launch up to 40 percent faster, while the keyboard can appear up to 50 percent faster. Opening the camera on the Lock screen to take a photo can be done 70 percent faster.
Apple has made animations smoother and more responsive across the operating system, so accessing Control Center, scrolling in apps, or swiping up when multitasking feels more fluid.
iOS 12 also includes optimizations for when the operating system is under load. Apps launch up to twice as fast under a heavy load, as does the Share Sheet.
With iOS 12 installed on 10 percent of devices, iOS 11 adoption has dipped to 82 percent and will continue to fall as more people adopt iOS 12. Installation could jump this weekend as some people wait until they have a free block of time to complete a major software update.
iOS 12 is a free download that’s available for the iPhone 5s and later, iPad mini 2 and later, and the 6th-generation iPod touch. In addition to noticeable and useful speed and performance improvements, the update introduces Screen Time for monitoring device usage, Memoji and new Animoji, ARKit 2.0, and a new Shortcuts app for creating customized automations. For more on what’s new in iOS 12, make sure to check out our roundup.
Related Roundup: iOS 12
Discuss this article in our forums
How to Use the New Photos App Features in iOS 12
In iOS 12, Apple has introduced some new features to the Photos app that aim to make it easier for you to search, share, and enjoy your photo collection. Here’s how to make the most of them.
The most prominent addition in the Photos app is a new For You tab, which replaces the old Memories and Shared tabs and brings together their features – along with any iCloud Shared Albums you may have – in a single scrolling panel.
Subscribe to the MacRumors YouTube channel for more videos.
For You Tab: Sharing Suggestions
Top of the For You tab is where your latest Sharing Suggestions appear. If the app recognizes someone in the photos it will ask if you want to share the collection with them, otherwise an option to “Share with friends?” is shown.
The great thing about sharing photos this way in iOS 12 is that if your friends have any pictures that are from the same event, time, or location, they will also be prompted to send those back to you, allowing you to fill any holes in your collection.

Tap the Sharing Suggestions card and you’ll be taken to a screen where you can choose the pictures you want to share. Tap Select and then tap any photos you don’t want to include, or choose Deselect All and then tap the ones you want to share.
Choose Next to select people in your contacts that you want to share the pictures with. Tap Share in Messages when you’re done – just note that anyone with access to the shared photo link will be able to view the photos.
For You Tab: Memories
Immediately below Sharing Suggestions you’ll find Memories, which curates various photos and videos you’ve taken in the past into specific memory collections. Without any steps required on your part, Memories gives you an automatic homemade movie from these past family gatherings or vacations.
Tap a memory and you’ll see a list of all the photos and videos contained in the memory (tap Show More to see more than a summary), the geographic location the pictures were taken, nearby photos, and related memories you might be interested in.

If you press the play button to begin viewing a memory, you can also use a number of customization options to edit it. For more on editing memories in Photos, see our dedicated tutorial.
Note that tapping Select on this page and deleting a photo doesn’t just remove it from the memory, but also deletes it from your iPhone and iCloud Library. The last two options at the very bottom of the screen let you favorite the memory or delete it permanently.
If your device supports 3D Touch, you can also hard press on any memory in the For You tab to get a preview of its contents, and then swipe up for options to add it to your favorite memories, delete the memory, or block it.
For You Tab: Shared Album Activity
At the bottom of the For You tab is any Shared Album Activity related to your iCloud account.

This lists iCloud albums shared by you as well as albums shared with you by other users. From here you can view photos and videos, “like” them with a thumbs up, and read comments or add your own.
How to Use Enhanced Search
In iOS 12, the Photos search function in the Search tab is more intelligent than before, so it’s easier to find the most relevant photos to you from events, people, or places.

You can also combine multiple search terms to narrow down your results. Simply start typing a person’s name, a date, a place, or a word like “cat”, “beach”, “waistcoat”, or “selfie”, and the Photos app will offer up similar or identical indexed search terms that you can tap to add to the search field.
Related Roundup: iOS 12Tag: Photos
Discuss this article in our forums
