


Meet the Mantis Q: A drone you can control by yelling, waving, or even smiling
Previous
Next
1 of 5

Yuneec
Yuneec

Yuneec

Yuneec
Yuneec
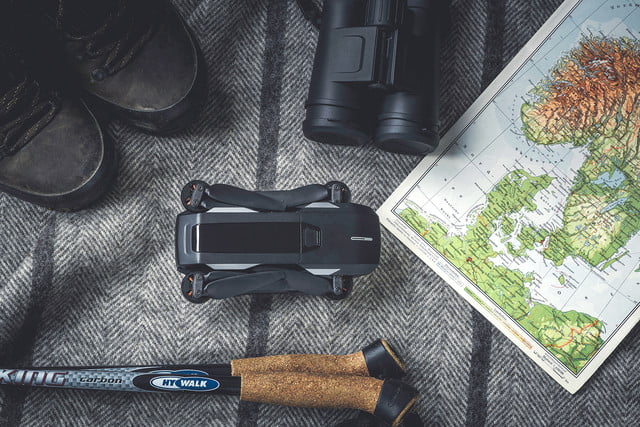
Talk, wave, or smile, and Yuneec’s newest drone will snap a photo. The Yuneec Mantis Q, as it’s called, integrates voice control and 4K inside a $500 folding drone designed for adventurers, families, and UAV enthusiasts.
While voice control has become increasingly common in devices like smartphones and smart speakers, it’s a rare feature (and to our knowledge, possibly a first) for drones. Yuneec’s new drone can reportedly respond to commands like “record a video,” “take a picture,” and “take a selfie.” You can even turn the Mantis Q on with a spoken “wake up” command.
Of course, the Mantis will have to hear you for those commands to work — and Yuneec doesn’t say how close you need to be in order for the drone to hear your commands, or how environmental noise like wind may play a role.
If yelling at the sky isn’t your style, Yuneec has also integrated facial recognition into the drone, allowing a smile to trigger a photo from up to 13 feet away. Similarly, the quad’s built-in gesture controls allow you to trigger a shot with a wave of your hand.
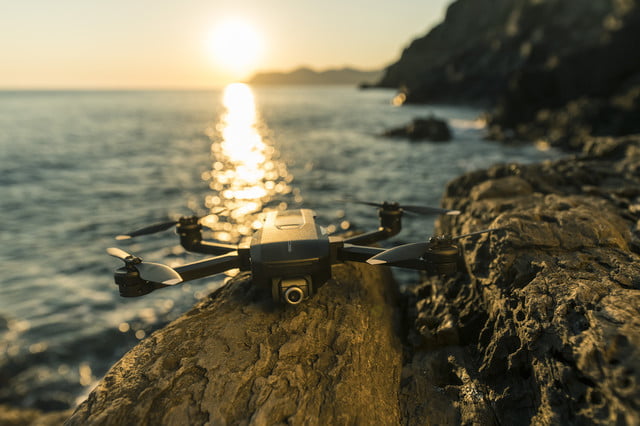
These fancy control options aren’t all that the Mantis brings to the table, though. The drone also boasts a number of preset flight modes, including journey, point of interest, and orbit me — as well as a tracking mode. The built-in camera shoots stills at over 4,000 pixels wide and video in 4K (3840×2160) at 30 FPS or in HD at 60 FPS — all of which can be saved onto an included MicroSD card in either JPEG or DNG format. The camera’s 1/3.1 inch CMOS sensor is relatively small compared to handheld cameras, but what the Mantis lacks in sensor size it makes up for with a 3-axis mechanical gimbal for stabilization.
Despite having enough computer power to recognize smiles, waves, and words, the Mantis Q is rated for up to 33 minutes of flight time (in ideal conditions) on one charge. The quadcopter also has a “sport mode” that allegedly allows it to reach up to 44 miles per hour. Sonar and infrared detection help the drone avoid obstacles and achieve stabilized flights indoors, without the aid of GPS.
The Mantis Q is also Yuneec’s first compact consumer drone that folds down into a smaller size — a feature that has become extremely popular ever since DJI’s Mavic series hit the market a couple years ago. The Mantis Q weighs about a pound and, once folded, measures 6.6 by 3.8 by 2.2 inches.
The drone ships with a controller — but you’ll have to attach your smartphone to it if you want a video uplink. The controller also includes a dedicated return-to-home button to make landing easier for novice pilots.
Pre-orders for the drone began Tuesday. The Mantis Q ships with a controller, battery, charger, cables, and an extra set of propellers for about $500, or with three batteries and a shoulder bag as part of the X-Pack for $650.
Editors’ Recommendations
- Parrot Anafi drone review
- The best drones under $500
- Resistance is futile: Amazon Fire TV Cube assimilates cord cutters, cable box users
- The Mito drone captures underwater action without the nausea-inducing footage
- The Best DJI Spark Accessories
The best Samsung Galaxy Note 9 screen protectors
Julian Chokkattu/Digital Trends
The Samsung Galaxy Note 9 is a whole lot of phone with a bunch of desirable features. No matter if the increased power, the A.I.-powered camera, or the improved DeX mode is your favorite, the Note 9 is promising to be one of the 2018’s biggest and best phones.
But with great power comes great responsibility. It’s an expensive phone, with prices starting at a startling $1,000 — and worst of all, it’s made from easily breakable glass. We’ve made sure most of your phone is covered with our selection of the best Galaxy Note 9 cases — but what about the all-important screen? At 6.4 inches, it’s a huge part of the phone, and just as easily broken.
Don’t worry, we’ve not forgotten about it. Here are some of the best Samsung Galaxy Note 9 screen protectors to keep your huge (and expensive) phone gorgeous.
Whitestone Dome Full Cover ($45)
When it comes to getting completely covered and seamless screen protection, Whitestone Dome is always near the top of our list. The Whitestone Dome screen protector is made from scratch-resistant tempered glass that curves to fit your screen. It has also been treated with an oleophobic coating to resist fingerprints and oily marks. However, the most important part isn’t the protector itself, but the application method, which puts a layer of liquid glass between the protector and your Note 9’s display. When cured by the UV lamp, this gives a close and tight fit, ensuring that no touch sensitivity or clarity is lost. It’s expensive, but it’s one of the best screen protectors you can get.
Buy it now from:
Amazon Mobile Fun
Spigen NeoFlex — Twin Pack ($30)
A name with a great pedigree, Spigen is one of the best brands around for phone protection, whether that’s in cases or screen protectors. The NeoFlex is made from a flexible material that fully covers your screen from edge to edge, providing great protection against scratches. It’s self-healing and should cover small scratches over time. The wet installation method ensures a close fit to your Note 9, but also avoids any rainbow effects or bubbles. It’s not going to be quite as protective as a glass protector, and might not help against the more serious drops — but it’s still a great choice. Best of all, you get two in case of accidents.
Buy it now from:
Spigen Amazon
Otterbox Alpha Glass ($45)
Otterbox‘s cases are some of the hardiest cases around, and its options for screen protection live up to the same reputation. You’ll find tempered glass here, with scratch-resistance and a special coating that stops the protector from shattering when broken, so you won’t need to pick broken glass off the floor. It’s super-hard, and Otterbox has also worked hard to ensure it’s clear, and doesn’t impinge on your Note 9’s touch sensitivity. The Alpha Glass is on the expensive side, but it’s a great choice to pair with one of Otterbox’s own cases.
Buy it now from:
Otterbox
Tech21 Impact Shield ($40)
Another great choice in flexible film protectors, the Impact Shield from Tech21 hides a secret behind its clear, flexible protection. It’s made from BulletShield — a material Tech21 claims is used in manufacturing bulletproof glass. While you still shouldn’t unload a handgun at it, this material does boost the strength of the Impact Shield, giving it great scratch-resistance. It fits perfectly, molding to your Note 9’s curved screen, and stretching from edge to edge. It’s easy to apply too, thanks to the included applicator and bubble-free method. It’s tough enough to last for a while, but if it doesn’t it’s backed up by Tech21’s Limited Lifetime Warranty.
Buy it now from:
Tech21
InvisibleShield Glass Curve ($50)
When curved screens were new, getting a curved glass screen protector was hard and not many manufacturers were up to the task. Thankfully, many have figured it out, and this InvisibleShield protector is one of the best. The curved glass is shaped to fit your Note 9 perfectly, while also being extremely hard and resistant to scratches. The adhesive covers the whole of the protector, so it sits close to your device with no air between that could block clarity and sensitivity. The other side comes with an oleophobic coating to stop unsightly smudges and fingerprints. It’s bubble-free and easy to apply, and if it breaks, it comes with a limited lifetime warranty.
Buy it now from:
Zagg
Skinomi TechSkin — Twin Pack ($8)
We’ve listed some of the best brands on the market in this list, but that doesn’t mean you can’t get a great screen protector from elsewhere. It’s made from a clear, flexible film that’s also used to coat luxury cars, military aircraft, and even the NASA space shuttle. That’s quite the family link, and it’s probably that which spurs Skinomi to claim the TechSkin is the toughest film protector on the market. It’s treated to resist any yellowing due to age, and it’s also self-healing, so any minor scratches should disappear. It’s cheap but effective — and you also get two for the price, making this an excellent choice.
Buy it now from:
Skinomi Amazon
Zizo Tempered Glass ($20)
Made to combine with Zizo’s protective cases for the Note 9, this screen protector is still worthy of your attention, even without one of Zizo’s cases. It’s made from extremely hard tempered glass, and should resist scratches well, as well as offering good protection in case of drops. It fits around the edges of your Note 9, offering complete protection — but these additional “wings” can cause issues with some protective cases, so be sure to check beforehand if your case covers these areas. It’s super-thin, measuring only 0.33mm, and it’s extremely easy to apply with a bubble-free application method.
Buy it now from:
Zizo Amazon
CoverOn InvisiGuard Series ($12)
Billed as the “anti-everything” screen protector, the InvisiGuard protector from CoverOn is anti-bubble, anti-scratch, anti-fingerprint, and anti-UV glare, giving it great protection from a variety of threats. Not only that, it has a slim fit which means it’s compatible with most protective cases, as well as being 99 percent clear. It’s rated to a 9H on the hardness scale, and it comes with a 90-day guarantee, so you can make sure it’s tough enough for your life. It’s also easy to apply, and comes with all the tools you need for the job.
Buy it now from:
CoverOn Amazon
BodyGuardz Pure Arc Privacy Premium ($55)
The Note 9 is an amazing productivity device, and even if you aren’t processing super-secret government data, you still probably have stuff on there you don’t want prying eyes to see. That’s where BodyGuardz‘s Pure Arc Privacy protector comes in. With this attached, your screen becomes unreadable from certain angles, making it harder for anyone peeking at you to see what you see — keeping your information safe. It’s also made from tempered glass, giving you strong protection — while still being extremely thin. While this will impact on your ability to share your screen with others, it might be worth it if you’re worried about your privacy.
Buy it now from:
BodyGuardz Amazon
LiQuid Shield Max Coverage ($8)
Last, but certainly not least — IQ Shield‘s LiQuid Shield protector is another film protector that molds around your device to provide a perfect fit. However, it’s got a few tricks up its sleeve, including a four-layer construction, comprising an anti-yellowing layer, a clear layer for transparency, a tough protective layer, and a layer of advanced adhesive that ensures a tight fit to your Note 9. Despite this, IQ Shield claims it’s near invisible to the naked eye, so you won’t regret putting it on when you glance at your screen. It’s covered by IQ Shield’s replacement policy, and is a wonderful budget choice for your non-budget phone.
Buy it now from:
IQ Shield Amazon
Editors’ Recommendations
- Best Samsung Galaxy Note 9 cases
- The best iPhone X screen protectors
- Samsung Galaxy Note 9 vs. Galaxy Note 8 vs. Note 5: All the changes of note
- The best OnePlus 6 screen protectors
- The best Galaxy S8 Plus cases and covers
Apple’s Share of Notebook Market Took a Hit Last Quarter Due to Lack of New MacBook and MacBook Pro
Apple recently reported sales of 3.72 million Macs in the third quarter, its fewest in any quarter since 2010. It was also the first time Apple sold fewer than four million Macs in any quarter since 2013.
For that reason, it should come as no surprise that Apple’s share of the worldwide notebook market took a hit last quarter.
Taiwanese research firm TrendForce estimates that Apple accounted for 6.5 percent of notebook shipments worldwide in the third quarter, a considerable decline over its estimated 10 percent market share in the year-ago quarter.
The decline resulted in Apple dropping below Acer and ranking sixth among notebook vendors, in terms of global shipments, in the third quarter. The top five spots were held by HP at 26.2 percent, Lenovo at 20 percent, Dell at 19.6 percent, Acer at 8 percent, and ASUS at 7.4 percent, according to TrendForce.
It’s important to note that Apple doesn’t break down its Mac sales on a model-by-model basis in its earnings reports, so TrendForce’s data is estimated, likely based in part on the average selling price of a Mac.

There’s a pretty simple explanation for the decline in sales last quarter: nearly every product in the Mac lineup was outdated.
Both the 12-inch MacBook and iMac lines haven’t been refreshed since June 2017, while the MacBook Air hasn’t received any substantial updates since 2015. Likewise, the latest Mac mini is from October 2014, and the Mac Pro hasn’t been updated since December 2013, but an all-new version is coming in 2019.
It certainly didn’t help that Apple refreshed the MacBook Pro in mid July, nearly two weeks after the quarter ended. Apple’s financial chief Luca Maestri highlighted this “difficult launch comparison” in the company’s earnings call:
Our year-over-year sales performance was impacted by the different timing of the MacBook Pro launch…
Mac sales should rebound in the near future, however, as TrendForce expects Apple to release a new MacBook Air at the end of the third quarter, while respected Apple analyst Ming-Chi Kuo expects the 12-inch MacBook, iMac, and Mac mini lines to be updated later this year—likely by the end of October.
Tag: TrendForce
Discuss this article in our forums
Apple Offers Rare Look Inside Mesa, Arizona Data Center
Apple doesn’t often allow people to visit its data centers, which are located across the country, but The Arizona Republic was recently given a tour of Apple’s Mesa Arizona data center, formerly the site of GT Advanced.
The Mesa Arizona facility spans 1.3 million square feet, with long, sparse hallways equipped with servers. Apple calls the Mesa site its “global data command” center, which employs a “handful” of employees working in 10-hour shifts to oversee Apple’s operations data. 150 employees total are employed at the data center.
Servers in the Mesa, Arizona data center, via The Arizona Republic
The facility is not recognizable as Apple’s from the outside, surrounded by thick, dark walls draped in vines. A guard patrols the entrance to the parking lot.
Server halls contain dozens and dozens of rows of large, humming electronics. Booming fans sit above the servers in an effort to cool the technology.
While The Arizona Republic was provided with a tour and was allowed to take photos inside the data center, Apple “would not share many specifics about what happens inside the facility” due to security concerns.
The Mesa data center, and others like it, house data from Apple apps and services that include iMessage, Siri, and iCloud.
Apple announced plans in 2014 to repurpose the Mesa, Arizona plant where GT Advanced worked to develop sapphire glass for Apple products before filing for bankruptcy. Hundreds of GT Advanced employees were laid off when the company failed, with Apple at the time pledging to bring more jobs to the city.
 The water-cooling system for the Mesa, Arizona data center, via The Arizona Republic
Not long after, Apple confirmed that it would transform the Mesa, Arizona plant into a “command center” for Apple’s global data network. It has been operational since 2016, and Apple has been renovating and adding on since then. According to The Arizona Republic, the most recent addition, several new halls of servers, was completed in April.
The Arizona Republic’s photos of the data center are worth checking out for anyone interested in Apple’s data operations.
Tags: data center, Mesa
Discuss this article in our forums
Tweetbot Removes Timeline Streaming, Activity and Stats Tab, and Push Notifications for Some Features Ahead of Twitter Changes
Ahead of upcoming Twitter changes set to be implemented tomorrow, Tapbots has released an updated version of its Tweetbot app for iOS devices, removing several features that have been present in the app for years.
Timeline streaming over Wi-Fi has been disabled, which means Twitter timelines will refresh every one to two minutes instead of as new tweets come in. We’ve been using the Tweetbot for iOS app in a beta capacity with these changes implemented, and while it’s not a huge change, the delay is noticeable.
Push notifications for Mentions and Direct Messages are also delayed by a few minutes, and push notifications for likes, retweets, follows, and quotes have been disabled. Tapbots says it is, however, investigating re-adding some of these push notification options in the future.
The Activity and Stats tabs have been removed from the app, and because the Apple Watch app was heavily dependent on Activity data, it too has been eliminated.
Tapbots says that it is sorry that the changes had to be made, but Twitter has decided to eliminate certain features provided to third-party apps without offering alternatives.
On August 16th Twitter will disable parts of their public interface that we use in Tweetbot. Because Twitter has chosen not to provide alternatives to these interfaces we have been forced to disable or degrade certain features. We’re sorry about this, but unfortunately this is totally out of our control.
Other third-party Twitter clients, such as Twitterrific, have also had to remove the same features that have been disabled in Tweetbot because of Twitter’s new limitations on third-party apps.
Twitter is requiring Twitter clients to pay for Premium or Enterprise accounts to access certain features, and timeline streaming has been deprecated entirely.
Tapbots has not yet updated Tweetbot for Mac, but changes should be coming to the Mac app soon as well.
Tweetbot for iOS can be downloaded from the App Store for $4.99. [Direct Link]
Tags: Twitter, Tweetbot, Tapbots
Discuss this article in our forums
Cotton and corn! Reebok’s newest sneaker is ‘made from things that grow’
We already have shoes made out of trash from Adidas, so why not footwear made out of corn from Reebok?
The global footwear and apparel firm this week launched its first shoe that’s “made from things that grow.” The stylish-looking sustainable sneaker features a woven upper made entirely from organic cotton, a base originating from industrial-grown corn, and an insole made using castor bean oil. No dyes have been used to color the shoes, either, and the packaging is 100-percent recyclable.
The Reebok Future team, which created the shoe, is tasked with finding ways to use plants rather than oil-based materials to make the company’s footwear “so that you can feel good about what you’re wearing and where it came from.”
To make the corn-based material, the company teamed up with DuPont Tate & Lyle Bio Products, a leading manufacturer of high-performance bio-based solutions. For Reebok’s shoe it developed Susterra propanediol, described as “a pure, petroleum-free, non-toxic, 100-percent USDA-certified bio-based product, derived from field corn.”
“We like to say we are ‘growing shoes’ here at Reebok,” Bill McInnis, head of Reebok Future, said last year when the company announced its plan for the unique footwear, adding, “This is really just the first step for us.”
Reebok
McInnis said that with Reebok’s new sustainable shoe, his team was focused on all three phases of the product lifecycle.
“First, with product development we’re using materials that grow and can be replenished, rather than the petroleum-based materials commonly used today. Second, when the product hits the market we know our consumers don’t want to sacrifice on how sneakers look and perform. Finally, we care about what happens to the shoes when people are done with them. So we’ve focused on plant-based materials such as corn and cotton at the beginning, and compostability in the end.”
For its own sustainable sportswear effort, Adidas teamed up with conservation group Parley for the Oceans to create shoes made from recycled plastic pulled from the sea. A typical pair of Parley running shoes reuses around 11 plastic bottles to create the laces, heel webbing, heel lining, and sock liner covers. Footwear firm Allbirds has also been making a name for itself with a range of shoes made from a specially crafted wool fabric.
As for Reebok, McInnes says the goal is to create a wide selection of bio-based footwear that can be composted after use. “We’ll then use that compost as part of the soil to grow the materials for the next range of shoes. We want to take the entire cycle into account; to go from dust to dust.”
Reebok’s cotton and corn shoes are available online and come with a $95 price tag.
Editors’ Recommendations
- U.S. Navy wants to ‘weaponize slime’ to stop enemy ships
- ‘No Man’s Sky’ review
- What is 3D printing? Here’s everything you need to know
- World’s first 3D-printed cornea made from algae and human stem cells
- NASA’s invention of the year award goes to … space lube?
T-Mobile attempts to reinvent customer service with its new ‘Team of Experts’
In attempt to reinvent how businesses approach customer care, T-Mobile is going old school — by connecting its customers with humans instead of robots. At a press event in Charleston, South Carolina, T-Mobile’s executive team took to the stage to announce ‘Team of Experts,’ — the company’s new customer service model.
Essentially, T-Mobile is attempting to make calling customer service less of a hassle. Rather than having to explain your issue repeatedly each time you get transferred to a new representative, you’ll have what the company refers to as an “elite care squad” assigned to you specifically. That way, every time you call or message T-Mobile, you’re directed to the same team who knows your region and preferences.
The new model is the company’s response to the Interactive Voice Response System (IVR) most businesses use. IVR is that robot that forces you to press number after number in order to reach the right department. Even when you do reach a representative, you’re often directed to someone else who actually specializes in the issue — also known as “call bouncing.”
“Forty percent of calls today to customer service in this country get transferred,” Mike Siever, T-Mobile chief operating officer, said at the event.
With Team of Experts, T-Mobile is attempting to cut this experience out completely. Every team member is trained to handle a wide range of topics — sometimes working with local retail and engineers to solve more complex issues. Since each team member also sits in close proximity to one another at T-Mobile’s call centers, information is easily accessible and you won’t be transferred.
Customers are able to call their Team of Experts 24/7 and can schedule a call if you know you’ll be available at a later time. There’s also the option to schedule a call through T-Mobile’s app and iMessage. If you can’t take a call, you can write to the team with your issue and they’ll get started on working on it.
T-Mobile’s Team of Experts are now live for T-Mobile postpaid customers for free. Customers can reach their team by dialing 611 from their T-Mobile phone or send a message via the app or iMessage using Apple Business Chat.
Editors’ Recommendations
- AT&T WatchTV is free streaming TV for wireless customers, fueled by Time Warner purchase
- Everything you need to know about the T-Mobile and Sprint merger
- Switching to AT&T? We break down the carrier’s new unlimited and prepaid plans
- T-Mobile rolls out better texting — but only to the Samsung Galaxy S7
- These fake Android apps steal your money when you aren’t looking
Apple considers making its own health-monitoring processors
Apple could be shaping up to take more of its technology creation in-house, if rumors based on a recent job listing are to be believed.
Health sensors have become a large part of Apple’s hardware over the last few years. The Apple Watch Series 3 comes with an optical heart-rate sensor built in, as well as a particularly impressive suite of fitness tracking tools, while the iPhone’s Health app was perhaps a little too helpful when it was first released. Back in 2017, Apple proved it was serious about filling out its fitness chops when it acquired Beddit, a successful sleep-tracking app.
It’s common with this sort of health-tracking to have a specialized processor dedicated only to the task of monitoring heart rates and other data — otherwise known as an “application-specific integrated circuit”, or “ASIC”. This chip takes the load off of the main chip, leaving the main processor to power other parts of the device.
Apple has previously bought these chips from a third-party supplier, rather than creating its own — having purchased ASICs from Broadcom for the Apple Watch Series 3. However, it seems Apple is ready to commit itself to further health-related features by bringing the construction of these dedicated processor chips in-house.
The job listing in question, posted on July 10, is for a Sensor ASIC Architect to work with Apple’s Health Sensing Hardware team. This role is centered around “develop[ing] ASICS for new Sensors and Sensing Systems for future Apple products” — making it seem pretty clear that Apple is looking to bring this particular part of the Apple Watch under their own manufacturers.
There are a few advantages to such a move. By developing and manufacturing its own specific chip for health monitoring, Apple would be able to wed the hardware and software together in a much more intimate fashion, increasing efficiency. In addition, it would also shore up Apple’s defenses against imitators, as the chip would be able to be patented as Apple’s own hardware, rather than being open to other companies — as a third party’s tech would be.
Most excitingly, this development could be an advancement of a story from April 2017 that claimed Apple was working on the so-called “holy grail” of life sciences — noninvasive technology that could monitor blood glucose levels constantly.
Editors’ Recommendations
- WatchOS 5 brings Walkie-Talkie, Podcast features, and much more
- Apple Watch Series 4: Everything you need to know
- Fitbit Versa vs. Apple Watch Series 3: Which should you wear?
- Here are five new features we want to see in Apple’s iOS 12
- iBeat Heart Watch detects when you go into cardiac arrest, is now available
How to use Adobe Spark Post to spice up your social media images
Hillary Grigonis / Digital Trends
A photo may say 1,000 words, but what if you need a few more? You could try your hand at making a meme, but if you want something more artistic or professional, Adobe Spark Post offers an easy way to make impactful images without having any design skills. It’s loaded with creative options for adding and styling text, shapes, and other design elements, but thanks to artificial intelligence, it makes the entire process incredibly simple.
From ready-made templates to layouts that automatically adjust to the content, Spark Post is one of the easiest graphics programs to use. Because of the AI involved, the web-connected app can sometimes take a few minutes to work it’s magic, so it may not be the best program for someone with internet speed that still thinks it’s 2002, but it otherwise turns the painstaking design process into an easy and fun experience.
How to download Adobe Spark Post
Adobe Spark is a suite of three mobile apps. Spark Post (available from Apple App Store and Google Play) is specifically for creating social media graphics, while there’s also Spark Pages for creating web pages and Spark Video for, well, exactly what the name suggests. Prefer to work on the desktop? You can also access Spark in a web browser by visiting spark.adobe.com. The mobile apps may have a few extra features that the web doesn’t, though — for example, Spark Post allows you to add animations.
Whichever way you access Spark, you’ll need an account to save your work. You can use Spark for free, the catch being that your final project will have Adobe Spark branding on the image. You can subscribe to Spark with premium features to remove that logo, but Spark is also included with other Creative Cloud plans. If you already use a program like Lightroom, you already have access to Spark with premium features.
How to use Spark Post
Spark Post is easy to jump into, but heading into the program without a map might mean missing a few of the bigger features. After logging in, tap the plus icon to create a new project
1. Start with a layout or a photo
Part of Spark’s simplicity is the ability to start with a customizable layout. But with design variations, you can use those layouts even if you start with a single photo. After tapping the plus icon, you’ll see a collection of suggested projects to choose from, but you can also start just as easily by selecting a photo and a graphic size.
Once the design or photo loads, you can tap on any item within that design to make adjustments. You can add a photo filter, for example, by clicking on the image and choosing a filter from the pop-up menu.
2. Tap Design to customize
After starting with a pre-made design or a photo, options for adjusting the look of the project are under the design icon. Here, you can choose a different design or add one if you just started with a photo. Unlike starting from that first design page, once you tap on a design here, your design will automatically adjust, making it easier to see if that look suits the image and text you had in mind. (You can tap the text that Spark automatically adds to change it, so you preview the design with what you want to say.) Thanks to the AI, you can go back and change the design at any time — the colors, text, and photos that you picked will update to the new design so you won’t have to redo them.
3. Tap the plus icon to expand
You don’t have to stick with a single photo just because the design you picked only had one. You can add more text, images, logos or icons by tapping on the plus icon. Here’s where that AI really comes in handy, because Spark will automatically find a good spot for that new addition within the layout (which you can always change because, hey, you’re smarter than an AI). For photos, you can upload your own, search for free images or paid stock photos or even connect to Lightroom or Google Photos. Just tap when you are ready to add.
Once the new item appears on your design, you can adjust by clicking and dragging to move, or clicking the arrow icon at the bottom to rotate. Depending on what you added, you’ll also have additional options in a toolbar above, including options to duplicate or delete.
4. Adjust using the layout
Now that you’ve added as much photos and text as you want to fit in, you can adjust the layout that Spark’s AI thought would look best under the layout options. Spark will make suggestions based on the number of items. Just click to see how the new layout would look and use the undo button at the top if you don’t like your pick or choose a different option.
You can also click on the edges of each item in the layout to and drag the edges to resize, or click in the middle and move the entire object. Spark Post will automatically adjust the other items in the layout to keep up with your changes. If you don’t want Spark Post to automatically adjust everything else, uncheck the option at the top of the layout toolbar that says “move content with layout.”
5. Find your color palette
Besides AI assisting in the layout, Spark can suggest the best colors for your graphic too. Click the colors icon to see a few different options. You can also click on an individual color inside the palette to change it.
The best way to find cohesive colors? After clicking on a color in the palette that you want to change, click on the eyedropper and hover over a color in the photo to pick colors inspired right from the image.
6. Add special effects (app-only)
Inside the Spark app, there’s one more option — animations. Under the effects option, you can turn your photo into a short video file. This will add options like fading in text or turning the photo from black-and-white to color.
7. Save — and resize
Once you’re finished with the graphic, save your work using the download icon at the top. Spark also makes it easy to format a single post for multiple social media networks, so if you want to go from an Instagram-favored square to a Facebook cover photo, save the first size, then go to the size options and select the second size. Again, Spark’s AI wizardry will adjust the layout based on that new size.
Tip: Using Spark for business? Spark for teams allows you to add logos and create a custom color palette, so options that match your brand are always the first choices that you see.
Why you shouldn’t buy the premium option
Spark is free to use if you don’t mind Adobe sticking their logo on your final project. If you want to create graphics without the Adobe Spark branding, or add your own branding, you’ll need to unlock premium features — but it’s probably not worth the $10 monthly fee. (Adobe also has options for students and teachers to access premium features for free.)
Why not? Because Spark is also included with any Adobe Creative Cloud plan, which also start at just $10 a month for the Photography Plan. But with that, you get Lightroom, Photoshop, and some cloud storage in addition to Spark. So you could spend $10 on Spark, or you could spend $10 on Spark, Photoshop, and Lightroom. Even if you’re not a professional photographer and have no need of Photoshop, Lightroom CC is a great way to keep your photos synced across your devices, includes a very capable RAW camera app, and integrates perfectly with Spark Post.
Editors’ Recommendations
- Google Photos is seeing stars (and hearts) with new social reactions
- How to make a watermark: A quick and easy way to protect your photos
- Can you spot a Photoshopped picture? Here are 9 ways to identify a fake photo
- The best photography portfolio websites for showing off your work
- Where to download free stock photos and public domain images
