


The Beats Solo3 wireless headphones are on sale from Walmart for $150 off
Beats Solo3 Wireless
Opinions on the Beats by Dre headphones tend to be mixed among the audiophile crowd, but few can deny that they’re solid cans – something that hasn’t changed since Apple took over the brand in 2014. Although Beats remain hugely popular, they’re pretty expensive (which is the main gripe you’ll hear from critics), and so your best bet when shopping for a pair is to wait for a sale to score one at a big discount.
If you’ve been eyeballing a pair of Beats and trying to sniff out a deal, you’re in luck. Walmart just slashed the price of the Beats Solo3 wireless headphones to just $150, bringing it down to about half of its retail price tag.
Earbuds are portable and convenient, but their small drivers can never compete with larger headphones when it comes to delivering great sound quality and the deep, punchy bass that Beats have built their name on. The Beats Solo3 features a compact on-ear design with folding earcups, making them a great alternative to those earbuds for listening to your music on the go.
The Beats Solo3 headphones are wireless, utilizing Bluetooth connectivity for fast and easy syncing to your phone or other compatible media device. The internal battery offers up to 40 hours of continuous use. In the off chance that you’re running on empty, Beats Fast Fuel technology lets you get three hours of playback with a quick 5-minute charge. The on-ear controls and built-in mic also make it simple to take calls, control your media playback, and use voice commands with Siri.
The Beats Solo3 wireless headphones retail for $300, with the actual price typically hovering around the $200 to 250 range. Now, however, you can score a pair of these for just $150 from Walmart while inventory remains. This offer is limited, so if it goes out of stock, these headphones are also currently on sale on Amazon for $197 – not quite as good of a deal, but still a decent discount off the retail price.
$150 | Walmart $197 | Amazon
Looking for more great stuff? Find headphone deals and more on our curated deals page, and be sure to follow us on Twitter for regular updates.
We strive to help our readers find the best deals on quality products and services, and choose what we cover carefully and independently. If you find a better price for a product listed here, or want to suggest one of your own, email us at dealsteam@digitaltrends.com.Digital Trends may earn commission on products purchased through our links, which supports the work we do for our readers.
Editors’ Recommendations
- Start your fitness journey with the best Fitbit deals available now
- Buy a professionally refurbished iPhone 6 and save $100
- Miss Prime Day? This Instant Pot is still on sale for super cheap
- Upgrade your home theater with the 50-inch Vizio smart TV, now just $300
- Check out our list of the best iPhone deals for August 2018
Apple Facing Investigation in Japan Over Accusations of Anti-Competitive Behavior
Japan’s Fair Trade Commission is investigating allegations that Apple pressured Yahoo Japan into pulling back from its Game Plus platform in the country, reports Nikkei.
Yahoo last fall submitted complaints about its Game Plus platform, a web-based service first launched in July 2017. Game Plus is designed to let users play games without needing to download a full app.
52 companies were participating in Games Plus at launch, according to Nikkei, including major game makers like Square Enix, and Yahoo initially planned to expand the platform into other areas, like business software.
Yahoo cut its Game Plus budget last year and pulled back on promotions for the service. According to Yahoo, it did so because of “pressure behind the scenes from Apple.” Such a platform competes with the App Store, where Yahoo also offers apps for sale.
Japan’s Fair Trade Commission is said to be gathering information on the situation, which it says “may constitute interference in Yahoo’s business prohibited by the Anti-Monopoly Act.”
Nikkei says it’s unclear how the investigation will proceed, as Japanese investment company SoftBank, a major Yahoo shareholder has stepped in to mediate. Companies also often hesitate to work with authorities, according to an attorney that spoke to Nikkei, which can make it difficult to prove wrongdoing.
Tag: Japan
Discuss this article in our forums
Beginner Guide on How to Fly a Quadcopter
The sight of a flying camera taking recordings have been around for some time, but only a meager sum have been able to afford it because like they said, it is basically for those with large pockets. But still, in the same vein, there are different models and types available basically on what you can afford. Regardless of whichever you purchase, what is necessary is that you know how to operate it and that involves that you go through the necessary procedure of learning either individually or dependently.

Whichever way it turns, you need to be able to decipher what you are getting yourself into. In this article, you will be learning how to fly a quadcopter at the first time.
What to do?
Go through the instructions properly
The principal thing you need to do after you must have purchased your drone is the manufacturer guide. This instruction manual contains all you need to know as regarding learning and maintaining the drone. In fact, it is one of the important parts you need to consider as it will come in handy should there be any problem.
Charge your quadcopter battery
Before you decide to start moving your quadcopter, you will be required to first charge the battery. It is essential that you utilize the battery and the charger the device comes with. If you have issues with battery charging, you may want to consider reaching out to the manufacturers as utilizing other units for your drones asides from the provided ones is not advisable.

Quadcopter Positioning
You have to make certain that the space you are utilizing is not close to any danger. Also be certain that you have positioned the Quadcopter as stated in the manual. You need to be aware of where the back and front of yourmodel are located. Place yourself in the back of the drone before takeoff.
Push down the quadcopter throttle
Before switching on your transmitter, hold down your throttle. Then you can turn on your transmitter. Connect the battery of the quadcopters after that. This is a very crucial sequence. When you are done with your flying session, remove the drone battery before switching the transmitter off.

Take off &landing
The initial flight maneuvering you are going to engage in is take-off and landing. You can push the throttle slowly upwards and the quadcopter will begin taking off from the ground. If the quadcopter begins to lean backward or forward, correct it by utilizing the pitch command. The same is available for the roll control. If you observe the drone leaning to any of its sides, correct it by holding it in balance.
Once you have taken off, keep the drone balanced and make efforts to land as smoothly as possible. You can do this by pushing down the throttle command. Make efforts to land it on the exact location you took off from.
Hold the position of the quadcopter after take-off
Next, you will take off and hold it in position a little above its landing area. It is crucial to remember that this phase needs concentration if you plan to hold the position. Keep the drone in place and ensure you hold it over the area you took off from as still as you can. This may initially seem difficult, but understanding this technique will help you in understanding how to begin and end you flying sessions. Additionally, it will ensure you are a safe pilot and that your device lasts for a long time.

If you don’t learn how to carry out the fundamentals of landing, take off and balancing, it will be difficult when you start the complicated aspects, so its ideal you practice this aspect for some time.
Rotating the quadcopter
One of the crucial aspects with flying quadcopters is understanding how to properly implement rotating commands. It’s best to note that rotation is controlled by the Yaw control.
If you remember the instructions, you should be behind the quadcopter. The next step will be taking off and rotating the drone. This may sound easy, but you will notice the issue the instant you try it. The quadcopter tends to change positions based on where you are standing. If you only rotate it, the drone will not correct the way it is positioned, but you will be left confused as to where its front and back are if you don’t take note.
The last step will be to create a great mental image as you fly. This will allow you to keep the drone in its appropriate course without issues. Lastly, learning to fly does not occur in a day, you will need to practice and practice until you get it.
How to Become A Better Entrepreneur
Being your own boss is a fun experience, but it also requires you to take on a lot of additional responsibility. You’re not only in charge of making sure you’re staying on task but that the business is running smoothly too.
Become a better entrepreneur by being open to listening to different ways for how you can improve your skills and develop as a boss and business owner. Never stop improving, and you’ll eventually experience a lot of success in your days. Remember the reasons why you got into the business in the first place to help keep you motivated and on the right track.
Create A Business Plan
Before you begin your venture, you need to take the time to sit down and write a well detailed and thought out business plan if you want to take your operation to new heights. It’s not a wise idea to tackle your goals blindly without a roadmap for how you’re going to achieve each objective. While it’s okay to revisit your business plan and make adjustments as time passes, you shouldn’t attempt to develop and grow your company without this important document in place.
Use Technology to Your Advantage
You’ll become a better entrepreneur when you aren’t afraid to experiment with technology. For instance, if you’re a day trader, then you’d want to spend time reviewing what platforms are out there and discovering the best return on your investment such as the tastyworks margin. Use technology to your advantage and see how quickly you’re able to achieve success and grow your business. You won’t have much to complain about when you’re seamlessly making money online with these types of advancements.
Always be Learning & Growing
Get further along with your business endeavor when you strive always to be learning and growing. Develop your skills in your downtime, listen to others and continuously be thinking of ways for how you can keep on innovating your products or services. Put yourself to the test each and every day and don’t stop challenging yourself if you want to truly thrive in the long-term. Become a better entrepreneur when you aren’t afraid to make mistakes or step outside of your comfort zone.
Find A Mentor
Although you’re a business owner, that doesn’t mean you have to go on the journey all alone. Find a mentor who you trust and has been in your shoes in the past and ask them for advice. Spend time chatting with them about your obstacles and be open to hearing what suggestions they have for you going forward. You can’t let your ego get in the way; otherwise, you may never completely develop and reach your full potential as an entrepreneur.
Conclusion
You’re never going to make it to the top if you’re afraid to expand your horizons. You’ll become a better entrepreneur when you put these tips into practice and start to challenge yourself daily. Remain positive and don’t let a few hurdles get you down or keep you from reaching your goals.
Android Pie Review: The reason why I gave up my iPhone X
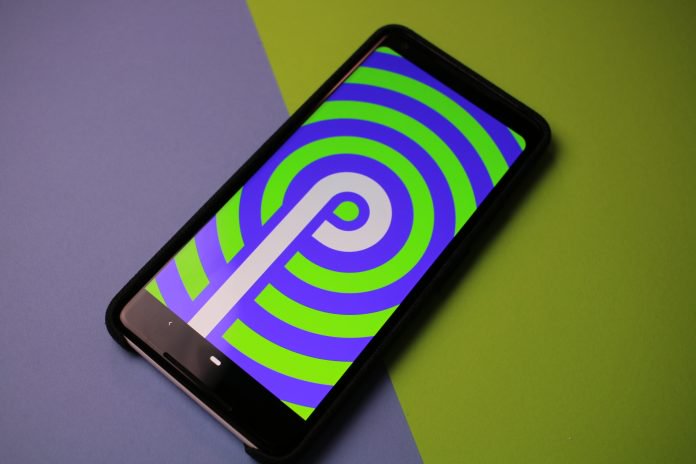

It’s August which means that we were greeted with a new version of Android. This has been Google’s MO for the last few years, and Pie is now available on your Pixel devices, along with the Essential Phone.
Android Pie made its debut after being unveiled at Google I/O 2018 and then came to handsets through Google’s beta program. Then, in a move that surprised most, Android 9 Pie was officially made available.
Read Later
- Nine features we love from Android 9 Pie
- How to install Android 9 Pie on your Pixel
- Android Pie Update Tracker
For the purpose of our review, we have been using Android Pie for the last month through the beta program and final release. This is also the reason why our review is a bit later than others, because we wanted to spend some time with Google’s final product.
What’s new?
At first glance, you probably won’t think that there is much packed into this latest release. But the real fun comes when you start diving deeper. Here is a list of some of the features coming with a “higher profile”:
- Adaptive Battery
- Adaptive Brightness
- Digital Wellbeing
- Gesture Navigation
- Notch Support (up to 3)
- App Actions
- New App Switcher
These are just some of the new features, and while that’s all fine and dandy, you probably want to know about the important ones. So let’s get started with the most surprising one – Battery Life.
Battery Life
Android Pie has provided a pleasant surprise in the battery department. In my usage, I was seeing all-day battery life with around 15% left with at least 4 hours of screen on time (SOT).
In fact, there were a few nights where I forgot to plug in my Pixel 2 XL, only to find that the battery drained just a little bit. Most recently, I went to bed at 1 AM with around 50% remaining, and woke up with 42% battery remaining.

This is no doubt in part to the new Adaptive Battery features. Google explained that this new functionality was intended to learn which apps you use, when you use them, and when to shut them down.
It seems that Android Pie really takes things into overdrive, as my battery life has just been incredible. From time to time, I noticed that an app (like Twitter) was closed when it had been a few hours, but notifications continued to come through.

Adaptive Brightness is another feature that is undoubtedly helping with the battery life race. The only issue that I found came when I was looking at my phone at night. The dark light of my room seemed to cause confusion with my device, as the brightness would fluctuate randomly and annoyingly.
What is making these new battery tweaks exciting is Google’s initiative to integrate Artificial Intelligence into its software. This is nothing new, but it will be interesting to see how everything holds up over time and with newer devices launched with Pie.
How are the gestures?
The next biggest change that users will be able to see is the removal of the good ole’ navigation bar. Instead of having three buttons to tap at the bottom, you are now greeted with a “pill”, which acts as the navigation for your device.
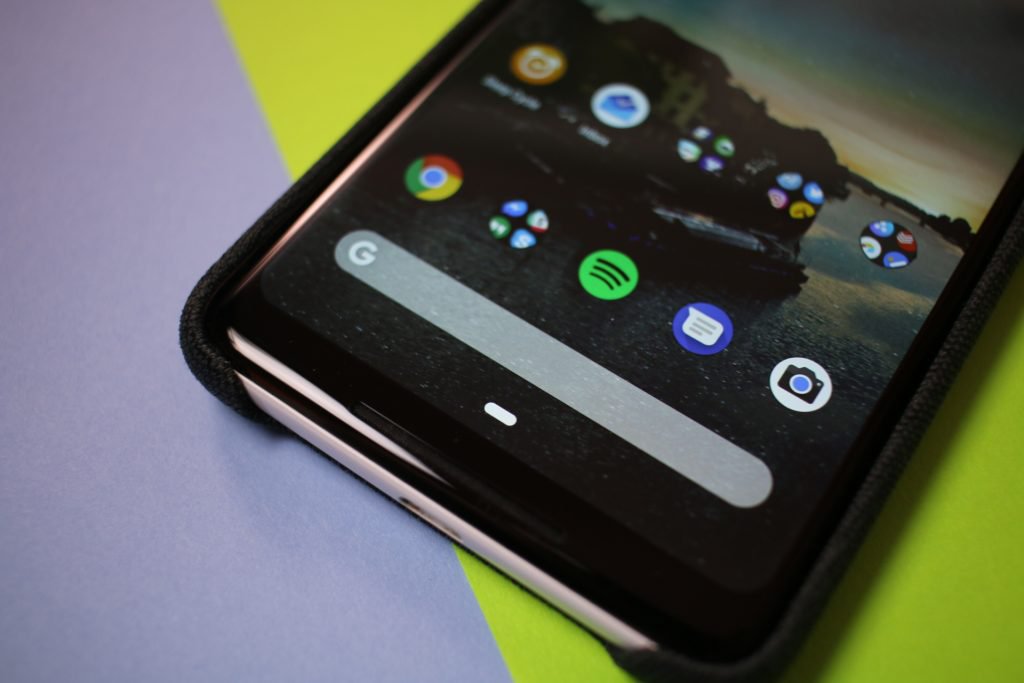 Android Pie ‘pill’ button
As someone who switched from an iPhone X to the Pixel 2 XL with Android Pie, the learning curb was not all that bad. Here are how the gestures work:
- Tapping the pill button will take you home
- Swiping to the right once will take you to the previous app
- Swiping and holding will allow you to scroll through your open apps
- Swipe up once to reveal the multi-tasking drawer
- Swipe up twice to reveal the App Drawer
In practice, this makes quite a bit of sense, other than the whole App Drawer debacle. You can do a slow drag to reveal the drawer, but having to swipe up twice to reach all of your apps is rather annoying.
 Android Pie Multi-tasking
To help combat the issue, I resorted to placing more apps on my home screens. My home screen has turned into folder-central and it is rather annoying for someone who doesn’t want a whole lot going on.
One extra feature that has been added is for those who make use of rotation lock. If you are using rotation lock but want to view one specific app in landscape mode, a new icon shows up in the navigation bar. This will allow users to view content how they want to, with just the tap of a button.
Visual enhancements in Android Pie
Something else that you may notice when you start poking around Android Pie is some slightly redesigned panels. Most notably, there has been a slight redesign to the notification tray, as the toggles are a bit brighter and more vibrant.
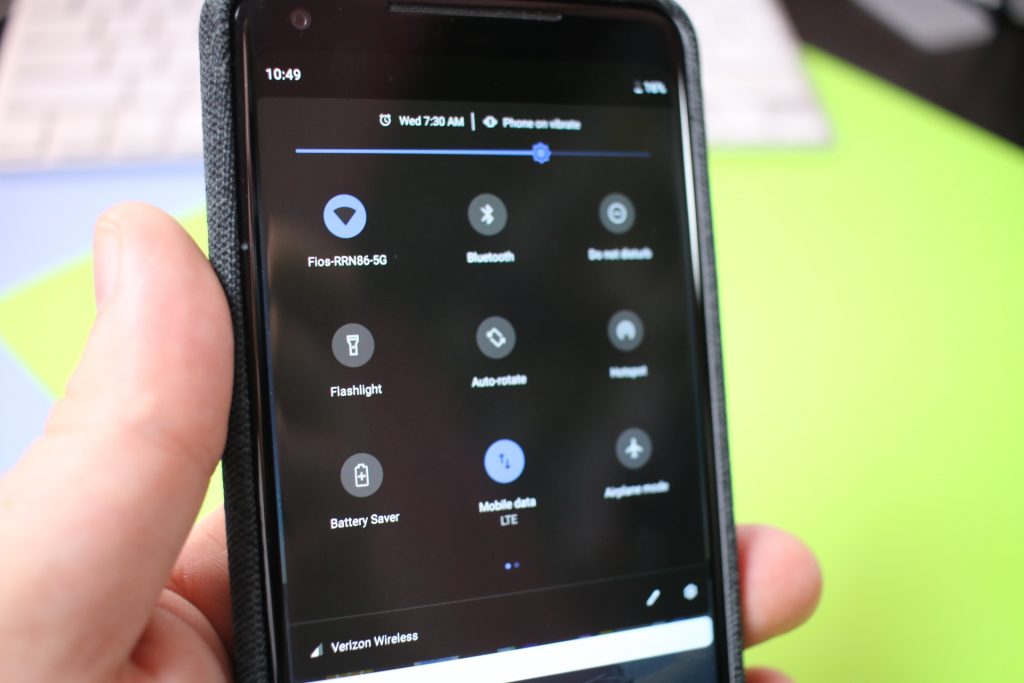
Additionally, since more devices are launching with notches, the clock has been moved from the right side to the left. This is to help make sure that you can see all the necessary notifications, while still seeing the time.
For some reason, Google has placed a limitation of three notches for Android OEM’s to be able to use with Android Pie. Hopefully, this doesn’t mean that Google knows something that we don’t and a phone is incoming with too many notches.

Notifications for messages have also been slightly revamped, as there are new quick reply features. You may remember an app called “Reply” which surfaced earlier this year that added smart replies to your favorite messaging apps.
This has been integrated into the system of Android 9 Pie, making it possible to quickly respond to your friends or family. The API has been also opened for developers, which hopefully means more apps will take advantage of this in the future.
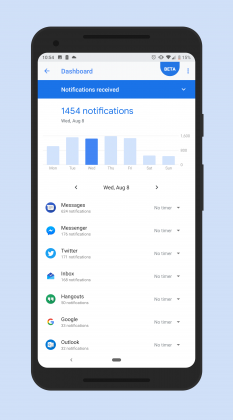
The fight to improve your “Digital Wellbeing”
At Google I/O 2018, during the Android P introduction, a new feature/app was announced called Digital Wellbeing. Google stated that the purpose of this app was to help provide users with a way to see exactly how much you are using your phone.
Not only can you now see that you are spending way too much time on Twitter, but you can also limit yourself. This is done with the help of App Timer, which is a setting that you set up for your “problematic” or “time-wasting” applications.
1 of 3


As someone who has no penchant for restraint, app timers seems like something that could be really useful. However, I ended up being more annoyed that I couldn’t access the app I was trying to view on my smoke break.
It was also a bit alarming to see just how many times I unlocked my screen or how many notifications that I received. Suffice to say, Digital Wellbeing really has given me a different look at how I should be staying off my phone when I don’t need to be on it.
READ MORE: What is Digital Wellbeing and how to sign up for it
The odd thing here is that it’s not automatically built into Android Pie. Instead, you have to sign up for a beta program and then wait for it to auto-magically appear in your settings menu.
As a side note, Chris Lacy (of Action Launcher fame) developed an app that allows you to view Digital Wellbeing as an application. It creates a direct shortcut, so you won’t have to dive into your settings to see what is going on.
Download Pixel Shortcuts
What’s next?
For owners of the Pixel, Pixel 2, and Essential Phone, you likely have already been enjoying the fruits of Android Pie. However, the real question remaining is when are other OEM’s going to jump on board.
As much as I would like to sit here and give you a rundown of what each manufacturer will be doing, I can’t. We have seen failed promises time and time again, and it just wouldn’t be fair for us to convey those failed promises to you, the readers.
So instead, I will say that it’s time to just sit back and play the waiting game.
Final Thoughts
Android 9 Pie is one of, if not the best, iterations ever released. My personal excitement drove me to pick up a Pixel 2 XL of my own, and put my iPhone X in a drawer.
In the time spent with Pie, I really fell back in love with Android and enjoyed all of the new features. I can safely say that once Pie arrives on more devices, it will be a joy to just about everyone to use.
Sure, gesture navigations may be annoying, but I feel that this is the way to full experience bezel-less devices. Google is making all of the right moves, and the Pixel 3 will be interesting to see how the latest version of Android works with the latest hardware
We want to hear from you. Sound off in the comments below and let us know what you think about Android Pie. Have you been using and enjoying it? Have you run into any issues? Let us know if you have any questions!
Don’t Miss
Google Home is awesome; here’s how to make it even better!
Check it out!
Gear Up: Consider myCharge’s wireless charging and Nintendo Switch solutions

Look around your home, school, or office, and you’ll probably find a number of devices that require regular charging. Maybe it’s a few phones, a tablet, wearable, or even a Nintendo Switch. Chances are that you’ve got something that needs an occasional, or daily charging.
Toss in a roommate, spouse, or co-worker, and we imagine things get pretty hairy around the wall chargers. No matter how big phones are or how great the battery life, you’re always going to want (or need) more.
What happens if you’re out and about and don’t have access to a wall or auto adapter? Consider adding something from myCharge.
SEE ALSO: myCharge portable chargers are perfect for Pokemon Go hunts
We’ve long been a fan of myCharge portable charging solutions, having had the privilege of reviewing them over the years. The 2018 selection is no different; it’s bigger capacities, faster charging, and smaller footprints. Not only that, but myCharge has a few recent tricks, too. What’s more, we’re happy to see the brand moving into other areas, such as the Nintendo Switch.
For your consideration
Our team has spent a few weeks using a number of myCharge portable charger options, each of which speaks to a different type of user. Here’s a couple that we’re more than happy to recommend.
UnPlugged 10K | $69.99
Having 10,000mAh of juice in your bag or pocket is pretty cool, but you’re probably still lugging around a cable. Even if it’s short, or attached to the charger, it’s one more piece to worry about breaking down.

The UnPlugged 10K is not your standard power bank. Sure, it can juice up your phone some 3-4 times, but that’s not all. There’s a Qi-ready charging platform on the top of the unit which lets you top off the battery simply by placing your phone on it.
Like other portable units, though, you still have a couple of USB-A ports to work with, too. This way, you can plug in your older phones for a direct charge. Or, mix and match at dinner time and you’ll all be ready to go for the rest of the night — or weekend.
Sold in white, you can purchase the UnPlugged 10K for $69.99 at myCharge’s website.
PowerDisk+ | $49.99
With so many phones offering wireless charging today, it just makes sense to take advantage of the technology. Sometimes it’s pretty expensive to go with the OEM’s preferred charger; myCharge offers a more affordable alternative.

The PowerDisk+ delivers incredibly fast charging speeds with Qualcomm 3.0 Quick Charge support. With up to 10W of output, it’s strong enough for any device you place on the platter.
Not only do you have the wireless surface to work with, but you’ve also got a USB port on the side. Indeed, you can plug in a secondary phone or device and charge (2.4A) at the same time.
Offered in white, the high-end charging pad won’t break your budget. At just $50 it’s the Qi-enabled charger your new phone deserves.
PowerGame | $49.99
A departure from the stuff you’d use for a phone or tablet, this one is more niche. That’s not to suggest there’s not a market for it, though. No, this one is designed strictly for the Nintendo Switch.

Featuring a 7,000mAh battery, the PowerGame plugs directly into your Switch and hugs the back of your console. Good enough for 10 hours of gaming, it’s everything you need for a week’s worth of commutes.
In addition to charging your Switch, it also pulls double duty with its kickstand. Feel free to put the unit down on a table and remove the controllers. It’s equal parts practical and convenient. Grab one for only $49.99 from myCharge today.


Products from Amazon.com
-

myCharge HubMax Portable Charger 10050mAh / 3.4A External Battery Pack with Built-In USB Port, Integrated Apple Lightning and Micro-USB Cables, Foldable Wall Plug for iPhone, iPad, Samsung Galaxy
Price: $69.99
-

myCharge AmpPlus Portable Charger 4400mAh/2.4A Output External Battery Pack with Dual USB Ports and Integrated Recharge Cable for Smartphone, Tablet and USB Devices (iPhone, iPad, Samsung Galaxy)
Price: Check on Amazon
-

-20%
myCharge Qi Wireless Charger Powerbank 10W/2.4A/10000mAh Unplugged Portable Charger with Dual USB Ports for Qi enabled Apple iPhone and Android (Samsung Galaxy, Note, Edge) – White
Price: $55.99
Was: $69.99
‹
›
Don’t Miss
Google Home is awesome; here’s how to make it even better!
Check it out!
Third-party calling apps no longer work with Android 9.0 Pie
If you’re one of the lucky few that have Android 9.0 Pie on your phone, you may still be getting used to all of the new updates and features on your phone. For those who frequently use third-party call recording apps, however, you may notice something different: These apps no longer work on your phone.
The change is sure to disappoint those who rely on call recording apps for business and personal purposes. The Android Play store currently has more than 200 call recording apps with an aggregate total of more than 200 million installs.
While there have been reports of the problems with third-party calling apps since Android Pie was in beta, some people believed it was just an issue that would be resolved with the official release of Pie. The team at Atlassian confirmed that Google closed a workaround in Android Pie that developers had been using for years to power third-party call recording apps.
An official call recording API was included in earlier versions of Android, however, Google removed the API with the release of Android 6.0 Marshmallow in 2015. The tech giant stated the API was removed on the grounds of user privacy, however, it left an easy workaround for app developers that worked through the release of Android 8.1 earlier this year.
It’s likely Google did indeed close the workaround due to privacy concerns. In the U.S. call recording laws vary by state: While most states have single- party consent laws, some states continue to require two-party consent. And with the enactment of new GDPR laws, express verbal consent is required for any call where either party is located in the European Union.
If you’re using a phone with Android 9.0 Pie, there are still a few options if you want to record calls. You can place calls on speaker and record with a third-party device such as your computer or laptop. You can also find hardware that connects to your phone via Bluetooth or USB-C that will let you record calls.
We reached out to Google to learn more about its decision for more information and will update our coverage as we learn more.
Editors’ Recommendations
- When is your phone getting Android 9.0 Pie? We asked every major manufacturer
- Android 9.0 Pie: Everything you need to know
- Here’s how to download and install Android 9.0 Pie
- Samsung rebrands Gear app as ‘Galaxy Wearables,’ it now supports Android 9.0 Pie
- How to use Do Not Disturb mode in Android
A new way to ‘freeze’ water could help transform organ preservation
Freezing can be a great way of preserving assorted foodstuffs or biological tissues and organs, but it’s not without its risks. The formation of sharp ice crystals can damage cell membranes, while the defrosting process comes with its own potential dangers.
Scientists from Massachusetts General Hospital (MGH), the original and largest teaching hospital at Harvard Medical School, may have changed the game with a new piece of research, however. They have developed a method of maintaining water and water-based solutions in their liquid form for long periods of time, at temperatures far below the usual freezing point. The breakthrough could have major implications for long-term safe preservation of everything from blood cells and organs to the food we eat.
“We have kept water at temperatures as low as minus-20 degrees Celsius (minus-4 degrees Fahrenheit) for as long as 100 days as water, [without] freezing,” O. Berk Usta, assistant professor of Surgery at the Center for Engineering in Medicine at MGH, told Digital Trends. “The approach relies on simply putting a layer of hydrocarbon solution, such as oils, short alkanes or alcohols, on top of the water in a solid container. This drastically suppresses the ice-nucleation events at the water-air interface by replacing it with a water-hydrocarbon interface.”
In an experiment, the researchers demonstrated that it is possible to more than double the amount of time, from the clinical standard approach, that red blood cells can be stored. At present, red blood cells can be stored for a maximum of 42 days. Using this new approach, it was possible to extend this up to 100 days.
Alongside the immediate practical applications, the researchers also believe that this discovery could enable fundamental scientific research by making it possible to study liquid phase reactions at a much lower temperature than is currently possible.
Heck, who knows — although this approach studiously avoids actual freezing, maybe it could prompt advances in the kind of long-term cryogenic preservation process that scientists, sci-fi authors, and, allegedly, Walt Disney have speculated about for years.
“We are now focused on increasing the volume of the preserved liquid phase from the 1-100 milliliter range to 500 milliliters to enable mass preservation of samples,” Usta continued. “[We also want to translate] our approach to the preservation of exotic cell types and organs, such as the liver, since our center already has a very active cell and organ preservation research thrust. Through collaborations, we are also looking into further understanding our observations by conducting [additional] computational and laboratory experiments.”
A paper describing the work was recently published in the journal Nature Communications.
Editors’ Recommendations
- Watching liquid crystals undulate under a microscope will melt your brain
- Is this the future of medicine? Synthetic blood could buy patients 48 extra hours
- Get your Sagan on with 60 awe-inspiring photos of the final frontier
- Italian researchers discover what they believe is a lake under ice cap on Mars
- With artificial bone marrow, scientists aim to decode blood disease
A turn for the better: Loupedeck+ adds custom dials, more to Lightroom console
HIllary Grigonis/Digital Trends
Brought to life by an incredibly successful Indiegogo campaign, the original Loupedeck introduced a bespoke hardware interface for Adobe Lightroom. The console used a host of buttons and dials for performing common and advanced commands that otherwise would rely on often esoteric keyboard shortcuts and slow mouse maneuvers. In our review, we found it to be a useful accessory for photographers needing to edit a large number of photos. Now, there’s a new version out: the Loupedeck+.
With it has come a price adjustment to the original: Introduced at $299, it can now be found for just $180, while the Loupedeck+ sells for $230. So how does the Loupedeck+ improve on the original, and will it win over any photographers who may have taken a pass on it?
Dialing up the customization
The Loupedeck+ features a very similar control layout to the original Loupedeck, but has turned up the customization options considerably. A new custom mode button will switch the function of the 11 pre-programed dials that control different elements of exposure, color, and white balance. That means you can switch the contrast dial — and ten others like it — to a different control by tapping a shortcut button on the upper left. That custom mode is helpful for users who need more than those 11 dials or simply want to better tailor the experience to their editing style. Beyond Lightroom, the Loupedeck+ also introduces support for Skylum Aurora HDR.
Custom mode aside, the Loupedeck+ has several new controls designed specifically for custom settings while leaving all the pre-labeled tools intact. While the original had one D1 dial, the update has two. We set these two to control sharpness and noise reduction.
HIllary Grigonis/Digital Trends
Along with the original’s two custom buttons in the center, the Loupedeck+ adds two more to the right and a set of three on the left. The three left “L” buttons are preset to tools like the brush and radial dial but, they can also be adjusted to control different options. The rotate/crop dial on the original is also renamed as a control dial, which can be custom set for two different actions, one for turning the dial and another for a press of the dial.
The color and flag keys used for culling images also double as a “keyboard mode.” Holding Fn and tapping the button to toggle between star and color labels turns those five buttons into shift, control, command, alt, and tab keys — they function just like the keys of the same name on a typical keyboard.
Each color channel has a wheel and three buttons swap between whether you’re adjusting hue, saturation, or luminance.
Like the first generation, the Fn button doubles the controls, working sort of like control key on a typical keyboard to expand key commands by pressing both. For example, in our setup, we used this to toggle our aforementioned noise reduction dial to color noise reduction, giving us full control over both parameters of noise reduction in one dial.
Perhaps our favorite feature on the original Loupedeck, the individual controls for each color channel, remain intact here, as do the dials for exposure, contrast, and white balance. For photographers who often make adjustments in the hue, saturation, and luminance (HSL) panel, this is where the Loupedeck can really start to save some time. Each color channel has a wheel and three buttons swap between whether you’re adjusting hue, saturation, or luminance. The actual efficiency gains can probably be measured in milliseconds for any one command, but it adds up over multiple commands and photos.
As with the first Loupedeck, as you make an adjustment, the Lightroom control panel will scroll to that adjustment on the screen. This makes sure that you always get visual feedback of the control your adjusting, although it doesn’t work perfectly. With noise reduction, for example, it scrolls to the top of Sharpness panel, which may leave the noise reduction sliders out of view on some monitors.
Along with the additional customization options, the Loupedeck+ feels sturdier. It is also heavier, but the keys feel a bit nicer under to the touch. We didn’t find anything wrong with the original build quality, but there is a noticeable improvement in the second generation. The Loupedeck+ also ditches the silver edge for an all-black design.
One of our few complaints about the original Loupedeck was the crop dial, which could only straighten the horizon. On the Loupedeck+, that dial can be customized to other options, such as scrolling through the image library, but you’ll still need to reach for the mouse when cropping an image. We still feel the crop dial could do more for actual cropping; even being able to use it select different aspect ratios would be nice.
Lower prices across the board
As with the original, the Loupedeck+ brings speed improvements that range from modest to meaningful depending on your editing workflow and workload. It is undeniably, however, a more fun way to work inside of Lightroom, rather than relying on a mouse, keyboard, and software sliders. We’d still like to see a wireless option — another complaint we had with the original — but most photographers will use it close enough to their computers that a USB connection won’t be an issue, so long as you have an open port.
Overall, this is an excellent tool for photographers who use Lightroom or Aurora HDR on a regular basis.
Rather than replacing the original, the Loupedeck+ serves as a flagship version, priced about $50 more. If you want more custom controls, the Loupedeck+ is the better option, but otherwise the original is a great buy at $180. The closest competitor is the Palette Gear, which is modular and customizable, but only includes two buttons, three dials, and two sliders in its $299 configuration.
But perhaps our favorite thing about the Loupedeck+ is simply that it costs less than the launch price of the first one ($230 compared to $299). That means both options are much more approachable, particularly to non-professional photographers who may not be able to justify the expense as easily.
Overall, this is an excellent tool for photographers who use Lightroom or Aurora HDR on a regular basis. Like any tool designed to save time, the fewer photos you tend to work with, the less important an accessory like the Loupedeck becomes. However, thanks to the price drop, more photographers will find the Loupedeck to be a worthwhile investment.
Editors’ Recommendations
- 18 Lightroom keyboard shortcuts you can actually remember
- What is HDR photography and how can I shoot it with my camera?
- Microsoft Surface Book 2 13-inch review
- Dr. Dabber Switch vaporizer review
- The Nik collection lives on with DxO Labs update — but at a cost
Intel serves up ‘Bean Canyon’ NUCs revved with ‘Coffee Lake’ CPUs
If you’re looking for a super-compact PC for streaming media that doesn’t break the bank, Intel updated its Next Unit of Computing (NUC) family with new “Bean Canyon” kits. Currently, there are five units packing Intel’s eighth-generation Core “Coffee Lake-U” processors released in April. But drawback with these “barebones” NUCs is that memory, storage, and the operating system are an additional cost on top of NUC’s original price tag. You’ll need a display and peripherals too.
If you’re not familiar with NUCs, they are miniature PCs that are designed to mount behind a desktop monitor or blend into your office environment or entertainment center unnoticed. They’re small and quiet yet powerful enough to possibly serve as a desktop replacement, depending on your needs. They’re typically provided in two compact sizes, one of which is larger than the other to accommodate additional storage.
Intel now serves up five affordable Bean Canyon NUCs: Two based on the Core i3-8109U for $300, two based on the Core i5-8259U for $400, and one based on the Core i7-8559U for $500. Technically, these chips were designed for mobile, but they don’t require excessive amounts of cooling, keeping the NUC’s noise level down to a minimum.
Here’s the new Bean Canyon family:
- NUC8i3BEK ($299)
- NUC8i3BEH ($299)
- NUC8i5BEK ($399)
- NUC8i5BEH ($399)
- NUC8i7BEH ($499)
As an example of the size differences, the NUC8i5BEK model only supports a single stick-shaped M.2 SSD while the NUC8i5BEH provides enough space to support a stick-shaped M.2 SSD and a 2.5-inch hard drive or SSD. Yet both provide two empty memory slots supporting up to 32GB of DDR4 system memory clocked at 2,400MHz.
Port-wise, both units are identical despite their different physical sizes. On the back, they provide one HDMI 2.0a port, two USB-A ports (5Gbps) and a Thunderbolt 3 port (40Gbps). On the front, you will see two USB-A ports (one of which will charge devices), headphone/microphone combo jack, and dual-array front microphones. A Micro SD card slot is located on the left side. For connectivity, the NUCs provide a gigabit Ethernet port on the back, Bluetooth, and Wireless AC networking.
You’ll see this same port and connectivity setup across all five Bean Canyon NUCs. All models support a maximum three external displays despite the Thunderbolt 3 port, all of which are handled by the integrated graphics in Intel’s CPUs. If you’re looking for compact gaming machines with discrete graphics, the company’s more-expensive “Hades Canyon” units would be a better option.
If you don’t want to be bothered with installing the memory and storage, and simply want to purchase these NUCs as complete PCs, SimplyNUC is taking pre-orders now for units what will ship in October.
For instance, a fully configured NUC8i7BEH with 8GB of memory, 128GB of storage, and a free installation of Windows 10 will cost $720. Maxing out the options can send the final price above $4,000 such as adding a 2TB M.2 SSD, a 4TB SSD and 32GB of memory. That doesn’t include tacking on peripherals or an extended warranty.
Editors’ Recommendations
- Intel’s next mainstream compact PCs won’t have discrete Radeon graphics
- Razer claims ‘world’s smallest’ with its 2018-edition Blade 15 gaming laptop
- Dell’s refresh of the XPS 13 2-in-1 series dips its toes into Intel’s Amber Lake
- Lenovo’s first VR-certified 15-inch mobile workstation packs a six-core CPU
- Intel finally ships an updated Radeon driver for its all-in-one ‘module’ CPUs
