


PlayOn, the DVR for streaming video, now also available as an Android app
Why it matters to you
Not satisfied with the limited number of titles you can download for offline viewing from Netflix? Just check out PlayOn Cloud instead, now available on Android.
It’s been six months since we were first introduced to PlayOn Cloud, a service that allows you to record video from Netflix, HBO Now, and other streaming service providers for viewing offline, and now the service is spreading its wings. After a successful debut on iOS last November, the app is coming to Android, which means that your “DVR for streaming video” can now be accessed regardless of what kind of smartphone you may have. And with 12 popular streaming services to record from, you can rest assured that you’ll never want for content ever again, even if you’re in a Wi-Fi dead zone.
Not only is PlayOn Cloud now available for Android, but it’s also introducing a pretty decent price reduction. Crediting technological advances, PlayOn says that it’s been able to cut the cost of a Cloud recording from 99 cents down to just 40 cents, a drop of 60 percent. You can buy recordings of your favorite movies or programs in packs of 5, 10, and 20 as in-app purchases.
“By offering PlayOn Cloud for both Android and iOS devices and by significantly reducing the cost of recordings, we are affordably offering the ultimate streaming experience — the ability to watch any streaming movie or show anytime, on any device — without worrying about blowing up your data plan or missing a show because it has expired,” said Jeff Lawrence, president and CEO of PlayOn. “This is a game changer for commuters, travelers, users with mobile data caps, and those who don’t want to miss movies and TV shows when they expire from streaming services.”
Recordings you create in PlayOn are kept in your own personal cloud locker within the app for 30 days. From there, you can download recordings directly to your mobile device, PC, or Mac, and enjoy it whenever your heart desires. And thanks to PlayOn’s AdSkip technology, you can watch your recordings without commercials (or at least, skip over them as they come up).
Currently, the PlayOn Cloud Android app lets you record and download all content from Netflix, Amazon, Hulu, Yahoo View, HBO Now, YouTube, NBC, ABC, CBS, FOX, PBS, and The CW. The service promises that even more streaming channels will be added in the near future. Future updates will bring more streaming channels to the app.
Following Intel integration, USB Type-C could be the only port we need
Why it matters to you
In the future all of our gadgets could be powered by and use inputs via a USB Type-C port.
Intel is looking to integrate Thunderbolt 3 support into all of its processors moving forward, in a move which it hopes will bring a new era of USB Type-C standardization to an industry which has a multitude of connectors for different products. Better yet, it will open up the protocol specification under a royalty-free license to further encourage its uptake.
Although there are certainly some problems with trying to create a new standard technology, Intel does have a reasonably solid history of achieving it. It helped develop the original USB standard back in the ’90s, which revolutionized the connection of various peripheral devices to PCs. Thunderbolt 3 is its next attempt to do so, with a reversible, high-power, wide-bandwidth input and output standard.
The future Intel hopes to reach one day is one where everything is run through a singular port type. With that support built into the Intel CPU at the core of a laptop or desktop, the systems can be built leaner, thinner, and lighter. Any of the Thunderbolt ports could power the system, or deliver data to and from it.
While that by itself should aid adoption by third-party manufacturers, in 2018 Intel will open up the protocol specification to a much wider audience, by releasing it with a non-exclusive, royalty-free license. This will allow other chip manufacturers like Qualcomm or AMD to build Thunderbolt functionality into their processors too, further enhancing the uptake of the Type-C standard.
Over the past few years, Intel has worked closely with other companies to enhance Thunderbolt 3 as the worthy successor to traditional USB ports. It teamed up with Apple to co-develop the standard and recently enhanced its device plug-and-play support with Microsoft’s Creators Update for Windows 10.
Moving forward, Intel hopes to see as many as 150 different PC designs supporting Thunderbolt by the end of the year. In the years to come, however, it expects to see more single-cable docking systems for laptops and tablets, as well as faster external storage options, better support for external gaming graphics cards, and higher throughput for virtual reality headsets.
That is, if they don’t go wireless for the next generation.
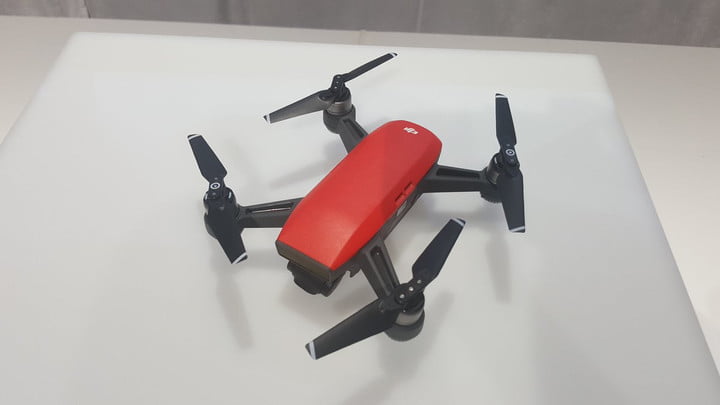
DJI’s new Spark drone is even better than the rumors led us to believe
Why it matters to you
DJI’s new drone is not only its most user-friendly product yet — it’s also the most affordable.
Putting months of rumors and speculation to rest, DJI — the undisputed king of drone world — finally unveiled its much-anticipated Spark drone to the world today at a press event in New York City.
Weighing in at less than a pound and measuring just 5.6 inches wide and long, the Spark is easily the most compact and portable drone in DJI’s product lineup — but don’t let its diminutive size fool you. Despite the fact that it’s just slightly larger than a can of soda, the Spark has plenty of technological muscle under its hood.
In addition to a 16-megapixel camera that shoots video in 1080p at 30 frames per second, the drone also sports a two-axis gimbal. This enables the Spark to mechanically stabilize the camera and cancel out any jarring, shaky movements — ultimately resulting in smoother, better-looking footage. This also gives it a leg up on the competition, as most selfie drovnes only feature single-axis mechanical stabilization.
To complement the camera, the Spark also comes with a wide array of intelligent flying modes. In addition to DJI’s standard offerings like TapFly and Active Track, the drone sports a handful of brand-new modes, such as Rocket (ascent with camera pointing down), Dronie (fly up and backward while locked on subject), Circle (orbit a fixed point), and Helix (orbit outward in a spiral pattern). It also recognizes gestures, and can be controlled via hand gestures — without a controller or smartphone.
As if that weren’t enough, DJI also equipped the drone with a slew of environmental sensors that allow it to sense and react to its surroundings autonomously. On top of the usual GPS and GLONASS positioning systems, the Spark has a forward-facing 3D vision system, which is used for both indoor positioning and obstacle avoidance.

Drew Prindle/Digital Trends
It’s pretty quick, too. According to DJI, Spark has a max speed of 31 miles per hour, and can stay airborne for about 16 minutes on a full charge. Range varies depending on your control style. Using gesture control only, the drone will stay within about 10-20 feet. Using your smartphone to fly gives you about 100 feet of range, and if you want even more distance, an accompanying controller stretches the maximum distance to over 100 yards.
Best of all is the price. You can pre-order the Spark today for just $499. That puts it squarely in competition with popular drones like the Yuneec Breeze and Hover Camera Passport — although on paper, DJI’s drone has significantly better specs. As for a release date, the company expects to begin shipping in June. Find out more here, and stay tuned for our hands-on review!
DJI’s new Spark drone is even better than the rumors led us to believe
Why it matters to you
DJI’s new drone is not only its most user-friendly product yet — it’s also the most affordable.
Putting months of rumors and speculation to rest, DJI — the undisputed king of drone world — finally unveiled its much-anticipated Spark drone to the world today at a press event in New York City.
Weighing in at less than a pound and measuring just 5.6 inches wide and long, the Spark is easily the most compact and portable drone in DJI’s product lineup — but don’t let its diminutive size fool you. Despite the fact that it’s just slightly larger than a can of soda, the Spark has plenty of technological muscle under its hood.
In addition to a 16-megapixel camera that shoots video in 1080p at 30 frames per second, the drone also sports a two-axis gimbal. This enables the Spark to mechanically stabilize the camera and cancel out any jarring, shaky movements — ultimately resulting in smoother, better-looking footage. This also gives it a leg up on the competition, as most selfie drovnes only feature single-axis mechanical stabilization.
To complement the camera, the Spark also comes with a wide array of intelligent flying modes. In addition to DJI’s standard offerings like TapFly and Active Track, the drone sports a handful of brand-new modes, such as Rocket (ascent with camera pointing down), Dronie (fly up and backward while locked on subject), Circle (orbit a fixed point), and Helix (orbit outward in a spiral pattern). It also recognizes gestures, and can be controlled via hand gestures — without a controller or smartphone.
As if that weren’t enough, DJI also equipped the drone with a slew of environmental sensors that allow it to sense and react to its surroundings autonomously. On top of the usual GPS and GLONASS positioning systems, the Spark has a forward-facing 3D vision system, which is used for both indoor positioning and obstacle avoidance.
Drew Prindle/Digital Trends
It’s pretty quick, too. According to DJI, Spark has a max speed of 31 miles per hour, and can stay airborne for about 16 minutes on a full charge. Range varies depending on your control style. Using gesture control only, the drone will stay within about 10-20 feet. Using your smartphone to fly gives you about 100 feet of range, and if you want even more distance, an accompanying controller stretches the maximum distance to over 100 yards.
Best of all is the price. You can pre-order the Spark today for just $499. That puts it squarely in competition with popular drones like the Yuneec Breeze and Hover Camera Passport — although on paper, DJI’s drone has significantly better specs. As for a release date, the company expects to begin shipping in June. Find out more here, and stay tuned for our hands-on review!
Xbox 360 architect is spearheading Microsoft’s quantum computing project
Why it matters to you
Microsoft is taking a unique approach to quantum computing in the hopes of outpacing its competition to become the first company to offer it to you.
After years and years of theoretical research, quantum computing is now well on its way to becoming a reality. In March, IBM unveiled its plans to offer the first commercially available quantum computer and it seems that Microsoft is betting big on its own aspirations for the technology.
Todd Holmdahl is Microsoft’s corporate vice president of next-gen devices. He is perhaps best known for his role in the hardware design of the Xbox and Xbox 360 video game consoles, but his current project puts him at the helm of the company’s burgeoning interest in quantum computing.
“We have line of sight to a commercial product,” Holmdahl told the MIT Technology Review. In some ways, Microsoft is facing an uphill struggle as it attempts to compete with rivals who have spent more time actively pursuing quantum computing. That said, the company is taking a different approach and there is a lot of optimism about the results it could yield.
Researchers have used various different methods in their attempts to create a large-scale universal quantum computer and two implementations — trapped ions and superconducting qubits — have emerged as the most promising options. However, even when the approach at the foundation of a project has been decided upon, there is plenty of work to be done in terms of scaling up.
For instance, the recent IBM Q announcement stated that the company expects to offer a 50-qubit system over the next couple of years and it is expected that quantum computers will need thousands of qubits or more to realize their potential. Even the most promising implementations are hindered by the delicate nature of quantum hardware.
However, Microsoft is carving its own path with an attempt to create the first device that is able to isolate and encode a single bit of data using a subatomic particle known as the Majorana fermion. The team hopes to use this research to create topological qubits, which would be much more resilient and stable than standard qubits.
If it is a success, it could help Microsoft outpace its competition once the necessary groundwork has been laid. Holmdahl is confident that the project will hit the mark, as the 52-year-old told the MIT Technology Review that he expects the company to construct its first topological qubit before he retires.
The race to secure the market for commercial quantum computers has been heating up for some time but with Microsoft doubling down on its efforts, things are about to get even more interesting. Holmdahl’s presence on the project indicates that the company is pursuing a commercial product, rather than just theoretical research and it seems clear that time is of the essence.
Honor adds a display and heart-rate monitor to its $30 fitness tracker
Why it matters to you
Fitness trackers are getting cheaper and while this one may not launch outside of China, we will likely see similar ones in the near future.
Honor is moving a little deeper into the fitness tracking landscape. The company, which is owned by Huawei, announced the new Honor Band A2 — which represents a pretty huge improvement over the original Honor Band.
The device now features a 0.96-inch OLED display, along with a built-in heart-rate sensor, and IP67 waterproof rating. When it comes to metrics, the device is able to track steps, sleep, and exercise — and it will even give you a notification if you have been sitting around for too long.
Of course, the screen is not just for fitness tracking — it will also deliver notifications such as text messages and phone calls. You can also manage those notifications — so you can dismiss or mute notifications quickly and easily. While the 95mAh battery seems small for somewhat used to the 2,000mAh+ batteries in phones, Honor says the battery will last up to nine days.
Perhaps the best thing about the fitness tracker, however, has nothing to do with its features — the band comes at only $30, which is an excellent price for what seems to be a capable device.
Unfortunately, however, the device is not going to be very widely available. It will only be available in China on June 9 and it comes in black, green, white, and red. The device is compatible with both Android 4.4 and above and iOS 8.0 and above — so the vast majority of people with a reasonably modern phone will be able to make use of the device.
The Honor Band A2 is a follow-up to the Honor Bad A1, which was a pretty good band in its own right. Still, it did not feature a display and as such could not really deliver things like notifications. It was also only available in China — so we do not really anticipate the Honor Band A2 ever expanding beyond Honor’s home country — despite the fact that we might not want to.
Sony Xperia X Series 2017 news, rumors, and release dates
Why it matters to you
Sony’s newest smartphones will likely feature great cameras at reasonable price points.
Sony had quite a 2016, but its 2017 looks to be even more exciting. So far, we’ve seen the Sony Xperia XZs, XZ Premium, XA1, and XA1 Ultra.
Despite those releases, rumor has it potentially even more phones are right around the corner — and we’ve already started hearing about them. Sony reportedly has three other handsets in the pipeline: the Xperia XZ1, XZ1 Compact, and X1. Although we don’t know much about them just yet, it’s believed they could debut at this year’s International Franchise Association Conference in Berlin in September.
While initial reports suggested Sony was also prepping a successor to last year’s Xperia X and X Compact, the company confirmed during its yearly investor meeting that it will be discontinuing that line to focus instead on true flagships and midrange models. The Xperia X was positioned as Sony’s “Premium Standard” family — devices offering nearly high-end internals without the high-end price tag.
Here’s everything we know about Sony’s upcoming devices, as well as pricing and availability information for those that have already been revealed.
Sony Xperia XZ1 and XZ1 Compact
The Xperia XZ1 is pegged to be Sony’s next flagship, and leaked specifications, courtesy of German site Review.ge by way of Playfuldroid, would support that claim. The XZ1 will reportedly feature a 5.2-inch 1080p display, driven by a Qualcomm Snapdragon 835 system-on-chip. The device will pack 4GB of RAM as well as a 3,000mAh battery, according to the rumors.
In classic Sony fashion, the XZ1 is expected to launch alongside a smaller device packing similar power. The XZ1 Compact, as it’s called, will feature the same processor and memory as its larger sibling, only with a 4.6-inch 720p display and a 2,800mAh battery.
Both of these devices are rumored to launch at the upcoming IFA Conference in Berlin, alongside yet another product: the Xperia X1.
Sony Xperia X1
The X1 is purported to complement the XA1 and XA1 Ultra released earlier this year as another of Sony’s midrange offerings. The primary difference may be the silicon powering the device: while the XA1 and XA1 Ultra pack MediaTek’s Helio P20 processor, the X1 will reportedly receive Qualcomm’s just-revealed Snapdragon 660. With 4GB of RAM, the X1 could be much more powerful than those two phones.
Otherwise, the X1 will reportedly contain a 5-inch 1080p screen as well as a 2,800mAh battery. All the phones expected to launch at IFA have been linked to new camera technology that will allow “full pixel continuous shooting,” according to the Review.ge report.
Sony Xperia XA1

Sony Xperia XA1
Julian Chokkattu/Digital Trends
While the Xperia XZ series is Sony’s flagship lineup, the Xperia XA is decidedly more midrange. The Xperia XA1 has a 5.0-inch display with a 720 x 1,280 resolution, and under the hood it’s powered by a MediaTek Helio P20 processor, coupled with 3GB of RAM. When it comes to storage, the phone features 32GB — however it does have a MicroSD card slot for more storage if you so choose.
Then comes the cameras, and the rear-facing camera has a 23-megapixel sensor with an f/2.0 aperture, while the front-facing camera’s sensor sits in at 8 megapixels.
The Xperia XA1 will cost $300 unlocked, which is quite pricey for its features — especially when you consider cheaper competitors like the new Moto G5. It will release in the United States on May 1, and can be pre-ordered immediately from Amazon and Best Buy. Other retailers, such as Fry’s and B&H, will also carry the device. You can read our first take hands-on report here.
Sony Xperia XA1 Ultra

Sony Xperia XA1 Ultra
Julian Chokkattu/Digital Trends
The Sony Xperia XA1 Ultra is a slightly higher-powered version of the standard XA1, however the two phones share many of the same specs. For example, the device does feature a MediaTek Helio P20 processor, along with 4GB of RAM. When it comes to storage, the phone offers 32GB — although once again you’ll get a microSD card slot to add as much as 256GB of storage.
Once again, the camera has a 23-megapixel sensor, while the front-facing camera has been upgraded to a 16-megapixel shooter. There is currently no word on the XA1 Ultra’s availability yet, but it should arrive sometime in the summer. Here’s what we thought of the phone when we got our hands on it.
Sony Xperia XZs

Sony Xperia XZs
Julian Chokkattu/Digital Trends
The Xperia XZs may not be as high-powered as the Xperia XZ Premium, but it still has quite a lot to offer. For example, the phone features the Qualcomm Snapdragon 820 — which is Qualcomm’s 2015 flagship processor. Sony has coupled that chip with 4GB of RAM and either 32GB or 64GB of storage.
The rear-facing camera on the Xperia XZs is the same 19-megapixel shooter as the XZ Premium, while the front-facing camera comes in at 13-megapixels. The display on the phone may not be as important as the XZ Premium, but it’s still relatively nice with its 1,080 x 1,920 5.2-inch display. The phone is available as of April 5, and costs $700. Check out our hands-on report here
Sony Xperia XZ Premium

Sony Xperia XZ Premium (left) Sony Xperia XZs (right)
Julian Chokkattu/Digital Trends
Sony launched the Xperia XZ in September but soon launched a follow-up at MWC in the form of the Xperia XZ Premium. The new device has quite a lot to offer in the specs department, and could come at a decent price for a flagship, too.
Under the hood, the device features the new Qualcomm Snapdragon 835 processor, making it one of the first devices to do so. Accompanying that chip, the device offers 4GB of RAM and a nice 64GB of storage — however that storage can be upgraded with the MicroSD card by up to 256GB. The rear-facing camera sits in at 19-megapixels with an f/2.0 aperture, while the front-facing camera comes in at 13-megapixels, also with an f/2.0 aperture.
When it comes to the display, the phone has a 5.46-inch screen with a resolution of a massive 3,840 x 2,160 and a 807 pixels-per-inch.
We don’t know exactly when the phone will be available for purchase beyond “late spring,” nor do we know how much it will cost.
Article updated on 05-24-2017 by Adam Ismail: Added rumors about the XZ1, XZ1 Compact, and X1, as well as news that Sony will not release new Xperia X models.
Need to scale down a massive image file? Here’s how to do it in seconds
This article was updated on 5-19-2017 by Tyler Lacoma to include instructions for Paint and Resizer.
Resizing an image doesn’t have to be rocket science. It’s true that more robust image-editing software sports all sorts of magical functions — i.e., content-aware analysis and 3D rendering, among other highlights — but resizing an image is as basic as it gets.
Almost all, if not all, image-editing software contains easily-accessible resizing tools that can resize your image to your desired proportions, whether it be in pixels, inches, or by a specified percentage change. Below, we’ve outlined five tools that allow you to do so, including those for both Windows and MacOS. Also, check out our picks for the best free image-editing tools, if you’re looking for some capable programs without having to resort to your savings fund.
Note: Although it is generally fine to shrink an image, enlarging an image often results in quality degradation, reducing the image’s crispness and visual fidelity. Just keep that in mind when re-sizing.
Photoshop, GIMP, and Preview
Photoshop — Windows and MacOS
Photoshop is a fantastic tool for resizing an image if you already have Adobe’s flagship software buried within your image-editing arsenal. Read on to find out how to use it for resizing images.
Step 1: Launch Photoshop and open your image
Launch whatever version of Photoshop you have installed and open the image you’d like to resize. To do so, click File in the Photoshop top menu and choose Open from the resulting drop-down menu. Afterward, select your image from its save location and click the Open button in the bottom-right corner.

Step 2: Resize your image
Once you’ve opened the image, click Image in the Photoshop top menu and choose Image Size from the resulting drop-down menu. A small pop-up window will appear housing various options for resizing and altering your image to your preferred specifications. Select your desired width and height — either by specifying the dimensions in pixels or percentage — and make sure the “Constrain Proportions” and “Resample image” boxes are checked. This will ensure you maintain the proper proportions when rescaling your image. When finished, click the OK button in the upper corner of the window.
GIMP — Windows and MacOS

GIMP, aka GNU Image Manipulation Program, is the Wikipedia of image-editing software; it’s an open-source application that is fueled by a community of volunteers hellbent on making the freemium application a high-quality rival to the many more robust software suites available on the web. It’s a powerful tool that touts basic and more advanced features alike, albeit with a high learning curve akin to Photoshop and other similar software.
Step 1: Download and launch GIMP.
Head to the GIMP homepage and click the orange Download button in the upper-right corner to download the executable file. Once finished, run the necessary installation software before launching the program by navigating to your main application or program folder and clicking the GIMP icon. When installing the application, remain wary of any additional add-ons, toolbars, or general malware that may come bundled with the software.
Step 2: Open your image.
Once open, click File in the GIMP top menu and choose Open from the resulting drop-down menu. Then, select your image from its save location and click the Open button in the bottom-right corner.
 Step 3: Resize your image.
Once the image is opened, click Image in the GIMP top menu and choose Scale Image from the resulting drop-down menu. A small pop-up window will appear housing various options for resizing and altering your image to your preferred specifications. Select your desired width and height by specifying the dimensions in pixels, inches, or picas, among other options, and click the Scale button at the bottom of the window.
Preview — MacOS
There’s a reason Preview has come pre-installed on all versions of MacOS for more than a decade. The built-in application is a fantastic, lightweight tool for making basic photo edits and adjustments, in lieu of more intensive software like Photoshop. Preview is typically set as the default program for viewing images and PDFs, hence it’s usually the first program to open your newly-imported images and doesn’t require any external software.
Step 1: Launch Preview and open your image.
Click the Preview icon depicting two photos and a magnifying glass in the main applications folder to launch the program. Once open, click File in the Preview top menu and choose Open from the resulting drop-down menu. Next, select your image from its save location and click the Open button in the bottom-right corner.

Step 2: Resize your image.
Once you’ve opened the image, click Tools in the Preview top menu and choose Adjust Size from the resulting drop-down menu. A small pop-up window housing various options for resizing and altering your image to your preferred specifications will appear. Choose from the custom presets at the top or select your desired width and height — either by specifying the dimensions in pixels, inches, centimeters, or percentage, among a host of other options — and make sure the “Scale proportionality” and “Resample image” boxes are checked, as to maintain the proper proportions when rescaling your image. When finished, click the OK button in the upper-right corner.
Video: Google’s crazy experiments from I/O 2017
Google I/O is about more than just keynote presentations, big announcements, developer sessions and sunburn. Each year, Google also has a tent full of wacky computational “experiments” based around some of its most important products, platforms and technologies, and I/O 2017 was no exception. This year’s “Experiments” tent combined everything from machine vision, with an AI-powered electronica robot, to VR ping-pong and machine learning picture recognition games.
As the show was winding down late last week, we stopped by the tent in question to capture these experiments in all their glory. Check out our video feature above to see how both professional and amateur developers are using Google’s technology to do fun, crazy and interesting things!
- Android Central on YouTube
- More on Google I/O 2017 experiments
- All the big announcements from I/O 2017
How to set up Samsung’s Secure Folder on the Galaxy S8

Secure Folder makes it easy to keep your stuff where only you can get to it.
Secure Folder is a component of Samsung Knox that gives you a “compartment” to hold apps and files that is separate from the rest of the phone. You don’t need to create a new user or go through any hoops to get it up and running, and once you’re all set up you can not only keep private files private but you can also use apps with a separate user login, or add apps that you only use through your secured profile.
Secure Folder is one of those awesome things Samsung offers on every Galaxy S8 or (Galaxy S7 with Android 7.0) so you don’t have to go looking for an app that tries to do the same thing.
As mentioned, it’s easy to get started.
Set up Secure Folder

Secure Folder uses your Samsung account, so you’ll need to have that setup and running. If you downloaded anything from Samsung Apps you’re already set up. If not, the easiest way to do it is to open Samsung Apps and check out some icon themes. You’ll be walked through the setup process. Don’t worry, it’s easy. Once that’s done, here’s how to set up Secure Folder.
Open the device settings by tapping the gear icon in the upper right corner of your notification shade.
Scroll down until you see the Lock screen and security section. Tap to open it.
Scroll down until you see the Secure Folder entry and tap it to open the setup process.
Log in with your Samsung account.
A few apps are part of Secure Folder by default, but you can add or remove most any app you like.
You’ll see a short tutorial about what Secure Folder is and what it can do that you should look at. The setup process itself is simple. You sign in, agree to the terms and conditions, and set an unlocking method. you can use the same options you use to unlock your phone: Pattern, PIN, Password, Fingerprint or Iris. This sets up Secure Folder with a few apps already there (Gallery, Calendar, Contacts, Email, Camera, Internet and My Files) ready for use. You can also add more, and any app you have installed on your phone can be copied to Secure Folder. You can also copy any file to Secure Folder’s storage.
This adds a Secure Folder icon in your apps list. To get inside, you tap the icon and you’re prompted to sign in with whatever method you used during the setup. You can customize the icon and name of the Secure Folder app, and if you go back to the Secure Folder section in your device settings you’ll now find other options. Be sure to take a look at them and set things up the way you like them.
Using Secure Folder

This is the cool part. When an app is copied to Secure Folder, it’s a completely separate installation. That means it doesn’t share any data with the “regular” version of the app and you can log in with a different username. Things you download or save while using an app from Secure Folder aren’t available through the regular version of an app, and you can even manually move files like photos or documents to Secure Folder to keep them private.
To install an app to Secure Folder

Open the Secure Folder app from your app drawer by tapping the icon.
Log in with the method you chose when you set things up.
Look for the Add apps button and tap it.
Choose an app from your phone or download an app through Google Play or Samsung Apps.
Data you save from an app in Secure Folder isn’t available to a ‘regular’ version of the same app.
Now your new app will be inside the Secure Folder app, ready to use and completely private. You use the apps the same way you would have before, but remember that you can’t share data between the secure version and the regular version. That means if you do something like add a calendar appointment through Secure Folder it won’t show in the normal calendar.
You can also edit the apps you have put in Secure Folder by tapping the Edit apps button instead of the Add apps button. Choose any apps you want to remove from Secure Folder or apps you want to place a direct shortcut to the secure version of on your home screen and make the corresponding choice.
To manually move files to Secure Folder

Open the Secure Folder app from your app drawer by tapping the icon.
Log in with the method you chose when you set things up.
Look for the Add files button and tap it.
Choose the file you want to be placed in the Secure Folder storage area.
You can copy files to Secure Folder or move the originals. Remember that they will still be visible outside of Secure Folder if you copy them.
You can add any file to Secure Folder by choosing the My Files button when you add a file. This opens the file browser, and from there you just choose it like you normally would. You can also filter for just pictures, music, documents and videos by using the shortcuts when you tap the Add files button.
You have a choice to move or copy files from the regular storage to the Secure Folder. If you choose to copy them you’ll still have the original that is available through any app. If you choose to move them, you’ll only be able to access them through Secure Folder.
This is awesome
Privacy is pretty important. Secure Folder gives us an option to hide files and apps from view even if we lose or phones without having to encrypt the entire SD card. The concept isn’t exactly new, but Samsung native implementation is great and it’s something you should have a look at!
