


How to use Nintendo Switch Joy-Con and Pro controllers on your PC

There’s one serious benefit that’s emerged from Nintendo’s choice to use standard Bluetooth technology in the Nintendo Switch: You can easily use the console’s unique, high-quality controllers on PC, in MacOS, and even on Android devices. That includes both the Joy-Con motion controllers, which come with the console, and the Switch Pro Controller, a $70 extra purchase (worth it, though, for the controller’s stellar quality). And all you need to use these controllers on PC is a Bluetooth receiver.
Here’s what you need to know.
How to connect the Joy-Con controllers
You can easily pair Joy-Con controllers with a Windows or Mac computer from directly within the Bluetooth menu. Follow the steps below to do so.
Step 1: Turn on Bluetooth on your PC.
Step 2: Disconnect the Joy-Con from the Switch as you would normally.
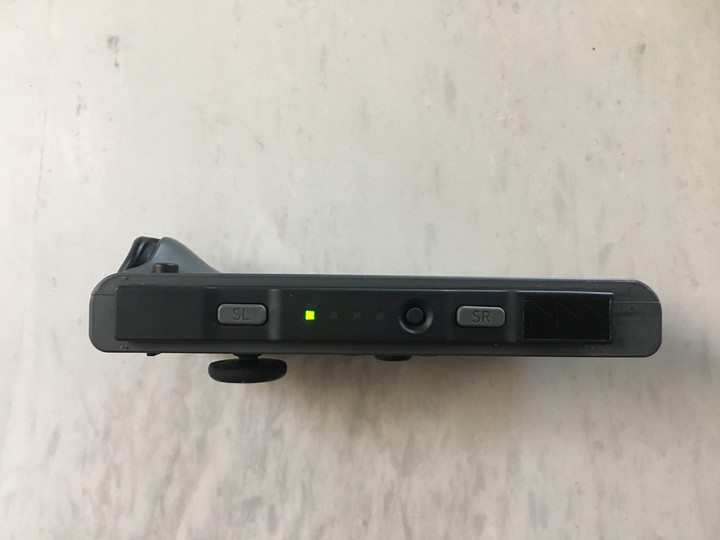
Step 3: Hold the “sync” button on the Joy-Con — which is located between the SR and SL buttons — until the LED lights start flashing. Use the image below, if you’re in need of further clarification.
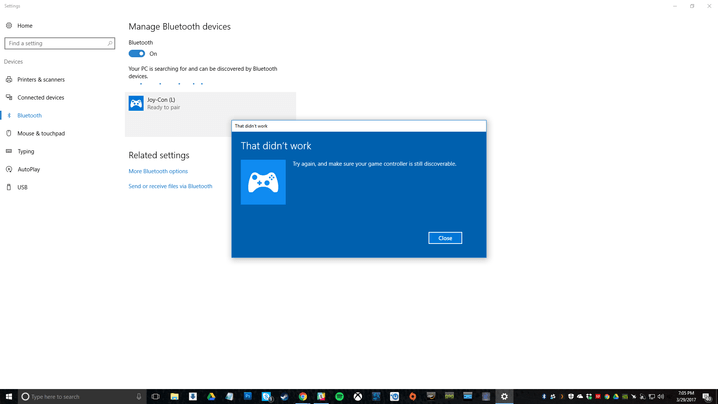
Step 4: Look for the Joy-Con in your computer’s Bluetooth menu, and select the option to pair it with your device. There are some quirks, like the fact that the pairing lights on the Joy-Con won’t stop blinking. You can confirm that the controller is connected, however, by looking at your computer’s Bluetooth settings. If you see the error message below, move the controller around to ensure no other devices are interfering with the signal. Afterward, try again.
Unfortunately, the two Joy-Cons will be treated as separate controllers. That’s great for two-player games, but it makes the Joy-Cons useless for playing anything complex, like a first-person shooter (why are you using a controller to play a PC shooter anyway?).
No doubt the PC homebrew community will eventually come up with a way to pair both Joy-Cons as a single controller, and even to use the controllers’ unique features — like motion controls — on platforms other than the Switch. Until then, however, use the Joy-Cons for simple 2D games or retro games with an emulator, and be thankful Nintendo is letting this happen at all.
‘MLB The Show 17’: Best practices for batting with precision
Although MLB The Show 17 is a serious baseball sim at its core, the game remains accessible to casual fans thanks to its refined, relatively simplistic control scheme. Even with its pick-up-and-play identity, though, if you go into a game swinging away at pitches without giving it much thought, you’re going to run into some trouble with friends. Worse still if you plan to tangle with hardcore baseball fans in online matchmaking. While batting difficulty scales according to your skill against the computer, when facing a real opponent, it helps to strategize.
If you’re looking to hang some serious numbers on the scoreboard, here’s what you should keep in mind.
Putting bat to ball
In order to score some runs, you will have to hit the ball. Since baseball is a game of reaction time and reflexes, there’s no better teaching mechanism than stepping into the box and swinging away. Still, if you find yourself striking out a lot, you may want to take a step back and reevaluate your strategy.
- Watch the windup: Each pitcher in The Show has a unique pitching motion. Some motions are elongated, some are abrupt, and many are in-between. Keep your eyes on the pitcher’s throwing hand to see the point of release. By watching the ball from the moment it leaves the pitcher’s hand, you’ll have a better chance of tracking it as it pummels towards the plate. This becomes even more important when playing in a match with one of the pitch guessing sensors on such as PCI. Here, you’ll have to move the cursor towards where the pitch crosses the plate to make solid contact.
- Check pitches: Each pitcher has up to five different pitches, from four-seam fastballs to curveballs to changeups to sliders, and more. Depending on your settings, you can check the opposing player’s list of pitches by pressing R2. Now, it’s hard to guess what pitch your opponent will throw, but knowing which types of pitches are possible certainly doesn’t hurt your chances.
An interactive map can keep you off LA’s most fatal roads
Open data can be an incredibly powerful tool, but it still requires context and people to actually pay attention to the information for it to be valuable. Los Angeles has discovered this the hard way. Its Vision Zero initiative aims to eliminate traffic deaths by 2025, but compared to other cities with similar programs, LA is coming up short in terms of results. After the program’s first full year (2016), fatalities rose by some 43 percent according to the Los Angeles Times. There are a number of reasons for this, including more pedestrian and bicycle traffic, distracted driving and driving under the influence. To combat the rising number, the city looked to data as a means of discerning the most fatal roadways.
It determined that 450 miles of the City of Angels’ streets (roughly six percent) are where 66 percent of pedestrian deaths happen. To address this, city officials hope to augment those roads with bike lanes, speed-tracking signs and widened sidewalks. Maybe LA should look into adding lights to its sidewalks to alert pedestrians distracted by their phones, too.
Residents also have a new interactive map at their disposal. It’s part data visualization and part commute-planning tool. Each dot on the map represents a traffic death, and in some cases, acts as a memorial for the departed. Age, name of the deceased and sometimes a photo and a short message inform users who the person was and what they meant to others — a way of humanizing data if there ever was one.
As Fast Company notes, the map could prove valuable to folks who walk or bike to work and help them pick a route that’s statistically safer. Of course, this is only helpful if people actually use it.
Prior to the map, the city’s hope for Zero Vision was a 20 percent decrease in fatalities by year’s end, but reality is at odds with mayor Eric Garcetti’s projections: In 2017, traffic deaths have already jumped 22 percent compared to last year.
Via: Fast Company
Source: Vision Zero, Los Angeles Times
For exactly zero dollars, this photographer built a working lens out of trash
Why it matters to you
With some tinkering and a bit of luck, this video shows how you can build a no-cost lens out of just about anything.
If you’ve spent the last few months trying to win over your significant over and convince them you need an expensive new lens for your camera, maybe don’t show them this video. Self-proclaimed experimental photographer Mathieu Stern is back with another cost-saving photography tip that seems almost too good to be true. With a bit of scavenging, some rubber bands, and a few minutes of his time, he assembled a functional 135mm camera lens out of items he found in the trash.
Aptly dubbed the “Crapinon,” the lens is literally garbage — which both refers to how it was made and the fact that it is really not sharp at all. However, we can’t help but be impressed with the results, soft as they are. The photos have a very retro, film aesthetic, with subdued contrast and colors. It’s a look that will undoubtedly help propel your Instagram account to unimaginable new heights.
Stern built the lens to work on a full-frame camera. He arrived at the focal length of 135mm after some experimentation. As for the aperture, which is fixed without a mechanical iris diaphragm, he believes it is between f/2 and f/3, according to DIYPhotography. Based on the very shallow depth of field of the sample photos, that would seem to make sense.
Of course, actually being able to reproduce Stern’s Crapinon may not be quite so easy as he makes it seem. For one, most of us likely don’t have M42 tubes and focusing helicoids just lying around. Rummaging through flea markets also isn’t guaranteed to turn up a suitable optic. Still, it is good to know that if you happen upon one and if you have access to the associated required parts, a little elbow grease and trial and error will let you turn it into a surprisingly usable lens for your mirrorless camera or DSLR.
Google brings its solar panel calculator to Germany
Google’s Project Sunroof is a way of combining the company’s mapping data with information on how much sunlight hits your home. With it, people can work out if their abode gets enough radiation for them to consider investing in solar panels. Until now, the service was limited to the US but, from today, the system is rolling out to Germans similarly curious about adopting renewables.
The search engine has teamed up with German power company E.On to map the country and calculate solar fall. The project currently covers 40 percent of all German homes, totaling some seven million buildings with a focus on densely-populated areas like Berlin, Munich, Rhine-Main and the Rhur. Locals can simply type in their address to be given Google’s estimate of the potential costs and return of the project.
The tool is also being added to E.On’s solar sales website and will, hopefully, encourage more people to make the switch. Germany is leading the way in the fight against climate change, and in 2016, a full third of its energy came from sources such as wind, solar and hydro. The country’s efforts have been so successful that there is a pleasant “trail of blood” running across the local coal industry.
Source: Google
How to download Netflix movies and TV shows to your phone, tablet, or PC
Netflix is a great service when you want to spend a night on the couch, but what if you have a long plane ride ahead of you? For years, Netflix subscribers have dreamed of the ability to download movies or episodes of their favorite TV shows to accompany them on a long trip off the grid. Now that dream has finally arrived, and we’re here to help you make that transition offline go as smoothly as possible so you can simply sit back and enjoy.
For now, downloading titles for offline playback is limited to the Netflix app on iOS and Android mobile devices, or the Windows 10 Netflix app on PCs (Windows 10 Mobile devices aren’t supported for now). Follow us below to figure out how to get downloading so you can get off the grid, and take your Netflix along for the ride.
Getting your download on
Step 1: Get up to date
First things first, you’ll need to make sure your Netflix app has been updated to be ready for downloading. If you don’t have your device set to auto update, for iOS devices you can simply click on the app in the app store to get version 9.0.1 or later, while on Android devices you can do the same at the Google Play store where the version varies by device. For Windows 10, select Store from the taskbar or start menu, then click your user icon, and select Downloads or Updates. From here, select Check for Updates and your Netflix app will be updated.
Step 2: Choose your download quality

Netflix offers two different quality levels for downloads: Standard and “Higher,” the latter of which is seemingly high definition (720-1080p resolution), though Netflix doesn’t specify there. Standard uses less space on your device and downloads faster, while Higher takes a bit more space. Which one you’ll want to use will depend on how much free space you have on your device, and what kind of device you’re using — a Standard title may look fine on a phone, while Higher may be necessary for your tablet of laptop. To choose, select the menu icon on the left, then scroll down to App Settings. From here, under the Downloads heading, click or tap Video Quality and select your preference. We’ll get into more details on how much space Netflix downloads take up later in this article.
Step 3: Pick your poison

Not everything on Netflix is available for download, but the company has made downloadable titles easy to find by arranging them in a special section called simply “Available for Download.” To get there, click or tap the menu button in the upper left and it’s the first option below the Home section. If you’re searching for specific titles simply look for the download icon, which looks like an arrow pointing down to a line.
Step 4: Get downloading

To begin downloading, simply select the download icon on the show or movie you want to watch. There is one thing Android users will need to be aware of here: Netflix can only download titles to the same storage space in which the Netflix app is stored, so if you want to download to an SD card, you’ll need to make sure to download the Netflix app there as well.
Step 5: Watch your downloaded titles


Once titles are downloaded, they are stored in the “My Downloads” section, found by selecting the menu button in the app’s upper left hand corner. The My Downloads folder is located just above the Home section. A title’s running time as well as how much space it uses is listed next to the title. To play a downloaded episode, simply click or tap on the video thumbnail.
This colorful cube grounds virtual objects in the real world
You can’t usually spin, stretch and otherwise manipulate virtual objects all that easily. You’re often relegated to clicking and dragging on a mouse, and even exotic approaches like HoloLens or VR headsets introduce issues like lag. However, North Carolina State University has developed a simple solution that only requires a webcam and a little geometry. Their Captive technology revolves around a color-coded cube that sends visual cues to video recognition software — all you have to do is rotate the cube to examine a virtual object, resize it or change textures.
It’s intuitive, as you can see in the clip below, but it’s also extremely quick. There’s no significant latency to make you second-guess your moves. And since Captive works with any device that has both a camera and a decent amount of computing power, you could use it on everything from your laptop to your smartphone.
A practical implementation of Captive is likely some ways off, since that would require both a mass-produced cube (the existing object is 3D-printed) and integrating support into apps. However, this is one of those why-didn’t-we-think-of-this-sooner discoveries that could easily find its way into 3D modeling tools, games (there’s a whiff of PlayStation Move to it) and other software that could benefit from quick and easy 3D control.
Via: The Verge
Source: NCSU
‘MLB The Show 17’: Pitching and fielding tips and tricks
MLB The Show 17 is definitely an offense-driven game. With helpful on-field cues to catch fly balls, automatically aligning infielders who get a good jump on grounders off the bat, and an intuitive pitching system, you could argument could be made that the every game comes down to who can take care of business at the plate.
Sometimes, though, even the best players struggle at bat. When getting on base is a challenge — let alone tacking on runs — having a steady command of your defense will keep you in the game. From solid pitching strategies to best fielding practices, here’s what you should keep in mind to get through your opponent’s at bats as unscathed as possible.
Pitching considerations
Everything on the defensive side of the ball begins, and possibly ends, with your pitcher.
The basics: By default, The Show features a pitching meter. Press the button assigned to the pitch you’d like to throw, confirm it, then the meter rises. Your goal is to press your pitch button when the meter is in the red zone on its way up, and then again on its way down. To throw a “perfect pitch,” you must tap the button at the very end of the meter on the way up, then hit the bright yellow line on the edge of the red zone on the way down.
The timing of these presses changes based on your pitcher’s confidence and energy. Stopping it in the red isn’t particularly difficult, but lining up perfect throws, particularly with the initial slim yellow line, can be tough.
If you’re having trouble making your throws, we found that paying attention to the pitcher’s motion helped us find our timing with the pitching meter. By looking at the pitcher’s arm, you get a more natural vision of where to press the button during the followthrough. Each pitcher’s windup and delivery is different, but after a few pitches, watching them in action becomes far more intuitive than focusing the brunt of your attention on the meter.
Managing velocity: A pitcher’s velocity determines the speed and break of a pitch. In The Show‘s pitching meter, velocity is measured as the top portion, which we referred to as the red zone. The closer to the top that you stop the meter, the more velocity the pitch will have. While hitting the far end of the red zone will deliver the fastest pitch, you should not aim for edge of the meter every time. Setting aside the fact that faster pitches are harder to throw accurately, trying to pitch that 100mph fastball isn’t always smart. Overthrowing too often will wear out your pitchers — especially your starters — and send them in to ice their shoulder early.
We recommend shooting for close to maximum velocity with relief and closing pitchers near the end of the game. With starting pitchers, try and stop the meter before the halfway mark in the red. Your starting pitcher in online matches is typically your ace, and conserving his energy — the green meter on-screen — is important. Energy depletes as the pitch count increases, but also from the pitcher’s exertion. More velocity equals more strain. If you can outlast your opponent’s starting pitcher, you’re usually on the right track.
Pitch usage: Each pitcher has 3-5 pitch types, a mix of fastballs and offspeed breaking pitches. Generally speaking, the majority of pitches — especially those from starting pitchers — are of the fastball variety. You should mix up pitches between fastballs and breaking balls, but the The Show is dedicated to realism, meaning that the fastball should be your go-to pitch. It also happens to be the easiest pitch to place.
While there’s no set formula for how to pick a throw, we’ve compiled a list of every pitch you might encounter so you’ll be ready for anything.
Fastballs
- Four-seam fastball: The hardest pitch in your arsenal. They follow on a straight path, and have no discernible movement. They are also the easiest to place where you want them
- Two-seam fastball: Similar to the four-seam fastball, but not quite as rigid, and can be bit harder to place. The pitch moves in a relatively straight line but usually sinks a bit over the plate.
- Running fastball: Virtually identical to a two-seam fastball.
- Sinker: Dips more noticeably than a two seam fastball.
- Cutter: Moves slightly in the direction of the pitcher’s glove. For right handers, it curves left, for left handers it curves right.
Breaking balls:
- Curveball: The most common breaking ball, the curveball has dramatic forward spin on the ball which causes it to dip dramatically and sweep across the plate.
- Sweeping Curve: A sweeping curveball has moves laterally with greater effect than a traditional curveball.
- 12-6 Curve: As hinted by its name, the 12-6 curve starts off high and gradually drops in flight.
- Slider: Similar to a Cutter, but more pronounced. This breaking pitch moves across the pitcher’s body and downward.
- Slurve: Derived from the slider and curveball, the slurve is almost indistinguishable from a slider in The Show.
- Knuckle curve: A curveball with two different variations. The first offers more control than the traditional curve with more controlled spin. The second has spin like a regular curveball while holding onto some of the unpredictability of a knuckleball.
- Screwball: This breaking ball curves away from the pitcher rather than back across the pitcher’s body like other breaking pitches.
Off-speed pitches:
- Splitter: The splitter, A.K.A. the split-finger fastball, looks like a normal fastball, but is actually a changeup. It appears to drop off suddenly at the plate to confuse batters.
- Knuckleball: A good knuckle ball spins minimally, if at all, in the air. The absence of spin causes the ball to take an unpredictable path towards the plate.
- Circle changeup: Thrown like a two seam fastball, the circle changeup mirrors the two-seamer’s minimal movement, but as an off-speed pitch.
- Palmball: With low velocity, and the appearance of a fastball, the palmball is meant to be thrown to overeager batters prone to swinging early.
- Forkball: Related to the splitter, the forkball moves a bit slower and drops off at the plate.
- Vulcanchange: Similar tot he circle changeup, but with a greater drop off at the plate.
Pitch placement: By default, The Show provides a strike zone overlay. Any pitch that crosses the plate inside that zone, and sometimes around its edges, is typically called a strike. Portions of the zone — one or more of the nine sections — may appear red, indicating that the batter excels at hitting pitches placed in the highlighted locations. Avoiding those areas is important, but you should also focus your efforts on throwing to the corners and edges of the zone. Tossing one down the center of the plate, even a screeching fastball, is never a good move. For breaking pitches, this means that you will often want to start the pitch outside of the zone, and let it work back in. If facing a same-handed player, try and start your breaking pitches inside to crowd the batter, as the pitch will break away from their stance.
Your pitcher’s confidence, the blue meter, is affected by your strike/ball ratio, as well as securing outs. The more batters a pitcher retires without allowing excessive hits and runs, the higher your followthrough meter climbs. Keep this in mind when you are trying to get opponents to chase pitches purposefully thrown as balls. If they swing, it will help your confidence meter, but if they lay off of your errant tosses, the size of the followthrough meter grows thinner.

Using your bullpen: In a nine-inning game, you will almost always have to swap in a pitcher from your bullpen. Even if your starter is having a phenomenal day on the mound, you should consider getting a fresh arm in there. The best moment to bring in a new pitcher varies, but you should usually look to sit your starting pitcher in the sixth or seventh inning. You should not wait until your pitcher can’t throw anymore before taking him out. You need to have forethought, and that comes with getting a new pitcher ready to come into the game.
You have the option to either “Stretch & Toss” or “Warm Up” up to two pitchers at any time. Under normal circumstances, we recommend setting a reliever to warm up, which lets your reliever get fully “hot” before trotting out to the mound, an inning before you plan to put him in. For example, if you plan on taking out your starting pitcher at the beginning of the seventh, start warming up a reliever at the beginning of the sixth.
Stretch and Toss, which gives pitchers a less effective warm up mid-inning, should be reserved for your starting pitcher has stayed in too long and is showing signs of slowing down. Though it’s always better to give your relievers a full warm-up, you still have a way to mitigate the damage and get yourself out an unexpected jam.
Since you have two spots, we recommend warming up a righty and a lefty at the same time so that you can make the most out of your new pitcher’s first matchup, i.e. righty versus righty, lefty versus lefty.
SoundCloud’s latest feature crafts playlists from fresh uploads
Soundcloud isn’t like other music streaming services. Rather than offering the back catalogs of seemingly every musician on the planet, the service is more of a resource for one-offs, mash-ups and folks looking for unique tunes to put into their DJ sets. As a way to help you discover more of what’s on its servers, SoundCloud has launched “The Upload.” The features looks at what you’ve liked and played and delivers a daily playlist based on your listening history.
To keep things fresh, these tracks will all have been uploaded within the past few days. The update is out on desktop, Android and iOS right now. To find it on the latter, navigate to the “search” tab and it should be right up top. Given the surfeit of music (and podcasts) available on the service, this should help people wade through what’s available and maybe even find a few new artists to obsess over along the way.
Source: iTunes, Google Play, SoundCloud
Wide angles, squares, and more: Get the best from the LG G6’s superb camera
The G6 continues the tradition of LG phones featuring excellent cameras, with a dual-lens wide-angle rear camera as well as a wide-angle selfie cam on the front. The G6’s other party piece, its 5.7-inch 18:9 aspect ratio screen, also enhances the camera experience through a special app, and some additional features.
While it’s not hard to just pick up the G6 and go shoot some excellent pictures, it’s worth taking the time to understand its intricacies, so we’ve put together a guide to help you really make the most of this great camera phone.
Wide-angle rear camera

The main camera app is the one you’ll use most of the time, but the interface is quite busy, so it’s a good idea to learn the various controls. Holding the phone in landscape orientation, at the top centre of the display are two buttons, each showing little tree icons. The left button with a single tree icon is for the standard-angle lens, but tap the button next to it with three tree icons, and it activates the wide-angle lens. Alternatively, you can use pinch-to-zoom and switch between the two lenses. Pinch your fingers together to move from standard to wide angle views.
Camera roll preview

On the right-hand side of the display are the buttons for the camera shutter release, and the video mode, plus a preview of the last photo taken. On the far left-hand side of the screen, thanks to the 18:9 aspect ratio display, there’s a vertical preview of the last four photos taken, which can also be scrolled through with a swipe. It’s a handy alternative to jumping out of the camera app and into the Gallery app. If you feel this makes the screen look too busy, you can turn off the preview. This is found by tapping the Settings cog icon, and toggling the switch for Camera Roll.
Settings and manual mode

While you’re under Settings, it’s here that the HDR mode can be force activated, the resolution for photos and video selected, along with handy features such as a grid for the viewfinder — activate this to make composing shots easier — and geolocation tagging for your pictures. In the interests of privacy, we’d suggest turning the latter off.
The G6’s camera defaults to auto mode, but if you want to experiment with manual mode — where you can adjust many aspects of the camera — tap the Auto button on the left-hand side of the screen, and select Manual. There are two manual modes, one for the still camera and another for video. Also found in this menu is a mode for taking square, 1:1 ratio pictures, for easy sharing on apps like Instagram.
Panorama, Food, Popout, and other modes


Other camera modes can be found by tapping the Mode button on the left-hand side of the screen. A basic panorama mode is accompanied with a 360-degree panorama mode, and an enhanced image mode for taking pictures of food. More unusually, there’s LG’s Popout, which produces psychedelic images with different effects, by splitting the image into separate areas. Give it a try, it’s a very unusual look.
Also on the left hand side of the screen is a filter button, which looks like three overlaid circles. Tap this and choose from nine different effects, which handily show up live on the viewfinder. The filter icon on the left is shown in color when a filter is active, so you won’t forget about it.
Selfies
Flip the camera around using the button on the left of the camera viewfinder, or simply swipe up or down the screen for the same result. The front camera on the G6 also has a wide-angle mode, and it’s activated in the same way as the rear camera, except the icons have little images of people instead of trees. Be careful when in wide-angle mode, it’s easy for a finger or your palm to invade the shot if you hold the phone in an awkward way.
There are three new modes available when shooting selfies, which are adjusted using buttons running down the right hand side of the viewfinder. They’re labeled Filter, Lighting, and Skin Tone. The filters adjust the look of the entire scene, and are shown live on the screen, just like with the rear camera. Lighting and Skin Tone only affects your face, acting like a beauty mode. Mess around with both using the on-screen slider controls to get the look that suits you best.
Editing

When viewing photos in the LG G6’s gallery, there’s an Edit button at the bottom of the screen, which unusually doesn’t open LG’s own image editing suite, but Google Photos. If it doesn’t do the job, consider installing an app such as Snapseed, which will then appear in the options when you tap the Edit button.
Square Camera


Square Camera makes clever use of the G6’s 18:9 (or 2:1) aspect ratio screen, by splitting the camera view into two perfect squares, and using each one differently. If you’re looking for a Square Camera app and can’t find it, don’t panic, it’s actually a widget and may have been hidden away on your phone. To get it working, hold down an empty area of home screen until you get a helicopter view of all your apps and screens, then select widgets from the menu running across the bottom of the screen. Scroll through the widgets available until you find Square Camera, then tap it to add it to a home screen.
Holding the phone in portrait here, the same method for switching between front and rear cameras applies: A swipe or a tap of the button. Also, the wide-angle mode is activated in the same way, along with the majority of controls for taking a picture. Tap the Square button in the top right to select manual mode for video or stills, and the filter button for live filter effects. To find Square Camera’s special modes, tap the Mode button along the top of the screen. There are four, and if you’re unsure which one to choose, tap the Question mark icon for a quick introduction.
Here’s how to get the best from them.
Snap Shot
This is Square Camera at its most basic. The viewfinder is in the top square, and when you take a photo, a preview appears in the lower square. There’s a quick delete button, or if you drag the social button — it usually defaults to a Facebook icon — across the screen, you can share it on your choice of social network, without jumping out the app.
Match Shot
Match Shot takes two shots in quick succession of each other, and presents them side-by-side. These shots can both be from the same camera, or one from the front and the other from the rear, or be video rather than stills. It’s controlled using the icon that shows two boxes over each other, with the numbers 1 or 2 inside.
When the icon shows 1 and 2, you can take two pictures at different times. When it shows 1 and 1, two photos are taken at the same time. Alternatively, look for the Gallery icon when shooting in 1/2 mode, and choose an image from the phone’s gallery to insert into one of the squares.
Guide Shot
A fast, easy way to take a photo with the same composition as another. This is a little confusing to use at first, but it’s easy once you get the hang of it. Like the G6’s other camera modes, the viewfinder appears in the top square, and all the usual modes and features apply, including switching lenses and from the front and rear camera.
The lower square shows previews of other shots you’ve taken, or some standard ones included by LG. These confuse the situation, and if you want to remove them from the preview screen, long press and select Delete. Look for the big square with a “+” in it and tap it, then choose Take Photo, and snap away. The result will appear as a new Guide Shot for use later on. Tap it to select it, the use the transparency slider to adjust how much the ghost image shows on the viewfinder. Using this, you can compose the same shot over and over, in many different situations.
In our tests, the simpler the composition, the easier it is to align the two images. Try anything too busy, and it gets very hard to match the two together.
Grid Shot
The final Square Camera mode may be the most fun. The lower square is split into four, each ready to be filled with either a still image or a 3-second video. Tap in square number one and take a photo. It should appear in the square, and automatically move on to square number two. To take a video here, and watch for the 3-second countdown in the top right of the viewfinder to help compose the clip. Add a still or video to squares three and four to complete your collage. If you want to retake one image, just tap on it again.
Our advice here is to think about the order before you start taking the shots, because you can’t rearrange them later on. It’s fun to make little stories with Grid Shot, and they’re easily shared on Facebook and Twitter, when the video clips play automatically in the post.
Gallery
When you take shots in Square Camera, they can all be seen in the standard LG Gallery app. Open it and tap the icon that looks like three stacked lines in the top left of the screen. Look down the list and find Camera Mode, then tap it. Each Square Camera mode gets its own album.
That’s it, we hope you enjoy using the LG G6 and its superb wide-angle camera — both front and back.
