


Samsung ‘hopeful of gaining market share’ in India this quarter

Samsung is on track to lose at least $5.3 billion with the Note 7 fiasco, but the company is bullish on the Indian market. The South Korean company expects to increase its market share in the country during the lucrative festive season in spite of the Note 7 setback by focusing on the Galaxy S7 and S7 edge.
Samsung was able to get customers that have pre-ordered the Note 7 in the country to switch to the S7 or S7 edge by rolling out several incentives. The brand has also mentioned that those that have imported the handset from other countries will be eligible to receive a refund.
In a statement to Economic Times, vice president of Samsung India’s mobile unit Manu Sharma talked about the sales strategy during the festive season:
We have converted the Note 7 prebooked customers in India to S7 and S7 Edge. We are humbled by the loyalty of the consumers towards the brand. There is now a strong sales momentum on S7 and S7 Edge. By virtue of being a full range player with 25 models across segments, we are confident to grow our share and sales this quarter.
Sales of the S7 and S7 edge have allegedly doubled following the termination of the Note 7, according to the publication. With over 30 phones available for sale across all price segments, Samsung is in a strong position to solidify its place at the top of the Indian smartphone segment, where the company already occupies a 48.7% market share.
With the rise of 4G services in the country, Samsung is also committing to support 4G on all of its upcoming phones, including entry-level handsets.
How to use Move shortcuts on the Google Pixel
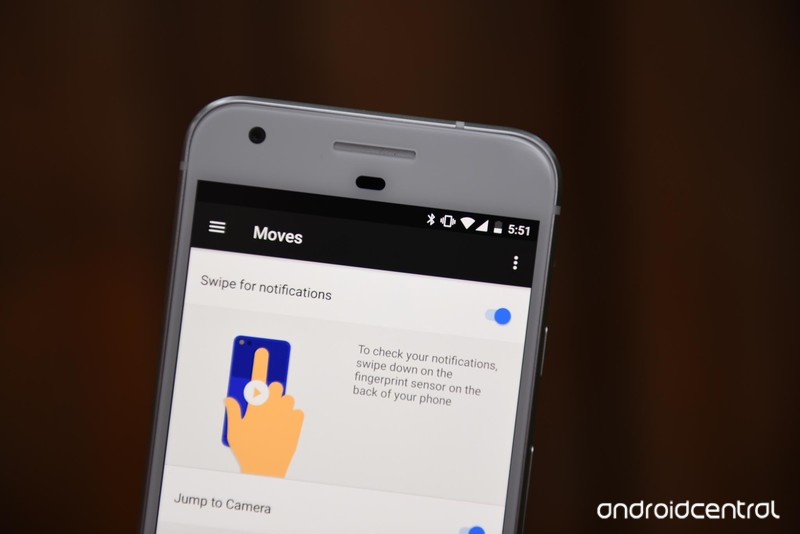
How do I quickly access notifications using the Google Pixel’s fingerprint sensor? Move shortcuts!
Google has added three useful gestures to the [Google Pixel] that are sure to make you more productive. While they’re not exactly new in the Android ecosystem, found in various phones from Motorola to Huawei to LG, they’re put to great use here.
- Swipe for notifications
- Jump to camera
- Flip camera
How to enable Move gestures on the Google Pixel
On the home screen, swipe down on the notification bar.
Tap the Settings icon (looks like a cog) on the right side.
Scroll down and tap on Moves menu.

Enable the gestures you want to use.

How to use “Swipe for notifications” on the Google Pixel
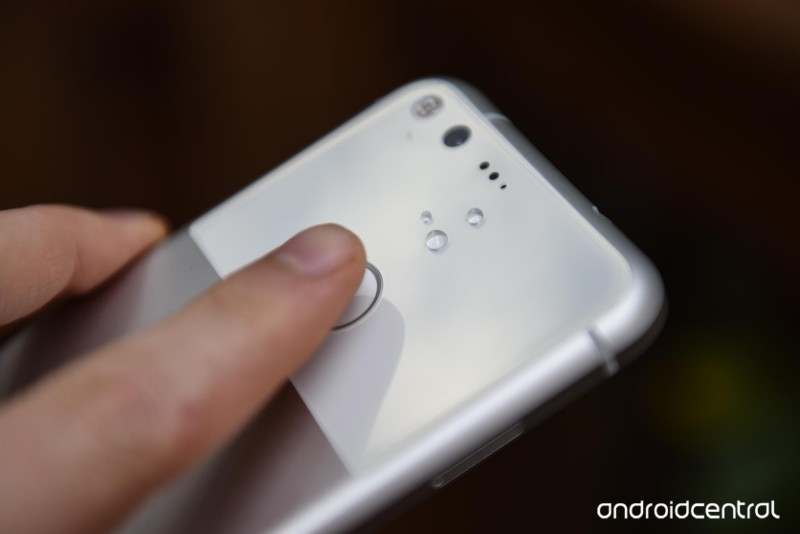
This is easily the most useful of the new Moves gestures. It allows you to use your finger — any finger, not just the ones stored in the secure fingerprint storage — to swipe down on the fingerprint sensor to access the notification bar.
How to use “Jump to camera” on the Google Pixel
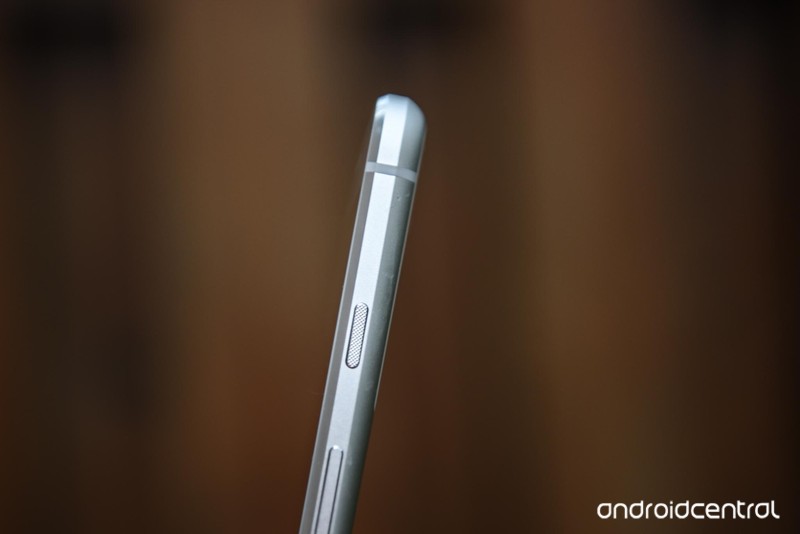
This is a fast and easy way to access the camera app from anywhere. Just double-tap on the power button on the right side of the phone to jump into the camera app and capture a photo or video — even when the phone is turned off!
How to use “Flip camera” on the Google Pixel
This gesture was taken directly from Motorola’s camera app, and that’s fine: we love it! When you’re in the camera app, just double-twist your wrist twice to change between forward and back cameras, and vice versa. It’s super convenient when you can’t touch the screen!
Google Pixel + Pixel XL
- Google Pixel and Pixel XL review
- Google Pixel XL review: A U.S. perspective
- Google Pixel FAQ: Should you upgrade?
- Pixel + Pixel XL specs
- Understanding Android 7.1 Nougat
- Join the discussion in the forums!
Google Store
Verizon
Best phone photography gear for kids (and their parents)

Take your kids on phone photography adventures with all the great gear you need to get creative!
Shooting with your Android device may be a great way to capture some incredible moments with your family, but it’s also an awesome tool to get your children involved with the fun and creative world of photography!
Photography – and phone photography – is a great way to encourage kids to get active, explore the world outside their bedroom, look at things from different, unique angles, allow for valuable, one-on-one teaching opportunities, and so much more.
Being able to go out and shoot some pro looking photography on your own is one thing, but shooting with a little sidekick can be a bit more difficult if you don’t have the right gear. You don’t need a full arsenal, either – all it takes is a few different pieces of tech to get your kids shooting like a professional with your Android device!
- External Lenses
- Durable or Waterproof Phone Case
- Backup Battery
- Editing apps
- Portable printer
External Lenses

External lenses are fantastic, tiny tools that secure onto your Android phone’s front or back camera to add different effects to your phone photographs, similar to how changing the lens on a DSLR camera will give your photography a completely different look and feel.
The most common type of lenses are macro, wide-angle, fisheye, and telephoto, each of which alter images to appear as if they were edited through Photoshop (though those aren’t the only ones available by any means).
More: Best universal add-on lenses for Android phones
Lenses can also be a really great way to shoot pictures with kids! By offering new perspectives and points of view, kids can get really creative with shots that a regular Android phone camera would be unable to capture. Fisheye shots can encourage kids to stand back and play with angles, while macro lenses can draw kids into small items that would otherwise seem boring and unexciting.
There are even funky lenses lenses that add strange fly eye-like effects to your photos, turning selfies into bizarre kaleidoscope dreams and photos of flowers into a whole new creative experience for you and your little future photographer.
Durable or Waterproof Phone Case

While having a rugged case for your Android phone is a good idea regardless, picking up a reliable or even potentially waterproof case to use is a really great move to make if you’re looking to shoot phone photography with your kids!
Most people wouldn’t let their kids shoot photos and video with a fancy DSLR camera without at least showing them how to wear the strap around their neck, so a rugged case is just that: an extra precautionary measure as you hunt out the perfect snapshot with your little one.
Not only will a durable case protect the screen, but also the phone’s camera, which can get damaged during falls from high places (like straining on your tippy-toes to get the ideal photograph)! Picking up a waterproof case for your Android phone might be worth it, too, but for a couple of other reasons, too:
Waterproof phone cases that are also durable are the perfect protective double-whammy. You won’t have to worry about dropping your phone and having it crack or having it accidentally go for a swim with a rugged, waterproof case.
Underwater photography is potentially some of the most fun, creative ways to shoot and see the world – and being able to do it with your Android phone is even better! Some waterproof cases even come with different lenses, so you can shoot wide-angle underwater shots with your kid like a pro.
Backup Battery

Plain and simple, a backup battery is a tool of great power in your kid-friendly phone photography arsenal. If you’re out on and about, the worst thing that can happen besides smashing your phone (but that’s why you have the durable case!) is having your Android phone die without any means of charging it.
There are plenty of different types of boring battery chargers out there, but you can always pick up some fun-looking, kid friendly ones, or even customize your duller battery packs with colorful tape and stickers.
After you have the perfect pack, just slip it into your camera bag or purse and put your kid in charge of monitoring the battery life as you shoot: if they catch that the battery is about to die and manage to get the phone plugged in, you can take a break from your photography adventure and share an awesome snack as a reward!
Editing apps

After snapping your phone photography masterpieces and capturing some super cool outdoor moments with your kidlet, editing through your pictures can be just as much fun as shooting them!
By downloading a number of free photography editing apps, you can get weird and wild with your Android phone photos. Apps like Prisma let you explore different art and photo styles, while Photo Lab Picture Editor allow you to add effects and details to pictures in a similar style to Photoshop.
Even exploring the photo editing app options is a task in itself, so be sure to allot a bit of time to explore, download, play, and pick your absolute favorite photo apps to tinker around with. Of course there are apps directed specifically towards kids, but this is also a great opportunity to teach your little one about photo editing and adjusting contrast, brightness, vibrance, and so much more, just like a regular pro!
Portable printer

After shooting and editing your Android phone photographs, you’ll want to be able to not only post them online, but print them off for your kids to show off, too. That’s why having a small, portable wireless printer is an great tool in your phone photography gear bag.
There are plenty of different wireless printers out there that connect to your Android phone and print your photos in an instant. Just pick the size of picture you want, and print away! Make duplicates of your perfect photography day out, the incredible macro shot your kid captured while at the park, or the goofy selfie the two of you took with the fisheye lens.
A good option is LG’s Portable Pocket Printer, which, for around $90, connects over Bluetooth to any Android phone and prints tiny, high-quality photos.
What do you think?
Do you think phone photography is a great way to get creative with your kids, or do you think it’s an unnecessary hassle?
Google Pixel tips and tricks: Getting to grips with Google’s phone
With the Pixel and the Pixel XL, Google has taken a step away from the Nexus programme. While it’s still committed to delivering updates to the previous pure Android devices, and while Android Nougat will have many similar features on the Pixel, there are a few differences.
The Google Pixel launched with Android 7.1, the first smartphone to do so, bringing with it a whole range of new features that build on the top of the existing goodness that Google introduced with Android Nougat a few months earlier.
Here are all the details you need to get to grips with Google’s new phone, as we dig deep into those Pixel features and Android 7.1.
Google Pixel general tips and tricks
Android has long been known for its customisation capabilities, but with Nougat 7.1 on the Pixel, the options are even greater. You can change the way a number of features appear and how the system works.
App action shortcuts: A lot like iOS with its Force Touch quick actions, many Android 7.1 stock apps have shortcuts. Just tap and hold any stock app icon like Calendar, Camera, Messenger or Dialler. This brings up a list of quick actions above the icon.
Adjust icon/screen size: In Settings > Display there’s a new option to adjust the size of onscreen content and icons. Simply select the Display size option and move the slider until the icons are the size you want them to be.
Enable developer settings: To turn on the developer settings, head into Settings > About phone. Scroll to the bottom and repeatedly tap on the Build number. After a number of taps, you’ll unlock the developer options.
Unlock System UI Tuner: This is a clever hidden setting that offers a range of options you can’t otherwise get to. Swipe down the Quick Settings and press and hold the settings cog at the top next to the battery. After a long press, the System UI Tuner will be unlocked, and a new option will appear in the settings menu. There’s a more detailed step-by-step guide here if you need more help.
Transfer everything from your iPhone: As part of the set up process, you can transfer all your contacts, messages, emails, calendar appointments, attachments and media across to your new Pixel phone from your iPhone. The video below shows how to do it.
Show the battery percentage: Once you’ve unlocked the System UI Tuner (as above), you have the option to show the battery percentage in the battery icon at all times. (Most third-party skins have this as a default option.)
Charge another device: Using the USB Type-C to Type-A adapter that comes in the box, you can use your Pixel to charge another device. Just your other device’s cable in to the adapter, and plug it in to your Pixel.
Turn on ambient display: A feature of Android Wear and Motorola devices, it’s now on Android Nougat by default. Head into Settings > Display and you’ll be able to glance at monochrome notifications.
Turn on Night Light: When reading your phone in the evening, the last thing you want is harsh, blue light from your phone screen glaring in to your eyes. To turn on Night Light, giving it a more yellow/warm tone, go to Settings > Display and choose the Night Light.
Schedule Night Light: While you can turn on the Night Light manually, it may be more beneficial and less of a chore to schedule it. Simply tap “turn on automatically” and choose the days and times you want, and it’ll come on automatically. Or, you can set it to change by sunrise and sunset times.
Play Pixel Android Nougat easter egg: Nougat’s Easter Egg is a little different to previous Flappy Bird style games. Instead, you’ve got to try and catch a cat by selecting a tasty treat. Head into Settings > About phone/tablet > Android version. Then tap the Android version repeatedly until it changes to the Android N screen.
Once you have the full Android “N” logo visible, tap repeatedly, then press and hold, then you should see a little cat icon appear on the screen. Watch the video below to see an overview on how to play the game.
Search settings: Rather than rooting through everything, you can search the settings. Just open up the Settings menu and hit the magnifying glass and type what you’re looking for.
Search Google for onscreen info: In other phones, this is called Now on Tap, in the Pixel, it has been integrated in to the Assistant.
Press and hold the home button to launch Google Assistant on any screen that has objects/text on it, then swipe up on the card border that appears at the bottom of the chat. Assistant will then offer various services to search for that information, videos or locations with.
Find the Google Settings: There was previously an app to handle Google settings, in Nougat this is now in the main Settings menu. This is where you’ll find settings for accounts and services, backup, and transferring content to a nearby device.
Use the native file explorer: There’s a file explorer in Android. Head to Settings > Storage and scroll to the bottom of the list. Tap Explore and you can view folders, open files, delete and share.
Google Pixel Moves tips
Android has had a number of features launch-able by gesture for a few years now. With the Google Pixel, and Android 7.1 Nougat, those get their own “Moves” section within the main settings app. Just head to Settings > Moves, and check out the three options available.
Swipe for notifications: With this option switched on, you can swipe downwards on your Pixel Imprint sensor and it’ll drop down the notifications from the top of your screen. Swipe it again and you’ll get quick settings.
Jump to camera: This feature isn’t entirely new, but when switched on, you can double-click the power/sleep button from any screen and launch the camera app.
Flip camera: Another camera related one, and when activated you can switch in and out of selfie mode with a quick double-twist of the phone. In previous years, this gesture would launch the camera, so it’s been tweaked a little.
- Google Pixel exclusive features explored: A cut above the rest of Android?
Google Pixel apps tips and tricks
Since phone screen sizes have been on the increase, it makes sense to make better use of that real estate. Along with a number of other additions, you can now have two apps running side-by-side on the same screen. You also get the same granular controls on apps that you got in Android Marshmallow.
Split-screen multitasking: Android Nougat is the first version of the OS to feature built-in split-screen multitasking. You can activate it a number of ways (as detailed in the video below), but the easiest is just to press and hold the recent apps button. You can also reposition where the split appears onscreen.
Switch quickly between recent apps: From any screen, you can quickly switch back and forth between the two most recent apps by double tapping the recent apps button.
Stop adding new app icons to home screen: If you don’t want new apps you install cluttering up your home screen, head into Play Store > Settings and uncheck the “Add icon to Home screen” box.
Enable fingerprint authentication: You can use the Pixel Imprint sensor to authenticate Google Play purchases with your fingerprint. Simply head to the Play Store > Settings, check the relevant box and confirm by typing in your password.
Clear all apps from your recent memory: Tap the recent apps button to see all the apps running, scroll to the top of the screen and choose “clear all”.
Add Yahoo! Mail or Exchange to Gmail: You can add Yahoo!, Exchange or other mail services to Gmail. Tap the icon to open the sidebar, scroll all the way to the bottom and hit Settings > Add account. You have the option for Google, IMAP/POP3 services (like Yahoo, Outlook.com) and Exchange.
Attach anything to Gmail: Tap the attachment button and you can attach local files, things in Drive, Photos, Dropbox files, OneDrive box and so on. It’s really flexible.
Customise Google Now: Go to your Google Now screen and access the sidebar menu. Find settings and use it to customise which cards appear, what language you use as well as privacy settings.
Change the default app: Android lets you decide which is the default app, if you have more than one that will do the same thing. In Settings > Apps, hit the settings cog in the top corner. Here you’ll see a list of defaults you can change.
Control app permissions: Nougat, like Marshmallow did, lets you manage all the permissions for each app on an individual basis. Go to Apps and select the app and hit Permissions. This will let you toggle permissions on and off, so you can disable location access, for example.
- Android 7.0 Nougat review: Subtle but super-sweet OS update
Google Pixel notifications and volume tips and tricks
Notification fine-tuning has been ramped up a notch with Nougat. It’s no longer a case of just having priority or non-priority, but you also get to choose which exact level of priority an application should have, as well as replying directly from a notification.
Turn on the notifications light: The normal flashing notifications LED is turned off on the Pixel by default. To switch it on, head into Settings > Notifications and hit the cog in the top right. Here you’ll find the option to “pulse notification light”.
Enable power notifications: Go to System UI Tuner in your settings (having enabled it using the method near the top of this article) and choose other > Power notification controls. On the next screen switch the toggle to the on position. Once enabled you can fine-tune the priority level of any app’s notification.
Direct reply: With Android Nougat, you’ll can direct reply from any app that has this feature built in. Swipe down on any notification card and if there’s a “reply” option, hit it and type away without leaving the screen. This works for loads of apps, like WhatsApp or Messenger.
Quickly switch to vibrate alerts: If you want silence, but are after vibration alerts still, then push the volume button and tap the bell on the pop-up. This will switch to vibrate.
Turn down media volume: Hit the volume up or down button, and the volume slider will appear. Tap the down arrow on the right-hand side, and you can change the ringer, media or alarm volumes.
Engage Do not Disturb: Swipe down Quick Settings and tap the Do Not Disturb button. This gives you the option to have total silence, alarms only, or priority only. You can choose if this is for a time period, or until you turn it off.
Schedule Do not Disturb: Swipe down Quick Settings then press and hold the Do Not Disturb button. Choose Automatic Rules and customise which times the Do not Disturb feature should activate automatically.
To mark an app as a Priority app: Head into Settings > Apps. Tap on the app you want. In Notifications you get app controls, and you can set an app as a priority so you always get notifications from that app.
To turn off notifications on an app: Go to Settings > Apps > Tap on the app you want. In Notifications you can block all notifications for any app on your device.
To turn off peeking on an app: Go to Settings > Apps > Tap on the app you want. In Notifications you can turn off peeking, so you don’t get a toast notification for that app.
Instant access to lock screen notifications: Just tap a notification twice and it will open up the app. Want to dismiss it? Just swipe it away.
Expand stacked notifications: Got a stack of notifications? You can drag down to expand them, both on the lock screen and in the notifications area.
Hide sensitive information in lock screen notifications: You can have lock screen notifications without too much information being revealed. Head to Settings > Notifications and tap the cog in the top right. This will give you a menu option called “On the lock screen”. You can then select the option you want. You’re also given this option during setup.
Each individual app also has lock screen controls, so in Settings > Apps, tap the app you want. You’ll find the option under “On the lock screen” again. This will enable you to turn off lock screen notifications for a specific app, but not others.
Pocket-lint
Google Pixel: Android Assistant tips
One of Google’s big plays with the Pixel is Android Assistant. This is an evolution of the voice-control options presented by the Ok Google hot word and the smart personal offering of Google Now.
Here’s some top tips to get you started with Google Assistant, but if you want more, we have a comprehensive breakdown of Google Assistant tips in a separate feature.
Access Google Assistant: A long press on the home button will activate Google Assistant and take you through to the interface where you can talk to, or type to interact with Assistant. You will also be served results that you can tap to get more information, or to move through to over apps.
Turn on the Ok Google hot word: If you want to use voice, you’ll have to turn it on and register your Ok Google voice. The best way to do this is to open Google Assistant (as above) and tap the menu in the top right corner, open Settings. You’ll see “Ok Google” detection in the next page, to get you started.
Open an app with Google Assistant: Simply say “Ok Google, open Netflix” and it will open Netflix or any other app. It’s smart too, as for some apps, Assistant can navigation content within them – like watching a specific show on Netflix, or playing a specific artist on Spotify.
I’m feeling lucky: If you’re looking for Google Assistant’s Easter Egg, trying saying “I’m feeling lucky”. This will take you to a crazy trivia quiz, that’s loads of fun.
View photos of dogs, babies, cars: Google Assistant ties closely into other Google apps, especially Photos. If you have photos in your account of specific things, Google Assistant can find them. Try asking to see photos of your dog, and you’ll get photos of your dog. Make sure, however, that your Google Assistant account is the same as the Photos account, for this cross-pollination to work.
- Android Assistant tips and tricks: Master your Android assistant
Google Pixel Quick Settings tips
Quick settings were good before, now they’re even better. There are more options and there’s far greater customisation.
Manage Quick tiles: In Android 7.1 you can manage the order of the quick settings tiles by dropping down the usual shade from the top of the screen and hitting “edit”. Now you can re-order, and even add new quick access toggles for things like Google Cast, Night Light, data saver and such.
Enable Night Light: Using the method above, add the Night Light tile to your quick settings tiles. Once it’s there, just tap to activate it or press and hold to access night mode settings to customise.
Enable data saver: Just like above, you can add the data saver toggle to your quick tiles. In essence it helps you limit how much of your data the phone consumes by limiting how much data apps use in the background.
Quickly select a Wi-Fi network: Swipe down for Quick Settings, then click the network name beneath the Wi-Fi icon. This takes you through to the Wi-Fi settings.
Quickly manage Bluetooth: The same applies to Bluetooth. Click beneath the Bluetooth icon in Quick Settings and you’ll head into settings to select your device.
Turn on torch/flashlight: There’s no need for a separate app, just tap the button in Quick Settings to turn on your flash as a torch. Or just say “Ok Google, turn on torch/flashlight” and it will turn on.
Cast your screen: Want your Android device on your TV? Just swipe down and tap Cast screen and it will be sent to your Chromecast. If it’s not there, add the Cast tile to your Quick Settings using the method mentioned above. Not all apps are supported though.
Google Pixel battery tips and tricks
Having brought Android Marshmallow’s Doze mode across – and enhanced it – Nougat is already great at conserving energy, but now it’s even easier to get a picture of what your battery is doing and how you can optimise its use further.
See your battery percentage: Open Quick Settings with a two-finger swipe. Your battery percentage is displayed in the quick settings screen. Tap the icon to see a more detailed overview.
Time till fully charged: Charge time is displayed when connected to a charger. Look at the bottom of the lock screen and in the battery status screen, but it takes a little while for Android to calculate how long charging will take. If you’re fast charging, it will say “charging rapidly”.
See what’s eating battery: Swipe down Quick Settings, tap the battery icon and tap “more settings”. You’ll go to the battery status page and see how long you have left and what apps are eating your battery.
Turn on battery saver: Drop down the Quick Settings, tap the battery icon and toggle Battery saver to the on position. If you want to set it up to switch on automatically when it hits 5 per cent or 15 per cent, hit “more settings” and tap the battery saver option at the top of the screen.
Google Pixel multiple user tips
Whether you want to add new user profiles or make it easier to get to your emergency information, Nougat has you covered.
Add emergency information: Go to Settings > Users then select Emergency Information. Here you can add contact details, medical conditions and any medication you’re currently taking.
Guest profile: In the same area (Settings > Users) you can create a Guest profile. While it is setup, you’ll get the option to access as a guest from the lock screen.
See how much storage they’re using: If you want to know how much space is being used up by another profile, head into Settings > Storage. At the bottom of the list it says how much other profile and the guest is using.
Pocket-lint
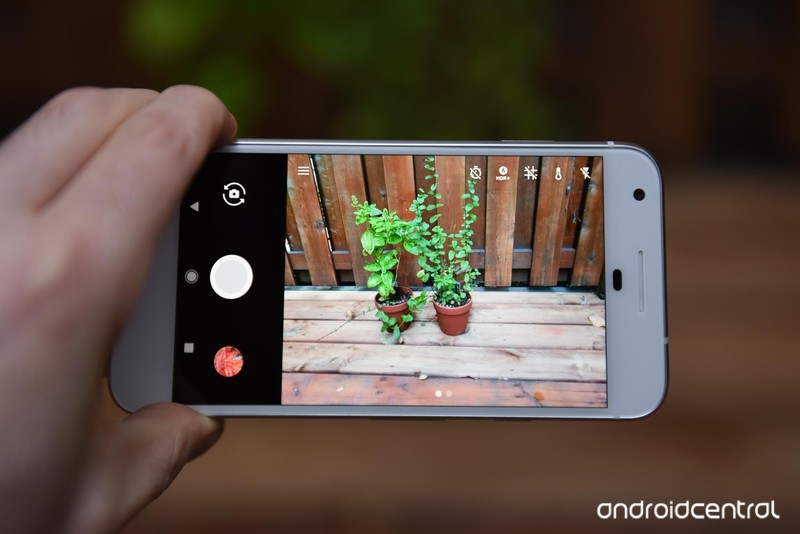
Google Pixel camera tips
The camera app in Android 7.1 on the Pixel is far simpler and more intuitive to use than many other camera apps. There are a few things worth looking at, however, that aren’t obvious from the very beginning.
Switch on 4K video recording: By default, Google Pixel records video in 1080p resolution. In the camera app, access the side menu by tapping the three lines in the top corner, choose settings and scroll down to “Back camera video resolution”.
Slow motion video: Access the side menu again, and choose “Slow motion” from the list of familiar photo modes. These include panorama, lens blur and Photo Sphere.
Manually change exposure: Although there’s no full manual mode, you can manually adjust exposure in any scene. Simply tap the area you want to focus on, then you’ll see a slider appear on the right side of the screen. Sliding up brightens the scene, down darkens it.
Manually adjust white balance: Pixel sometimes has a tendency of getting white balance wrong. In the camera app, tap the thermometer icon at the top of the screen and choose the preset that best suits your lighting.
Shoot burst photos: To shoot a really fast burst of photos, just press and hold the shutter button on the screen.
Lock the focus and exposure: Called AF/AE lock, this feature will mean that things stay in the same focal point and exposure, even when the subject changes. It’s idea for video consistency or more deliberate shots. Just tap as you would to focus and keep pressing. You’ll see the circle around your finger fill and go solid, then you’re AF/AE locked.
Google Pixel Security tips
Manage fingerprints: Head into Security > Pixel Imprint and you’ll be able to add or remove fingerprints that will unlock your device. A pro tip is to register fingers on both hands so you can unlock your phone with whichever hand you have free.
Bluetooth unlock: Again in Security > Smart Lock, you have the option to nominate trusted devices, so your Android will unlock when connected to something else. You can nominate Bluetooth devices (like your smartwatch or car Bluetooth) or select an NFC tag.
Google Pixel keyboard and language tips
Typing should always be easy and personally tuned to your needs, and with Nougat on the Pixel, that’s even easier thanks to the ability to support multiple languages and customise the keyboard.
Add multiple languages: Go to settings then languages & input, tap languages and then “add a language”. There are dozens of languages available to use (including Welsh).
Change themes: Head to Settings>Languages & input>Virtual keyboard, then select Google keyboard at the top of the page. Select theme and choose one of the available colours or just add your own image as a background. Toggle the key border if you want one.
Enable one-handed mode: When the keyboard is onscreen, tap and hold the return key. Select the icon that looks like a hand holding a phone. Switch the keyboard to the left side of the screen by tapping the chevron on the left side.
Change keyboard height: Once again in the virtual keyboard settings, select the Google keyboard and choose Preferences. Find Keyboard height in the list and adjust the slider until the keyboard is at your required height.
Best TV 2016: EE Pocket-lint Gadget Awards nominees
The Pocket-lint Gadget Awards will be taking place at the end of the month, celebrating products across 14 categories from smartphones and tablets to wearables and TVs.
Each category has between five and seven nominees, whittled down from the hundreds of devices we have reviewed in full at some point in the last 12 months and there are some excellent contenders. As usual, we have delivered, and will continue to deliver, a series of features, with one for each category detailing the nominees and why we think they deserved a place on the shortlist.
If you visit the EE Pocket-lint Gadget Awards hub, you’ll find all the previous features including the nominees for Best Game, Best Phone, Best Laptop, and Best Camera, among others. Here we are looking at the nominees for Best TV 2016 and what we loved about the six models shortlisted. As with all the categories, it’s a tough competition and there can only be one winner.
Click here to see the Awards nominees for 2016’s Best TV in a little more detail to help you make your mind up about which model should get your vote.
Voting in the 13th annual EE Pocket-lint Awards is now open so you can let us know which one of these great devices you think should win the Best TV award for this year and give us your verdict on all the other tech across the 13 select categories.
Winners will be announced at the exclusive event in London on 23 November in association with EE. Keep an eye on the EE Pocket-lint Gadget Awards 2016 hub for all the latest on how the voting works, who the elite judges are and the EE Pocket-lint Gadget Awards shortlist.
Star Trek: Bridge Crew delayed until 2017, this is what you’re missing
Ever since we first caught a glimpse of Star Trek: Bridge Crew at E3 in June, we’ve been extremely excited by the communal VR game. And recently we got to spend a lot more time with it, playing in different crew member roles and trying to complete the demo mission in different ways.
It was certainly one of the games we thought would give PlayStation VR a massive push on the build up to this Christmas. Could even have been the stand-out virtual reality game of the year.
However, Ubisoft has officially announced that it is delayed until 14 March 2017, from its original 29 November street date. As it says in a statement, the publisher believes that by delaying the release, it will make for a better game: “In order to deliver the best game experience possible at launch, we have decided to push the release of Star Trek: Bridge Crew. It is designed exclusively for VR and we want to offer a compelling and engaging experience.”
- Best Sony PlayStation VR games you must play: Farpoint, Resident Evil 7, Batman and more
- Sony PlayStation VR game trailers: Farpoint, Batman: Arkham VR, Star Wars and more
- Best VR headsets to buy in 2016, whatever your budget
That means us Trekkies and anyone who wants to experience what it’s like to be a crew member of a Federation starship will have to wait. From our experiences though, it’ll be well worth it. Here’s why…
Star Trek: Bridge Crew preview: To boldly go
Star Trek: Bridge Crew will be available for Oculus Rift, PlayStation VR and HTC Vive when it does come out next year, and depending on which platform you run it on will likely make a difference to the graphical fidelity – the PS4 does not have the rendering capability of a high end, Nvidia GTX 1080 powered gaming PC, for example.
- Sony PlayStation VR review: Virtual reality for the masses
- Oculus Rift review: The VR revolution begins here
- HTC Vive review: An experience that’s out of this world
However, all three versions will play essentially the same. Each time we’ve tried it we used an Oculus Rift and Oculus Touch controllers, but it will work as effectively using a PSVR and Move controllers, or the HTC Vive and its wands.
It is a seated experience, as your Star Trek character will also remain seated throughout, but you use the motion controllers to double as your hands in the game.
Four players are required for each game session and we played it over a LAN with all four in the same room. Indeed, during our first play at E3, we were accompanied by LeVar Burton – yes, the actual Geordie La Forge – as one of the other crew members. He was rubbish at it, by the way.
The final release will also be available to play online, with friends or matched with like-minded players. You choose your crew position from captain, helm, tactical or engineer and after a short tutorial about your position (in the demo at least) away you go.
Pocket-lint
Star Trek: Bridge Crew preview: Make it so
Each crew member has specific responsibilities and we’ve played them all save for captain. The captain doesn’t really have a lot to do in the alpha build demo version so it’s always been played by a member of the development team during our sessions, but the role will be expanded for the final game.
We were told some of the tasks assigned to specific the crew members in the alpha will also be available to others in the final build, but for the purposes of the demo, each of them had defined roles.
At helm, we essentially piloted the USS Aegis, engaged warp drive, that sort of thing. It might not sound like the most interesting position, but considering you spend most of the demo mission chasing or evading Klingon Birds of Prey, it’s very involving.
When taking the tactical seat, we were in charge of scanning floating escape pods, locking on targets, raising and lowering shields and firing phasers and photon torpedoes. It’s possibly the most fun role at present, which is why Ubisoft is rebalancing the tasks, we suspect.
Finally, the engineer is in charge of assigning power to different ship functions, such as warp drive, shields and weapons. The person in this position must also “Beam them up, Scotty!”
Ubisoft
Star Trek: Bridge Crew preview: The final frontier
We played the same mission in all of our Star Trek: Bridge Crew sessions, but it’s a great indication of how the final game will turn out. And we became a dab hand at it by the end, managing to zip through it in just four minutes or so as a speed run.
There will be other missions available in the final release, but this one has a basic Star Trek premise – rescue stranded citizens who are floating in escape pods in space before a nearby star explodes. Of course, the aforementioned Klingon vessels get in the way once they decloak and it becomes a firefight (or an exercise in quickly saving the survivors and pegging it in our speed run), then all crew members get to use their assigned tasks to the max.
It’s great fun and becomes very communal, as you chat to each other in order to succeed even if you’ve never met your compatriots before. The graphical effects are excellent too, with male and female avatars not only representing the human controlled crew members, but random others on the deck to make up numbers.
During one of our outings, one of them even died in front of us, lying there for the rest of the mission to remind us of our failure. They weren’t even a “red shirt”.
First Impressions
Clearly there will be much more to Star Trek: Bridge Crew in its final release version, and the scope to add further missions through DLC is great.
But even from our gameplay sessions so far we can tell that it’s going to be one of the triple-A VR games that we’ll come back to time and again. As it stands it’s one of the best PlayStation VR games we’ve played so far.
Roll on stardate 14 March 2017, when it’s finally out.
Blizzard launches its own cross-game voice chat service
About a year ago, Blizzard revealed a chat service for all of its Battle.net multiplayer games, starting with Overwatch. Last month it killed the Battle.net name altogether, saying multiplayer support is a “normal expectation” that no longer requires its own service. Now, the World of Warcraft maker has rolled out Blizzard Voice, a chat service that works across all its multiplayer titles.
The system works much like Steam’s Voice Chat, letting you talk to friends or friends of friends inside or outside of games, as long as you have the Blizzard Launcher open. The company promises “high quality voice audio and superior stability,” full customization, and the ability to “individually mute and change player volume.”
Blizzard Voice has arrived! Be sure to update your Blizzard Launcher before trying to give it a go 🗣 pic.twitter.com/P3T2lEMVWM
— Blizzard Ent (@Blizzard_Ent) October 20, 2016
To the dismay of some, it’s not an in-game chat system, however. That means you can’t talk to players not in your friends list during random pick-up games, for example, unless you use a third-party app like TeamSpeak. However, some Reddit users are hopeful that, with the technology now in place, team play will be launched soon. As one user says, “it’s such an obvious thing … if people are having a problem with toxic kids, just mute them or turn voice chat off completely.” To get Blizzard Voice, you just need to upgrade your Launcher.
Source: Blizzard (Twitter)
‘Doom’ unleashes hell with a new arcade mode
If you’ve shotgunned and boot-stomped your way through the new Doom campaign (and if you haven’t yet, you should) fear not: Bethesda has plenty more demon hunting ready to go. The developer released “Free Update 4” this week, which comes with a nifty arcade mode. Every gun, suit and “Rune” upgrade is unlocked from the start, giving you the best possible edge in the battlefield. The aim is to blitz through the “streamlined” game in the shortest time possible, avoiding enemy attacks and racking up multipliers. Points are rewarded for butt-kicking your opponents, leading to a final score that you can compare with friends.
If you miss the original Doom experience, you’ll want to dive back into SnapMap. The level editor has been updated with some classic Doom assets — walls, floor panels, computer banks and more — which you can stitch together into devious, ramshackle stages. They won’t change the core gameplay, but if you liked the retro Easter eggs baked into the main campaign, this is a way to feed those retro cravings once again. And if you’re not particularly creative, that’s okay, because you can download other people’s maps, or a selection put together by the Doom team.
Source: Bethesda
Best Android Wear smartwatch 2016: The best smartwatches available on Google’s platform
Android Wear launched in 2014 with three hero smartwatches – the Motorola Moto 360, LG G Watch and the Samsung Gear Live. These three watches are now obsolete, taken over by fancier models that are far more appealing, far better looking and far more fashionable.
The platform has had several big updates since it originally launched, all of which have pushed several new features, including iOS compatibility. Despite still needing some improvements, which will hopefully come with Android Wear 2.0, the platform has become increasingly more appealing, not just to Android users, but iPhone users too if the Apple Watch doesn’t float their boat or sit in their budget.
In light of the world of smartwatches becoming much more fashionable than they were originally, we have rounded up the best Android Wear smartwatches currently out there. We have a separate feature that presents the best smartwatches on all platforms including Android Wear, Pebble and Apple, but here we are focusing on Android Wear and only those we’ve lived with and reviewed in full.
We will be updating this feature as we get more on our wrists and into our hands so keep checking back if you haven’t quite decided which one tickles your fancy.
Click here to find the best Android Wear smartwatch for you.
The Oatmeal’s latest Kickstarter hit is a monster card game
The Oatmeal’s Exploding Kittens project took Kickstarter by storm and raised an impressive $8.8 million. Now, the online sensation is back on the crowdfunding platform with another card game, and it’s all about building monsters that can eat horribly hairy, axe-wielding, laser-toting infants. Matthew Ingram (that’s The Oatmeal’s artist’s name) has teamed up with his Exploding Kittens collaborator Elan Lee yet again to create Bears vs Babies. The project is already a hit after having raised $1.3 million, but that amount’s bound to grow with 27 days left to the campaign.
In Bears vs Babies, you have to collect cards with different body parts to build the most ferocious monsters you can in order to defeat an army of horrible mini-humans. The campaign only has two tiers to choose from: you can get the kid-friendly core deck if you pledge $25. If you want to get the NSFW booster pack on top of the core deck, you’ll have to pledge $10 more. At this point in time, the duo only has plans to release a physical card game. But if it ends up as successful as their first one, we wouldn’t be surprised if they also release a mobile version.
Source: Bears vs Babies, Kickstarter
