


Fitbit Blaze review

As the company’s first take on the traditional every day watch design, the Fitbit Blaze falls somewhere between a smartwatch and an activity tracker.
On paper the wearable matches up with the likes of Samsung’s Gear Fit family and the Withings Activite Pop. Running a proprietary OS, the Blaze technically offers less practicality and flexibility than an Android Wear watch or Apple Watch.
 The Fitbit Blaze doesn’t blaze any new territory and does pretty much the same stuff you’ll find in various Garmin models. Heck, it’s not unlike a number of other Fitbits when it comes to function. Pricing is listed about $200 but there are other bands and accessories which can be purchased, too.
What does all of this mean to the average user? How does the Fitbit Blaze work in the real world? In short, it’s a great little device that does more for wearers than they might expect. But, it comes with a small adjustment and acclimation period.
Design
Introduced in early 2016, the Blaze looks like a first-generation approach to smartwatches. It’s angular and the black and silver aesthetics are decidedly masculine. You might be forgiven for thinking it’s more of an enhanced techie watch than a fitness tracker. Should you want something a little less serious there’s also a plum/silver and blue/silver option. On the other end of the spectrum is an all-black unit.

The watch is considerably lighter than it looks and doesn’t feel as if it constricts movement in any way. The default band is a tad wider than we might have liked but it is generally comfortable to wear.
Features
The Fitbit Blaze tracks just about any fitness-related activity you might think of, including steps, flights of stairs climbed, heart rate, and sleep. It’s very similar to its sibling, the Fitbit Surge, but this one adds in the touch-friendly color display and side buttons while swapping out the standalone GPS.
 Should you want to track a bike ride or run you will need to have your phone nearby; the GPS comes from the handset and talks to the app/watch combination.
Out of the box, the watch gives users quick access to nearly all functions. Additionally, the watch can double as a timer or stopwatch. Wearers can go into the app on the smartphone to toggle other details and customize a few settings such as watch face and notifications. It’s also in the app where you can track how many glasses of water you’ve had or set up a meal plan to help lose weight.
Where to Buy
- Amazon
- B&H Photo Video
- Best Buy
- Target
Wearers will notice the watch can show incoming phone calls, calendar reminders, and message notifications from a variety of apps. Moreover, there’s also a music player with basic controls that handles songs from your phone.
The Blaze will detect and record “active exercises” when it notices you’re doing something more intense for a period of ten minutes or longer. Along those lines, the software makes it so that you’re just a few taps away from manually tracking a number of physical activities, too.
Battery
Touted at one week, we found the battery life on the Fitbit Blaze to be excellent. This was good, because the method of charging was wonky to say the least. To charge the battery you are required to remove the main square component from the watch and place it inside of a cradle. Moreover, the cradle locks down similar to a roller coaster harness. Yeah, it’s weird and somewhat awkward, but thankfully you’re only doing this once every six to seven days. We charged in a Monday night and went into Saturday before throwing it back on a charge at bedtime.

General Impressions
As someone who normally has an Android Wear-powered watch on, it took a day or so to get acclimated to a less “smart” unit. Conversely, it was great to have all of these health and fitness options so readily accessible. It’s nice to not have to go digging for an app or launching something if I want to track water intake or a particular exercise.
The display automatically turns itself off, which is a great way to preserve battery. A quick flick of the wrist or tap of the screen pulls up a watch face that shows time and usually some aspect of tracking. We wished there were more than four faces to choose from or some elements of customization. But, given this is a fitness and activity tracker, we understand it’s not all about the watch aspect.

While we do understand that the watch is designed to help track sleep, it’s somewhat odd to wear the Fitbit Blaze to bed. After a long day of doing whatever it is we do, sometimes the last thing we want is to have something wrapped on our wrist. For us, sleep monitoring isn’t the key reason to own this, so we’d recommend a different wearable for that use case. But, if you don’t mind the “confinement”, the Blaze is great at detecting heart rate and sleep.
There’s plenty of discussion about how accurate of a pedometer you’ll get in a watch, regardless of band. Wear any two products in a day and you’re bound to find different figures in the end. Along those lines, we’re not sure how accurate the Fitbit Blaze is as compared to other models; we didn’t wear it in conjunction with any other brand.
Staying with accuracy, we liked that the watch would help us with tracking different activities. But, let’s be honest here, there’s no way the Fitbit Blaze knows how good your form is when lifting weights or doing jumping jacks. The silent buzz prompts are a nice touch, but it’s mostly like having a coach blow a whistle for you. A coach who has his face in his phone and not paying attention to whether you’re doing things properly.

We really appreciate the way in which Fitbit held our hands in designing a meal plan or goal for losing weight. It’s a simple process of putting in a starting weight, desired goal, and determining how aggressive you want to be. The app can be used to forecast the date you should reach your goal, help track foods (barcode scanner for the win), and let you know whether you are on pace for the day. Our advice is to stick with it once you start. Doing it sporadically won’t help you in the end and you’ll not be able to mine your data very effectively.
Optional Accessories
Fitbit offers a number of accessories to choose from for its Blaze, including other elastomer bands, leather straps, and steel-link straps. Pricing ranges from $30 to $100, to $130, respectively with color options along the way.
Conclusion
It’s easy to find a fitness tracker in 2016. There are plenty of models to choose from, each with a variable reason to consider. Heck, Fitbit alone has more than a couple devices to choose from. You’re not going to go wrong if you pick something from Fitbit. You’ll just want to figure out which model speaks to your needs.
If you’re mostly interested in tracking basic stuff like steps taken or heart rate, there’s plenty of other, cheaper options. But, should you wish to step things up include distance, water intake, weight tracking, and meal plans, the Blaze is a terrific option.

The Fitbit Blaze occupies a space somewhere between a generic fitness tracker and a smart watch. It’s not going to have the overall flexibility and intelligence of an Android Wear or Apple Watch, but it’s excellent at what it does. We would have liked for a waterproof design, but understand that lines have to be drawn somewhere. The same goes for not having an internal GPS. Going this route might nickle and dime us into a price point that turns people away. With a recommended $200 price tag for the Fitbit Blaze, it’s definitely attractive enough to justify its cost.
The post Fitbit Blaze review appeared first on SmarterWatching.
Where to Buy
- Amazon
- B&H Photo Video
- Best Buy
- Target
[Review] Take the Aukey wireless outdoor speaker on your next adventure
If you’re looking for a rugged Bluetooth speaker the next time you go camping, then this Aukey speaker may be what you’re looking for. Let’s take a look.

First Impressions
Weighing in at just over half a pound, this rugged device is perfect for camping, hiking, road trips, etc. The speaker is labeled as water resistant, although I wasn’t able to find an exact specification. The speaker grills are made from anodized aluminum, while the casing is made from acrylonitrile butadiene styrene (ABS). To get technical, it’s a thermoplastic polymer with three monomers.
ABS rubber is amorphous in nature so it doesn’t have a true melting point. It’s also impact and mechanically tough even at lower temperatures, providing a safe range of use between -4˚ and 176˚ F. Even though the rubber is durable, it’s also silky smooth to the touch, so holding the speaker is a tactile delight. For reference, ABS is what Legos are made of.
Features
- Bluetooth version: 4.1
- Standard: A2DP, AVRCP, HFP, HSP
- Weight: 1.43 lbs (650.6 g)
- Dimensions: 8.23 x 3.27 x 2.87in (20.9 x 8.3 x 7.3cm)
- Play Time: 30hrs
- Charging Time: 6hrs
- Operating Range: up to 10m / 33ft
- Power Output: 2×5 W
- AUX: 3.5mm audio-in jack
- Power Input: DC 5V
- Battery Type: Rechargeable lithium-polymer battery (7.4V 2600mAh)
Usage
Even though this is a Bluetooth speaker, it still has an auxiliary port so you can plug in an aux cable directly into your phone. On the bottom, there is a 1/4’20 standard screw mount so you can screw it onto most camera tripods if you wish.

The speaker has dual 5W drivers which deliver a clear sound that is fairly balanced amongst bass, mids and highs. In addition, the speaker has a built in microphone to take audio calls.The sound output is loud so you don’t even have to turn it up much.
As a way to test the sound quality of audio devices, I like to play this song. It has a lot of bass and sub bass, and those drops are sick bro. Check it out:

On one end of the speaker you’ll find a place to attach a keychain attachment (not included) so you can hang the speaker from a tree branch, bike, a tent frame, etc.
The speaker battery seriously lasts for a long time. It’s 2600mAh, which may not seem like much, but it’s rated at 30hrs of battery life and that’s only if you use it frequently. I was able to use it for a week without needing to charge, but as it says in the manual, it does take six hours to charge.

Due to the bulk of the speaker you probably won’t find yourself casually throwing it into a purse or backpack, but it’s still portable enough to easily carry around in a suitcase or duffel bag.
Conclusion
After having reviewed several Aukey products, I can objectively say that they are a good company. This speaker, along with the Bluetooth headphones I reviewed, are both awesome products. It’s a great accessory for your smartphone, whether you have an iPhone or Android phone.
This speaker is affordable at $47.99 and you can pick it up on Amazon (Affiliate link).
1 of 8


LG G5 Review: modular marvel or bold blunder?
2016 has so far been a year of impressive flagship phones with perhaps the most unique of the bunch being the LG G5. LG was coming off a year of success with two wonderful flagships (the G4 and V10) receiving rave reviews. Many speculated that the G5 would be a fusion of the two devices – stealing the most innovative features of the V10 but in a smaller, easier to handle body.
What we got was something completely different. As early as January, we brought you news that the G5 was going to have a metal unibody that pulled apart at the bottom and featured a removable battery. No one has ever tried this combination before and our interest was piqued. More news leaked about a “magic slot” that would allow users to expand the phone’s functionality with modules. This was truly something new and unique to the market. We’ve seen some of this functionality in beta devices from Project Ara (now named just Ara), but never in a consumer device.
What we got was controversial. Is it metal unibody? Sure is, but it doesn’t remotely feel like it. Does it have a “magic slot”? Yep, but how much it expands the functionality of the phone is debatable.
The G5 matches up in terms of specs with every other flagship on the market, but phones are more than a sum of its parts. What matters is how those chips and that silicon perform and how engaging and easy to understand the software is. LG has had issues with these areas in the past, and they’ve held LG back from challenging Samsung for supremacy in the Android market in the United States. Can the fifth iteration of the G series finally make the leap from also-ran to front-runner?
Software
LG has always deployed one of the heaviest skins of any of the Android OEM’s currently producing flagship phones. This hasn’t changed for the LG G5. Actually, not much has changed from the LG G4’s software, to be honest. This year’s model does ship with the most recent version of Android 6.0.1 Marshmallow, but unless you were looking in the settings, you could be forgiven for not knowing that. There are little enhancements that Marshmallow brings present in the G5, but you’re going to get almost the exact same experience on last year’s G4.

The most notable change in LG’s software is removing the Application Drawer on the default launcher. I did receive an update during the review process that enabled a Home + App Drawer launcher, but for the first week or so, I was stuck without it since I wasn’t using a third-party home replacement like Nova Launcher.
Removing the Application Drawer is a bold move, and I honestly hated it. I have no idea what the purpose of such a move would be other than to be more like Apple. Throwing over 100 applications into folders and hoping I remember where I put them is not a fun experience. It doesn’t lend to finding an app quickly, which is very frustrating when you’re pressed for time.
I hope LG got this out of its system and never tries it again. If I wanted to put every application on my home screen, I could already do that. Forcing me to goes against what Android is all about: choice.
I miss the app drawer
1 of 3

Luckily when I was living an App Drawer-less life, there wasn’t too much bloat to worry about. I am using an unlocked, unbranded version so there are no carrier-installed applications on the phone, but the suite of apps from LG wasn’t excessive. I had no use for apps like LG Friends manager, LG Health, Music, Quick Help, QuickMemo+, QuickRemote, SmartWorld, Tasks, but they were quickly hidden in a folder that I could forget about on a distant home screen.
Kudos to LG for not loading down the device with uninstallable crap from third parties. Android OEMs like to sign commercial deals where they add apps like Yellow Pages or Facebook to the phone to drive up profits, and I like that LG hasn’t sunk to that level.
Another huge win for LG is the quality of life improvements they made to the software. The ability to customize the navigation bar at the bottom of the phone is just smart. Not only can you choose on which side of the home button you want the back and recent apps buttons to be located, but you can add buttons for the QuickMemo+ app and one to drop the notification shade so you don’t have to reach the top of the phone. This is one of my favorite little features on any Android phone out there. LG has been including these options in its phones for a while now, and I hope it continues until Android makes them irrelevant.
You can see Marshmallow poking its head through occasionally. LG decided to keep the stock recent apps screen basically completely stock – clear apps button included. There’s also an always-on display that LG talked about a lot at its Mobile World Congress press conference that shows the time and some notifications. It’s a nice feature that I appreciate, but it’s nothing I think should influence your buying decision. This feature is becoming standard on most phones these days – the Samsung Galaxy S7, Moto X, OnePlus 3, and Nexus 6P all have various forms of this – and the inclusion of an LCD screen means that the G5 has to keep the entire screen on for this always-on display. It’s not ideal in its implementation, and I honestly don’t miss it when I’m not using the G5.
The puzzling choices LG made continue past using an LCD panel for an always-on display. The Settings app is a complete mess. The tabbed layout is confusing and frustrating. There is a reason that most phones use a longer list layout, and LG needs to get the memo that it’s a superior option. In fact, if it could use the stock Android settings menu and just add in the options it needs, do that. Google has made it pretty easy on OEM’s by including a great Settings app in AOSP, and yet, they keep screwing it up somehow.
LG seems to put a lot of effort into its software to make it a true selling point. There are some great little features that no-one knows about like the phone composing a ringtone based on the number calling you. That’s not a feature that is going to make your life easier on a day-to-day basis, but it’s something innovative that people will love. It’s cute. I wish LG would focus on features like this instead of theming every inch of the OS with its own brand of color vomit. Stop messing with things that already work just to make them different.
Performance
The LG G5 has a Snapdragon 820 processor clocked at 2.15GHz with 4GB of RAM and an Adreno 530 GPU. This is the standard loadout for a flagship phone released in the first half of 2016, which includes the Samsung Galaxy S7, HTC 10, and LG G5.
As much as I complained about the software in the previous section, this set of hardware is easily able to power through it. LG had been notoriously bad about its home screens redrawing every time you hit the home button on the G4, but luckily I’ve never seen that happen in the several weeks I’ve spent with the G5.
There are no lags in long menus or the recent apps window and zero stutters when swiping through home screen pages. App loading times are on par with the Samsung Galaxy S7 Edge, with maybe the slightest advantage going to LG, but it’s nothing that you’ll notice unless you have the two phones sitting right next to each other.
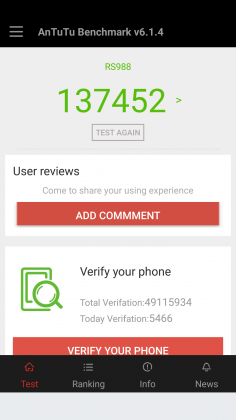
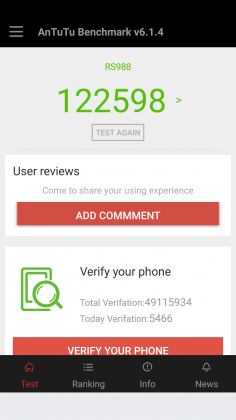
Consecutive AnTuTu Benchmark runs
1 of 4


Since the G5 has a top of the line processor in it, expect it to power through extremely difficult tasks like 3D games and video editing. We’re living in 2016, and phones have gotten to the point where there is almost nothing you can throw at a flagship device that it can’t handle.
Benchmarks are always being blown up by the next generation of devices because of the giant leaps being made by companies like Qualcomm, and the G5 is no different. You can put it up against any device from last year and it’ll crush it. Will you see that performance gain in day-to-day use? The all depends on how you use your phone, but you shouldn’t be scared off from the G5 because you think something else can power through difficult tasks better. Everything is amazing these days.
Where you may run into some issues is with connecting to calls. I consistently had issues with phone calls taking forever to connect once I hit send. I am using T-Mobile in an excellent coverage area so there should be no issue. Tested next to other flagship devices, the LG G5 had significantly longer lag times between hitting the dial button and the phone beginning to ring. I don’t know where the issue is coming from. I think I can rule out T-Mobile because I tested it against other unlocked devices, but this just seems like a weird bug. Calls sound wonderful on both my end and the recipient once it actually connects, but I hope that LG is working on a fix for this because it was one of the most annoying issues that popped up while testing the G5.
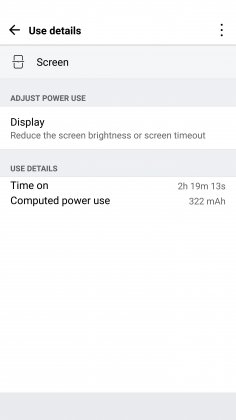
The G5 does have one thing that most phones of today don’t, a removable battery. I consistently applaud OEM’s for including removable batteries in their devices due to the demands consumers are putting on their phones. The 2800mAh battery is smaller than last year’s flagship and it shows in the life, unfortunately.
Time and again I had trouble passing three hours of Screen on Time. I’m not one who pushes my devices to the limit so those three hours were filled mostly with listening to music with Google Play Music, reading Reddit, and the occasional glimpse at Facebook along with the normal calling and texting. To say I was disappointed would be a bit of an understatement.
To engineer a device as forward thinking as the modular G5 to have it only have it held back by terrible battery life is frustrating. I used to have to charge my phone multiple times a day in 2014, I don’t expect to do so in 2016. At least I can trade out the battery or use quick charging around lunch to get through the rest of the day.
Screen on Time
1 of 4


Quick Charging really does save this phone. The G5 actually has the latest in Quick Charge 3.0 which will let you charge up your device about 60% in 30 minutes. If you get an hour for lunch and keep your phone on the charger while eating, you should be good to go for the rest of the day. It’s just disappointing how much I had to utilize this feature. You’ll notice the battery drop especially quick during intensive tasks like heavy games. During setup (installing all my applications and setting them up the way I want) the battery dropped from 78% to 16%. That is a pretty ridiculous drop for the little over an hour it took to get the phone up and running.
Screen

LG brings back another 2560 x 1440p display for the G5, which is now the standard for flagship phones in 2016. Whether you need all of those pixels is still being debated on message boards and in comments sections of reviews like this, but the truth of the matter is that we’re never going to go backward on resolution. It’s a selling point and people want the biggest and best, and higher numbers rule the day.
The fact of the matter is that the display on the G5 is nothing wonderful. Sure, it has a ton of pixels, but it does tend to skew blue and colors simply don’t pop like on Samsung devices. Samsung tends to over-saturate colors and has a superior contrast ratio due to using AMOLED displays, giving it a huge advantage.
The inclusion of an LCD display of the G5 is disappointing if I’m being honest. The always-on display begs for the battery friendly AMOLED display if nothing else. I think LG also overdid it with the auto-brightness again; this is an issue I’ve had with the G3, G4, and now the G5. It doesn’t matter how good the display looks if it’s never lit up high enough to actually see it clearly. Even at max brightness, the G5 cannot compete with other phones on the market.
While the display does have good viewing angles, we would like to see the ability to adjust the display levels and white balance through software. Unfortunately, it’s simply lacking from the phone. There’s also an issue of backlight bleed when the screen is dark that won’t bother you much, if at all, but is present.
Camera
The camera is much like the display, there are a lot of big numbers and plenty of fancy marketing lingo, but it doesn’t blow away its competitors like LG might have hoped. This year we got dual cameras: a wide-angle camera set to capture more of the world around you and a regular field-of-view camera meant to capture more true to life pictures.
The regular camera can shoot up to 16 MP, which is about standard for 2016, while the wide-angle camera sacrifices some megapixels (it tops out at 8MP) to gain the desired effect.

Both cameras are really good. They take comparable pictures to others on the market, but we’re getting to the point in mobile photography where almost everything is fine for what we end up using the pictures for, social media and sending picture messages. Is this my first choice for a camera on a phone? Nope, but it got the job done just fine.
1 of 2

Default Camera

Wide Angle Camera
The camera does tend to bring in lots of light. This is great for those low-light situations that tend to make up many pictures, but can have an adverse effect in well-lit pictures. Luckily, there is a robust manual mode that will let you decide exactly how bright you want the picture to be before you ever snap it.

Pictures provided by our own Josh Noriega. Check out his Flagship Phone Camera Shootout to see how the G5’s camera stacks up against the Samsung Galaxy S7 and HTC 10.
Hardware
The body of the G5 is made out of metal. It doesn’t look like it, and it certainly doesn’t feel like it. There was a controversy when the phone first came out that most reviewers were calling out LG for not actually producing a metal phone.
It was eventually confirmed that LG has covered the body of the phone with a coating to hide the antennas and thus giving a false impression of the phone being made out of plastic. Whatever the reason for, it still doesn’t change the fact that it just doesn’t feel great in the hand. The size is good, but it doesn’t feel like metal, which is really what you want if you’re buying a metal phone.

We’re seeing a bit of a resurgence of phones that feature the microSD card. Both the HTC 10 and the Samsung Galaxy S7 feature the card slot, and LG follows suit with an expandable storage slot of its own. You can expand your storage up to 256GB, and even though adoptable storage isn’t enabled out of the box, it’s only an easy command prompt away.
Part of the advantage of being a modular phone is the removable battery that LG placed in the G5. The 2800mAh battery is smaller than competitors and previous LG flagships, and it shows. As I discussed previously, battery life isn’t great, but you can buy an extra battery to easily swap out when you get low.
Also, since the G5 features Quick Charge 3.0, you can get back about 60% of your battery in a half hour if you happen to be close to a wall outlet and have your charger on you. It’s not a perfect solution to sub-par battery life, but if I believe most people will get through the day on a single charge and a top-off before bed.
Audio output is a bit of a mixed bag. The bottom firing speaker isn’t great. It doesn’t get the loudest and can distort at higher volumes. If you’re often listening to YouTube videos or music in crowded places, you’re probably annoying other people anyway. If you’re using it for speaker phone, it should get you by.
The audio output from the 3.5mm jack is another story. It easily stacks up with the Samsung Galaxy S7 for best output on the market. It’s loud and puts out a quality sound. Props to LG here.

The last thing I want to touch on here is LG’s removable bottom and “Friends”. Having the ability to add in functionality is a great idea. I’ve never been so excited after a product press conference as I was after watching LG’s show at Mobile World Congress 2016. But I’m extremely disappointed in the practical usage of the phone.
The bottom of the phone slides slot, but there’s still a gap at the bottom. Not only that but on my unit, it doesn’t even line up correctly. There is a sharp edge where the phone should be flush, not to mention that the sides where the metal band meets the body is decently sharp too. It won’t hurt, but it is annoying.

I don’t believe LG’s Friends initiative provide enough functionality to justify the design choices it had to make. Right now, it’s a closed system with no real third party modules you can buy and everything that you can buy can easily be duplicated on other phones with different accessories. There’s nothing exclusive about the LG G5, and that’s a shame.
Conclusion
I’ve brought up a lot of negatives about the LG G5 in this review. Maybe I tend to skew toward the negatives because every phone is amazing these days. What really sets them apart is what they can’t do.
The LG G5 can do pretty much what every other phone on the market can do right now. It’s extremely fast and fluid, it takes fine pictures, you can expand the storage with low-cost storage, and charge up the battery incredibly quick.
Where I think LG took a huge misstep were the compromises they had to make for their modular body. Due to this design, it can’t be water resistant like the Samsung Galaxy S7, it doesn’t feel excellent like the hand like the HTC 10 and it isn’t cost efficient (likely to R&D costs) like the OnePlus 3. The functionality it adds is little more than a gimmick, and it gave up major selling points to do it.
Our thanks to B&H Photo for making this review possible!
2017 Mercedes-Benz E300 review – Roadshow
Jul 2016
The Good The 2017 Mercedes-Benz E300 is top of the segment in terms of technology. The small, turbocharged is gutsy enough for the target market, and the car cuts a sophisticated profile.
The Bad All the fun technology comes with a steep price tag over $10,000.
The Bottom Line The E300 is a high-tech machine with plenty of luxury features. The smooth ride and willing, although not eager, chassis make it a comfortable and pleasant midsize sedan.
Looking at a list of midsize luxury sedan manufacturers is like holding roll call for the UN. You can get your high-class on with the Japanese, British, Americans, Koreans or Swedes, but today we’re talking German luxury. More specifically, Mercedes-Benz richness in the form of the 2017 E300.
The E-class, long a top seller in the segment, routinely sells more than the BMW 5-series, the Audi A6 and Cadillac CTS. In fact, the only luxury sedan that sold more units in 2014 and 2015 is the Lexus ES. Deutschland, Deutschland almost über alles.
For its 10th generation, the E-class offers a whole new look and a massive amount of technology, adding good looks to affluent comfort, resulting in a sumptuous ride indeed. This overhaul likely won’t hurt its sales position.
Nerd alert
Mercedes-Benz calls the E-class the most intelligent sedan in the world, and while I’m not one for superlatives, it certainly is well on its way to autonomy. The Drive Pilot adaptive cruise control and semi-autonomous steering system can follow cars up to 130 miles per hour. What if you’re out on a dark, desert highway with no lead cars in sight? The E300 can read the speed limit signs and adjust the speed accordingly. Don’t worry speed demons. You can turn this feature off.

Chris Paukert/Roadshow
While not not perfect, the system does a good job of keeping your foot off the pedals while commuting. During heavy traffic the steering pilot pulled either extremely right or left, and at higher speeds it gently moved from side to side, instead of keeping me directly centered. Still it made my rush-hour voyage from San Jose to Monterey down the unpleasantly busy Pacific Coast Highway less stressful than usual.
The E300 can even change lanes for you when in Drive Pilot. Just signal your intention and the E300 will swing around the slower car, traffic permitting. However, it’s better to keep this assist to the straightaways. A left-hand lane change during the middle of a long right-hand sweeper confused the E300, but on straight sections of the highway it centered itself in the new lane just fine.
Save that squirrel!
I also got to experience Mercedes-Benz’s new evasive steering assist, though as a passenger, not as a driver. While barreling through the California countryside my drive partner and I came upon two squirrels who had decided the road was their turf. A flick of the wheel to the left and the system kicked in, offering extra steering torque to get us around the defiant rodents. One may think it would be easy for an experienced driver to overcorrect the computer’s correction, but we ended up perfectly centered in our original lane.
My turn to feel the computerized nannies of the E-class came on the freeway, when sudden traffic had me on the brakes quite firmly. Even though I had it all under control, the brake assist came on to give me a little extra boost so I stopped at least a foot away from the lead car’s bumper, and not merely inches.
A
totally
redesigned
Mercedes-Benz
E-Class…
See full gallery


1 – 6 of 30
Next
Prev
Other new safety features include Pre-safe Sound, which sends out a short burst of aural interference if a collision is detected. This interference triggers a protective reflex in the human ear, mitigating hearing loss in an accident. Further, if a lateral collision is detected the side bolster rapidly inflates, forcing the occupant towards the midline of the car to reduce the load of impact.
Look out, Virtual Cockpit
Mercedes-Benz adds some sweet technological advances to the E300’s infotainment system for 2017. A 12.3-inch LCD is standard in the center dashboard, but to my delight my test model had an additional 12.3-inch screen as the instrument cluster. Similar to Audi’s Virtual Cockpit, the layout of the screen can be changed to include radio, fuel economy or navigation information as well as different gauge layouts.
Verizon will reward customers for referring new subscribers
Need a little extra pocket money? Is Verizon your cell phone carrier? You might be able to hit the company up for a little boost in your cash flow then, provided you bring a few new customers along with you.
Starting today, Verizon will begin rewarding its current customers for utilizing posts on social media networks like Facebook or Twitter to refer family and friends. You can earn up to $100 in Visa rewards cards this way, with $25 for 1 referral, $50 for two and $100 for three or more. Unfortunately it doesn’t keep stacking, but the new customers will also receive a $50 Visa rewards card after signing up as well.
If you’re interested in signing up for the program, you’ll need to head to the special Verizon page set up for referrals here and follow the prompts on the page to ensure you both get your moola. There’s one catch, though: The rewards cards won’t be sent to either party until the new account has been active for 45 days.
Source: Verizon
How to take photos of fireworks – CNET
Taking photos of fireworks is not as difficult as you might think. Rather than pointing your smartphone or dSLR toward the sky and hoping for the best, keep these tips in mind before setting off to watch the holiday light show.
Set up
Get into position early. For the best results, scope out the area beforehand and work out where the fireworks will be set off so you can have the best vantage point. It’s also handy to figure out how the wind is blowing so you can avoid the smoke which can affect the look of your photos.

Lexy Savvides/CNET
Equipment
The most important investment for firework photos is a tripod. For smartphones, here’s how you can attach a handset to a standard tripod. Otherwise, you can invest in a portable solution like the GorillaPod GripTight that’s compatible with almost every handset.
You need to keep your camera stable because the main trick to firework photography is keeping the shutter open for long enough to capture light.
Another tip for minimizing any blur caused by camera shake is using the self-timer option once your smartphone or camera is on a tripod. This is especially useful when using a smartphone as touching the screen to take a photo introduces a lot of movement.
Dreamstime stock photographer Betsy Hern also suggests to bring a flashlight, which works in two ways. “You can use the flashlight to help you see the camera’s menu in the dark, but also as additional light for your frame,” she says.
Smartphone
Once your smartphone is stable, there are a few options you will want to tweak before taking firework photos. The most important is to turn off the flash and make sure HDR mode is not active.
If your default camera app has a night mode or even a dedicated fireworks mode, enable it for better results. Set and lock your focus if possible using an AE/AF option and take some establishing shots to work out the exposure.

Some default camera apps like those on the Galaxy S7 and S7 Edge have a so-called “pro” mode that lets you fine-tune exposure details including ISO and shutter speed.
Andrew Hoyle/CNET
A smartphone that has manual exposure options in the default camera app will give the most control. Set your ISO to a low value such as 100 or 200, focus at infinity or on an object that’s roughly on the same plane as where the fireworks will be.
As your aperture is fixed on a mobile phone, the shutter speed will need to be a little faster than on a dSLR to avoid blowing out the image. Experiment with a one second exposure, and reduce or increase as needed to capture the light trails from fireworks.
Don’t have manual controls in your default camera app? Try downloading a third-party app like Manual Camera for iOS, Camera FV-5 for Android or CameraPro for Windows Phone for more flexibility.
Another option is to take a video of the light show and extract still images of the best scenes. It will only give you the equivalent of a 2-megapixel image for full HD, or 8 megapixels for 4K, but it is something to consider if you want both photos and videos of the show.
Other accessories you might want to add to your firework photography kit include clip-on lenses for your smartphone like the Olloclip or Zeiss Exolens.
If you can’t get close enough, resist the urge to use digital zoom. Instead, use a telephoto clip-on lens so you can crop into your images later.
Compact
There is not much to mention when shooting on a compact, unless your camera has manual exposure controls. If it does, read the dSLR section for the settings to use.
Otherwise, if you are stuck with a camera that has automatic or program modes only, try and find a scene mode that is dedicated to fireworks or use a night mode with the flash deactivated. If you have the option, use manual focus.

Lexy Savvides/CNET
You can also trick the camera into behaving like it has selectable shutter speeds by using program mode, turning off the flash and setting your ISO low. This will force the camera’s shutter to stay open for a longer period of time in order to gather more light. As long as the camera is stable, you should get a shake-free shot.
dSLR
Learn to get comfortable with manual mode on your dSLR. Set your lens to manual focus and don’t change it during the fireworks.
Your aperture should be around f/8 to f/11 while your ISO should be low at 100. The shutter speed needs to be at least a few seconds’ duration in order to capture the fireworks properly.
Experiment with 3 to 4 seconds to start with, increasing or decreasing the time depending on your results. To avoid camera shake from pressing the shutter button, use a remote shutter release or the self-timer option on your dSLR.

Lexy Savvides/CNET
Another option is bulb mode, which keeps the shutter open as long as you hold the shutter button. It’s best to use a remote release for bulb mode, otherwise you can introduce camera shake into your images.
During the fireworks show, try varying the shutter speed to obtain different effects. Remember that fireworks are a very bright light source, so anything longer than a few seconds may result in overexposure. Shooting in raw will help you recover detail in case your exposure is too long or short.
Consider shooting wide in order to capture more of the scene and then crop in later. Fireworks will be at all levels from high in the sky or close to the ground. You may need to recompose — but don’t refocus — during the show.

Lexy Savvides/CNET
Once you have nailed the technical component, think about composition. It’s not all about what’s happening in the sky; try and contextualize the fireworks by including some of the surrounds.
Also try playing around with orientation. Landscape shots can look great, but portrait orientation works well too so you can capture a longer trail of light.

Lexy Savvides/CNET
Post-processing
Don’t forget to take advantage of editing and processing your photos after the fireworks show is over. Consider boosting the contrast to make the background a deeper black; or increase the hue and saturation to make the fireworks pop, suggests Hern.
Also, you may want to combine several photos into one for a more dramatic effect. “Clone out any imperfections, crop them, and combine them on different layers so you can move them around,” says Hern. Then you can layer them over each other and make it look like it was all taken in one photo by changing the blending mode in a program like Photoshop.

Lexy Savvides/CNET
Remember that not every shot you take will be a keeper. Take plenty of photos, but also try to enjoy the show rather than watching it through your camera screen.
Editors’ note: This post was originally published June 25, 2014, and has been updated.
Is Evernote Premium’s new price worth it? – CNET
Evernote, once considered a tech “unicorn” with a valuation of over $1 billion, is on the receiving end of much criticism and scrutiny this week, following the announcement of a price hike and device limitations for free users.
One thing is clear about the recent changes: no one is happy, since Evernote wants you to start paying for features that were once free. For some, paying for the new plans is a no-brainer, as the chat and sharing features built into Evernote make it a powerful collaboration tool, as do its helpful integrations with IFTTT and Zapier.
Still, the pricing changes force us to ask, is paying the higher prices for Evernote worth it?
Evernote’s new plans
Until 2015, Evernote had two tiers, Basic and Premium. Last year, the company introduced a middle tier called Plus, which was slightly more affordable than Premium with a cap on its features. Here’s what the plans look like today:
 Enlarge Image
Evernote
- Evernote Basic was and is still entirely free to use. It still limits uploads to 60MB per month and allows you to use the web clipper tool, search for text within images and share notes with other users. What’s new is a passcode lock on the mobile apps, previously a feature reserved for paying users, and a limit of two devices on which you can sync Evernote.
- Upgrading to Evernote Plus unlocks features like accessing notebooks offline, emailing notes to your Evernote account and the ability to email customer support. It also increases the upload limit to 1GB per month. This plan went from $2.99 (£2.99 or AU$3.99) per month or $24.99 (£19.99 or AU$29.99) per year to $3.99 (£3.99 or AU$4.99) per month or $34.99 (£29.99 or AU$49.99) per year.
- Evernote Premium, the top tier, adds the most features, such as the ability to search for text in Office documents and PDFs, annotate PDFs, scan business cards and suggested notes and content from the web that are relevant to the note you’re currently working on. These features, plus up to 10GB of uploads per month, will set you back $7.99 (£4.99 or AU$11.00) per month or $69.99 (£44.99 or AU$89.99) annually. That’s up from $5.99 (£3.99 or AU$) per month or $49.99 (£34.99 or AU$69.99) per year.
For those looking at paid tiers, that’s roughly a 33 percent to 40 percent increase, depending on whether you pay monthly or annually. The monthly rates saw the smaller percent increase in price, while the annual pricing became less enticing. And, no new features were introduced — you’ll be paying more for the same set of features.
Evernote is, however, offering a grace period to free users who need sync across more than two devices. This grandfathered plan will only last for a few weeks and the new changes and pricing will roll out for users at different times, the earliest being August 15. Keep an eye on your inbox for an email from Evernote within the next two weeks detailing the exact time frame for the changes to be applied to your account.
Is it worth the money?

Taylor Martin/CNET
Whether you can justify paying for Evernote or not certainly depends on your personal usage, but with zero new features added, the blatant price hike is hard to recommend.
For plain note-taking: Save your money
With only plain text notes, you’re not likely to reach the 60MB limit. Evernote Basic comes with 60MB of uploads per month. Very few plain text notes in my Evernote are over 4KB in size, which means I could upload approximately 15,000 notes to my account in a month with Basic. That’s a lot of notes to take in a month — approximately 500 per day.
But if your needs exceed what Evernote Basic has to offer and you just want to take notes, services like Google Keep or Simplenote provide everything you need for free. And if you’re within Apple’s ecosystem, the inbuilt Notes app uses iCloud to sync your notes between your Apple devices. While iCloud may not be free for you, the note taking will likely have very little impact on your total iCloud storage.
My personal solution for syncing notes between all my devices is using a cloud storage service I already pay for — Dropbox — and finding individual applications on different platforms for taking notes. Currently, I use iA Writer on Android, iOS and Mac, which together cost less than a year of Evernote Plus.
Consider device limits
I don’t expect the device limit to affect most Basic users, despite how off-putting it may be.
Basic users will only be able to use sync in the official Evernote apps with two devices at once — such as a computer and a phone, a phone and a tablet or two phones. Most people will only need Evernote on a phone, computer and maybe a tablet. If you only install the Evernote app on your two mobile devices and opt to use Evernote in a web browser instead of a desktop app, you will still have access to notes from all your devices.
If you have multiple phones or tablets you wish sync notes between there are a number of free alternatives that don’t restrict the number of devices you can use with sync.
For web clipping and other files: Maybe
One of the draws of Evernote for me is the web clipper tool. Think of it as a more powerful version of Pocket that allows you to save full web pages as PDFs or screenshots directly into Evernote, as well as save or bookmark articles for later reading.
You can also use Evernote for storing documents, such as PDFs, spreadsheets or photos — much like Dropbox. However, when you branch out from plain text notes, you will chew through the 60MB upload limit very quickly, as note sizes can jump from a few kilobytes to several megabytes each.
Having web clippings, important files and notes all under one roof allows for some helpful organization and consolidation of apps. But you still can’t use Evernote to edit or alter most of those file types — just notes and PDF annotations. At that point, Evernote becomes a weird combination of a collaborative cloud storage account with upload limitations and inbuilt note taking. But it’s not particularly efficient for cloud storage and we’ve already established that there are great, free alternatives for note-taking.
Bottom line: If you want to use Evernote for anything beyond simple notes and you’re heavily invested in the app, you’re better off upgrading.
But there are alternatives. Microsoft OneNote, Evernote’s biggest and most direct competitor, offers almost everything you will get with Evernote Premium for free. OneNote works with Android, iOS, Mac and Windows. It also works from the web for platforms that aren’t officially supported, and includes its own web clipper, offline access to notes, email to OneNote and most other Evernote Premium features completely free.
Moving on
For the last three years, I’ve been a big fan of Evernote despite some of its quirks. I have hundreds of notes in my account and spent time meticulously organizing everything with tags and in different notebooks. I gladly paid for Premium to get more out of Evernote.
But without any new features or major changes, the price hike stings quite a bit. It just doesn’t make sense for me to upgrade to Evernote Premium when the annual price of Microsoft Office and 1TB of storage in OneDrive is the same price and OneNote is free.
Get the iOS Control Center on your Mac – CNET
 Enlarge Image
Taylor Martin/CNET
On iPhones and iPads, swiping up from the bottom edge of the screen, from anywhere within the operating system, unveils a panel of quick settings toggles for Wi-Fi, Bluetooth, Do Not Disturb, Night Shift, volume, brightness, Airplane Mode and more.
Officially, the closest thing to you can get to that on a Mac is settings toggles in the menu bar. But a third-party app called Command Center puts the Control Center you know and love on your iOS devices on your Mac.
It looks almost identical to Control Center, though some settings from mobile devices — like flashlight or the camera shortcut — are swapped out for more logical toggles for a computer, such as shortcuts for Log Out, Restart, Shut Down and hiding desktop icons. It has sliders for brightness and volume, music controls and toggles for Do Not Disturb, Wi-Fi, Bluetooth, a Night Shift- or f.lux-like mode that adjusts the temperature of your computer’s display either manually or automatically.

Taylor Martin/CNET

Enlarge Image
Taylor Martin/CNET
You can also drag and drop files into the section titled File Drop to get quick access to them without cluttering up your desktop.
There are two themes to choose from — light or dark — and tucked away behind a second tab is an activity monitor that shows CPU, RAM, network and battery usage and condition.
The best part, though, is how it’s accessed. By default, it’s hidden off screen. If you want, you can click the menu bar icon to show the app. But the faster and easier way is to slide your cursor towards the edge of the screen, either right or left, depending on your personal preference, and Command Center will appear.
The app will set you back $9.99 (£7.53 or AU$13.34), which might give some potential buyers pause. That’s a lofty price tag for something so simple. But I’ve been using it for several days now and I’ve found it’s quite a bit faster than using the menu bar shortcuts for quick toggles. Whether that’s worth a tenner or not is up to you to decide.
Save
Home networking explained, part 5: Setting up a home router – CNET
Editors’ note:This article was first published on March 26, 2013 and updated on July 1, 2016 with up-to-date information.
It might seem like a daunting task to set up a new home router. But it doesn’t have to be if you understand the most common way routers are managed: through the web interface. The hardest part of using the web interface is getting to it. Once you have accessed it, the rest — at least most of it — is self-explanatory.

Most routers’ web interfaces are similar and self-explanatory.
Dong Ngo
Note: Almost all home routers on the market come with a web interface; that is, a web page from which users can view, manage and monitor the router’s settings and features. The only company that doesn’t offer a web interface for its routers is Apple. There are also some new types of routers with vendor-assisted setup and management using a mobile app, such as the Google OnHub, the Eero or the Starry that also don’t have a web interface. With that in mind, this guide is intended only for routers with a web interface.
In this post, I’ll talk about how you can quickly set up any router by accessing its web interface using a browser and manage it from any connected computer or even a tablet or smartphone.
Let’s start with the basics.
1. What is a browser?
Home networking explained
- Part 1: Here’s the URL for you
- Part 2: Optimizing your Wi-Fi network
- Part 3: Taking control of your wires
- Part 5: Home router setup
- Part 6: Securing your network
- Part 7: Powerline explained
- Part 8: Cable modem shopping tips
- Part 9: How to access your home computer remotely
A web browser is a software application designed for retrieving, presenting, and exchanging information resources on the internet. All browsers have an address bar where you can type in the web address of a website, such as http://www.cnet.com. After that, you hit Enter and the browser will let you browse (hence the name) the content of the site. As you surf the internet, the address bar automatically displays the current address of the web page you’re looking at, whether you typed in the URL or got to it by clicking on a link, such as one from within an email or from another web page. This web page address is called a uniform resource locator (URL).
Among the most popular browsers are Google Chrome, Mozilla Firefox, Apple Safari, and Microsoft Internet Explorer. You’ll find at least one of these browsers on any computer, tablet, or smartphone, and any of them can be used to manage a router’s web interface.
Common home router Web interfaces (pictures)


1 – 5 of 6
Next
Prev
2. Setting up the hardware
When you get a new router, setting up the hardware is very simple. (If this part of home networking is new to you, check out part 1 of this series first). All you need is a computer that has a network port (most computers do) and two network cables (a new router comes with at least one network cable). Follow these steps, regardless of what the router’s included setup guide might say:
Connect the router’s WAN port to your internet source, such as a DSL or cable modem, using the first network cable. All home routers have just one WAN port (sometimes labeled the internet port); this port is always separate from the other network ports and often is a different color to further differentiate it. Note: If you do not have internet access at home, or want to have an isolated (non internet-enabled) network, you can skip this step. Later on you can always complete this step when the internet is available or needed.
Connect one of the router’s LAN ports (most routers have four LAN ports) to the computer using the second network cable.
Plug the router into the power outlet using its power adapter, as you would with most electronics. If the router has an on-off switch, make sure the router is on. Many routers don’t have this switch and will turn on as you plug it in.
That’s it — you have just finished the hardware setup.

A router’s WAN (internet) port is always clearly distinguished from the LAN (Ethernet) ports. Also note the reset button, which brings the router’s settings to default value.
Dong Ngo/CNET
3. Accessing the web interface
The next step is to use the web browser to display the router’s web interface. Basically, you will need two things: the router’s URL, which is always its default IP address, and default log-in information. You’ll find this information in the router’s manual, and sometimes it’s printed on the underside of the router, as well.
Most, if not all home routers on the market have a default IP address in this format: 192.168.x.1, where, depending on the vendor, x tends to be 0, 1, 2, 3, 10 or 11. For example, routers from Trendnet almost always have a default address of 192.168.10.1, while D-Link routers use 192.168.0.1 or 192.168.1.1.
And the log-in information is also quite predictable. The username (if any) is almost always admin and the password (if any) tends to be one of these: admin, password, default, or 1234.
Once you have gotten these two pieces of information, just type the router’s IP address in the address bar of a browser on a connected computer, press Enter, and then enter the log-in information, after which you’ll be greeted with the web interface.
| 192.168.0.254 / 192.168.1.254 | (blank)/(the device’s serial number or access code) |
| 192.168.3.1 | admin/admin |
| 192.168.1.1 | admin/admin |
| 192.168.2.1 | (blank)/(blank) or admin/1234 |
| 192.168.11.1 | root/(blank) |
| 192.168.0.1 or 192.168.1.1 | admin/(blank) |
| 192.168.0.1 or 192.168.1.1 | admin/admin or (blank)/root or (blank)/admin or Administrator/admin |
| 192.168.0.1 | admin/motorola or admin/password |
| 192.168.0.1 or 192.168.1.1 | admin/password or Admin/1234 |
| 192.168.10.1 | admin/admin |
| 192.168.1.1 | admin/1234 |
 You can quickly find out the router’s default address by using the ipconfig command on a Windows computer.
Dong Ngo/CNET
Also, from a connected computer, you can always find out what the current IP address is of the local network’s router. This is helpful if a router’s default IP address has been changed. On a Windows computer do this:
Run the command prompt (you can find it in the Start menu, or in Windows 8 just type cmd when you’re at the Metro Start menu, then press Enter).
At the Command Prompt window, type in ipconfig then press Enter. You will see a lot of things, but the IP address following the Default Gateway is the address of the router.
 On a Mac, it’s also quite easy to find out the default IP of the local network’s router.
Dong Ngo/CNET
On a Mac: Head to System Preferences > Network > select the current connected connection (it’s likely Ethernet) > click on Advanced > on the first tab, TCP/IP, the router’s IP address is shown next to Router.
4. A new router’s basic settings
Though the design of the web interface is opened varies from one vendor to another, most of them have granular menus. Listed below are typical main menu items and what they do.
Wizard: This is where you can start a step-by step guided setup process. Many routers’ interfaces show the wizard when the web interface is accessed for the first time. You just have to go through and set up a few of the routers’ settings, such as its log-in password (to be changed from the default — you should definitely do this to keep your network secure) and the name and password for the Wi-Fi network (or networks, for dual-band routers). Some wizards also ask for your time zone, the current time and date, and so on. With most routers you can skip the wizard and set up the router manually, if you want to, or you can finish the wizard and get back to the interface to further customize the network.
 It’s a good practice to save the router’s current settings before making changes. This way you can always restore the previous settings if something goes wrong.
Dong Ngo/CNET
Setup section
Wireless (or Wireless settings): Where you can customize the router’s Wi-Fi network(s). You can pick the name of the network, change the password, turn the Wi-Fi Protected Setup feature on or off, and a lot more.
WAN (or Internet): Most of the time you should use the Auto setting for this section. However, some ISPs might require special settings; in those cases you can enter them here.
LAN (or Network settings): This is where you can change the local network settings, including the default IP address of the router itself. (Note that if you change the router’s default IP address, which is recommended for security reason, you’ll then need to use the new address to access the router’s web interface.) Here you can also change the range of IP addresses used for local clients, and add clients to the DHCP Reservation list. Once on this list, the clients’ IP addresses will remain the same, which is required for some internet applications. Most of the time, you don’t need to change anything in this section at all.
Tools (or Administration) section
Admin password (or Password): Change the router’s password. This is the password required when you log in the router’s web interface.
System: Where you can back up the current settings of the router to a file, or restore settings from a file; update the router’s firmware; and so on. It’s always helpful to back up the router’s settings before you make changes.
You’ll find a lot more settings and features on a router’s web interface, and when have time, you should try them out. If worst comes to worst, you can turn to the last-resort step below to restore the router to its default settings.
5. The last resort
All routers come with a reset button. This is a tiny recessed button that can be found on the bottom or side of the device. Using something pointy, such as an unfolded paper clip, to press and hold this button for about 10 seconds (when the router is plugged into a power source) will bring its settings back to the factory default. In other words, the router will be reset to the state it was in when you bought it. You can set it up again from the beginning, or you can log in to its web interface and restore the router’s settings from a backup file.
Google Fit makes it easier to see your daily stats with new design

Google Fit, the company’s fitness tracking app, has recently received a pretty sizable update. Included in the update is a new look that helps show all your daily stats at once, an easier way to see how your weight is trending and more.
You’ll be able to see how you compare to other users in your area and even set more detailed goals. A full list of changes in this release include:
- More goal options and support for multiple goals. Set daily, weekly and monthly goals and goals for specific activities like “run three times a week”.
- A new look that shows all of your daily stats at once.
- See how your weight is trending after logging a new measurement.
- See how your activity compares against other Fit users in your area.
- Bug fixes
If you are not already using Google Fit, you can download it now from Google Play for free.
