


Make your bike electric with this swap-in tire
Electric bikes have been around for decades but haven’t broken out of their niche audience. Instead of building a bicycle around electric power, GeoOrbital is a universal wheel you can swap into your existing bike to power your ride.
GeoOrbital’s creators had previously worked at SpaceX and Ford, companies that know a thing or two about renovating traditional transportation. The device replaces the front wheel in bikes with 26-inch or 700c (28-inch/29-inch) size tires; either way, its proprietary foam wheel won’t get a flat when punctured. Additionally, its lithium-ion battery boosts your bike up to 20mph for up to 50 miles, has a USB port to charge your devices while you ride, and recharges as you pedal, brake, or coast downhill.
All this powered assistance comes with a tradeoff: added weight. Whereas traditional tires weigh three to six pounds, GeoOrbital is 11 to 17 pounds depending on the model. While the early-bird specials are already sold out, you can still pick up one for $650 on the company’s Kickstarter campaign, with units expected to ship in November.
Source: GeoOrbital
Review: Pryme Vessyl is an iPhone-Connected Smart Cup That Isn’t Smart Enough
Mark One’s Pryme Vessyl is an iPhone-connected cup that’s designed to track your daily liquid intake, making sure you’re at your optimal hydration level. According to Mark One, hitting an ideal hydration level can increase your energy level and improve your mental balance.
Paired with an accompanying app, Pryme Vessyl calculates a user’s hydration needs based on height, weight, activity level, and other factors, making sure that intake level is met by measuring each sip of water or liquid through accelerometers in the cup itself. Hydration needs change from day to day, so the goal of the Pryme Vessyl is to make sure users are getting enough hydration as activity level shifts.
The idea is to drink all of your liquids — coffee, tea, water, juice — out of the Pryme Vessyl to get an overall picture of liquid intake and track any deficits.
Design
Mark One’s Pryme Vessyl features a clean design that looks like it could have come out of the Apple design lab. It has a sleek white exterior that’s soft and smooth to the touch with a glass interior. There’s plastic at the top of the cup and the lid, which fits into the top, is also plastic, so it’s not going to be a good purchase for those who prefer to avoid plastic drinking vessels entirely.
The lid of the Pryme Vessyl is problematic because it can be difficult to remove. Pressing with a thumb on the lid slides it over to reveal an opening to drink from, and pulling up on the extra plastic pries open the lid. It takes a lot of force to open the lid of the Pryme Vessyl, but Mark One says it will loosen up over time.

Once I learned the trick for opening the lid, I found it simple to do, but it does require pulling so hard in an upward motion that it feels I’m going to break something. Popping the lid off needs to be done every time the cup is filled, and because it only holds 16 ounces, it needs to be filled frequently if you drink a lot of water.
Drinking from the Pryme Vessyl is like drinking from any travel cup with a lid. The opening is small so you can’t get much liquid per sip, and it can be awkward to drink from because the top part doesn’t fully come off. The lid opening is not large enough to fit a straw, and for the first several days of use, I noticed a plasticky taste.

With the lid snapped into place, the Pryme Vessyl looks like it should be watertight, but it’s not. If you put it in a backpack or bag and it tips, it’s going to leak. Because it’s lined with glass, the Pryme Vessyl is heavier than your average travel cup, but it does support both hot and cold liquids and it can be used with or without the lid in place. There’s no real insulation aside from the glass, so it’s not going to keep cold drinks cold or hot drinks hot and it will feel warm or cold based on what’s inside it.
 This line is where the LED is located
An LED on the side of the cup can be pressed to display a line representing how close you are to reaching your daily water intake goal, and it also lights up when charging the battery. I found myself wishing the LED indicator did more, like letting me know when the cup disconnected from Bluetooth or how much water was left.
Functionality
There’s an accelerometer built into the Pryme Vessyl, which is what tracks the water level in the cup and detects whenever a sip is taken so it can be recorded. Built-in Bluetooth transmits that data to the iPhone, keeping tabs on all of the liquid consumed through the cup. It tracks as little as 0.5 ounces at a time, which is a relatively small sip.
Every couple of days, the Pryme Vessyl inexplicably disconnected from my iPhone even though it said Bluetooth was still enabled, and I had to go through an entire reset process to fix the connection. When it isn’t able to connect to the iPhone, the cup will store sips and upload them later, so it doesn’t need to be used alongside the iPhone at all times and data isn’t lost if a connection is lost.

When walking around with the Pryme Vessyl, transporting it in the car, or washing it, I had errant sips added to my liquid intake totals. Mark One says an update is in the works to fix this problem and improve the algorithm that detects when a sip is taken, but it accounted for several inaccuracies.
Phantom sips can be deleted by pressing and holding on the drink in the timeline screen, which is how any liquid can be deleted. This isn’t exactly intuitive — the Vessyl needs an app design that makes hidden features like this more apparent. The Vessyl can also be turned off when washing or traveling, another feature that’s not obvious because it’s done through a teeny tiny hole in the bottom of the cup.
With an accelerometer, Bluetooth, and other electronics inside, the Pryme Vessyl needs to be hand washed — it’s not dishwasher safe. It’s also not microwave safe and Mark One says it shouldn’t be placed in the freezer, but it can go in the refrigerator for short periods of time.

The Pryme Vessyl needs to charge every day to two days, and charging is done inductively through a metal base on the cup that attaches to an included coaster. It’s definitely not convenient to have to charge a cup, but I put the coaster on the table where I work, which made the charging process relatively painless. It generally took just under two hours to fully charge the cup.
App
Like most smart objects, the Pryme Vessyl interfaces with the iPhone using an app (there’s also an Apple Watch add-on). Available for free in the App Store, the Pryme Vessyl app is used to track how much liquid is consumed during the day. Using input including height, weight, age, and activity level, the app calculates an ideal hydration level for you.
Based on activity information pulled in from Apple Health, Jawbone, and/or Fitbit, it adjusts hydration calculations on an ongoing basis. Sleep schedules are also input so it knows when to track liquid intake, and it should be noted that when the app thinks you’re sleeping, it will not track sips at all. Mark One says this is because nighttime water intake disrupts sleep, but this is inconvenient for people who would like to track overall liquid intake 24 hours a day.
Each sip of water from the Pryme Vessyl is tracked in the app and fills up a circle that takes up most of the main view. The circle represents hydration level and the idea is to drink enough liquid to stay at your “Pryme” for the entirety of the time you’re awake.

Scrolling downwards displays a timeline of the exact number of ounces consumed at each point during the day (as tracked by the cup), but the main circle view of the app doesn’t give a picture of overall ounces. All it does is let you know whether or not you’re at your Pryme, aka optimal hydration level. In landscape mode, the timeline is displayed as a line graph.
Tracking from the Pryme Vessyl is automatic, but drinks not consumed through the cup can be entered manually. When entering a drink manually, the app offers up three preset ounce options, but there’s a hidden option to customize the amount consumed at the time it was consumed at. A similar option exists for entering activity.

The app, while pretty, is overly simple and surprisingly unintuitive, mainly because there are no instructions to let you know how to manage the features. There’s no obvious way to see the total ounces consumed, but hidden in a weekly overview menu (which doesn’t make it obvious you should tap), there’s a way to see full water consumption for the day.

One of the biggest shortcomings in the app is its inability to store more than a week’s worth of water consumption data. Because it links to the Apple Health app, which supports the tracking of liquid, there’s a way to get data for longer periods of time, but the app itself only displays one week of information. When tracking hydration to improve health, most people likely want historical data readily available.
The Pryme Vessyl app is designed to deliver notifications, but in my experience, these were inconsistent and not useful. I reliably got one notification each morning, but notifications during the rest of the day were sporadic. On one day when I fully met my Pryme goals for most of the day, I received five notifications reminding me to stay at my Pryme or take another sip of water, and on another day where I drank next to nothing from the cup, I received no notifications.
I expected a smarter app to go with a smart cup, perhaps letting me know the times of the day when I needed more hydration based on historical activity information or data on how my personal hydration needs were being calculated on a day to day basis, but it didn’t do much more than wishing me a good morning or occasionally telling me to take another sip.
On the plus side, the app used very little battery life on my iPhone despite being connected to the Pryme Vessyl and transmitting data over Bluetooth all day long.
Bottom Line
Using the Pryme Vessyl to its full potential is a compromise because you have to hassle with drinking liquids exclusively through the cup, fuss with connectivity problems, and charge yet another device. Liquid consumption tracking is accurate most of the time, but you’re going to have to deal with inaccuracies from time to time, which require time and attention to watch for and fix.
Over the time that I tested the Pryme Vessyl, I found it surprisingly inconvenient to pour all of the liquid I drank, from regular water to tea to cans of sparkling water, into the cup. I had the option to add liquid manually when I didn’t feel like drinking out of the Pryme Vessyl, but when I got into the habit of doing that, I wondered why I wasn’t using a simple water tracking app that does away with the need to drink from a single cup.

Even on days when I was active, my water needs didn’t shift a lot and I didn’t notice the cup telling me to drink much more than I did on an average day, so the Vessyl didn’t do enough for me to justify its cost. Since I already drink a lot of liquids during the day, I didn’t notice any measurable difference consuming water from the Vessyl and staying at my “Pryme.”
If you’re someone, like me, who already drinks a lot of water, tea, juice, and other liquid throughout the day, you don’t need the Pryme Vessyl. If you’re someone who has a hard time remembering to drink enough water in a day, whether because of a busy schedule, a preference for soda, or another reason, I guess the Pryme Vessyl has the potential to be a decent investment.
A person who is regularly dehydrated and adopts the Pryme Vessyl will undoubtedly notice the health benefits that come with drinking more water throughout the day, and if you’re paying $99 for a cup, I bet you’re going to use it.
It’s worth noting that water intake can be tracked much more cheaply and smartly through a simple water tracking app available from the App Store, which is a good starting point for anyone who wants to up their water intake. Liquid consumed will need to be entered manually, but there’s no charging, no setup, no fussing with Bluetooth disconnects, and no need to drink out of just one vessel.
Pros:
- Accurate liquid intake tracking in most conditions
- Encourages more water consumption
- Works with hot and cold liquids
- Apple-style design
- App uses little battery life
Cons:
- It’s another device that needs frequent charging (every two days)
- Only holds 16 ounces
- Not as easy to clean as a regular cup — not dishwasher safe
- Loses Bluetooth connection a lot and requires resetting
- Doesn’t store more than a week’s worth of data
- Inconsistent notifications
- Not watertight, so it leaks
How to Buy
The Pryme Vessyl can be purchased from the Vessyl website for $99 and $10 shipping. It is also available from Apple.com and in Apple retail stores for $99.95.
Note: Mark One provided a Pryme Vessyl to MacRumors free of charge for the purposes of this review. No other compensation was received.
Tags: Pryme Vessyl, Mark One
Discuss this article in our forums
What to do with a broken Android screen – CNET

Josh Miller
Many Android phones are a bit more durable than iPhones, but that doesn’t mean they’re immune to damage. Phone screens are made of glass, after all, and glass breaks when you drop it.
So. You dropped your Android phone for the 60th time and you now have a beautiful spider web pattern blooming across your home screen. If you don’t have month-to-month phone insurance, here are your options for getting that screen fixed.
Hit up the manufacturer
If your Android device is relatively new (read: still under manufacturer’s warranty), the first place you’ll want to go for your phone fix is the manufacturer. The price for a broken screen will vary depending on your device, but for a Samsung Galaxy S7 Edge you’re probably looking at around $270 plus a day or two without your device. Going to the manufacturer is almost always going to be more expensive than a third-party repair shop, but your warranty will stay intact and your phone will be fully restored (possibly even replaced with a fully refurbished model) to its pre-broken-screen excellence (and waterproof phones, like the Galaxy S7 Edge, will retain their waterproof status).
Samsung owners might want to consider purchasing Samsung Protection Plus — it’s like Apple Care, but for your Galaxy phone. Samsung Protection Plus is an extended warranty available for all of Samsung’s high-end smartphones that covers everything from mechanical breakdowns to accidental damage (e.g., broken screens). It costs between $99 and $129 for two years of protection — during those two years, you’ll get two accidental damage claims per year and you’ll pay a $79 deductible per incident. So one broken screen replacement on the Galaxy S7 Edge will cost you $208.
Get it fixed by a third-party repair shop
If your Android device is older (out of warranty) or a less-popular model, you’ll probably be able to save money by going to a third-party repair shop. I called a few local repair shops in the Los Angeles area and got quotes for between $100 and $250 for a Samsung Galaxy S5 screen replacement.
There are a couple of benefits — aside from price — to using a third-party repair service. If you go to a local repair shop, they’ll be able to fix your phone quickly (some in less than an hour; one local LA shop even offered to come right to my apartment and fix it on the spot), which means you won’t be stuck without a phone. Most third-party repair shops also offer a warranty on the parts they replace, which means you can call them if your replacement screen stops working for any reason (aside from, you know, dropping it and breaking it again).
All third-party repair shops are not created equal, so here’s what you’ll want to ask before you hand over your device:
- How much will it cost?
- How long will it take?
- What type of warranty do you offer? (Parts and service, or parts only/service only? Limited or lifetime?)
Using a third-party repair service to fix your device’s broken screen will void your manufacturer’s warranty, so if your phone is new it’s best to first check out the manufacturer’s quote. Some new phones, like the Samsung Galaxy S7 Edge, are very difficult to repair, so you may find that the manufacturer has a better price than any reputable third-party service.
Deal with it
Assuming your device’s broken screen isn’t drastically interfering with your ability to use your phone, or making your fingers bleed, you may want to just ride out the cracks until you get a new phone (or until it does make your fingers bleed). To make your device last as long as possible, cracks and all, I suggest putting it in a sturdy, shockproof case, because any bumps or drops could cause more damage. If the cracks on the screen cross usable area, you may also want to look into a glass screen protector — to protect your fingers from cuts and to protect your screen from more damage.
The Android Security Bulletin for May 2016 is live — here’s what you need to know

Notes and new factory images for the May Android patch are now available, with source code and updates rolling out.
Google’s monthly security patch notes have a new name and a new purpose — they’re now titled the Android Security Bulletin, and the scope has been broadened to include mention of vulnerabilities that affect phones and tablets that aren’t Nexus branded from Google.
The updates for the Nexus line — both over the air or as a new factory image — haven’t changed. OTA updates have begun their staggered roll out, and new factory images have been posted at Google’s Developer site for manual downloading and installation. The new Security Patch Level date is May 2, 2016 and changes to the Android Open Source Project should be finished and published within 48 hours. Google also tells us that partners have had access to the warnings in this month’s bulletin since April 4, 2016 or earlier.
According to Google, “The most severe of these issues is a Critical security vulnerability that could enable remote code execution on an affected device through multiple methods such as email, web browsing, and MMS when processing media files.”
In total, 25 security vulnerabilities have been addressed, ranging from critical to low in terms of their assessed severity. 24 of these fixes affect Nexus or Android One branded devices. Google also stresses that there have been zero reports of any devices actively exploited by these vulnerabilities, and that their platform-level security protections and service protections like SafetyNet make the risk of actually being affected low. A quick summary:
- Exploitation for many issues on Android is made more difficult by enhancements in newer versions of the Android platform. We encourage all users to update to the latest version of Android where possible.
- The Android Security team actively monitors for abuse with Verify Apps and SafetyNet, which are designed to warn users about Potentially Harmful Applications. Verify Apps is enabled by default on devices with Google Mobile Services, and is especially important for users who install applications from outside of Google Play. Device rooting tools are prohibited within Google Play, but Verify Apps warns users when they attempt to install a detected rooting application—no matter where it comes from. Additionally, Verify Apps attempts to identify and block installation of known malicious applications that exploit a privilege escalation vulnerability. If such an application has already been installed, Verify Apps will notify the user and attempt to remove the detected application.
- As appropriate, Google Hangouts and Messenger applications do not automatically pass media to processes such as mediaserver.
Full details of all the issues address can be found at the security bulletin site.

The most interesting part of this month’s notice is the way the program has been renamed to drop the “Nexus” tag, and what that might mean. For starters, each vulnerability now identifies which of Google’s own devices are affected, and exactly which devices and platform source versions will be updated.
Some, like vulnerabilities in the NVIDIA video driver address a kernel patch for all kernel versions of the Nexus 9 only. Others, like the previously mentioned Mediaserver vulnerability affect everything that’s currently supported directly from Google: Nexus 5, Nexus 5X, Nexus 6, Nexus 6P, Nexus 7 (2013), Nexus 9 and all Android One models as well as all versions of the AOSP from 4.4.4. This is Google’s way to let everyone know that this patch encompasses security updates for all current devices and code, even if individual exploits don’t affect certain phones and tablets.
Also worth noting — the Nexus Player and Pixel C are not mentioned by name in the document. This doesn’t mean they won’t be updated, of course, but we’re not sure if anything has changed with these two models. I’ve reached out to Google for clarification, and will update when we know more.
That’s not the only change to the program. Google has also specifically named a vulnerability that doesn’t affect any of their hardware — a vulnerability in the Qualcomm Tethering controller. While many of the other vulnerabilities affect Android as a whole, this certain bug isn’t part of Android that every device uses (unlike the Mediaserver, for example). By doing this, Google is letting users know that there are also patches outside the overall Android source that specific vendors will need to incorporate.
The patch source was made available directly to vendors and the source tree. Without actually saying as much, Google has put the folks making Android phones under the spotlight. Everything Google does means something — you don’t steer a boat this big without making some waves. Seeing if there’s any response from partners will be interesting (and telling), but we don’t really expect any. I’m going to try and get some sit-down time with the right people at Google I/O 2016 and see what, if anything, these changes mean.
In the meantime, start checking for those OTA updates or get to flashing if you have a current Nexus.
Google acquires Synergyse to bring interactive training to all Google Apps users
Google has announced it has acquired Synergyse, which formed in 2013 to help business customers train with Google Apps. The company’s product, Synergyse Training, will now be free for all Google Apps customers.

Before today’s deal, Synergyse had signed up 3,000 businesses and organizations to use its training program for Google Apps. Today’s blog post from the company stated:
By joining the Google Apps team, we can accelerate our mission because we will be working even closer with the teams that build Google Apps. Advancing our mission at a faster speed is very exciting for the Synergyse team and our customers will directly see the benefits as we move forward.
As usual with these kinds of small acquisitions, the specific financial terms were not disclosed. You can check out Synergyse in action in the video below:
Kick ass with our Captain America: Civil War themes
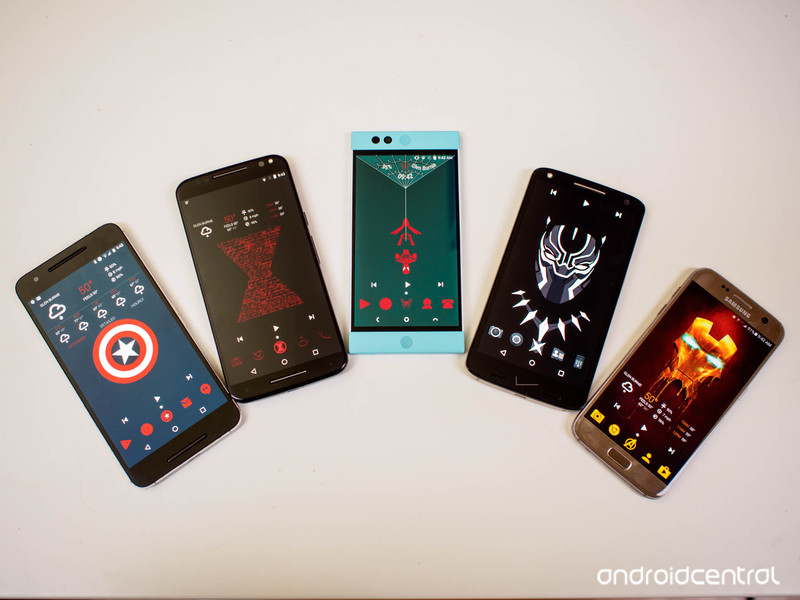
Let’s get ready to watch superheroes fight each other. Again!
Captain America: Civil War debuts this Friday, and chances are you’re as excited for it as we are. In honor of the major Marvel smackdown about to begin, our resident themer Ara Wagoner has assembled a team of themes to help us show our #TeamCap or #TeamIronMan pride. Or #TeamUnderoos, to celebrate the return of Spidey to the MCU. So, grab your favorite launcher and your spangly armor and let’s get to it!
Captain America theme
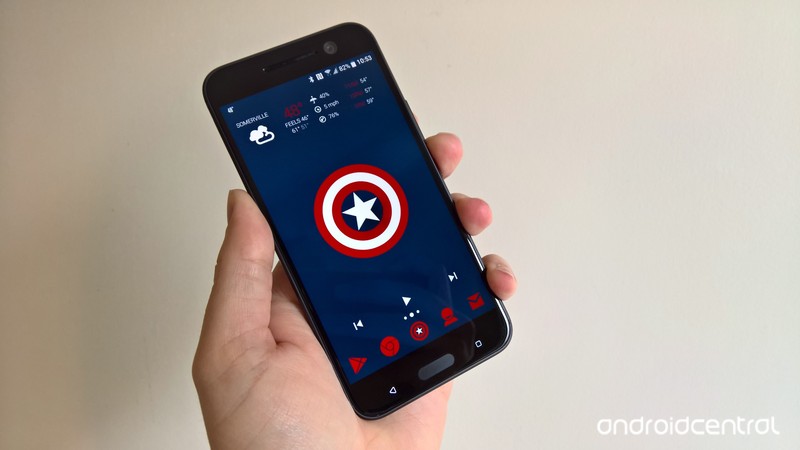
The First Avenger has a lot going on here between the whole Bucky situation and the world growing increasingly fearful and hostile towards “enhanced” humans. Steve Rogers prides himself on being a simple man, and we feel he’d be content with this simple and efficient theme. Cap is the man out of time, and his theme feels timeless and patriotic, even as he fights the government for civil liberties. Here’s what we pulled off his theme with:
- Wallpaper
- Cap Shield Custom Icon
- Shield Slam Notification Tone OR Shield Slot Notification Tone OR Shield Throw Notification Tone OR Shield Beam Hit Notification Tone
- Zedge
- Captain America Ringtone
- Captain America Winter Soldier Ringtone
- Stamped Red Icons
- 1Weather
- Jack’s Music Widget
- File manager app for moving sound files to appropriate folders
Download Wallpaper and Cap Shield Custom Icon.
Set image as your wallpaper using your launcher’s wallpaper picker, with Cap’s shield dead center.
Install Stamped Red Icons from Google Play.
Set Stamped Red Icons as your icon pack in your launcher’s settings. If your launcher doesn’t support icon packs, you’ll either need a launcher that does or a custom shortcut creator like Awesome Icons.
Long-press your app drawer icon and Edit it.
Select Gallery Apps to select your custom icon from. Navigate to Cap Shield Custom Icon and select it as your icon.
Save the icon.
Add a 4×1 Jack’s Music Widget to the bottom row of the home screen. (If you home screen is wider than 4 across, resize the widget to fit.)
Open Jack’s Music Widget app (in the app drawer, don’t tap the widget) and set the widget style to Clear.
Add a 4×2 1Weather Tabbed widget to the top row of your home screen.
When configuration screen pops up, select the Dark Background color, 0% Background opacity, White Icon Set and Deep Red Accent.
Select Done in the top left corner to set the widget configuration and return to the home screen.
Download Shield Slam Notification Tone OR Shield Slot Notification Tone OR Shield Throw Notification Tone OR Shield Beam Hit Notification Tone and + Captain America Ringtone or Captain America Winter Soldier Ringtone
Copy your chosen Shield notification tone to Notifications folder using a file manager app like Solid Explorer.
Enter Settings app. In Sounds, set Ringtone to Captain America or Winter Soldier and Notification Tone to capam_shieldslam, capam_shieldslot, capam_shieldthrow or capambeamhit. (Note: if after initially copying your sounds to these folders, they don’t appear in the sound picker, reboot device and they should appear.)
Iron Man theme
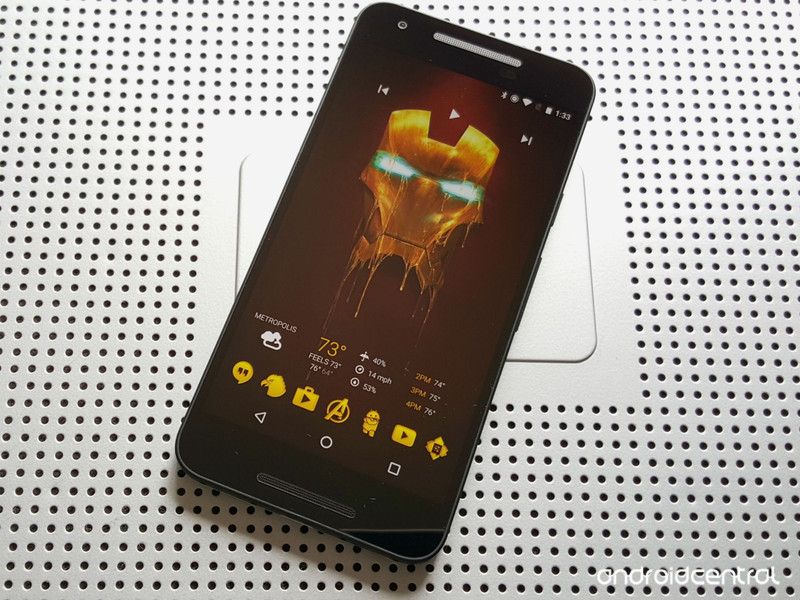
Iron Man’s got the best toys, just ask him. He’s got the best AI in the history of the world (and that AI’s finally got a shiny, sweater-rocking body now). Iron Man’s got the best witty remarks, and his snark is only matched by the aforementioned AI. He’s gonna have a bit of a time in Civil War, but his theme is undeniably Stark.
Ara built this theme in a cave! With a box of scraps! Here’s what you’ll need to reproduce it:
- Iron Man Wallpaper
- Repulsor Charge Notification Tone OR Missiles Up notification Tone OR Repulsor Fire Notification Tone OR Repulsor Hit Notification Tone OR Chest Buildup Notification Tone OR Sonic Boom Notifcation Tone
- Zedge
- Iron Man Ringtone
- Golden Icons
- 1Weather
- Jack’s Music Widget
- File manager app for moving sound files to appropriate folders
Download Iron Man Wallpaper.
Set image as your wallpaper using your launcher’s wallpaper picker, with Iron Man’s melting faceplate dead center.
Install Golden Icons from Google Play.
Set Golden Icons as your icon pack in your launcher’s settings. If your launcher doesn’t support icon packs, you’ll either need a launcher that does or a custom shortcut creator like Awesome Icons.
Long-press your app drawer icon and Edit it.
Select your custom icon from the Golden Icons pack. Scroll down to T for The Avengers and select the Avengers A.
Save the icon.
Add a 4×1 Jack’s Music Widget to the top row of the home screen. (If you home screen is wider than 4 across, resize the widget to fit.)
Open Jack’s Music Widget app (in the app drawer, don’t tap the widget) and set the widget style to Clear.
Add a 4×1 1Weather Compact widget to the bottom row of your home screen.
When configuration screen pops up, select the Dark Background color, 0% Background opacity, and Gold Accent.
Select Done in the top left corner to set the widget configuration and return to the home screen.
Download Repulsor Charge Notification Tone OR Missiles Up notification Tone OR Repulsor Fire Notification Tone OR Repulsor Hit Notification Tone OR Chest Buildup Notification Tone OR Sonic Boom Notifcation Tone and Iron Man Ringtone.
Copy your preferred Notification Tone to Notifications folder and using a file manager app like Solid Explorer.
Enter Settings app. In Sounds, set Ringtone to Iron Man Ringtone and Notification Tone to your chosen notification tone. (Note: if after initially copying your sounds to these folders, they don’t appear in the sound picker, reboot device and they should appear.)
Black Panther theme
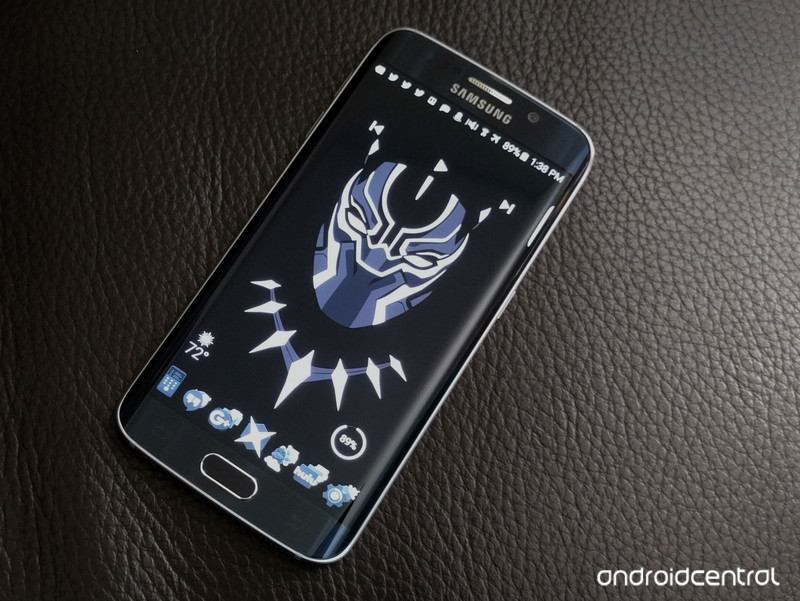
What is with heroes who are kings not getting nearly as much love and cred for being badasses? Anyway, Black Panther is finally making his Marvel Cinematic Universe debut, and he deserves a great theme. Our theme is built around this truly awesome Black Panther poster by Ethan Livingstone. It also comes in sick metal poster prints at Displate, if you need even more Black Panther awesomeness to display.
Here’s what else you’ll need for the theme:
- Color-adjusted Panther Wallpaper
- Panthers Roar Notification Tone
- Zedge
- Black Panther Theme Ringtone
- Noctum
- Jack’s Music Widget
- File manager app for moving sound files to appropriate folders
Download our color-adjusted Panther Wallpaper.
Set image as your wallpaper using your launcher’s wallpaper picker, with Panther’s mask dead center.
Install Noctum from Google Play.
Set Noctum as your icon pack in your launcher’s settings. If your launcher doesn’t support icon packs, you’ll either need a launcher that does or a custom shortcut creator like Awesome Icons.
Long-press your app drawer icon and Edit it.
Select your custom icon from the Noctum pack. In the app drawer icon section, select the X shield icon, which looks suspiciously like a cross slash from Panther’s vibranium claws.
Save the icon.
Add a 4×1 Jack’s Music Widget to the top row of the home screen. (If you home screen is wider than 4 across, resize the widget to fit.)
Open Jack’s Music Widget app (in the app drawer, don’t tap the widget) and set the widget style to Clear.
Download Notification Tone and Black Panther Theme Ringtone.
Copy Panthers Roar to Notifications folder using a file manager app like Solid Explorer.
Enter Settings app. In Sounds, set Ringtone to Black Panther Tas and Notification Tone to Panthers Roar. (Note: if after initially copying your sounds to these folders, they don’t appear in the sound picker, reboot device and they should appear.)
Black Widow theme
Widow never gets enough love for being the most badass spy not wearing an eyepatch in the Marvel Cinematic Universe. Iron Man may be a futurist with plans for everything, but Widow’s the one who can walk into a room and know how she’d eliminate every single person there. Our theme for Widow pays homage to the glorious quotes surrounding our resident Russian and her ledger. Here’s what you’ll need:
- Widow’s Words Wallpaper
- Grappling Hook Notification Tone OR Whip Notification Tone
- Black Widow Kicks Ass Ringtone
- Red Shadow Icons
- 1Weather
- Jack’s Music Widget
- File manager app for moving sound files to appropriate folders
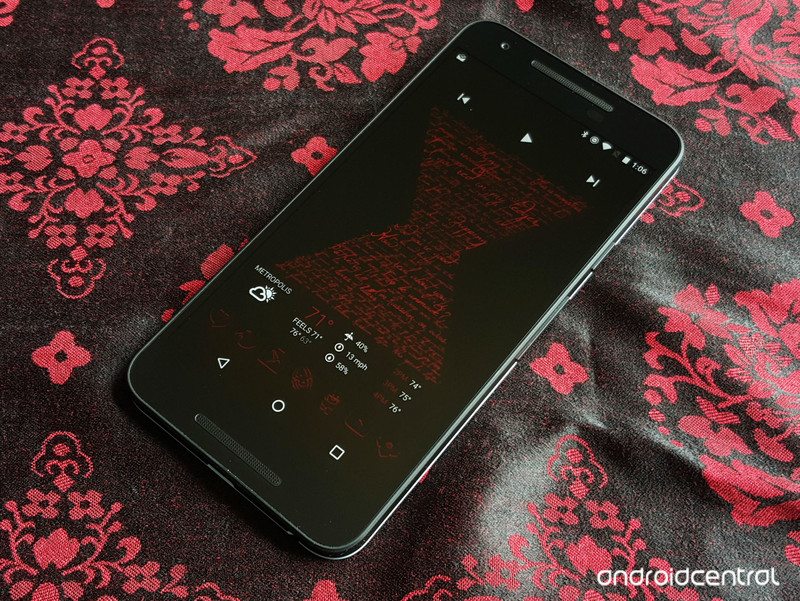
Download Widow’s Words Wallpaper.
Set image as your wallpaper using your launcher’s wallpaper picker, with the hourglass slightly raised from the center (to leave room for the 1Weather widget).
Install Red Shadow Icons from Google Play.
Set Red Shadow Icons as your icon pack in your launcher’s settings. If your launcher doesn’t support icon packs, you’ll either need a launcher that does or a custom shortcut creator like Awesome Icons.
Long-press your app drawer icon and Edit it.
Select Red Shadow to select your custom icon from. Navigate to S for Spider and select the spider icon as your icon.
Save the icon.
Add a 4×1 Jack’s Music Widget to the bottom row of the home screen. (If you home screen is wider than 4 across, resize the widget to fit.)
Open Jack’s Music Widget app (in the app drawer, don’t tap the widget) and set the widget style to Clear.
Add a 4×1 1Weather Compact widget to the top row of your home screen.
When configuration screen pops up, select the Dark Background color, 0% Background opacity, and Deep Red Accent.
Select Done in the top left corner to set the widget configuration and return to the home screen.
Download Grappling Hook Notification Tone OR Whip Notification Tone and Black Widow Kicks Ass Ringtone.
Copy Grappling Hook/Whip Notification Tone to Notifications folder and Black Widow Kicks Ass Ringtone to Ringtones folder using a file manager app like Solid Explorer.
Enter Settings app. In Sounds, set Ringtone to Black Widow Kicks Ass and Notification Tone to grapplefire or whipnowt. (Note: if after initially copying your sounds to these folders, they don’t appear in the sound picker, reboot device and they should appear.)
Spider-Man theme
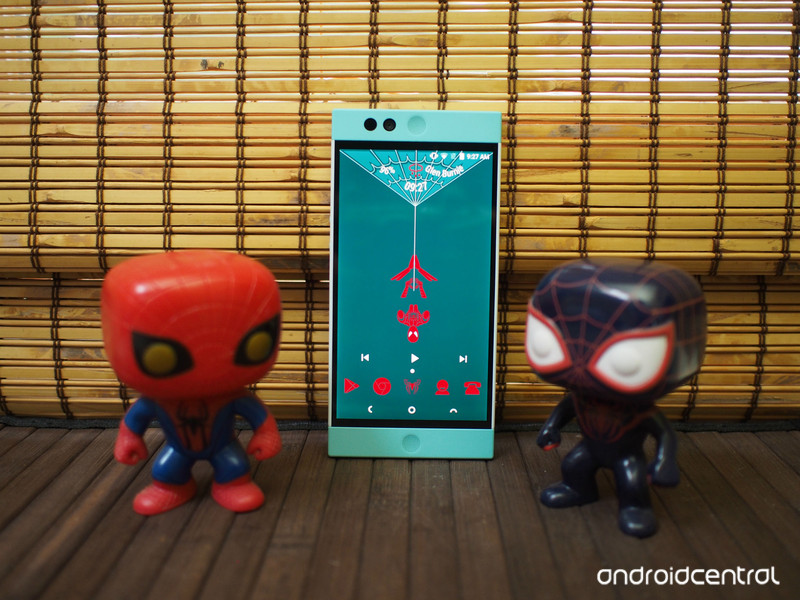
Spider-Man is the bright, shiny newcomer in a Marvel Cinematic Universe that has been getting greyer, grittier, and bogged down in itself. He’s new blood, fresh perspective, and we’re all hoping he’s gonna be as important in the films as he was in the comics version of Civil War. We’ve got a web-slinging theme as bright and classic as our friendly neighborhood Spider-Man, and since we figure Spider-Man is more of a tinkerer with his phones, it’s even got a fully-customizable KWGT to sit on its
- Spider-Man Wallpaper
- Web Thwip Notification Tone 1 OR Web Thwip Notification Tone 3
- Ultimate Spider-Man Ringtone OR Amazing Spider-Man Ringtone
- Spider-Man KWGT Preset
- KWGT Pro
- Stamped Red Icons
- Jack’s Music Widget
- File manager app for moving sound files to appropriate folders
Download Spider-Man Wallpaper.
Set image as your wallpaper using your launcher’s wallpaper picker, with Spidey’s web centered on the top of the image.
Install Stamped Red Icons from Google Play.
Set Stamped Red Icons as your icon pack in your launcher’s settings. If your launcher doesn’t support icon packs, you’ll either need a launcher that does or a custom shortcut creator like Awesome Icons.
Long-press your app drawer icon and Edit it.
Select Stamped Red icon pack to select your custom icon from. Navigate down to S for Spider-Man.
Save the icon.
Add a 4×1 Jack’s Music Widget to the top row of the home screen. (If you home screen is wider than 4 across, resize the widget to fit.)
Open Jack’s Music Widget app (in the app drawer, don’t tap the widget) and set the widget style to Clear.
Download Spider-Man KWGT Preset and use a file manager app like Solid Explorer to copy the file to the Kustom/widgets folder on your phone.
Add a 4×1 KWGT to your home screen. Resize it to cover Spider-Man’s web at the top of the home screen.
12.Tap the widget to configure it.
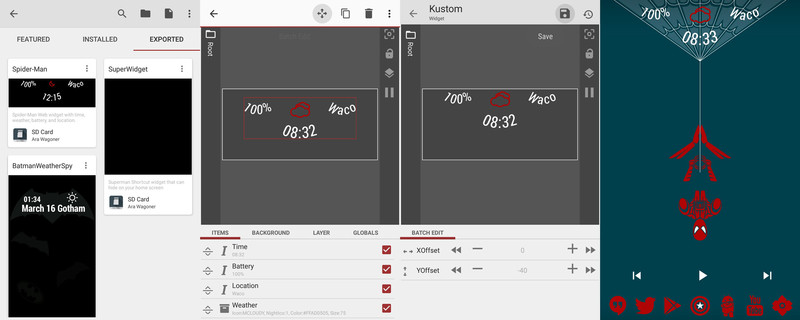
Tap the Exported tab of the Preset gallery.
Select Spider-Man Widget.
Save the widget with the floppy disc icon in the top right corner.
Return to the home screen. If the widget needs any adjustment, tap the widget to re-enter the editor.
To move an element left/right, tap that item in the Item list, then go to the Position tab. Adjust the XOffest (left and right) and the YOffset (up and down) as needed.
Save the widget with the floppy disc icon in the top right corner.
Download and copy Web Thwip Notification Tone 1 OR Web Thwip Notification Tone 3 to Notifications folder and Ultimate Spider-Man Ringtone OR Amazing Spider-Man Ringtone to Ringtones folder using a file manager app like Solid Explorer.
Enter Settings app. In Sounds, set Ringtone to Amazing Spider-Man Ringtone or Ultimate Spider-Man Ringtone and Notification Tone to Web Thwip 1 or Web Thwip 3. (Note: if after initially copying your sounds to these folders, they don’t appear in the sound picker, reboot device and they should appear.)
Wearable Themes
Now your phone’s all heroed out, but what about your watch? It needs some superhero magic, too! And that’s where these watch faces come in.
- AMERICA ($1.99): It’s star-spangled awesome! This is one of the watch faces I always seem to come back to. The night mode on this watch face even takes Cap’s shield from First Avenger to a cybernetic Winter Soldier.
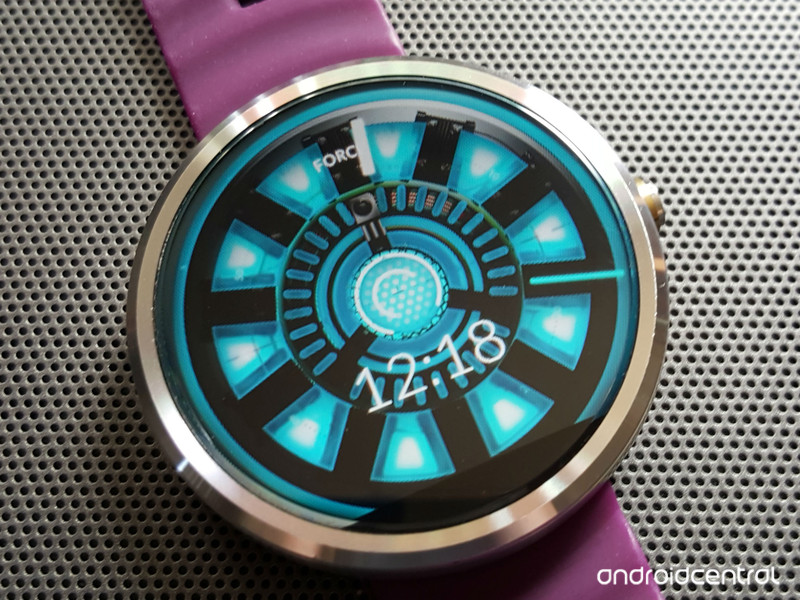
- IRON ($1.99): I know the expression is ‘wear your heart on your sleeve’, but this might take things a little too far. Tony Stark’s life-saving and suit-powering device is often referred to as Tony’s heart, and now you can wear it proudly on your wrist. Just don’t think it’ll give your watch repulsor-firing abilities.
- CIVIL ($1.99): Feeling torn between both sides? More a fan of the conflict that of either side? Not a problem! Wear the fight on your sleeve – or rather your watch – with the CIVIL watch face, which is split between Cap’s shield and Iron Man’s Arc Reactor.
T-Mobile Galaxy S7 and S7 edge updates fix power and volume button bugs
T-Mobile is rolling out updates for both the Samsung Galaxy S7 and Galaxy S7 edge. Both updates fix an issue with the phones’ power and volume buttons, along with some other “system improvements”.

The T-Mobile support pages for the Galaxy S7 and Galaxy S7 edge show that the download sizes for both phones will be 164.61 MB. As usual with these kinds of over-the-air updates, it may take a few days for them to reach your particular phone.
Samsung Galaxy S7 and S7 edge
- Galaxy S7 review
- Galaxy S7 edge review
- Here are all four Galaxy S7 colors
- Should you upgrade to the Galaxy S7?
- Learn about the Galaxy S7’s SD card slot
- Join our Galaxy S7 forums
AT&T
Sprint
T-Mobile
Verizon
Big Google Keyboard update brings one-handed mode, layout tweaks and more!

A pretty major update is now rolling out for the Google Keyboard, bringing a load of new tweaks and features, including one-handed mode. And it’s that addition of one-handed mode that is probably the biggest change, allowing you to easily adjust the keyboard for left- or right-handed use in the keyboard’s settings.

Also new in this update is the ability to customize the keyboard height. Thanks to a new option in the settings menu, you can drag a slider to adjust the height of the keyboard from short to tall, which should make compensating for different hand sizes much easier. There are also some new gestures that can be enabled from the settings menu, including the ability to move the cursor by sliding across the space bar, or deleting words by sliding left from the delete key.

A more minor change — but cool nonetheless — is that there is now a number key to the left of the spacebar on the full keyboard. Tapping it will give you quick access to a three-by-three number pad layout with a selection of relevant symbols (plus, minus, etcetera) on each side. Another interface tweak places an emoji shortcut to the right side of the spacebar as well, offering quicker access to the colorful characters.
This rather large update is currently in the process of rolling out on Google Play, so it will likely take some time to reach everyone. However, there’s plenty to like here, especially for those looking for easier one-handed typing.
Have you received the update yet? Let us know what you think in the comments below!
Moto X Pure Edition is just $300 at Motorola until May 9
Motorola is selling the unlocked Moto X Pure Edition smartphone for $299.99, a $100 discount from its normal price. The sale lasts until Monday, May 9.

This latest discount is designed as a Mother’s Day promotion, which means you can use Motorola’s Moto Maker to customize the unlocked Moto X Pure Edition with different front, back and accent colors. You can then add your own custom engravings and messages to give mom a special gift made just for her.
See at Motorola
Fit more on your Galaxy S7’s screen with condensed mode

With a new software update, Samsung lets you increase your GS7’s information density dramatically — at the expense of one or two things looking a little weird.
Phones are getting bigger with each release cycle, but new devices don’t always let us see more stuff on the screen at once. This is an issue Samsung has attempted to solve with a new addition to the Galaxy S7 series: “display scaling.” Simply put, this lets you not only adjust the size of fonts — as Samsung phones have for some time — but the way the entire user interface is scaled.

But first, it’s worth noting that not all Galaxy S7 models have been updated with this feature. It popped up under “Display settings” on our European Galaxy S7 edge with the latest April update; meanwhile our U.S. devices aren’t seeing this addition. So it’s possible it’ll arrive in some countries later than others. (And thanks to the vagaries of the U.S. carrier system, some operators may even choose not to include it.)
If your GS7 has the display scaling feature, you’ll find it under Settings > Display settings, between “Font size” and “Icon backgrounds.”
Once selected, you’ll have two options to choose from. The first, standard, is the way your Galaxy S7 works out of the box, with large-ish menus, icons and text. The second, “condensed,” lets you fit more on screen by making just about everything a little smaller. As you can see in the animation below, that means an extra email shown in Gmail, a smaller status bar, and some tweaks to the way icons and widgets are spaced on the home screen.

It’s also worth noting that some widgets don’t play nice with condensed mode — Google Keep, for instance, has really tiny text when you enable the feature. So it won’t be for everyone, which surely is why it’s not enabled by default. But it’s a great option to have — especially for GS7 edge owners wanting to make better use of that 5.5-inch display.
A few extra ways to get more (or less) stuff on your GS7’s screen at a time:
- Change the font size. This has a less pronounced effect than changing the display scaling level, but it’s noticeable all the same.
- In the Galaxy S7’s home screen launcher, long-press on an empty area, then tap “Screen gif” to choose the size of your home screen grid. A 5×5 display will let you fit more stuff on there than the default 5×4 arrangement.
Samsung Galaxy S7 and S7 edge
- Galaxy S7 review
- Galaxy S7 edge review
- Here are all four Galaxy S7 colors
- Should you upgrade to the Galaxy S7?
- Learn about the Galaxy S7’s SD card slot
- Join our Galaxy S7 forums
AT&T
Sprint
T-Mobile
Verizon
